Note
Access to this page requires authorization. You can try signing in or changing directories.
Access to this page requires authorization. You can try changing directories.
In this article, we walk through various options for creating a more secure guest sharing environment in Microsoft 365. These are examples to give you an idea of the options available. You can use these procedures in different combinations to meet the security and compliance needs of your organization.
This article includes:
- Setting up multifactor authentication for guests.
- Setting up a terms of use for guests.
- Setting up quarterly guest access reviews to periodically validate whether guests continue to need permissions to teams and sites.
- Restricting guests to web-only access for unmanaged devices.
- Configuring a session timeout policy to ensure guests authenticate daily.
- Creating a sensitive information type for a highly sensitive project.
- Automatically assigning a sensitivity label to documents that contain a sensitive information type.
- Automatically removing guest access from files with a sensitivity label.
Some of the options discussed in this article require guests to have an account in Microsoft Entra ID. To ensure that guests are included in the directory when you share files and folders with them, use the SharePoint and OneDrive integration with Microsoft Entra B2B Preview.
Note that we don't discuss enabling guest sharing settings in this article. See Collaborating with people outside your organization for details about enabling guest sharing for different scenarios.
Set up multifactor authentication for guests
Multifactor authentication greatly reduces the chances of an account being compromised. Since guests may be using personal email accounts that don't adhere to any governance policies or best practices, it's especially important to require multifactor authentication for guests. If a guest's username and password is stolen, requiring a second factor of authentication greatly reduces the chances of unknown parties gaining access to your sites and files.
In this example, we set up multifactor authentication for guests by using a conditional access policy in Microsoft Entra ID.
To set up multifactor authentication for guests
- Open the Microsoft Entra admin center.
- Expand Protection, and then select Conditional Access.
- On the Conditional Access | Overview page, select Create new policy.
- In the Name field, type a name.
- Select the Users link.
- Choose Select users and groups, and then select the Guest or external users check box.
- In the dropdown, select B2B collaboration guest users and B2B collaboration member users.
- Select the Target resources link.
- Select All cloud apps on the Include tab.
- Select the Grant link.
- On the Grant blade, select the Require multifactor authentication check box, and then click Select.
- Under Enable policy, select On, and then select Create.
Now, guests are required to enroll in multifactor authentication before they can access shared content, sites, or teams.
More information
Plan a Microsoft Entra multifactor authentication deployment
Set up a terms of use for guests
In some situations, guests may not have signed non-disclosure agreements or other legal agreements with your organization. You can require guests to agree to a terms of use before accessing files that are shared with them. The terms of use can be displayed the first time they attempt to access a shared file or site.
To create a terms of use, you first need to create the document in Word or another authoring program, and then save it as a .pdf file. This file can then be uploaded to Microsoft Entra ID.
To create a Microsoft Entra terms of use
Open the Microsoft Entra admin center.
Expand Protection, and then select Conditional Access.
Select Terms of use.
Select New terms.
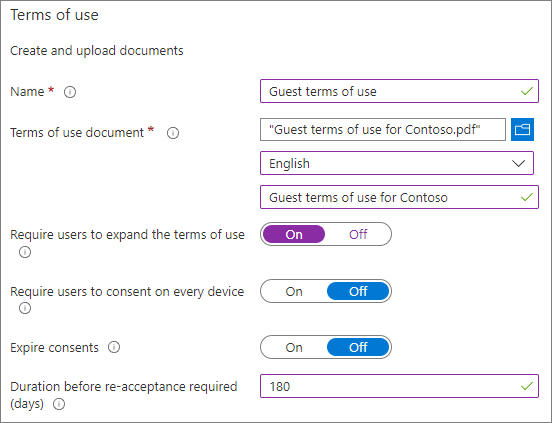
Type a Name.
For Terms of use document, browse to the pdf file that you created and select it.
Select the language for your terms of use document.
Type a display name.
Set Require users to expand the terms of use to On.
Under Conditional Access, in the Enforce with Conditional Access policy template list choose Create conditional access policy later.
Select Create.
Once you've created the terms of use, the next step is to create a conditional access policy that displays the terms of use to guests.
To create a conditional access policy
- In the Microsoft Entra admin center, under Protection, select Conditional access.
- On the Conditional Access | Overview page, select Create new policy.
- In the Name box, type a name.
- Select the Users link.
- Select Select users and groups, and then select the Guest or external users check box.
- In the dropdown, select B2B collaboration guest users and B2B collaboration member users.
- Select the Target resources link.
- On the Include tab, select Select apps, and then click the Select link.
- On the Select blade, select Office 365, then click Select.
- Select the Grant link.
- On the Grant blade, select the check box for the terms of use that you created, and then click Select.
- Under Enable policy, select On, and then select Create.
Now, the first time a guest attempts to access content or a team or site in your organization, they'll be required to accept the terms of use.
More information
Overview of Microsoft SharePoint eSignature
Set up guest access reviews
With access reviews in Microsoft Entra ID, you can automate a periodic review of user access to various teams and groups. By requiring an access review for guests specifically, you can help ensure guests don't retain access to your organization's sensitive information for longer than is necessary.
To set up a guest access review
Open the Microsoft Entra admin center.
Expand Identity governance, and select Access reviews.
Select New access review.
Choose the Teams + Groups option.
Choose the All Microsoft 365 groups with guest users option. Click Select group(s) to exclude if you want to exclude any groups.
Choose the Guest users only option, and then select Next: Reviews.
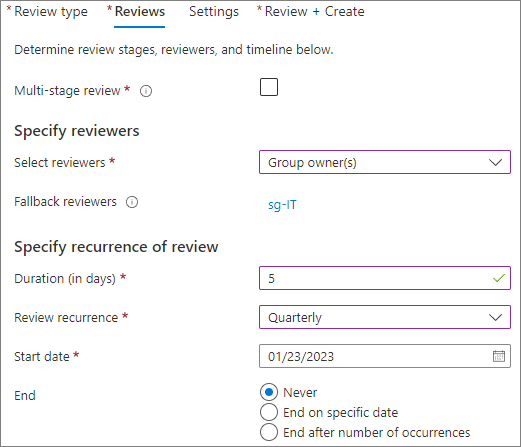
Under Select reviewers, choose Group Owner(s).
Click Select fallback reviewers, choose who should be the fallback reviewers, and then click Select.
Choose a Duration (in days) for the review to be open for comments.
Under Specify recurrence of review, choose Quarterly.
Select a start date and duration.
For End, choose Never, and then select Next: Settings.
On the Settings tab, review the settings for compliance with your business rules.
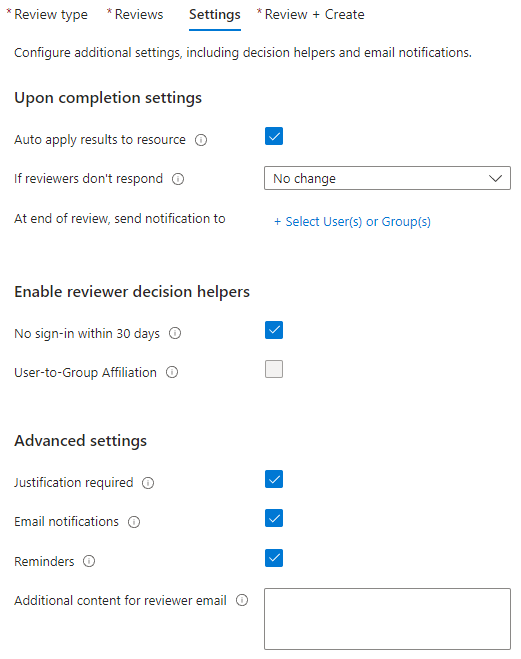
Select Next: Review + Create.
Type a Review name and review the settings.
Select Create.
More information
Manage guest access with access reviews
Create an access review of groups and applications in Microsoft Entra ID
Set up web-only access for guests with unmanaged devices
If your guests use devices that aren't managed by your organization or another organization that you have a trust relationship with, you can require them to access your teams, sites, and files by using a web browser only. This reduces the chance that they might download sensitive files and leave them on an unmanaged device. This is also useful when sharing with environments that use shared devices.
For Microsoft 365 Groups and Teams, this is done with a Microsoft Entra Conditional Access policy. For SharePoint, this is configured in the SharePoint admin center. (You can also use sensitivity labels to restrict guests to web-only access.)
To restrict guests to web-only access for Groups and Teams:
Open the Microsoft Entra admin center.
Expand Protection, and then select Conditional Access.
On the Conditional Access | Overview page, select Create new policy.
In the Name box, type a name.
Select the Users link.
Select Select users and groups, and then select the Guest or external users check box.
In the dropdown, select B2B collaboration guest users and B2B collaboration member users.
Select the Target resources link.
On the Include tab, select Select apps, and then click the Select link.
On the Select blade, select Office 365, and then click Select.
Select the Conditions link.
On the Conditions blade, select the Client apps link.
On the Client apps blade, select Yes for Configure, and then select the Mobile apps and desktop clients, Exchange ActiveSync clients, and Other clients settings. Clear the Browser check box.
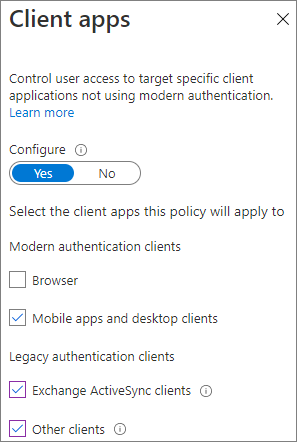
Select Done.
Select the Grant link.
On the Grant blade, select Require device to be marked as compliant and Require Microsoft Entra hybrid joined device.
Under For multiple controls, select Require one of the selected controls, and then click Select.
Under Enable policy, select On, and then select Create.
More information
SharePoint and OneDrive unmanaged device access controls
Configure a session timeout for guests
Requiring guests to authenticate on a regular basis can reduce the possibility of unknown users accessing your organization's content if a guest's device isn't kept secure. You can configure a session timeout conditional access policy for guests in Microsoft Entra ID.
To configure a guest session timeout policy
- Open the Microsoft Entra admin center.
- Expand Protection, and then select Conditional Access.
- On the Conditional Access | Overview page, select Create new policy.
- In the Name field, type a name.
- Select the Users link.
- Select Select users and groups, and then select the Guest or external users check box.
- In the dropdown, select B2B collaboration guest users and B2B collaboration member users.
- Select the Target resources link.
- On the Include tab, select Select apps, and then click the Select link.
- On the Select blade, select Office 365, and then click Select.
- Select the Session link.
- On the Session blade, select Sign-in frequency.
- Choose 1 and Days for the time period, and then click Select.
- Under Enable policy, select On, and then select Create.
Create a sensitive information type for a highly sensitive project
Sensitive information types are predefined strings that can be used in policy workflows to enforce compliance requirements. The Microsoft Purview portal comes with over one hundred sensitive information types, including driver's license numbers, credit card numbers, bank account numbers, etc.
You can create custom sensitive information types to help manage content specific to your organization. In this example, we create a custom sensitive information type for a highly sensitive project. We can then use this sensitive information type to automatically apply a sensitivity label.
To create a sensitive information type
- In the Microsoft Purview portal, in the left navigation, expand Data classification, and then select Classifiers.
- select the Sensitive info types tab.
- Select Create sensitive info type.
- For Name and Description, type Project Saturn, and then select Next.
- Select Create pattern.
- On the New pattern panel, select Add primary element, and then select Keyword list.
- Type an ID such as Project Saturn.
- In the Case insensitive box, type Project Saturn, Saturn, and then select Done.
- Select Create, and then select Next.
- Choose a confidence level, and then select Next.
- Select Create.
- Select Done.
For more information, see Learn about sensitive information types.
Create an auto-labeling policy to assign a sensitivity label based on a sensitive information type
If you're using sensitivity labels in your organization, you can automatically apply a label to files that contain defined sensitive information types.
To create an auto-labeling policy
- Open the Microsoft Purview portal.
- In the left navigation, expand Information protection, and select Auto-labeling.
- Select Create auto-labeling policy.
- On the Choose info you want this label applied to page, choose Custom and then select Custom policy.
- Select Next.
- Type a name and description for the policy and select Next.
- On the Assign admin units page, select Next.
- On the Choose locations where you want to apply the label page, select SharePoint sites and optionally select Edit to choose the sites.
- Select Next.
- On the Set up common or advanced rules page, choose Common rules and select Next.
- On the Define rules for content in all locations page, select New rule.
- On the New rule page, give the rule a name, select Add condition, and then select Content contains.
- Select Add, select Sensitive info types, choose the sensitive info types that you want to use, select Add, and then select Save.
- Select Next.
- Select Choose a label, select the label you want to use, and then select Add.
- Select Next.
- Leave the policy in simulation mode and choose if you want it to automatically turn on.
- Select Next.
- Select Create policy, and then select Done.
With the policy in place, when a user types "Project Saturn" into a document, the auto-labeling policy will automatically apply the specified label when it scans the file.
For more information about auto-labeling, see Apply a sensitivity label to content automatically.
More information
Configure a default sensitivity label for a SharePoint document library
Create a DLP policy to remove guest access to highly sensitive files
You can use Microsoft Purview Data Loss Prevention (DLP) to prevent unwanted guest sharing of sensitive content. Data loss prevention can take action based on a file's sensitivity label and remove guest access.
To create a DLP rule
Open the Microsoft Purview portal.
In the left navigation, expand Data loss prevention, and select Policies.
Select Create policy.
Choose Custom and then Custom policy.
Select Next.
Type a name for the policy and select Next.
On the Assign admin units page, select Next.
On the Locations to apply the policy page, turn off all settings except SharePoint sites and OneDrive accounts, and then select Next.
On the Define policy settings page, select Next.
On the Customize advanced DLP rules page, select Create rule and type a name for the rule.
Under Conditions, select Add condition, and choose Content is shared from Microsoft 365.
In the dropdown, choose with people outside my organization.
Under Conditions, select Add condition, and choose Content contains.
Select Add, choose Sensitivity labels, choose the labels you want to use, and select Add.
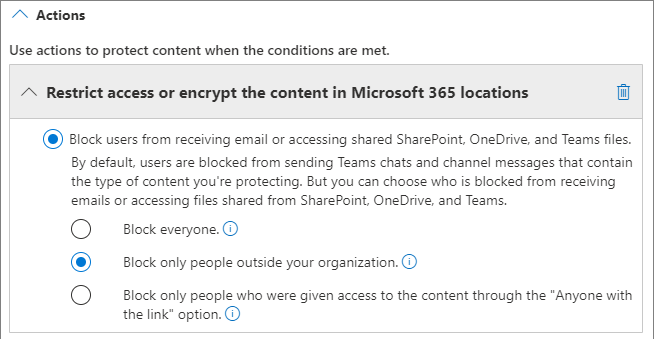
Under Actions select Add an action and choose Restrict access or encrypt the content in Microsoft 365 locations.
Choose the Block only people outside your organization option.
Turn user notifications On, and then select the Notify users in Office 365 service with a policy tip check box.
Select Save and then select Next.
Choose your test options and select Next.
Select Submit, and then select Done.
It's important to note that this policy doesn't remove access if the guest is a member of the site or team as a whole. If you plan to have highly sensitive documents in a site or team with guest members, consider these options:
- Use private channels and only allow members of your organization in the private channels.
- Use shared channels to collaborate with people outside your organization while only having people from your organization in the team itself.
Additional options
There are some additional options in Microsoft 365 and Microsoft Entra ID that can help secure your guest sharing environment.
- You can create a list of allowed or denied sharing domains to limit who users can share with. See Restrict sharing of SharePoint and OneDrive content by domain and Allow or block invitations to B2B users from specific organizations for more information.
- You can limit which other Microsoft Entra tenants your users can connect to. See Restrict access to a tenant for information.
- You can create a managed environment where partners can help manage guest accounts. See Create a B2B extranet with managed guests for information.
Related articles
Limit accidental exposure to files when sharing with guests
Best practices for sharing files and folders with unauthenticated users