Note
Access to this page requires authorization. You can try signing in or changing directories.
Access to this page requires authorization. You can try changing directories.
After you publish your agent and make it available in the Microsoft admin center, you can create agent instances and agent users. These instances and users use the agent blueprint and agent code you created.
This article breaks down the process into three main steps:
If you encounter challenges, refer to the Troubleshooting section.
Prerequisites
- Agent blueprint correctly set up as described in Setup agent blueprint step.
- Agent application correctly published as described in Publish agent to Microsoft admin center.
1. Configure agent in Teams developer portal
After publishing, configure the agent blueprint in Teams Developer Portal to connect your agent to the Microsoft 365 messaging infrastructure. Without this configuration, your agent doesn't receive messages from Teams, email, or other Microsoft 365 services.
Get your blueprint ID
Open
a365.generated.config.jsonin your working directory and copy theagentBlueprintIdvalue.Navigate to Developer Portal
Open your browser and go to the configuration page:
https://dev.teams.microsoft.com/tools/agent-blueprint/<your-blueprint-id>/configurationReplace
<your-blueprint-id>with theagentBlueprintIdvalue you copied.Note
If you don't have access to the Developer Portal, contact your tenant administrator to grant you access or complete this configuration on your behalf.
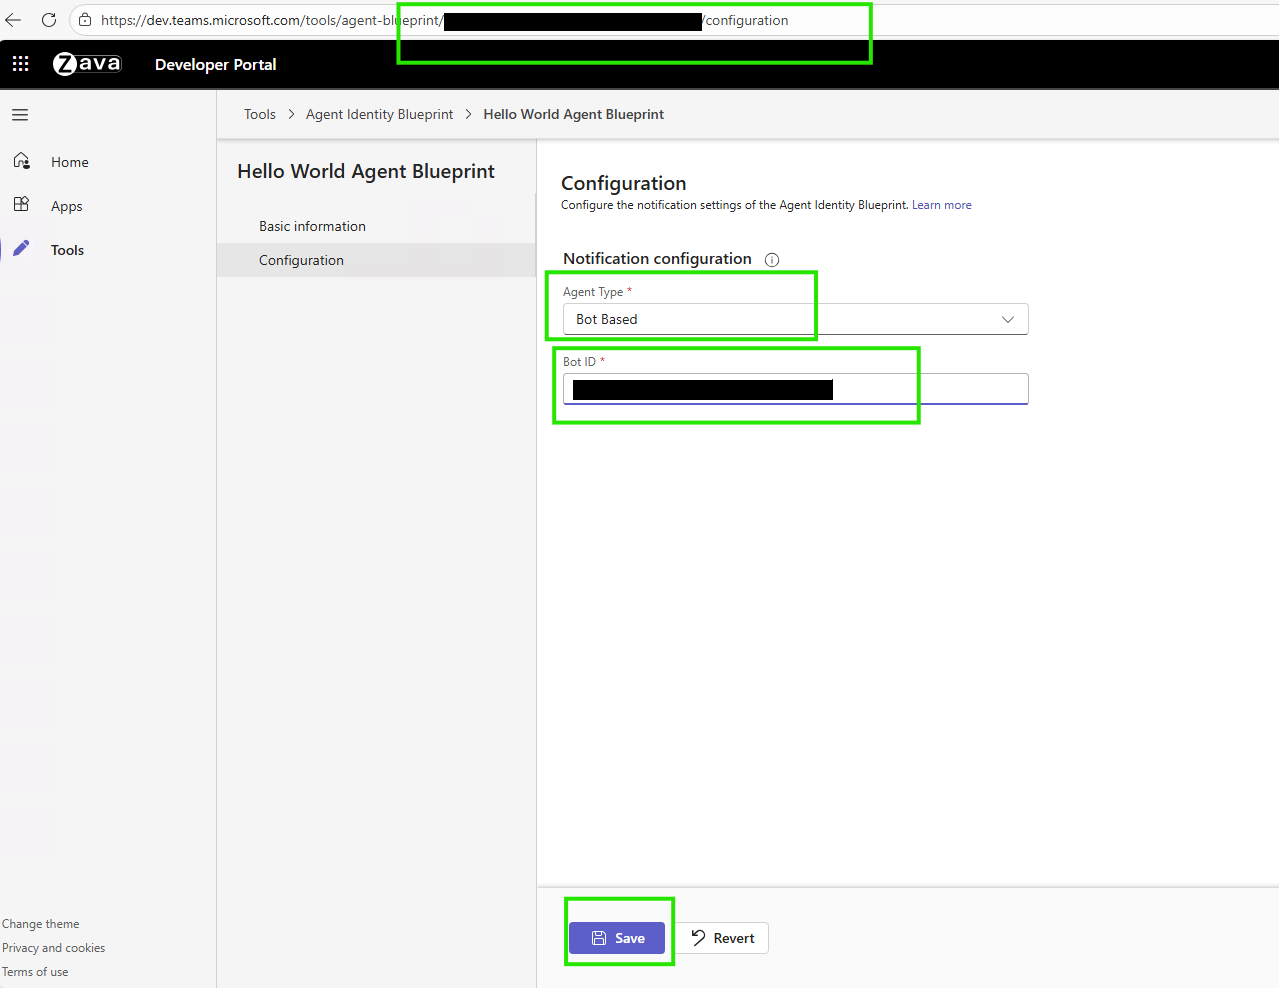
Configure the agent
In the Developer Portal:
Set Agent Type to API Based
Set Notification URL to your agent's messaging endpoint. Find the
messagingEndpointvalue ina365.generated.config.json.Select Save.
You need this configuration before you can create agent instances in Teams.
Learn more about agent identity blueprints and Developer Portal configuration.
2. Create agent instance
Now you can request an instance of your agent blueprint from Teams. Learn more about how to discover, create, and onboard an agent.
When you request an agent instance, Teams sends the request to your tenant admin for approval. Admins can review and approve requests from the Microsoft admin center - Requested Agents page.
After the admin approves your request, Teams creates your agent instance and makes it available in Teams.
3. Test your deployed agent
After creating an agent instance, test it in Microsoft 365 to ensure it works correctly in production.
After deployment, and with agent notifications enabled in the Agent 365 SDK, your agent integrates with Microsoft 365 services. It works with Teams for chats, channels, and meetings; with email and calendar for sending, receiving, and scheduling; and with SharePoint and OneDrive for document access and file sharing. It also supports collaboration features such as organizational presence, Planner tasks, and document comments.
Important
Just like regular users, agent users also require appropriate Microsoft 365 licenses to access services. Common licenses include Microsoft 365 E5, Teams Enterprise, and Microsoft 365 Copilot.
View deployed agent in admin center
After you publish your agent, it appears in Microsoft admin center for hiring. It might take some time to propagate.
Go to the Microsoft 365 admin center - Agents to:
- View your published agent
- Manage agent settings
- Monitor agent usage
- Configure permissions
Test agent in Teams
After you deploy, publish, and configure your agent blueprint and create an agent user, test the agent user directly in Microsoft Teams:
Start testing
Search for your new agent user in Teams.
Note
The agent user creation process is asynchronous. It can take a few minutes to a few hours for the agent user to become searchable after you create it.
Start a new chat with your newly created agent instance.
Send test messages to verify agent functionality.
Example test message
If you configured the agent with Email, send this message to test email functionality. Update the recipient recipient@contoso.com email value.
Send an email to <recipient@contoso.com> with subject "Hello from Teams" and message "This is a test message from my agent!"
The agent processes the request and sends the email without requiring more confirmation.
Verification checklist
After creating your agent instance, verify it's working correctly in Teams.
✅ Developer portal configuration saved
✅ Agent appears in Teams apps search
✅ You can create instance agent to teams
✅ Agent instance created
✅ Agent user appears in organization
✅ Agent responds to messages
✅ Agent can perform actions
✅ Application logs show no errors
✅ Observability working in admin center
If your agent instance isn't working as expected, see the Troubleshooting section for detailed solutions to common problems.
Verify developer portal configuration is saved
Navigate to: https://dev.teams.microsoft.com/tools/agent-blueprint/<your-blueprint-id>/configuration
✅ Agent Type shows: API Based ✅ Notification URL matches your agent's messaging endpoint ✅ Shows Saved successfully message
Verify agent appears in Teams
Open Teams > Apps
Search for your agent name
✅ Agent appears in search results ✅ Shows your agent icon and description
Verify you can create instance agent to teams
Select your agent in Teams Apps
✅ Request Instance/Create Instance button is enabled ✅ Can request instance without errors
Verify agent instance created
After selecting Request Instance:
✅ Request sends successfully to admin
Verify agent user appears in organization
In Microsoft 365 admin center:
- Go to:
https://admin.cloud.microsoft/#/agents/all - Navigate to All Agents Requests tab
✅ Your agent instance request is listed with state as pending review ✅ Admin can approve the agent instance for use ✅ User can create instance from Teams and give it a name.
Verify agent responds to messages
In Teams chat with your agent - Send a test message: Hello!
✅ Agent shows typing indicator ✅ Agent responds within a few seconds ✅ Response is coherent and relevant
Verify agent can perform actions
If you configure tools, test tool functionality. For example, if you add the Mail MCP server, send a test email to yourself.
Agent should:
✅ Acknowledge the request ✅ Execute the tool call ✅ Confirm successful completion
You should verify the email arrives in your inbox.
Verify functionality
The following checklist provides a systematic testing approach for your agent:
Basic functionality:
✅ Agent responds to simple greetings. ✅ Agent handles multistep conversations. ✅ Agent provides relevant responses.
Tool functionality:
Depends on the MCP server configuration
✅ Can send emails. ✅ Can access calendar. ✅ Can search documents. ✅ Can perform configured actions.
Error handling:
✅ Handles invalid requests gracefully. ✅ Provides helpful error messages. ✅ Doesn't crash on unexpected input.
Performance:
✅ Responds within a few seconds. ✅ No timeout errors. ✅ Consistent response times.
Verify application logs
To see what your agent is doing, check the application logs by using the az webapp log tail command.
# Real-time logs from Azure
az webapp log tail --name <your-web-app> --resource-group <your-resource-group>
What to look for in logs:
✅ Incoming requests from Teams ✅ Successful authentication ✅ Tool calls being executed ✅ Responses sent ❌ Error messages or exceptions
Verify observability in admin center
After your agent starts running:
Go to:
https://admin.cloud.microsoft/#/agents/all.Select your agent and open the Activity tab.
You should see:
✅ Sessions appearing. ✅ Each session shows triggers and actions. ✅ Tool calls are logged with timestamps.
Next steps
Your agent is now live in the cloud and ready to work alongside your team in Microsoft 365. What started as local code is now a registered, enterprise-ready assistant where users can create agent instances across your organization.
Your agent's development lifecycle is complete, but its impact is just beginning. Much of what you built in the agent 365 developer lifecycle is open source and welcomes community contributions. Raise bugs, feature requests, and pull requests:
- Agent 365 Samples: Got some interesting and fun sample agents? Share your agent code with the open source community here!
- Node.js SDK: The Agent 365 SDK in Node.js.
- Python SDK: The Agent 365 SDK in Python.
- .NET SDK: The Agent 365 SDK in C# (.NET).
- Agent 365 DevTools CLI: A CLI to help you through the entire Agent 365 development lifecycle.
Troubleshooting
This section contains common issues when creating and testing agent instances.
Tip
Agent 365 Troubleshooting Guide contains high-level troubleshooting recommendations, best practices, and links to troubleshooting content for each part of the Agent 365 development lifecycle.
Agent doesn't appear in Teams
Symptom: Agent appears in admin center but you can't find it in Teams Apps.
Root cause: Missing Developer Portal configuration.
Solution:
Get your blueprint ID from
a365.generated.config.json— look foragentBlueprintId.Configure in Developer Portal:
Go to:
https://dev.teams.microsoft.com/tools/agent-blueprint/<your-blueprint-id>/configurationSet Agent Type to API Based
Set Notification URL to your agent's messaging endpoint. Find the
messagingEndpointvalue ina365.generated.config.json.Select Save.
Wait 5-10 minutes for propagation.
Verification:
- Open Teams > Apps > Search for your agent.
- Agent appears and is available to add.
Can't create agent instance in Teams
Symptom: Agent appears in Teams but you can't add or create an instance; Request Instance button doesn't work.
Root cause: Microsoft Agent 365 Frontier isn't enabled for the tenant.
Solution: Contact your tenant administrator to verify Microsoft Agent 365 Frontier is enabled for the tenant.
Verification:
Frontier features appear within Microsoft 365 Copilot and Microsoft 365 apps once your license and admin settings allow it.
Agent not responding to messages
Symptom: You create an agent instance but it doesn't respond to messages. You see no logs in the application.
Root cause: Multiple possible causes - messaging endpoint issues, authentication problems, or configuration errors.
Basic troubleshooting
Verify the web app is running:
az webapp show --name <your-app-name> --resource-group <your-resource-group> --query state
# Should be: "Running"
Check the messaging endpoint:
- It should be:
https://<your-app-root-url>/api/messages - Verify it in
a365.config.jsonanda365.generated.config.json
- It should be:
Test the endpoint directly:
curl https://<your-app-root-url>/api/messages
# Should not return 404
Check application logs:
az webapp log tail --name <your-app-name> --resource-group <your-resource-group>
# Look for incoming requests and errors
Advanced diagnostics
Verify authentication:
- Check if tokens are expired. Renew them if needed.
- Verify credentials in Web App configuration.
Check tool/MCP configuration:
- Verify MCP servers are configured.
- Check permissions are granted.
Test locally:
- Run agent locally with same configuration.
- Test with Agents Playground.
- If works locally but not in cloud > deployment issue
Common solutions
- Messaging endpoint incorrect: Update in Azure portal and Developer Portal.
- Web app stopped: Start it using Azure portal or CLI.
- Token expired: Update tokens in Web App environment variables.
- Missing environment variables: Check App Settings in Azure portal.
- MCP server problems: Verify service principal and permissions.
- Code errors: Check application logs for exceptions.
Verification
Send a message to your agent in Teams and check application logs for incoming requests.
You may also want to try:
- Troubleshoot deploying an agent to Amazon Web Services.
- Troubleshoot deploying an agent to Google Cloud Platform.
Tool calls failing
Symptom: Agent responds to messages but tool calls fail. You see permission denied or timeout errors.
Root cause: Missing MCP server permissions, service principal not configured, network connectivity problems, or incorrect tool configuration.
Solutions
Try the following solutions when tool calls fail:
Verify permissions in admin center
Review and approve required MCP server permissions:
- Go to:
https://admin.cloud.microsoft/#/agents/all - Select your agent > Permissions
- Make sure the list includes and approves the required MCP servers
- Go to:
Check service principal
Run the one-time setup script if you didn't run it before:
# Download and run:
# https://github.com/microsoft/Agent365-devTools/blob/main/scripts/cli/Auth/New-Agent365ToolsServicePrincipalProdPublic.ps1
Verify MCP endpoint configuration
Ensure you're using the production MCP endpoint:
# Should be production endpoint, not mock
MCP_PLATFORM_ENDPOINT=https://agent365.svc.cloud.microsoft
Check managed identity
Verify managed identity is enabled on your Web App:
# Verify managed identity is enabled
az webapp identity show --name <your-app-name> --resource-group <your-resource-group>
Verification
Test tool calls through Teams and check the logs for successful execution.
You might also want to try these steps:
License assignment fails
Symptom: You can't assign a license to an agent user. You see license errors in the admin center.
Root cause: Insufficient licenses available, incorrect license type, or permissions issue.
Solutions
Try the following solutions when license assignment fails:
Verify licenses are available:
- Check Microsoft 365 admin center > Billing > Licenses.
- Ensure Microsoft Agent 365 Frontier is enabled for the tenant.
Manually assign license:
- Go to Microsoft 365 admin center > Users.
- Find the agent user.
- Assign appropriate license.
Required licenses for full functionality:
- Microsoft 365 E5 (or equivalent).
- Teams Enterprise.
- Microsoft 365 Copilot (for Copilot features).
Verification
Check that the user profile in the admin center shows assigned licenses.