Note
Access to this page requires authorization. You can try signing in or changing directories.
Access to this page requires authorization. You can try changing directories.
The integration of Azure OpenAI Natural Language Processing (NLP) and completion capabilities offers significant potential for enhancing user productivity. By leveraging appropriate prompts and rules, an AI assistant can efficiently generate various forms of communication, such as email messages, SMS messages, and more. This functionality leads to increased user efficiency and streamlined workflows.
While this feature is quite powerful on its own, there may be cases where users need to generate completions based on your company's custom data. For example, you might have a collection of product manuals that may be challenging for users to navigate when they're assisting customers with installation issues. Alternatively, you might maintain a comprehensive set of Frequently Asked Questions (FAQs) related to healthcare benefits that can prove challenging for users to read through and get the answers they need. In these cases and many others, Azure OpenAI Service enables you to leverage your own data to generate completions, ensuring a more tailored and contextually accurate response to user questions.
Here's a quick overview of how the "bring your own data" feature works from the Azure OpenAI documentation.
Note
One of the key features of Azure OpenAI on your data is its ability to retrieve and utilize data in a way that enhances the model's output. Azure OpenAI on your data, together with Azure AI Search, determines what data to retrieve from the designated data source based on the user input and provided conversation history. This data is then augmented and resubmitted as a prompt to the OpenAI model, with retrieved information being appended to the original prompt. Although retrieved data is being appended to the prompt, the resulting input is still processed by the model like any other prompt. Once the data has been retrieved and the prompt has been submitted to the model, the model uses this information to provide a completion.
In this exercise, you will:
- Create a custom data source using the Azure AI Foundry portal.
- Deploy an embedding model using the Azure AI Foundry portal.
- Upload custom documents.
- Start a chat session in the Chat playground to experiment with generating completions based upon your own data.
- Explore code that uses Azure AI Search and Azure OpenAI to generate completions based upon your own data.
Let's get started by deploying an embedding model and adding a custom data source in Azure AI Foundry.
Adding a Custom Data Source to Azure AI Foundry
Navigate to Azure OpenAI Studio and sign in with credentials that have access to your Azure OpenAI resource.
Select Deployments from the navigation menu.
Select Select Deploy model --> Deploy base model in the toolbar.
Select the text-embedding-ada-002 model from the list of models and select Confirm.
Select the following options:
- Deployment name: text-embedding-ada-002
- Model version: Default
- Deployment type: Standard
- Set the Tokens per Minute Rate Limit (thousands) value to 120K
- Content Filter: DefaultV2
- Enable dynamic quote: Enabled
Select the Deploy button.
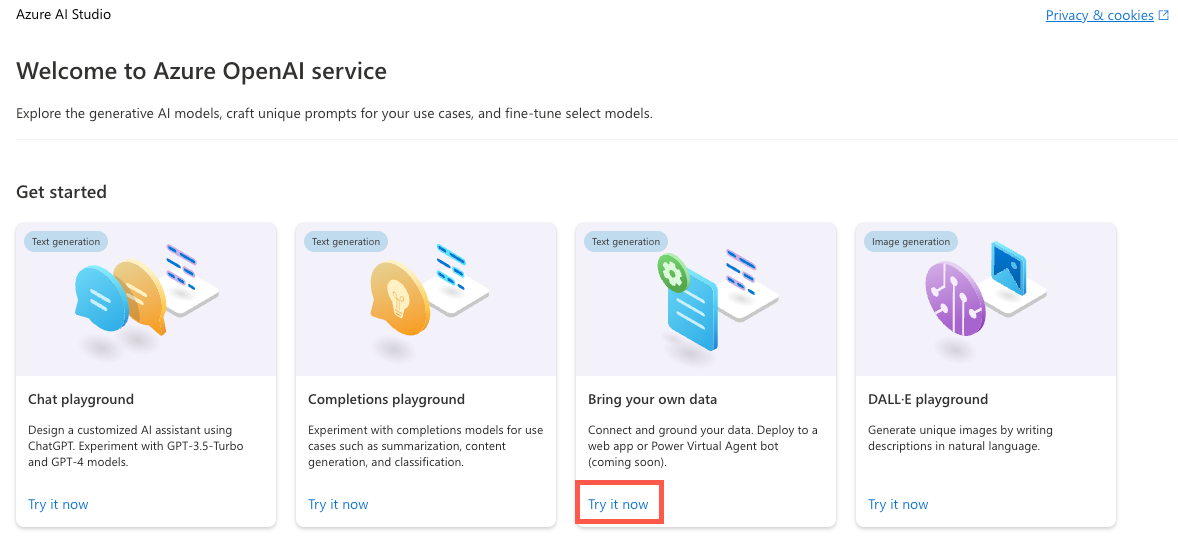
After the model is created, select Home from the navigation menu to go to the welcome screen.
Locate the Bring your own data tile on the welcome screen and select Try it now.
Select Add your data followed by Add a data source.
In the Select data source dropdown, select Upload files.
Under the Select Azure Blob storage resource dropdown, select Create a new Azure Blob storage resource.
Select your Azure subscription in the Subscription dropdown.
Under the Select Azure Blob storage resource dropdown, select Create a new Azure Blob storage resource.
This will take you to the Azure portal where you can perform the following tasks:
- Enter a unique name for the storage account such as byodstorage[Your Last Name].
- Select a region that's close to your location.
- Select Review followed by Create.
Once the blob storage resource is created, go back to the Azure AI Foundry dialog and select your newly created blob storage resource from the Select Azure Blob storage resource dropdown. If you don't see it listed, select the refresh icon next to the dropdown.
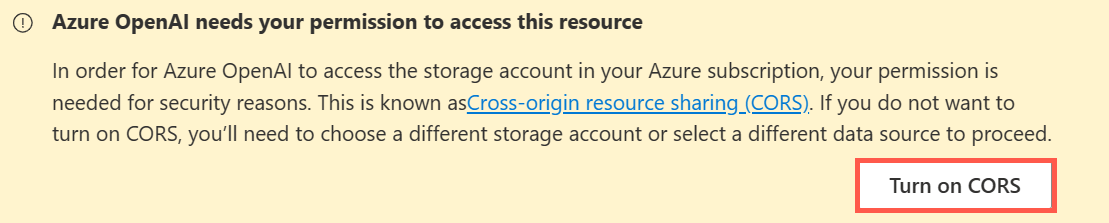
Cross-origin resource sharing (CORS) needs to be turned on in order for your storage account to be accessed. Select Turn on CORS in the Azure AI Foundry dialog.
Under the Select Azure AI Search resource dropdown, select Create a new Azure AI Search resource.
This will take you back to the Azure portal where you can perform the following tasks:
- Enter a unique name for the AI Search resource such as byodsearch-[Your Last Name].
- Select a region that's close to your location.
- In the Pricing tier section, select Change Pricing Tier and select Basic followed by Select. The free tier isn't supported, so you'll clean up the AI Search resource at the end of this tutorial.
- Select Review followed by Create.
Once the AI Search resource is created, go to the resource Overview page and copy the Url value to a local file.

Select Settings --> Keys in the navigation menu.
On the API Access control page, select Both to enable the service to be accessed by using Managed Identity or by using a key. Select Yes when prompted.
Note
Although we'll use an API key in this exercise since adding role assignments can take up to 10 minutes, with a little additional effort you can enable a system assigned managed identity to access the service more securely.
Select Keys in the left navigation menu and copy the Primary admin key value to a local file. You'll need the URL and key values later in the exercise.
Select Settings --> Semantic ranker in the navigation menu and ensure that Free is selected.
Note
To check if semantic ranker is available in a specific region, Check the Products Available by Region page on the Azure web site to see if your region is listed.
Go back to the Azure AI Foundry Add Data dialog and select your newly created search resource from the Select Azure AI Search resource dropdown. If you don't see it listed, select the refresh icon next to the dropdown.
Enter a value of byod-search-index for the Enter the index name value.
Select the Add vector search to this search resource checkbox.
In the Select an embedding model dropdown, select the text-embedding-ada-002 model you created earlier.
In the Upload files dialog, select Browse for a file.
Navigate to the project's customer documents folder (located at the root of the project) and select the following files:
- Clock A102 Installation Instructions.docx
- Company FAQs.docx
Note
This feature currently supports the following file formats for local index creation: .txt, .md, .html, .pdf, .docx, and .pptx.
Select Upload files. The files will be uploaded into a fileupload-byod-search-index container in the blob storage resource you created earlier.
Select Next to go to the Data management dialog.
In the Search type dropdown, select Hybrid + semantic.
Note
This option provides support for keyword and vector search. Once results are returned, a secondary ranking process is applied to the result set using deep learning models which improves the search relevance for the user. To learn more about semantic search, view the Semantic search in Azure AI Search documentation.
Ensure that the Select a size value is set to 1024.
Select Next.
For the Azure resource authentication type, select API key. Learn more about selecting the right authentication type in the Azure AI Search authentication documentation.
Select Next.
Review the details and select Save and close.
Now that your custom data has been uploaded, the data will be indexed and available to use in the Chat playground. This process may take a few minutes. Once it's completed, continue to the next section.
Using Your Custom Data Source in the Chat Playground
Locate the Chat session section of the page in Azure OpenAI Studio and enter the following User query:
What safety rules are required to install a clock?After submitting the user query you should see a result similar to the following displayed:
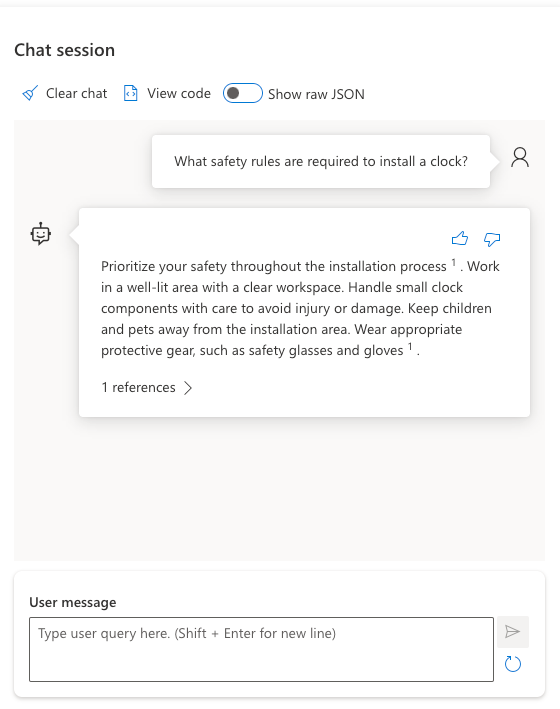
Expand the 1 references section in the chat response and notice that the Clock A102 Installation Instructions.docx file is listed and that you can select it to view the document.
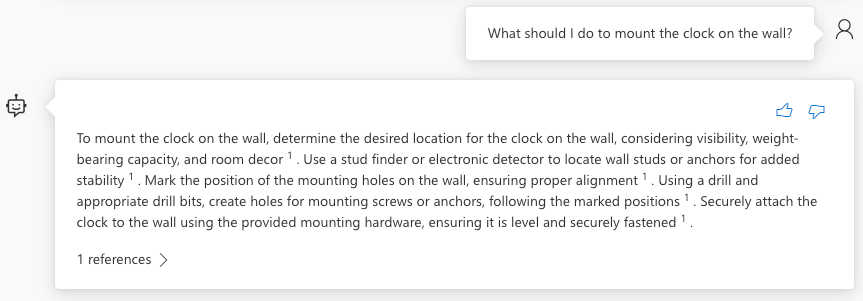
Enter the following User message:
What should I do to mount the clock on the wall?You should see a result similar to the following displayed:
Now let's experiment with the Company FAQs document. Enter the following text into the User query field:
What is the company's policy on vacation time?You should see that no information was found for that request.
Enter the following text into the User query field:
How should I handle refund requests?You should see a result similar to the following displayed:
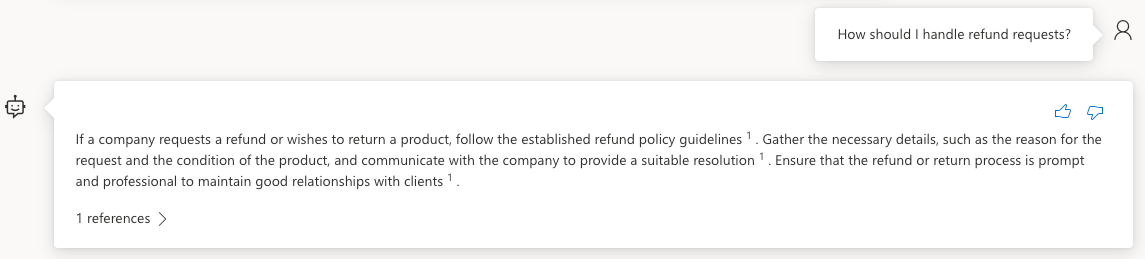
Expand the 1 references section in the chat response and notice that the Company FAQs.docx file is listed and that you can select it to view the document.
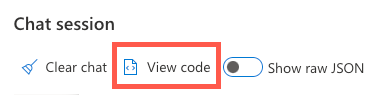
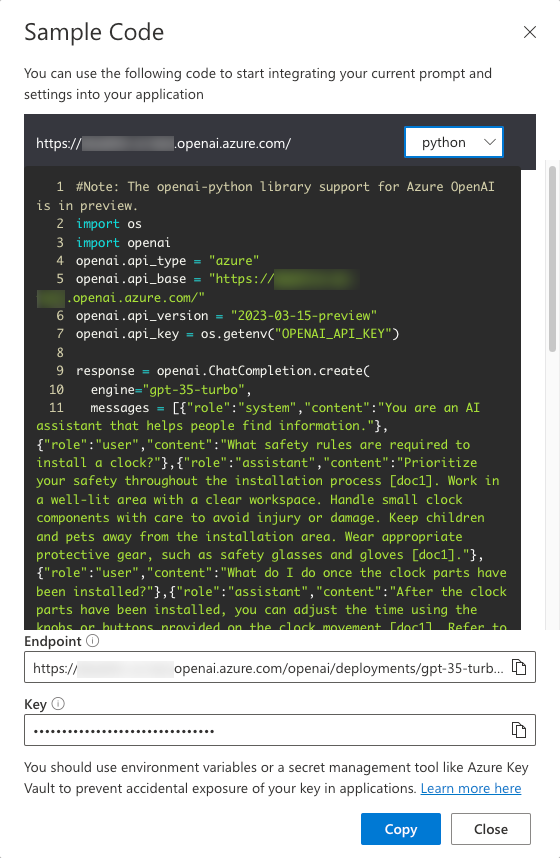
Select View code in the toolbar of the Chat playground.
Note that you can switch between different languages, view the endpoint, and access the endpoint's key. Close the Sample Code dialog window.
Turn on the Show raw JSON toggle above the chat messages. Notice the chat session starts with a message similar to the following:
{
    "role": "system",
    "content": "You are an AI assistant that helps people find information."
}
Now that you've created a custom data source and experimented with it in the Chat playground, let's see how you can use it in the project's application.
Using the Bring Your Own Data Feature in the Application
Go back to the project in VS Code and open the .env file. Update the following values with your AI Services endpoint, key, and index name. You copied the endpoint and key to a local file earlier in this exercise.
AZURE_AI_SEARCH_ENDPOINT=<AI_SERVICES_ENDPOINT_VALUE>
AZURE_AI_SEARCH_KEY=<AI_SERVICES_KEY_VALUE>
AZURE_AI_SEARCH_INDEX=byod-search-index
In a previous exercise you started the database, APIs, and application. You also updated the
.envfile. If you didn't complete those steps, follow the instructions at the end of the earlier exercise before continuing.Once the application has loaded in the browser, select the Chat Help icon in the upper-right of the application.

The following text should appear in the chat dialog:
How should I handle a company refund request?Select the Get Help button. You should see results returned from the Company FAQs.docx document that you uploaded earlier in Azure OpenAI Studio. If you'd like to read through the document, you can find it in the customer documents folder at the root of the project.
Change the text to the following and select the Get Help button:
What safety rules are required to install a clock?You should see results returned from the Clock A102 Installation Instructions.docx document that you uploaded earlier in Azure OpenAI Studio. This document is also available in the customer documents folder at the root of the project.
Exploring the Code
Tip
If you're using Visual Studio Code, you can open files directly by selecting:
- Windows/Linux: Ctrl + P
- Mac: Cmd + P
Then type the name of the file you want to open.
Go back to the project source code in Visual Studio Code.
Open the server/apiRoutes.ts file and locate the
completeBYODroute. This API is called when the Get Help button is selected in the Chat Help dialog. It retrieves the user prompt from the request body and passes it to thecompleteBYOD()function in the server/openAI.ts file. The results are then returned to the client.router.post('/completeBYOD', async (req, res) => { const { prompt } = req.body; if (!prompt) { return res.status(400).json({ status: false, error: 'The prompt parameter must be provided.' }); } let result; try { // Call OpenAI to get custom "bring your own data" completion result = await completeBYOD(prompt); } catch (e: unknown) { console.error('Error parsing JSON:', e); } res.json(result); });Open the server/openAI.ts file and locate the
completeBYOD()function.async function completeBYOD(userPrompt: string): Promise<string> { const systemPrompt = 'You are an AI assistant that helps people find information in documents.'; return await callOpenAI(systemPrompt, userPrompt, 0, true); }This function has the following features:
- The
userPromptparameter contains the information the user typed into the chat help dialog. - the
systemPromptvariable defines that an AI assistant designed to help people find information will be used. callOpenAI()is used to call the Azure OpenAI API and return the results. It passes thesystemPromptanduserPromptvalues as well as the following parameters:temperature- The amount of creativity to include in the response. The user needs consistent (less creative) answers in this case so the value is set to 0.useBYOD- A boolean value that indicates whether or not to use AI Search along with Azure OpenAI. In this case, it's set totrueso AI Search functionality will be used.
- The
The
callOpenAI()function accepts auseBYODparameter that is used to determine which OpenAI function to call. In this case, it setsuseBYODtotrueso thegetAzureOpenAIBYODCompletion()function will be called.function callOpenAI(systemPrompt: string, userPrompt: string, temperature = 0, useBYOD = false) { const isAzureOpenAI = OPENAI_API_KEY && OPENAI_ENDPOINT && OPENAI_MODEL; if (isAzureOpenAI) { if (useBYOD) { return getAzureOpenAIBYODCompletion(systemPrompt, userPrompt, temperature); } return getAzureOpenAICompletion(systemPrompt, userPrompt, temperature); } return getOpenAICompletion(systemPrompt, userPrompt, temperature); }Locate the
getAzureOpenAIBYODCompletion()function in server/openAI.ts. It's quite similar to thegetAzureOpenAICompletion()function you examined earlier, but is shown as a separate function to highlight a few key differences that are unique to the "Azure OpenAI on your data" scenario available in Azure OpenAI.async function getAzureOpenAIBYODCompletion(systemPrompt: string, userPrompt: string, temperature: number): Promise<string> { const dataSources = [ { type: 'azure_search', parameters: { authentication: { type: 'api_key', key: AZURE_AI_SEARCH_KEY }, endpoint: AZURE_AI_SEARCH_ENDPOINT, index_name: AZURE_AI_SEARCH_INDEX } } ]; const completion = await createAzureOpenAICompletion(systemPrompt, userPrompt, temperature, dataSources) as AzureOpenAIYourDataResponse; console.log('Azure OpenAI Add Your Own Data Output: \n', completion.choices[0]?.message); for (let citation of completion.choices[0]?.message?.context?.citations ?? []) { console.log('Citation Path:', citation.filepath); } return completion.choices[0]?.message?.content?.trim() ?? ''; }Notice the following functionality in the
getAzureOpenAIBYODCompletion()function:- A
dataSourcesproperty is created which contains the AI Search resource'skey,endpoint, andindex_namevalues that were added to the.envfile earlier in this exercise - The
createAzureOpenAICompletion()function is called with thesystemPrompt,userPrompt,temperature, anddataSourcesvalues. This function is used to call Azure OpenAI API and return the results. - Once the response is returned, the document citations are logged to the console. The completion message content is then returned to the caller.
- A
A few final points to consider before moving on to the next exercise:
- The sample application uses a single index in Azure AI Search. You can use multiple indexes and data sources with Azure OpenAI. The
dataSourcesproperty in thegetAzureOpenAIBYODCompletion()function can be updated to include multiple data sources as needed. - Security must be carefully evaluated with this type of scenario. Users should't be able to ask questions and get results from documents that they aren't able to access.
- The sample application uses a single index in Azure AI Search. You can use multiple indexes and data sources with Azure OpenAI. The
Now that you've learned about Azure OpenAI, prompts, completions, and how you can use your own data, let's go to the next exercise to learn how communication features can be used to enhance the application. If you'd like to learn more about Azure OpenAI, view the Get started with Azure OpenAI Service training content. Additional information about using your own data with Azure OpenAI can be found in the Azure OpenAI on your data documentation.