Note
Access to this page requires authorization. You can try signing in or changing directories.
Access to this page requires authorization. You can try changing directories.
[This article is prerelease documentation and is subject to change.]
This article describes how to use multistage and AI approvals in agent flows.
Important
This article contains Microsoft Copilot Studio preview documentation and is subject to change.
Preview features aren't meant for production use and may have restricted functionality. These features are available before an official release so that you can get early access and provide feedback.
If you're building a production-ready agent, see Microsoft Copilot Studio Overview.
What are multistage approvals?
A multistage approval is a capability that caters to more complex approval processes. It offers a rich set of capabilities that allow organizations to build robust approval workflows for their business processes, now enhanced with AI-powered decision-making.
Multistage approvals combine human and AI reviews to make approval decisions based on given instructions, documents, and images. This combination enables automated processing of routine requests while maintaining human oversight for complex decisions, significantly accelerating approval cycles while ensuring compliance with organizational policies.
Multistage approvals build upon standard approvals found in cloud flows. Before getting into multistage approvals, you should familiarize yourself with standard approvals first. Here are some resources to get you started:
- Get started with approvals
- Microsoft Power Platform and Azure Logic Apps approvals connector reference
Access multistage approvals
Multistage approvals are available exclusively in agent flows. Agent flows are automations or flows built in Copilot Studio and used standalone or with Copilot Studio agents. Learn more about agent flows in agent flows overview.
Key functionalities of multistage approvals
Multistage approvals offer the following key functionalities that set them apart from standard approvals:
Manual approval stages: Request approval decisions from human stakeholders at various stages of the process.
AI approval stages: Implement automated decision-making at key points in your approval workflow using AI models.
Conditions/conditional approvals: Place conditions between stages to dynamically control the approval workflow based on specific criteria.
All of these capabilities are in preview.
Manual approval stages
Manual stages in your multistage approval let you request approval decisions from different human stakeholders at various stages of the process. In these stages, you can define the approval type to be either "First to respond" or "Everyone must approve," the title of the approval request, who the approval should be assigned to, and the relevant details with which the human approver needs to make a decision.
AI approval stages
AI stages in your multistage approval enable you to implement automated decision-making at key points in your approval workflow. In these stages, you provide the AI model with specific instructions and relevant inputs such as documents, images, text, and organizational knowledge, and the AI produces a clear Approve or Reject decision with clear rationale based on your instructions. You can configure approval decisions from AI stages for review and approval by human approvers in subsequent stages. The human review ensures that humans remain in control always while still benefiting from faster processing of routine evaluations.
Conditions and conditional approvals
Conditions can be placed between stages in your multistage approval to provide dynamic workflow control by evaluating specific criteria to determine the next action in your approval process. With conditions, you can define logical rules based on inputs and configure the workflow to automatically approve, reject, route to another stage, or skip stages entirely based on whether those conditions are met. Conditions enable flexible decision-making that adapts your approval workflow to different scenarios without manual intervention.
Set up your multistage approval
There are a few steps to set up a multistage approval.
Add the multistage action
In your agent flow, you can add Run a multistage approval as an action via the new Human in the loop connector.
Open the designer of the agent flow into which you want to add a multistage approval.
Select the + button in the location between nodes where you want to add the multistage approval.
From the Add an action card or pane, you see the Run a multistage approval action in the Human in the loop section. You can also find the same action in the Human in the loop connector from the list. If you don't see the action or connector, search for them.
For easy access next time, favorite the action by selecting the star icon on the action card.
Select Run a multistage approval action. This action starts an approval, sends it to the required assignees, and waits for the approval requests to be completed, before the rest of the flow continues.

By default, the name of your multistage approval is the action name, "Run a multistage approval." To rename your approval, you must do so in the left pane. If you're using the new inline designer, select the button to open the left pane.

In the left pane, select the action name and rename as you choose.

Select Set up the approval to open the modal.
Add and configure a manual stage
Approvals are configured in stages. Stages represent different gate points in the approval process where the flow pauses and waits for a designated approver to review and approve before continuing. You can configure each stage independently, customizing to meet the needs of each group of stakeholders.
Let's start with how to configure a manual stage.
In the modal, select Create and from the dropdown, select Manual stage. A single tile appears in the approval viewer.
On the right-hand side of the dialog, select the approval type you want. Check out approval types and their behaviors to learn about the different types of approvals and how they work.
Other configuration options appear. Configure these fields as you would configure a standard approval. The three main fields that should be configured are: Title (signifies the title of the approval request); Assigned to (details that human the approval should go to); Details (provides all the relevant details that the human approver need to make an approval decision).
Note
In the "Assigned to" field, don't assign the same approver to multiple stages as this causes the flow to fail.

Using inputs in a manual stage
If you have tokens or variables created in your agent flow that you wish to use in your manual stage approval, you need to create inputs. You can't directly use tokens or variables inside the approval without creating inputs first. In the previous image, we created three inputs namely, Expense ID, Expense amount, and Manager approval details. To add an input, simple hit slash, / on your keyboard where you want the input to be, choose from one of these types, String, Number, and Boolean, and then give your input a name. If you were to save this approval process, you would see fields for the inputs you created in within the flow designer. You can now map a token or variable from the flow to this input.

Add and configure an AI stage
Important
Before you add an AI stage to your multistage approval, ensure that you have Copilot Studio Copilot Credits assigned to the environment you're working in. For more information on licenses and billing, see Copilot Studio licensing. If you don't have sufficient Copilot Credits, your approval stalls and doesn't proceed.
Let's now configure an AI stage.

In the approval viewer on the left pane, select the plus button "+" above the manual stage that you created.
Select AI stage from the dropdown. A single tile for the AI stage appears in the approval viewer.
Select the text in the tile and rename the stage (1).
In the Instructions pane (2), start by writing instructions and criteria you want the AI stage to use to make a decision.
Important
See How to write instructions in your AI stage for better results to learn how to craft your instructions well.
If you want the AI stage to use inputs such as documents, images, text, and knowledge to make an approval decision select "/" on your keyboard or select Add content (3) where you want that input in the instructions. A menu appears to select an input type and then to upload a sample input for testing.
If you used inputs in your instructions, be sure to upload samples before testing.
From the model picker (4), select the AI model you want to use to make the approval decision.
Note
Where possible, favor the more powerful models for approval decisions. For example, favor GPT-o3 over GPT-4.1.
Select Test (5) to test the instructions and wait for some seconds.
In the Approval decision (6) pane view the test result, and below the rationale for the decision.
The Next step based on decision (7) section allows you to route your approval based on the decision from the AI stage. Here by default, if the AI stage approves, the approval continues to the next stage. If rejected, the approval ends as rejected. If the approval fails to give an approve/reject decision, it simply continues to the next stage.
Note
The Next step based on decision section ensures that humans are always in control giving them the ability to make final decisions even after AI stages make decisions.
At this point if you save and close the multistage approval, you see fields for the inputs you configured in this AI stage in the flow designer.
Add and configure a condition
Conditions are essential for routing approvals and automatically approving or rejecting based on specific criteria. If no conditions are set between stages, the default behavior is:
- If a stage is approved, the process moves to the next stage.
- If the stage is rejected, the approval process ends.
However, with conditions you can customize the default behavior of your multistage approval.
To add a condition, select + in the multi-stage viewer between the two stages.
Select Condition from the dropdown.
Add condition statements as you wish.
Note
On the left side of the condition statement, you can only use an input. You can select from existing inputs or create new ones.
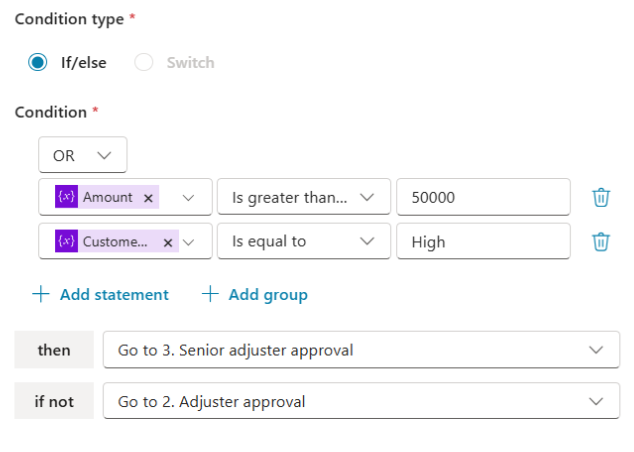
Configure where the approval goes based on whether the condition is met:
- If the condition is met, you can continue to the next stage, approve/reject, or route to another stage.
- If the condition isn't met, you can continue to the next stage, approve/reject, or route to another stage.
In this simple example, we define that if the expense amount is greater than $5,000, the request should continue to the manager for approval. However, if the amount is under $5,000 and the AI stage approves it, the request can bypass the manager approval and automatically end the approval as Approved.
Mapping variables from your flow to inputs in the approval
If you created inputs inside of the approval, you need to map variables from your flow to those inputs. When you save and close the approval dialog, you can see fields to perform these mappings in the action card.

Select the fields and then select the items from preceding actions in the flow that you want to be used in the approval at run time.
Document format requirements for approvals files
Documents used in approvals must be in base64 format. Some connectors return outputs that are already in base 64. But if you're using outputs from connectors that don't, use the string function from Power Fx on the file as shown in the following image:

Bringing it all together
Let's look at an example of how this approval process works with manual and AI stages, and conditions. The following image shows a complete approval process with four stages and a condition check.

The approval request reaches the AI expense screening stage first when the approval runs.
- If approved, the request moves to the condition check.
- If rejected, the approval process ends without reaching the condition check.
At the condition check:
- If the expense amount is greater than 5000, the approval continues to the Manager approval stage.
- If the expense amount isn't greater than 5000, the approval ends as Approved.
For expenses over 5000 that reach the Manager approval stage:
- If approved, the request moves to the AI budget verification stage for final compliance checks.
- If rejected, the approval process ends as Rejected.
The AI budget verification stage performs final budget and compliance validation:
- If the AI approves, the request continues to Finance review for processing.
- If the AI rejects, the approval process ends as Rejected.
Finally, the finance professionals in the Finance review stage perform their own evaluation based on accounting rules, budget availability, and payment processing requirements:
- If approved, the approval process ends as Approved and payment is initiated inside the agent flow.
- If rejected, the approval process ends as Rejected.
This demonstrates how you can build intelligent approval workflows that combine AI efficiency with human oversight, automatically routing requests based on specific business rules like expense amounts.
Note
In each AI stage, you can configure whether the approval should continue to the next stage even when the AI approves, giving you full control over your workflow routing.
Responding to approvals
Responding to approvals remains consistent between standard and advanced approvals. Users assigned to approvals can respond through:
- Microsoft Teams approvals app
- Outlook
- Power Automate portal
More on AI stages
Using AI approvals for sensitive cases
While AI approvals can streamline many business processes, exercise care when implementing them for highly sensitive approvals such as financial transactions, legal decisions, personnel actions, or compliance-critical processes. For these scenarios, we recommend ensuring that human approval stages are reached in the workflow so that humans remain in ultimate control of important decisions. Review these terms https://www.microsoft.com/en-us/business-applications/legal/legal-landing-page/ for more guidance.
For more information on responsible use of AI for approvals, see FAQ for AI approvals.
What happens when the AI stage is unsure of the decision to make
Sometimes, the AI stage might return a response labeled "Analysis failed." This typically occurs when the AI model is unable to determine an appropriate approval decision. Common causes include contradictory or off-topic instructions, or insufficient information provided to support a clear decision.
Here's an example where the AI returned an "Analysis failed" response due to conflicting input.

In this example, we instruct the AI stage to approve expenses under $500 and reject those over $300. However, the attached expense is $400, which falls within both criteria. As a result, the AI can't confidently determine whether to approve or reject the request due to the conflicting instructions.
Important
To avoid the "Analysis failed" response, follow guidelines in the How to write instructions in your AI stage for better results section of this article.
Viewing AI stage decision and rationale in Power Automate
There are two ways to see the decision and rationale of the AI stage after it runs:
- Approvals center
- Prompt builder activity screen
View in approvals center
If you're an approver in a completed multistage approval, you should see the decision and rationale of the AI stages in Power Automate.
Sign in to make.powerautomate.com.
From the environment picker, select the environment that the approval was run from.
From the left navigation pane, select Approvals.
In the History tab, select the approval that was completed and that includes the AI stage.
View the approval decision and rationale from the preceding AI stages in the right pane that opens.
View in prompt builder activity screen
Sign in to make.powerautomate.com.
From the environment picker, select the environment that the approval was run from.
From the left navigation pane, select prompt builder activity. If you don't see that option, select the three dots (…) > Discover all.
Under the monitor header in the Discover screen, select prompt builder activity. You can pin this screen to your navigation for easier access in the future.

In this screen, you can see all the runs of your AI prompts including the runs from the AI stages.

Select the Processed time part of one of the rows (the blue text in the column) to see the decision and rationale of that run.

Here you see the Input which is the piece of text, document, or image that was given in the instruction and the Output which contains the decision and rationale of the AI stage represented in the JSON format.

How to write instructions in your AI stage for better results
Approvals are a critical component of business processes, so it's essential that your instructions are clearly written and consistently yield accurate results. This section is especially important. Follow these best practices to ensure your AI approval stages deliver reliable and consistent decisions. While not every guideline might apply in every case, using them where possible helps maximize effectiveness.
Keep instructions focused on the business process: Ensure your approval instructions relate to legitimate business process approvals such as expense approvals, purchase order approvals, contract reviews, etc. AI stages work best when evaluating specific business workflows with clear policies.
Use more powerful models for complex tasks: Because accurate approval decisions are critical to your business, it's important to use the most capable AI models available whenever possible. For example, prefer GPT-o3 over GPT-4.1 for improved reasoning and consistency. For approval scenarios that involve complex tasks, intensive calculations, multistep logic, or nuanced analysis, consider using reasoning-optimized models like o3 or your own fine-tuned models from Azure AI Foundry to achieve better accuracy and reliability.
Focus on either reasons to reject or reasons to approve: Focus on either approval criteria OR rejection criteria, and avoid both. Mixing approaches can confuse the model. For example, if you provide the AI stage conflicting criteria such as "Approve if the expense is under $500 but reject if the expense is over $300 and it's a meal expense," it won't know how to make a correct decision when processing a $400 meal expense that meets both conditions simultaneously.
- Good: "Reject if the expense amount exceeds $500 or if no receipt is attached"
- Avoid: "Approve if under $500 but reject if over $500 unless it's travel expenses"
Reference your inputs specifically: When using uploaded inputs, documents, or data, reference them by name and specify exactly where the AI should look for information in your instructions. This ensures the AI knows which files to check and what data points to extract.
- Good: "Check the 'Budget_Report.pdf' file and approve if the Q3 revenue exceeds $100,000".
- Avoid: Avoid: "Check the budget file for revenue numbers".
Be specific and measurable: Avoid subjective terms that can be interpreted differently. Use concrete, measurable criteria that leave no room for ambiguity.
- Good: "Approve if delivery date is within five business days of request date"
- Avoid: "Approve if the timeline is reasonable" (here there's no quantitative rule for what 'reasonable' means)
Ensure file quality: Verify that inputs such as images and documents are clear, unprotected, and readable. Blurry images, password-protected files, or corrupted documents are more likely to lead to an analysis failure.
Test with realistic data: To validate your instructions work as expected, use representative examples that mirror your actual approval scenarios. Don't just test with perfect examples—include edge cases. For example, use real documents from your workflow, test with missing information scenarios, include borderline cases near your thresholds, try documents with formatting variations, test both approval and rejection scenarios.
Define edge cases and fallback behavior: Specify what should happen when the AI encounters unclear, incomplete, or unexpected information. This prevents the AI from making incorrect assumptions. For example, you can state, "If expense category is missing, reject the request."
Set clear thresholds and ranges: Avoid ambiguous boundaries by defining exact cutoff points. Be explicit about what happens at boundary values.
- Good: "Approve if satisfaction score is 4.0 or higher on a 5-point scale"
- Avoid: "Approve high satisfaction scores"
Use structured formats for complex criteria: For multistep evaluations, break down your logic into numbered steps or decision trees. This ensures the AI processes each condition systematically and makes your approval logic transparent. Here's a good structure:
Reject the expense report if ANY of the following conditions are true:
- Amount in the "Total" field exceeds $500.00
- No receipt image file is uploaded
- Expense date is more than 60 days before the date due date found in the expense guidelines
- Manager signature field in the expense form is blank
- Employee ID field is empty or doesn't match format XXX-XXXX (three numbers, dash, four numbers)
Include relevant organizational context: Reference specific company policies, compliance requirements, or business rules the AI should enforce via inputs like documents or knowledge. For example, you could state, "Follow Travel Policy v2.3: meals over $75 require itemized receipts with business justification. Reject if receipt or justification is missing."
Avoid time-sensitive references: Don't use relative dates or time references that become outdated. Use specific timeframes or calculated periods instead. The AI model might not know what today's date it as an example.
- Good: Approve if submission date is within 30 days of expense date
- Avoid: "Approve if submitted this month"
Use consistent terminology: To avoid confusion, stick to the same terms throughout your instructions. Avoid using different terms for the same thing. For example, use "expense amount" consistently throughout your instructions and avoid switching between "expense amount," "cost," "total," "sum," and "charge"
Known limitations
The following are known limitations:
- Only base64 encoded file contents in file inputs for AI stages are supported.
- If a user in a different environment from which an approval was sent responds to the approvals, the approval might fail. To prevent the failure, identify the user you want to send the approval to, go to the Power Platform admin center, and add the user to that environment.
- You can't assign the same approver to different stages. For example, if you assign John Doe to stage 1, you can't assign him to stage 2 as well. This causes your flow to fail.
- File attachments aren't currently supported.
- Application lifecycle management (ALM) is currently not supported for advanced approvals, meaning that if you import a flow with an advanced approval, you need to recreate the multi-stage approval in the flow.
- Sharing is currently not supported, meaning that if you share a flow that has the human in the loop connector, the recipient needs to recreate the multi-stage approval in the flow.