Edit files with Workspaces (Filesystem tab)
Use the Filesystem tab in the Sources tool to define a workspace, to save DevTools changes in your source code files rather than only in a transient copy of the files that are returned by the web server.
This tutorial provides hands-on practice in setting up and using a workspace in DevTools. After you add files to a workspace, changes that you make in your source code by using DevTools are saved on your local computer. These changes are preserved across page refreshes.
To refresh your knowledge of the technologies used, see the following articles:
Use HTML, CSS, and JavaScript to build a web page. See Getting started with the web
Use DevTools to make basic changes to CSS. See Get started viewing and changing CSS
Run a local HTTP web server. See:
Using Node.js (used for this tutorial): Set up a localhost server in Installing the DevTools extension for Visual Studio Code.
Using Python: Running a simple local HTTP server in How do you set up a local testing server?
Introduction
A DevTools workspace lets you save changes that you make to a local copy of the source code to the same file on your computer, so that changes are retained across refreshes of the page. Here's a typical scenario for using a workspace:
You have the source code for the demo website on your desktop.
You are running a local web server from the source code directory, so that the site is accessible at
localhost:8080. Note: If you use the Python server option, the default port number is8000.You opened
localhost:8080in Microsoft Edge, and you are using DevTools to change the website source code which includes the CSS, HTML, and JavaScript files.
The tutorial steps below walk you through this environment setup.
Limitations
If you're using a modern framework, it probably transforms your source code from a format that's easy to maintain into a format that's optimized to run as quickly as possible. A workspace is usually able to map the optimized code back to the original source code, by using source maps for JavaScript and CSS. However, there's a lot of variation in how each framework uses source maps.
DevTools doesn't support every framework variation; for example, the Workspaces feature (Filesystem tab) doesn't work with the Create React App framework.
If you run into issues while using workspaces with your framework of choice, or you identify framework-specific steps that are needed, start a thread in the Chrome DevTools mailing list or ask a question on Stack Overflow to exchange information with the rest of the DevTools community.
Related feature: Overrides
Overrides is a DevTools feature that's similar to a workspace. You can use an override when you want to experiment with changes to a webpage, and you need to display the changes across webpage loads, but you don't care about mapping your changes to the source code of the webpage. However, your changes aren't saved when you refresh the webpage.
The Overrides feature lets you store a local copy of the webpage files on the server. When you refresh the page, Microsoft Edge loads the local copy of files instead of the files on the server. To learn more about overrides, see Override webpage resources with local copies (Overrides tab).
Create the directory of source files
We'll set up the demo files, and then set up DevTools.
In another window or tab, go to the Workspaces demo source code.
Create an
appdirectory, such as~/Desktop/apporC:\Users\myusername\app\. Copyindex.html,../shared/img/logo.png,README.md,script.js, andstyles.cssfrom the demo source code to yourappdirectory. For the rest of the tutorial, this directory is referred to as~/Desktop/apporC:\Users\myusername\app\, though you can use a different path.If you haven't already, install Node.js and npm. For more information, see Install Node.js and Node Package Manager (npm) in Installing the DevTools extension for Visual Studio Code.
Go to a command prompt, such as the git bash shell, or the Terminal pane in Microsoft Visual Studio Code.
Go to the
appdirectory that you created, such as~/Desktop/apporC:/Users/myusername/app. If you use the git bash shell, it's a UNIX shell, so even on Windows, you need to wrap a directory path that has backslashes in quotes, or else use forward slashes rather than backslashes.Run one of the following commands, to start up the web server:
Node.js option:# Node.js option cd ~/Desktop/app # or: cd C:/Users/myusername/app npx http-server # Node.jsFor more information and options, see Start the server (npx http-server) in Installing the DevTools extension for Visual Studio Code.
# Python 2 option
cd ~/Desktop/app  # or:  cd C:/Users/myusername/app
python -m SimpleHTTPServer  # Python 2
# Python 3 option cd ~/Desktop/app # or: cd C:/Users/myusername/app python -m http.server # Python 3Open a tab in Microsoft Edge, and go to the locally hosted version of the site. You should be able to access it by using
localhost:8080:
Another common equivalent URL is
http://0.0.0.0:8080. The default port number for the Python server option is8000. The exact port number might be different.
Define a workspace in DevTools
Press Ctrl+Shift+J (Windows, Linux) or Command+Option+J (macOS) to open the DevTools Console:

Click the Sources (
 ) tab.
In the Navigator pane (on the left), click the Filesystem tab (which is grouped with the Page tab):
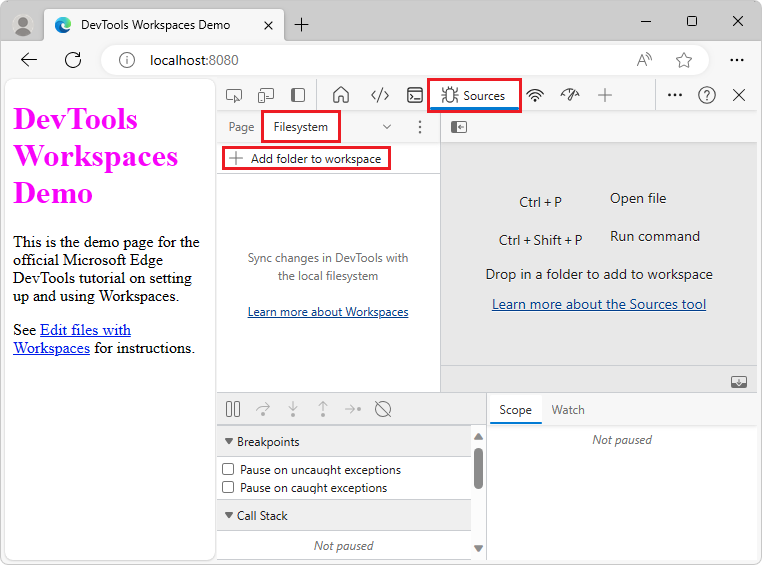
Click Add folder to workspace. File Explorer or Finder opens.
Go to the
/app/directory that you created. For example, in the Folder: text box, enter the path, such as~/Desktop/apporC:\Users\myusername\app\. Then click the Select Folder button.DevTools prompts you whether to grant DevTools full access to your
appdirectory.Click the Allow button, to give DevTools permission to read and write to the directory.
In the Filesystem tab are page icons that have a green dot, for
index.html,script.js, andstyles.css. The green dot indicates that DevTools has established a mapping between a network resource of the page that's received from the web server, and the local source file in yourappdirectory: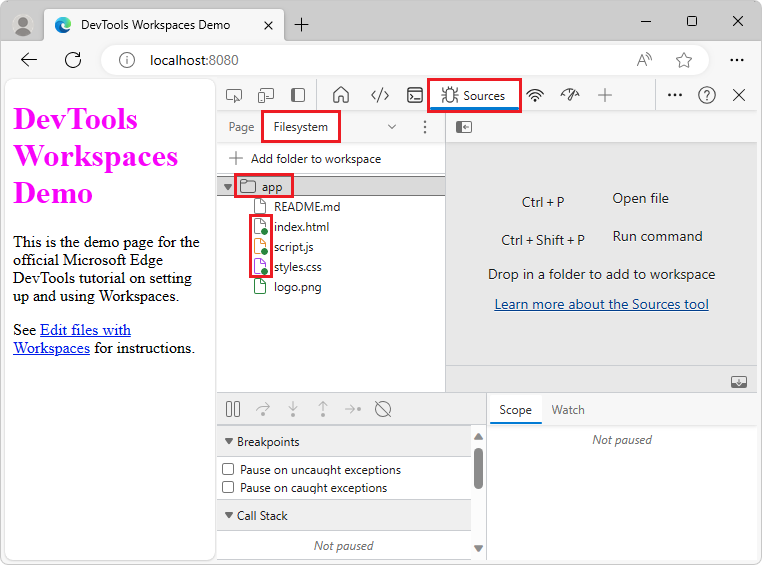
Edit CSS and save changes to the source file
To make a change in the CSS file and save it to disk:
In the Sources tool, in the Filesystem tab (grouped with the Page tab), select
styles.cssto open it in the editor pane. Thecolorproperty of theh1element is set tofuchsia: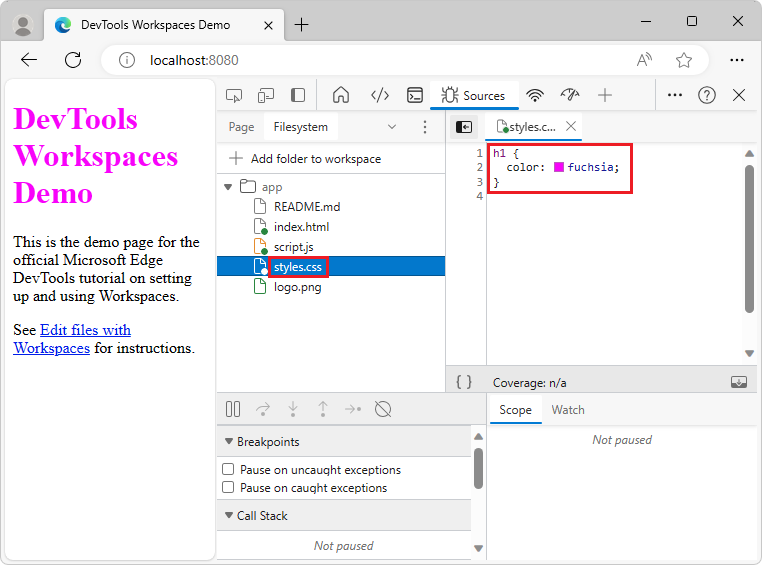
Select the Elements (
 ) tool, and then in the DOM tree, expand the
 <body>element, and then select the<h1>element.The Styles pane displays the CSS rules that are applied to the
<h1>element. The mapped file ( ) icon next to
 styles.css:1is a page with a green dot. The green dot means that any changes that you make to this CSS rule are mapped tostyles.cssin yourappdirectory: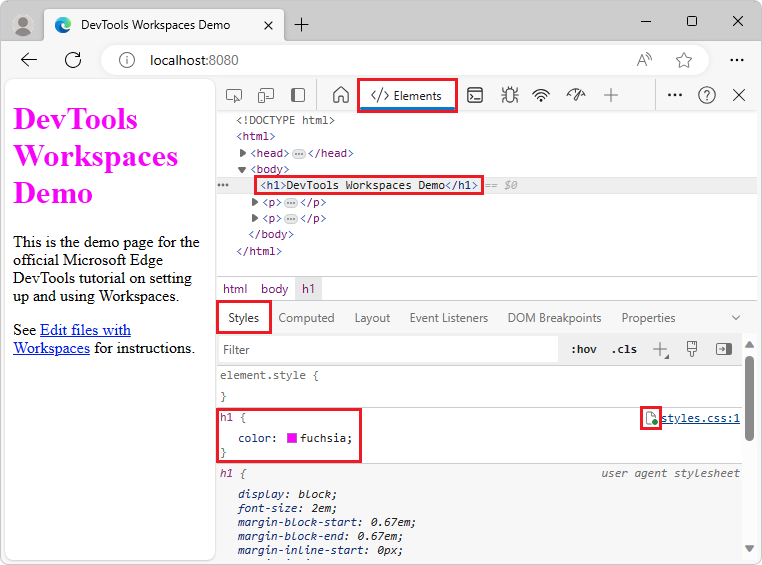
Change the value of the
colorproperty of the<h1>element to orange. To do this, select the<h1>element in the DOM Tree. In the CSS rule forh1, clickfuchsia, start typing orange, and then select orange from the color list: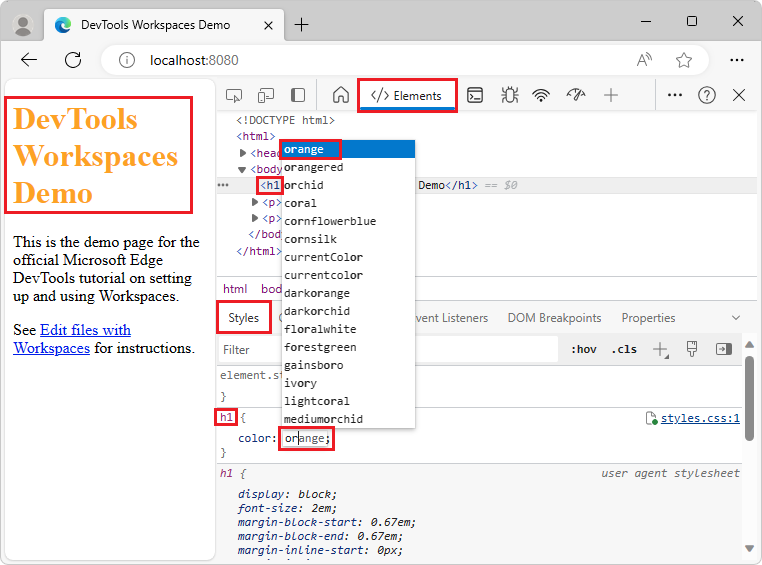
Open the copy of
styles.cssthat's in yourappdirectory in a text editor, such as Visual Studio Code. Thecolorproperty is now set to the new color, which is orange in this example. The change was not only made in the copy of the file returned from the web server; the change was also made in your mapped file in yourappworkspace directory.Refresh the page.
The color of the <h1> element is still set to the new color. The change remains across a refresh, because when you made the change, DevTools saved the change to disk. When you refreshed the page, your local server served the modified copy of the file from disk.
Tip: You can also change the color by clicking the fucshia-colored swatch to open the color picker to pick a new color. The HEX value for the color you pick is the color name.
Edit HTML and save changes to the source file
In the Elements tool, it's possible to change HTML tagging in a copy of the file that's returned by the server. However, to save your edits to a local source file, you need to use the Sources tool instead of the Elements tool.
Changing the DOM tree in the Elements tool doesn't save changes
You can make changes to the HTML content using the DOM tree in the Elements tool, but your changes to the DOM tree aren't saved to disk, and only affect the current browser session.
The following steps demonstrate that edits in the DOM tree aren't preserved across page refreshes:
Continuing from above, select the Elements tool.
In the DOM tree, in the
<h1>element, select the text stringDevTools Workspaces Demo, delete it, type the text stringI Love Cake, and then press Enter. The rendered webpage shows the new heading text: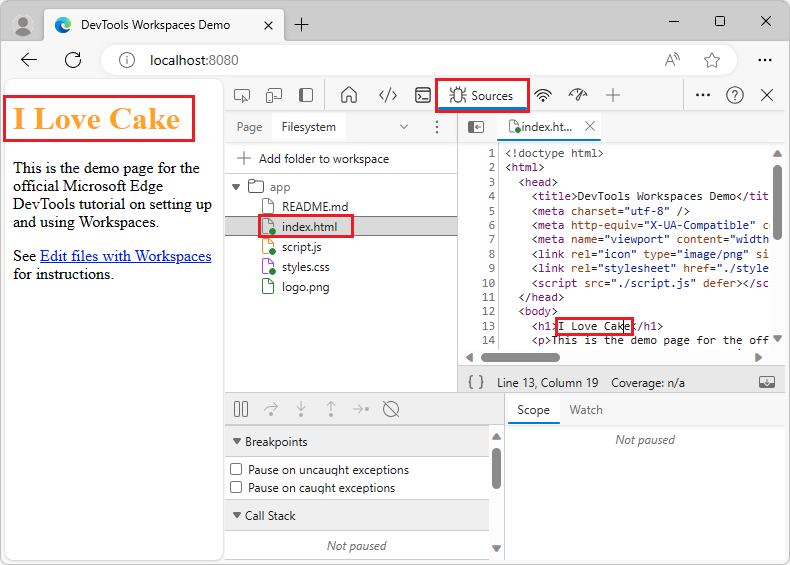
Open the
index.htmlfile that's in yourappdirectory in a text editor, such as Visual Studio Code. The change that you just made doesn't appear; the heading still reads "DevTools Workspaces Demo".In the browser, refresh the demo page. The page reverts to the original heading, "DevTools Workspaces Demo", because the DOM tree with your edit was discarded, and the DOM was re-created from the unchanged
index.htmlfile in yourappworkspace directory.
Changing HTML from the Sources tool saves changes
If you want to save a change to the webpage HTML, edit the HTML in the Sources tool with a workspace defined (in the Filesystem tab), rather than changing the HTML in the DOM tree in the Elements tool.
Continuing from above, click the Sources (
) tab.In the Navigator pane on the left, select
index.html. The HTML for the page opens.Replace
<h1>DevTools Workspaces Demo</h1>with<h1>I Love Cake</h1>, in the file listing (as opposed to the DOM tree in the Elements tool).Press Ctrl+S (Windows, Linux) or Command+S (macOS) to save the change.
Refresh the page. The heading in the rendered page changes to "I Love Cake", because that string was saved in
index.htmlin your mappedappdirectory:Open the copy of
index.htmlthat's in yourappdirectory in a text editor, such as Visual Studio Code.The
<h1>element contains the new text, because you made the change using the Sources tool's editor to editindex.htmland then saved the change, and that file was mapped in a workspace (the Filesystem tab), indicated by a green dot on the file's icon.
Edit JavaScript and save changes to the source file
The main place to use the code editor of DevTools is the Sources tool. But sometimes you need to access other tools, such as the Elements tool or the Console, while editing files. The Quick source tool gives you just the editor from the Sources tool, while any tool is open.
To open the DevTools code editor alongside other tools:
Continuing from above, select the Elements (
) tool.Press Ctrl+Shift+P (Windows, Linux) or Command+Shift+P (macOS) to open the Command Menu.
At the Run prompt, start typing quick, and then select Show Quick source:

At the bottom of the DevTools window, the Quick source tool opens, displaying the contents of
index.html, because that's the last file you edited in the Sources tool. If needed, click Expand Quick View, and make sure the Elements tool is selected.Press Ctrl+P (Windows, Linux) or Command+P (macOS) to display the Open File prompt of the Command Menu:

Start typing script, and then select script.js that's in the app/ directory.
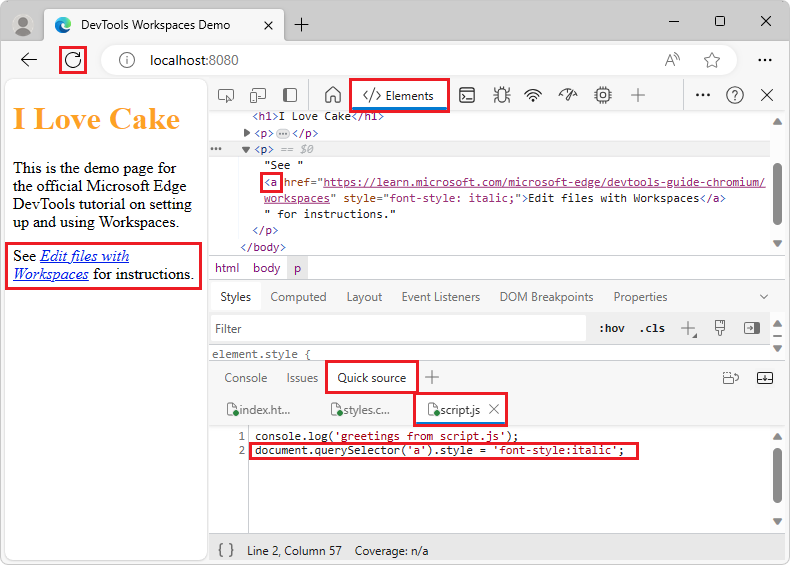
The file listing is displayed in the Quick source tool. In the rendered demo webpage, the Edit files with Workspaces hyperlink is not styled with italic.
Use the Quick source tool to add the following code to the bottom of script.js:
document.querySelector('a').style = 'font-style:italic';Press Ctrl+S (Windows, Linux) or Command+S (macOS) to save the change.
Refresh the page. If needed, click and hold the Refresh button and then select Hard Refresh. The Edit files with Workspaces hyperlink on the page is now italicized:
See also
- Open a demo folder in the Sources tool and edit a file in Sample code for DevTools.
Note
Portions of this page are modifications based on work created and shared by Google and used according to terms described in the Creative Commons Attribution 4.0 International License. The original page is found here and is authored by Kayce Basques (Technical Writer, Chrome DevTools & Lighthouse).
![]() This work is licensed under a Creative Commons Attribution 4.0 International License.
This work is licensed under a Creative Commons Attribution 4.0 International License.
Feedback
Coming soon: Throughout 2024 we will be phasing out GitHub Issues as the feedback mechanism for content and replacing it with a new feedback system. For more information see: https://aka.ms/ContentUserFeedback.
Submit and view feedback for