Note
Access to this page requires authorization. You can try signing in or changing directories.
Access to this page requires authorization. You can try changing directories.
This tutorial is for developers using WebView2 in immersive HoloLens 2 Unity applications.
This article is to learn to write your own WebView2 code. If you want to run a sample first, see Win32 sample app or another sample app article.
Important
WebView2 on Hololens 2 continues to be available. However, support for WebView2 on Hololens 2 is discontinued; there are no planned bug fixes or content updates, and technical support has ended. Applications that use WebView2 on Hololens 2 are not guaranteed to continue to work.
WebView2 on HoloLens 2 and the WebView plugin for Unity are both in Preview and are subject to change before general availability.
WebView2 only works on HoloLens 2 devices running the Windows 11 update. For more information, see Update HoloLens 2.
For WebView2-enabled 2D applications on HoloLens 2, see Get started with WebView2 in WinUI 2 (UWP) apps.
In this tutorial, you:
- Set up your development tools for creating HoloLens 2 Unity apps that use WebView2 to display web content.
- Install the Mixed Reality Toolkit, by using the Mixed Reality Feature Tool.
- Create an initial Unity project for HoloLens 2 development.
- Add the Microsoft Mixed Reality WebView plugin for Unity, by using the Mixed Reality Feature Tool.
- Configure a WebView prefab that displays webpage content in your HoloLens 2 app.
- Learn about WebView2 concepts and interactions in Unity.
Completed project
A completed version of this Getting Started project is available in the WebView2Samples repo. You can use the completed project (from the repo or from following the steps below) as a baseline to add more WebView2 functionality and other features to your HoloLens 2 Unity app.
A completed version of this tutorial project is available in the WebView2Samples repo:
- Sample name: HoloLens2_GettingStarted
- Repo directory: HoloLens2_GettingStarted
- Unity project folder: HoloLens2GetStartedApp
Follow the major Step sections in sequence, below.
About HoloLens 2, Unity, Mixed Reality Feature Tool, Mixed Reality Toolkit, and the WebView plugin
By combining HoloLens 2, Unity, the Mixed Reality Toolkit, and the WebView plugin for Unity, you can create immersive mixed-reality experiences that seamlessly integrate web content.
HoloLens 2
HoloLens 2 is a groundbreaking, untethered holographic device, offering a hands-free and immersive mixed reality experience. HoloLens 2 seamlessly overlays digital information onto the real world, rendering high-definition holograms that stay in place and respond naturally to interaction.
You can use the Unity game engine and Visual Studio to create your HoloLens 2 project.
Unity
Unity, a versatile game engine, is a popular choice for creating 3D applications, including mixed reality experiences for HoloLens 2 devices, due to its extensive features and robust capabilities for augmented reality (AR), virtual reality (VR), and mixed reality (MR).
Mixed Reality Feature Tool (MRFT)
The Mixed Reality Feature Tool (MRFT) is a new way for developers to discover, update, and add mixed reality feature packages into Unity projects. You can search packages by name or category, see their dependencies, and even view proposed changes to your projects manifest file before importing. A manifest file is a JSON file defining all of your project's packages. Once you've validated the packages to be included, the Mixed Reality Feature tool will automatically download them into your selected Unity project. This guide will use the MRFT to install the Mixed Reality Toolkit and the Microsoft Mixed Reality WebView plugin for Unity.
Mixed Reality Toolkit (MRTK)
The Mixed Reality Toolkit (MRTK) is a Microsoft-driven open-source project that accelerates the development of mixed reality applications in Unity by providing essential components and features for developing mixed reality experiences. The MRTK provides a collection of scripts, components, and prefabs specifically designed to help you create performant and intuitive mixed reality experiences on HoloLens 2 devices.
The Microsoft Mixed Reality WebView plugin for Unity
The Microsoft Mixed Reality WebView plugin for Unity enables the integration of WebView2 functionality into your HoloLens 2 app. This WebView plugin for Unity simplifies the integration of WebView2 functionality into your HoloLens 2 app by wrapping the WebView2 control, automatically handling rendering, and automatically directing input to the WebView2 control.
This plugin also manages interop between Unity and WebView2, enabling communication between JavaScript and Unity via messages and events.
In Unity, the Microsoft Mixed Reality WebView plugin for Unity can be installed by using the Mixed Reality Feature Tool.
Step 1 - Install Visual Studio
This tutorial assumes you have Unity 2021.3 LTS or later and Visual Studio 2019 version 16.9 or later installed. Visual Studio 2017 isn't supported. In this step we will start by setting up your Visual Studio environment for HoloLens 2 development, follow the Mixed Reality tools installation guide. That article guides you through installing and configuring the necessary tools, including Visual Studio and the Universal Windows Platform development workload.
Also set up your development environment for WebView2, by following the steps in Set up your Dev environment for WebView2.
Once you have completed the setup, return to this page and continue with the next steps to get Unity installed.
Step 2 - Install Unity for HoloLens 2 development
Before you can start developing a HoloLens 2 app with WebView2, you will need to install Unity. Follow the steps in Choosing a Unity version and XR plugin to complete installation of the toolset that's needed to build mixed reality applications.
Step 3 - Configure the Unity project for Mixed Reality development
Once you have your tools installed, you're ready to create and configure your project. The easiest way to get started with HoloLens 2 development is to use the Mixed Reality Toolkit in your project.
The Mixed Reality Feature Tool simplifies the process of discovering, installing, and managing mixed reality features, including the Mixed Reality Toolkit, and packages for your Unity project. For more guidance on installing the Mixed Reality Feature Tool, see Welcome to the Mixed Reality Feature Tool.
First, Download the Mixed Reality Feature Tool from the Microsoft Download Center.
Run the downloaded Mixed Reality Feature Tool executable, and follow the prompts to install the Mixed Reality Toolkit and any additional required packages for HoloLens 2 development.
The Mixed Reality Feature Tool allows you to select and install the appropriate versions of the Mixed Reality Toolkit, along with other mixed reality features, directly into your Unity project.
After you've used the Mixed Reality Feature Tool to install the Mixed Reality Toolkit, the toolkit's assets and prefabs will appear in your Unity project. The Mixed Reality Toolkit will guide you through configuring the Open XR plugin for your project.
For a detailed step-by-step walkthrough of configuring the Unity project, see Set up a new OpenXR project with MRTK.
Step 4 - Install the WebView plugin for Unity by using the Mixed Reality Feature Tool
In this step, as above, you'll use the Mixed Reality Feature Tool to install the Microsoft Mixed Reality WebView plugin for Unity. This will install the specific version of the WebView2 NuGet package that's compatible with HoloLens 2.
Launch the Mixed Reality Feature Tool (which you installed above). The Start page of the Mixed Reality Feature Tool for Unity opens, containing options to configure settings and to view documentation:
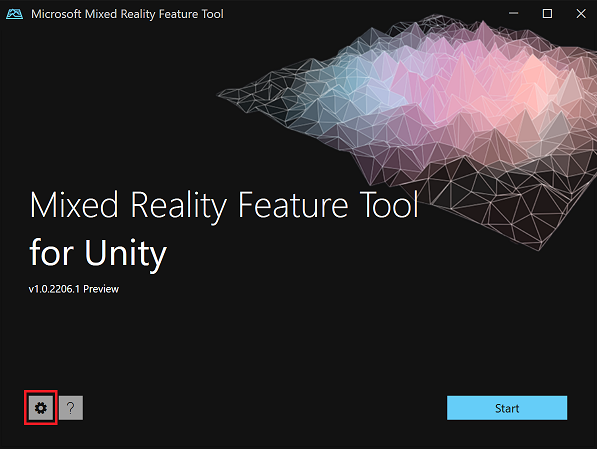
Click the gear button. The Settings pane opens.
Click the Feature tab, and then make sure the Show preview releases checkbox is selected:
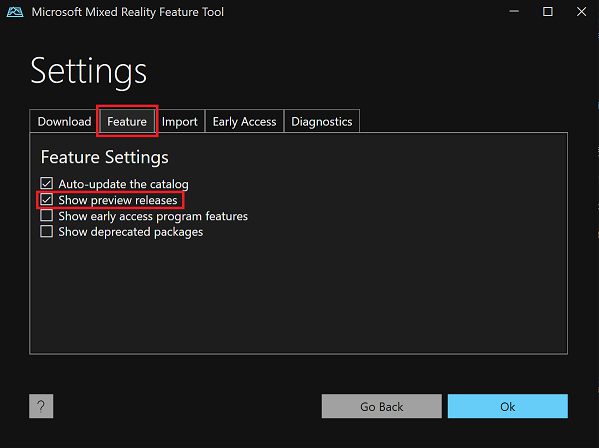
Click the Ok button to return to the starting page.
Click the Start button to begin discovering feature packages.
Point the Mixed Reality Feature Tool to your Unity project. To do this, click the Browse for the project folder (...) button to the right of the Project Path field:
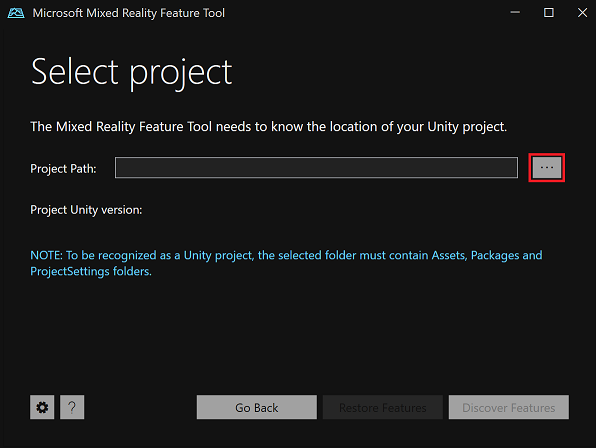
In the file selection dialog, select your Unity project folder, and then click the Open button.
In the Select project dialog, click the Discover Features button.
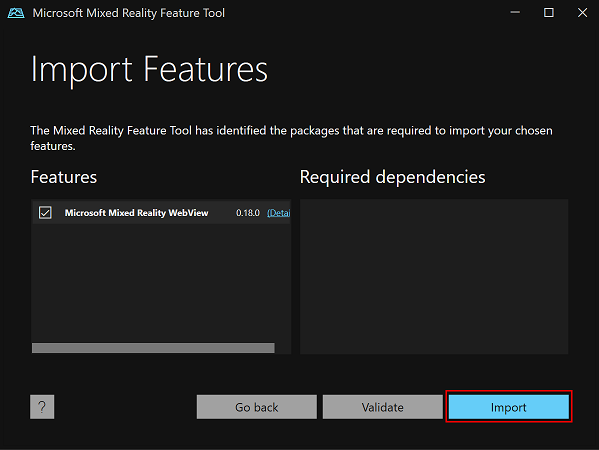
In the Discover Features page, expand the Other features section, and then select the Microsoft Mixed Reality WebView checkbox:
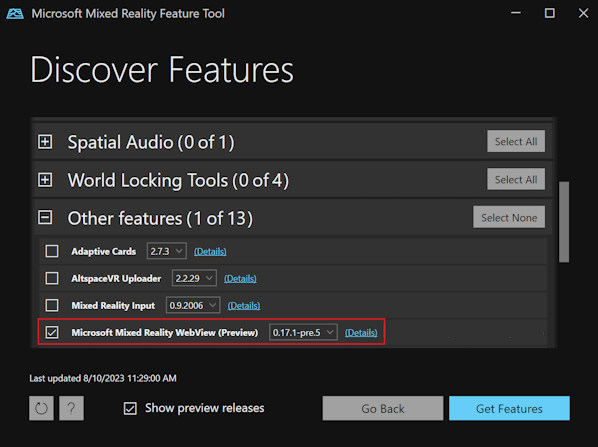
This marks the WebView plugin for Unity for installation. In the Version dropdown list, by default, the latest version of the plugin is selected.
Click the Get Features button. This downloads the required packages.
Once the packages are downloaded, click the Import button:
On the Review and Approve page, inspect the modifications that will be made to your project
manifest.jsonfile, and inspect the list of files (such as.tgzpackages) that will be copied into your project: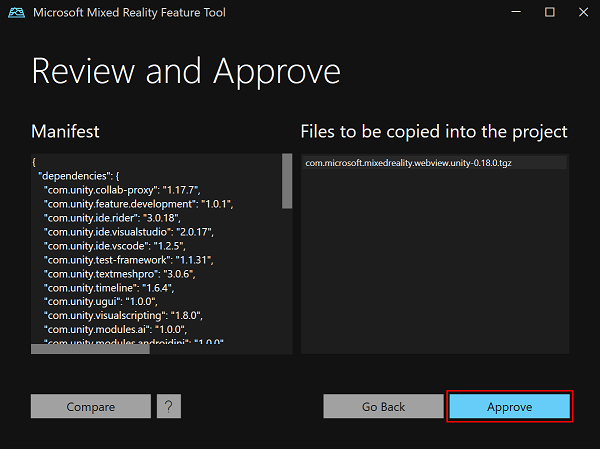
Click the Approve button to finalize the changes.
In your Unity project, in your project's Assets folder, inspect the WebView prefab.
The Microsoft Mixed Reality WebView plugin for Unity is now installed and imported. Continue with the next Step below.
For more information, see Welcome to the Mixed Reality Feature Tool.
Step 5 - Set up the WebView prefab in Unity scene
Now that the WebView plugin for Unity is installed and imported, set up the WebView prefab in your Unity scene, as follows:
In the Unity Editor, navigate to the Project window, and then find the WebView prefab by going to Packages > Microsoft Mixed Reality WebView (Preview) > Runtime > Prefab.
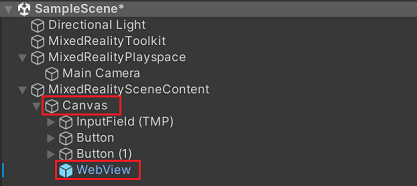
Drag the WebView prefab into your scene.
With the WebView prefab selected in the Hierarchy window, move it to a suitable starting location within the scene (such as under the
MixedRealitySceneContentnode), making sure it's in view of the default camera.In the Inspector window, you can change the initial URL that's loaded by the WebView prefab. To do this, locate the Current URL text box, and then enter the desired URL. By default, the prefab loads
https://www.microsoft.com: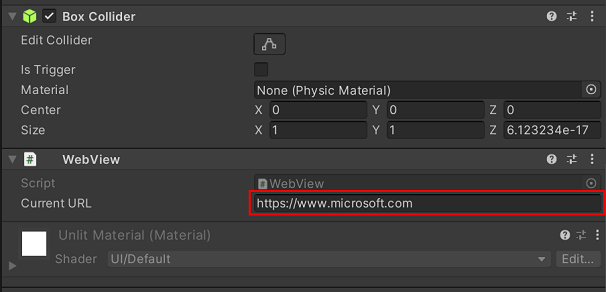
Step 6 - Test the project
Now that you've added the WebView plugin to the scene, it's a good time to test your project.
To test the project directly in the Unity editor, click the Play button:

To test the project on the actual device, follow the steps in Build and deploy to the HoloLens.
Then continue with the next steps below.
Step 7 - Extending WebView2 functionality
Although the prefab exposes just a single property, there's additional functionality exposed on the WebView script. Let's take a look at exposing some of this functionality in our project. First, inspect the WebView script to get an idea of what's available.
Tip
To view the contents of a script in your default code editor, double-click the name of the script in the Inspector window.
Now that you've reviewed the WebView code, let's extend the functionality of the sample. In the rest of this step, we'll add some basic functionality so that the user will have a Back button, a Go button, and a text field to navigate to a custom URL.
Add the input field and buttons
Modify the scene hierarchy as follows:
- Under
MixedRealitySceneContent, add a new input component (right-click > UI > Input Field - TextMeshPro). This automatically adds a parentCanvasfor the component. - Under the new
Canvas, add two newButtoncomponents (right-click > UI > Button - TextMeshPro). - Reorder the
WebViewcomponent to make it a child of theCanvascomponent:
- Under
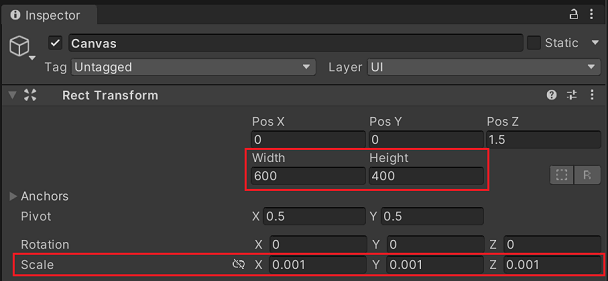
Update the Canvas properties by selecting the Canvas in the Hierarchy pane, then making the following changes in the Inspector pane:
- Change Width and Height to 600, 400 respectively.
- Change Scale for X, Y, and Z to 0.001, 0.001, 0.001:
Update the input field's properties by selecting it in the Hierarchy pane, then making the following changes in the Inspector pane:
- Change Name to "AddressField (TMP)"
- Change Pos X, Pos Y, Pos Z to -2, 178, -5, respectively.
- Change Width and Height to 390, 30 respectively:

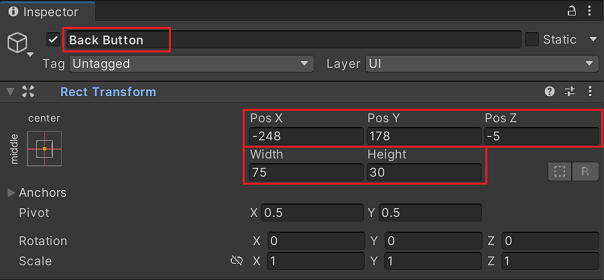
Update the first button's properties by selecting it in the Hierarchy pane, then making the following changes in the Inspector pane:
- Change Name to "Back Button"
- Change Pos X, Pos Y, Pos Z to -248, 178, -5, respectively.
- Change Width and Height to 75, 30 respectively:
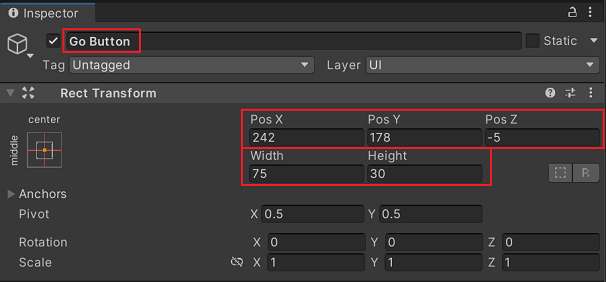
Update the second button's properties by selecting it in the Hierarchy pane, then making the following changes in the Inspector pane:
- Change Name to "Go Button"
- Change Pos X, Pos Y, Pos Z to 242, 178, -5, respectively.
- Change Width and Height to 75, 30 respectively:
Update the WebView's properties by selecting it in the Hierarchy pane, then making the following changes in the Inspector pane:
- Change Position > X, Y, Z to 0, -16, -5, respectively.
- Change Scale > X, Y, Z to 570, 340, 1 respectively:

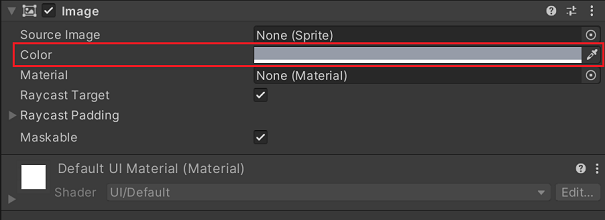
Add a background image to the Canvas:
- Select the Canvas in the Hierarchy pane.
- Click the Add Component button at the bottom of the Inspector pane.
- Type Image and then select the top result in the list.
- Click the Color well for the image and then choose a background color. In our example, we chose a gray color. (This is simply to show some contrast between the different controls in the canvas.)
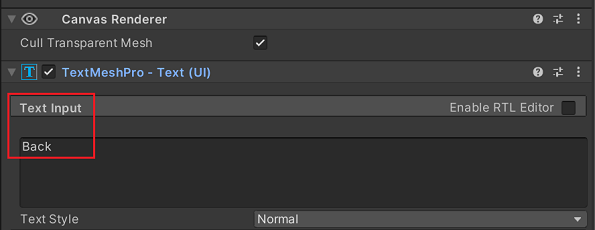
In the Hierarchy pane, under Back Button, select Text (TMP). Then in the Inspector pane, change the Text Input to Back:
Repeat the above process for the Go Button, substituting Go as the text.
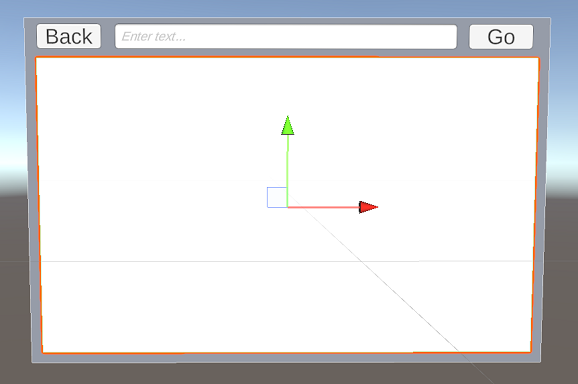
You should now have a scene which looks similar to the following:
Add code to hook up the buttons
Now that we have our UI designed, we will now create the code to hook up the buttons. To do that, we'll create a new script that derives from Microsoft.MixedReality.WebView.
In the Inspector window for WebView, click Add Component, select New script, type WebViewBrowser, and then click Create and add. Your new component is added to the Inspector window.
In the Inspector window, double-click the
WebViewBrowserscript, to edit the script.Replace the contents of that file with the following code:
using Microsoft.MixedReality.WebView;
using UnityEngine.UI;
using UnityEngine;
using TMPro;
using System;

public class WebViewBrowser : MonoBehaviour
{
   // Declare UI elements: Back button, Go button, and URL input field
   public Button BackButton;
   public Button GoButton;
   public TMP_InputField URLField;

   private void Start()
   {
      // Get the WebView component attached to the game object
      var webViewComponent = gameObject.GetComponent<WebView>();
      webViewComponent.GetWebViewWhenReady((IWebView webView) =>
      {
            // If the WebView supports browser history, enable the Back button
            if (webView is IWithBrowserHistory history)
            {
               // Add an event listener for the Back button to navigate back in history
               BackButton.onClick.AddListener(() => history.GoBack());

               // Update the Back button's enabled state based on whether there's any history to go back to
               history.CanGoBackUpdated += CanGoBack;
            }

            // Add an event listener for the Go button to load the URL that was entered in the input field
            GoButton.onClick.AddListener(() => webView.Load(new Uri(URLField.text)));

            // Subscribe to the Navigated event to update the URL input field whenever a navigation occurs
            webView.Navigated += OnNavigated;

            // Set the initial value of the URL input field to the current URL of the WebView
            if (webView.Page != null)
            {
               URLField.text = webView.Page.AbsoluteUri;
            }
      });
   }

   // Update the URL input field with the new path after navigation
   private void OnNavigated(string path)
   {
      URLField.text = path;
   }

   // Enable or disable the Back button based on whether there's any history to go back to
   private void CanGoBack(bool value)
   {
      BackButton.enabled = value;
   }
}
Connect the UI
GameObjectsto theWebViewBrowsercode that we just wrote:- Select the WebViewBrowser.
- Drag Back Button from the Hierarchy pane into the Back Button variable field for the WebView Browser in the Inspector.
- Drag Go Button from the Hierarchy pane into the Go Button variable field for the WebView Browser in the Inspector:

You can now test the scene in the Unity Editor. With everything wired up in your scene, you should be able to verify that everything is working as expected. Try testing out the scene by entering a new URL into the
AddressFieldtext box (must be a full URL including the protocol), then pressing the Go button. Make sure the Back button works as well.It can sometimes be helpful to debug your application running on your HoloLens, and the steps to do so are slightly different than standard debugging within Visual Studio. For more information on how to set up and connect to your application running on the HoloLens or inside of the Unity editor, see Managed debugging with Unity.
See also:
- WebView2 API Reference
- API Reference for Mixed Reality WebView plugin - for HoloLens 2 in the WebView2 Unity plugin.
Continue with the next steps below.
Step 8 - Learn about WebView2 events and interactions in Unity
The Microsoft Mixed Reality WebView plugin for Unity provides events for working with the webview.
One important event is IWithPostMessage.MessageReceived, which is raised when a message is sent from the webview to the Unity app. The MessageReceived event is defined in the Microsoft.MixedReality.WebView.IWithPostMessage interface.
IWithPostMessage also defines the PostMessage() method, which can be used to send a message from the Unity app to the webview.
Here is an example of how to use these events and methods for working with the webview:
using Microsoft.MixedReality.WebView;

public class WebViewExample : MonoBehaviour, IWithPostMessage
{
    private void Start()
    {
        var webViewComponent = gameObject.GetComponent<WebView>();

        if (Url != string.Empty)
        {
            Debug.Log("Loading URL: " + Url);
            webViewComponent.Load(new Uri(Url));
        }

        webViewComponent.GetWebViewWhenReady((IWebView webView) =>
        {
            // Add event listeners for WebView2 events
            ((IWithPostMessage)webView).MessageReceived += OnMessageReceived;
        });
    }

    // Handler for WebView2 OnPostMessage event
    void OnMessageReceived(string message)
    {
        Debug.Log("WebView2 message received: " + message);
    }
}
See also
- Get started with WebView2 in WinUI 2 (UWP) apps
- WebView2 API Reference
- API Reference for Mixed Reality WebView plugin - for HoloLens 2 in the WebView2 Unity plugin.