Note
Access to this page requires authorization. You can try signing in or changing directories.
Access to this page requires authorization. You can try changing directories.
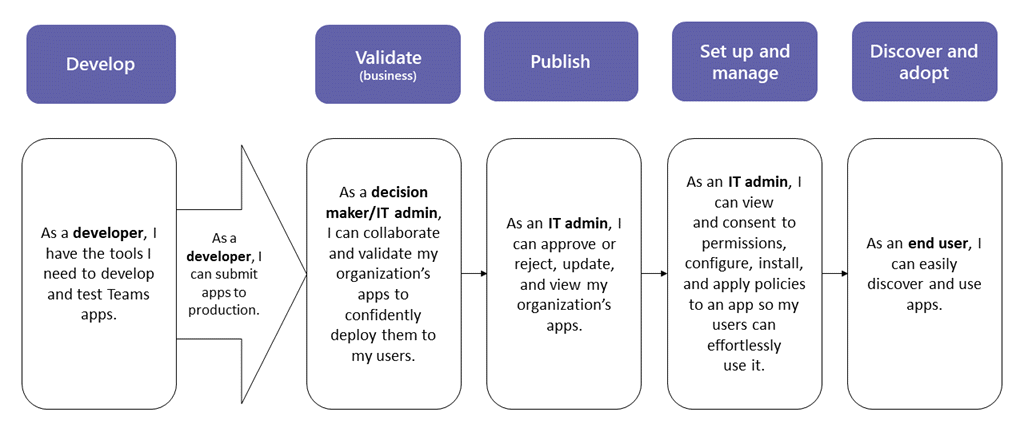
This article provides end-to-end guidance for how to take your Teams app from development to deployment to discovery. You'll get an overview of the connected experiences that Teams provides across the app lifecycle to streamline how to develop, deploy, and manage custom apps in your organization's app store.
Developers can use the Teams App Submission API to submit custom apps directly to the Microsoft Teams admin center for you to review and approve. You can set policies to manage apps for users in your organization and your users discover these apps in Teams client.
When you publish a custom Teams app, it's available to users in your organization's app store. There are three ways to publish a custom app and your approval method depends on how you receive the app from the app developer.
- Developer submits the app using the Teams App Submission API.
- Developer sends you an app package in .zip format. The approve app widget isn't available in GCC tenants.
- Developer uploads custom app using Teams client for your approval.
App developer submits the app
When the app is ready for use in production, the developer can submit the app using the Teams App Submission API, which can be called from Graph API, an integrated development environment (IDE) such as Visual Studio Code, or a platform such as Power Apps and Power Automate. Doing this makes the app available on the Manage apps page of the Teams admin center, where you can review and approve it.
The Teams App Submission API, built on Microsoft Graph, allows your organization to develop on the platform of your choice and automates the submission-to-approval process for custom apps on Teams.
Here's an example of what this app submission step looks like in Visual Studio Code:
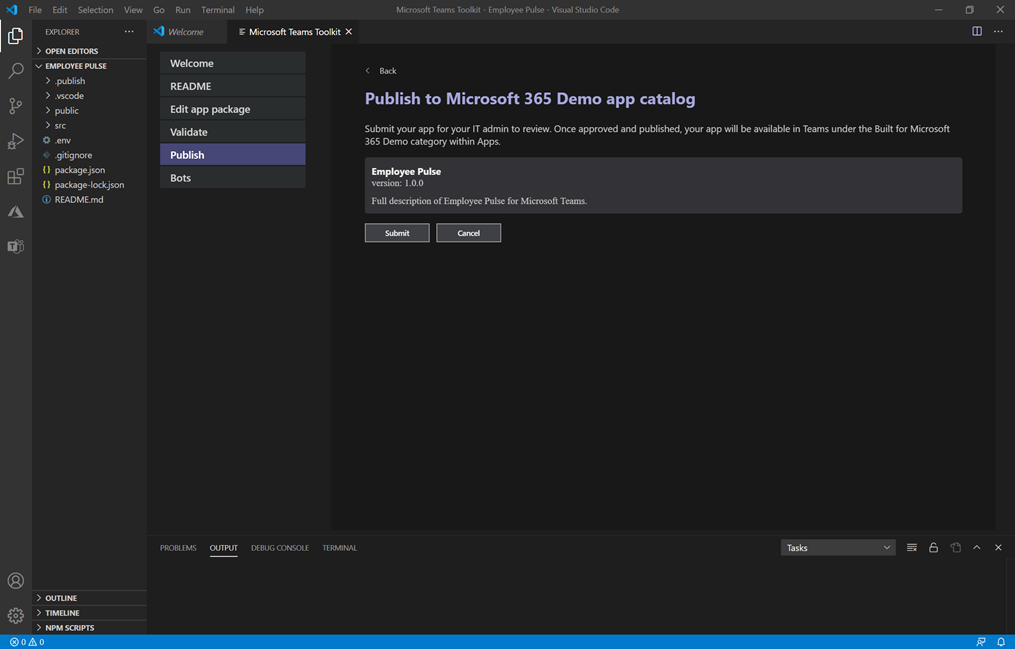
Keep in mind that this doesn't publish the app to your organization's app store yet. This step submits the app to the Teams admin center where you can approve it for publishing to your organization's app store.
For more information about using the Graph API to submit apps, see here.
Notification for app submissions
You can turn on notifications so you know when developers submit a new application for review and approval. You'll also get notifications when developers submit app updates. To enable app submission notifications in the Teams admin center, go to Notifications & alerts > Rules > App submissions, and activate the rule by changing the status to Active. By default, this setting is turned off. You must be a Teams admin to turn on this setting.
After you turn on this setting, you'll get notifications in the Admin Alerts and Notifications team under a new channel named App submissions. Alternatively, you can choose an existing team and channel to get notifications delivered to a specified team and channel. To do this, follow these steps:
In the App submissions rule, select the Channel alert checkbox under Actions.
Choose the Select channel button.
Search for a team to add.
Search for a channel to add.
Select Apply.


Note
Select the Default channel alert checkbox to receive notifications to the Admin Alerts and Notifications team in the App Submissions channel.

You can also set up notifications to an external webhook by specifying a public webhook URL after you select the Webhook checkbox. A JSON notification payload will be sent to your webhook URL.

After you set up the app submissions rule, you can review notification cards in the specified channel to see app details and select View details to open apps in the Teams admin center.
Approve the submitted app
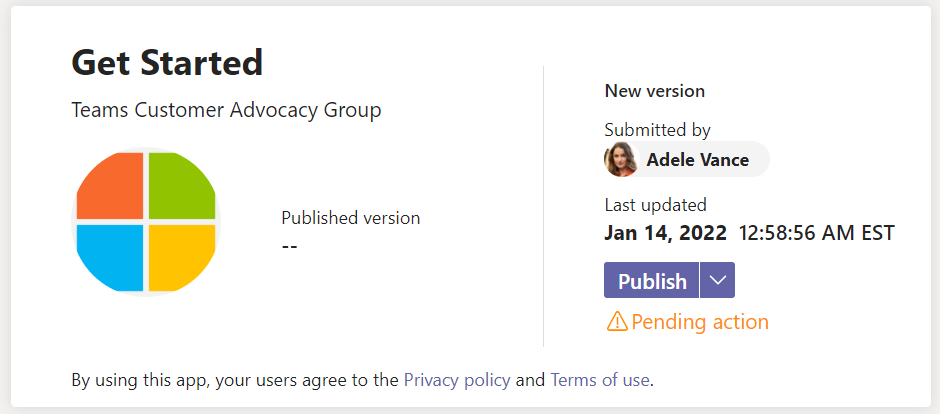
The Manage apps page in the Teams admin center (in the left navigation, go to Teams apps > Manage apps), gives you a view into all Teams apps for your organization. The Pending approval widget at the top of the page lets you know when a custom app is submitted for approval.
In the table, a newly submitted app automatically shows a Publishing status of Submitted and Status of Blocked. You can sort the Publishing status column in descending order to quickly find the app.

Select the app name to go to the app details page. On the About tab, you can view details about the app, including description, status, submitter, and app ID.

For more information about using the Graph API to check the Publishing status, see here.
Publish the app to your users
When you're ready to make the app available to users, publish the app.
Sign-in to Teams admin center and go to Teams apps > Manage apps.
Select the app name to go to the app details page, and then in the Publishing status box, select Publish.
After you publish the app, the Publishing status changes to Published and the Status changes to Allowed.
Set up and manage
Control access to the app
By default, all users in your organization can access the app in your organization's app store. To restrict and control who has permission to use the app, you can create and assign an app permission policy. To learn more, see Manage app permission policies in Teams.
Pin and install the app for users to discover
By default, for users to find the app they have to go to your organization's app store and browse or search for it. To make it easy for users to get to the app, you can pin the app to the app bar in Teams. To do this, create an app setup policy and assign it to users. To learn more, see Manage app setup policies in Teams.
Search the audit log for Teams app events
You can search the audit log to view Teams apps activity in your organization. To learn more about how to search the audit log and to see a list of Teams activities that are logged in the audit log, see Search the audit log for events in Teams.
Before you can search the audit log, you have to first turn on auditing in the Security & Compliance Center. To learn more, see Turn audit log search on or off. Keep in mind that audit data is only available from the point at which you turned on auditing.
Discover and adopt
Users who have permissions to the app can find it in your organization's app store. In the Teams client, in the Apps page, these apps are available in the Built for your org section.

You can create an app setup policy and assign it to all or a few users to pin one ore more apps in Teams client. It improves easy of access and app adoption for the apps that are relevant to the needs of your users.
Update a custom app
When the developer submits an update to a published custom app, you get notified in the Pending approval widget on the Manage apps page in admin center. In app listing on Manage apps page, the Publishing status of the app is set to Update submitted.

To review and publish an app update:
In the left navigation of the Teams admin center, go to Teams apps > Manage apps.
Select the app name to go to the app details page, and then select Update available to review details of the update.
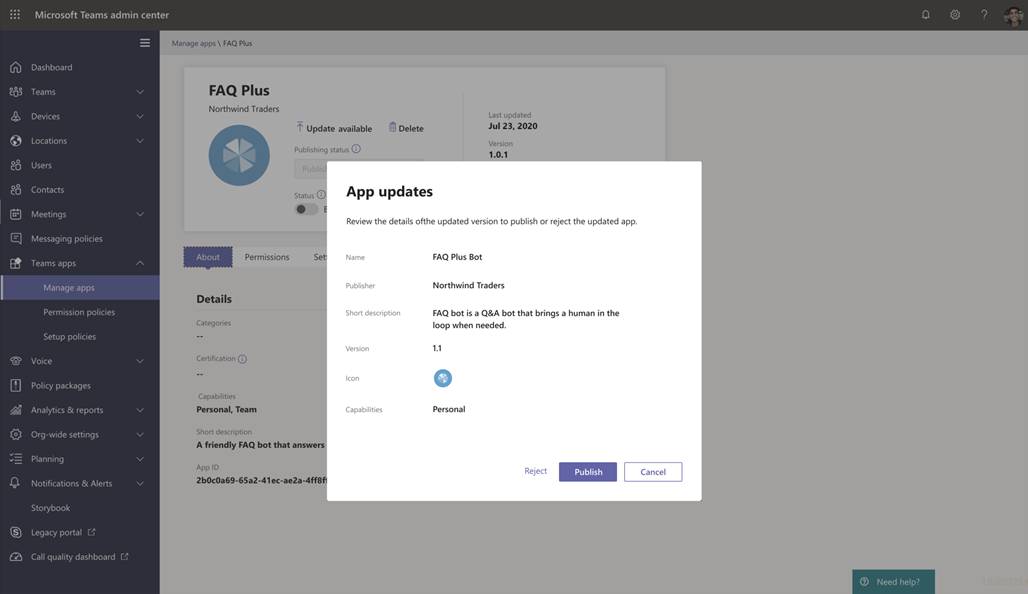
When you're ready, select Publish to publish the update. Doing this replaces the existing app, updates the version number, and changes the Publishing status to Published. All app permission policies and app setup policies remain enforced for the updated app.
If you reject the update, the earlier version of the app remains published.

Keep in mind the following:
- When an app is approved, any one can submit an update to the app. This means other developers, including the developer who originally submitted the app, can submit an update to the app.
- When a developer submits an app and the request is pending, only that same developer can submit an update to the app. Other developers can submit an update only after the app is approved.
For more information about using the Graph API to update apps, see here.