Note
Access to this page requires authorization. You can try signing in or changing directories.
Access to this page requires authorization. You can try changing directories.
Users can sign in to Office, and your Office Web Add-in can take advantage of this sign-in process to authorize users to your add-in and to Microsoft Graph without requiring users to sign in a second time. For an overview, see Enable SSO in an Office Add-in.
This article walks you through the process of enabling single sign-on (SSO) in an add-in. The sample add-in you create has two parts; a task pane that loads in Microsoft Excel, and a middle-tier server that handles calls to Microsoft Graph for the task pane. The middle-tier server is built with Node.js and Express and exposes a single REST API, /getuserfilenames, that returns a list of the first 10 file names in the user's OneDrive folder. The task pane uses the getAccessToken() method to get an access token for the signed in user to the middle-tier server. The middle-tier server uses the On-Behalf-Of flow (OBO) to exchange the access token for a new one with access to Microsoft Graph. You can extend this pattern to access any Microsoft Graph data. The task pane always calls a middle-tier REST API (passing the access token) when it needs Microsoft Graph services. The middle-tier uses the token obtained via OBO to call Microsoft Graph services and return the results to the task pane.
This article works with an add-in that uses Node.js and Express. For a similar article about an ASP.NET-based add-in, see Create an ASP.NET Office Add-in that uses single sign-on.
Prerequisites
Git Bash (or another git client)
A code editor - we recommend Visual Studio Code
At least a few files and folders stored on OneDrive for Business in your Microsoft 365 subscription
A build of Microsoft 365 that supports the IdentityAPI 1.3 requirement set. You might qualify for a Microsoft 365 E5 developer subscription, which includes a developer sandbox, through the Microsoft 365 Developer Program; for details, see the FAQ. The developer sandbox includes a Microsoft Azure subscription that you can use for app registrations in later steps in this article. If you prefer, you can use a separate Microsoft Azure subscription for app registrations. Get a trial subscription at Microsoft Azure.
Set up the starter project
Clone or download the repo at Office Add-in NodeJS SSO.
Note
There are two versions of the sample:
- The Begin folder is a starter project. The UI and other aspects of the add-in that are not directly connected to SSO or authorization are already done. Later sections of this article walk you through the process of completing it.
- The Complete folder contains the same sample with all coding steps from this article completed. To use the completed version, just follow the instructions in this article, but replace "Begin" with "Complete" and skip the sections Code the client side and Code the middle-tier server side.
Open a command prompt in the Begin folder.
Enter
npm installin the console to install all of the dependencies itemized in the package.json file.Run the command
npm run install-dev-certs. Select Yes to the prompt to install the certificate.
Use the following values for placeholders for the subsequent app registration steps.
| Placeholder | Value |
|---|---|
<add-in-name> |
Office-Add-in-NodeJS-SSO |
<fully-qualified-domain-name> |
localhost:3000 |
| Microsoft Graph permissions | profile, openid, Files.Read |
Register the add-in with Microsoft identity platform
You need to create an app registration in Azure that represents your web server. This enables authentication support so that proper access tokens can be issued to the client code in JavaScript. This registration supports both SSO in the client, and fallback authentication using the Microsoft Authentication Library (MSAL).
Sign in to the Azure portal with the admin credentials to your Microsoft 365 tenancy. For example, MyName@contoso.onmicrosoft.com.
Select App registrations. If you don't see the icon, search for "app registration" in the search bar.
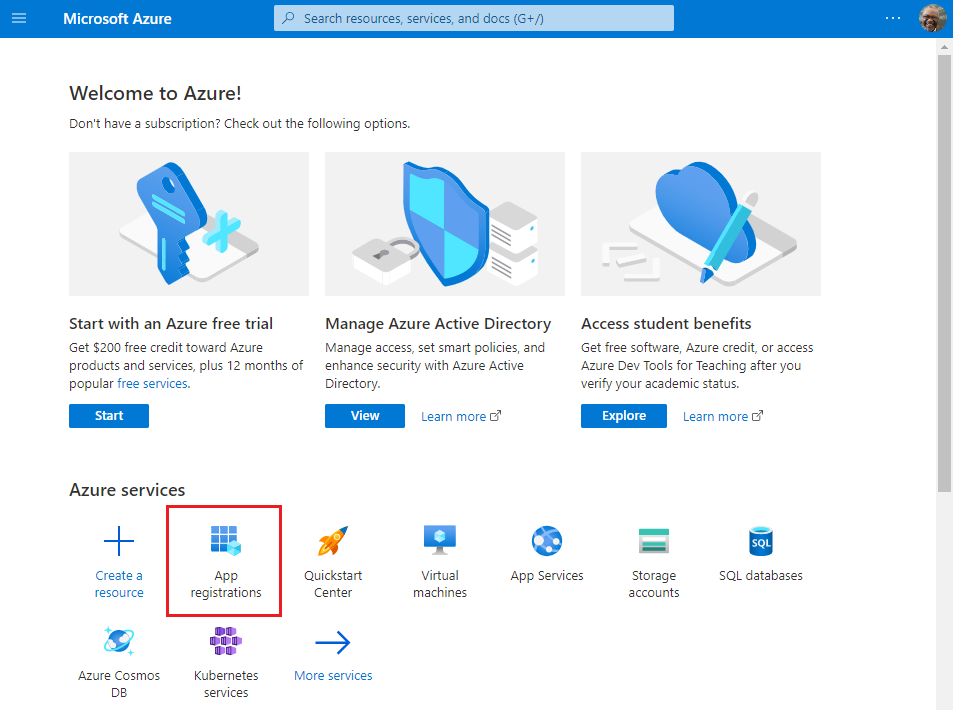
The App registrations page appears.
Select New registration.
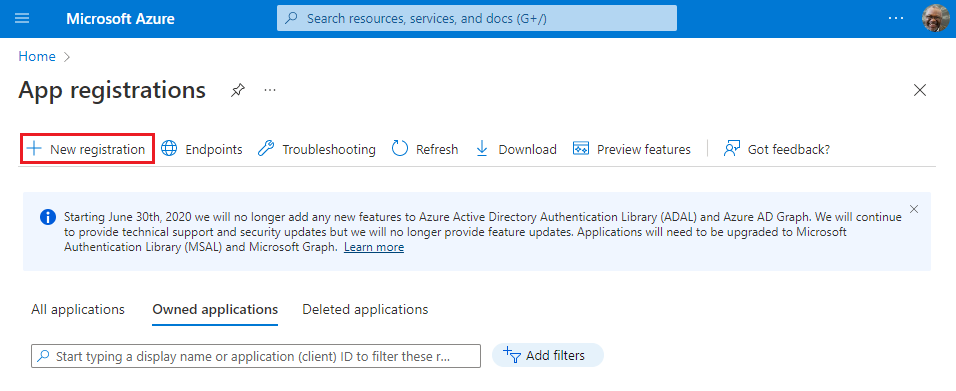
The Register an application page appears.
On the Register an application page, set the values as follows.
- Set Name to
<add-in-name>. - Set Supported account types to Accounts in any organizational directory (any Azure AD directory - multitenant) and personal Microsoft accounts (e.g. Skype, Xbox).
- Set Redirect URI to use the platform Single-page application (SPA) and the URI to
https://<fully-qualified-domain-name>/dialog.html.
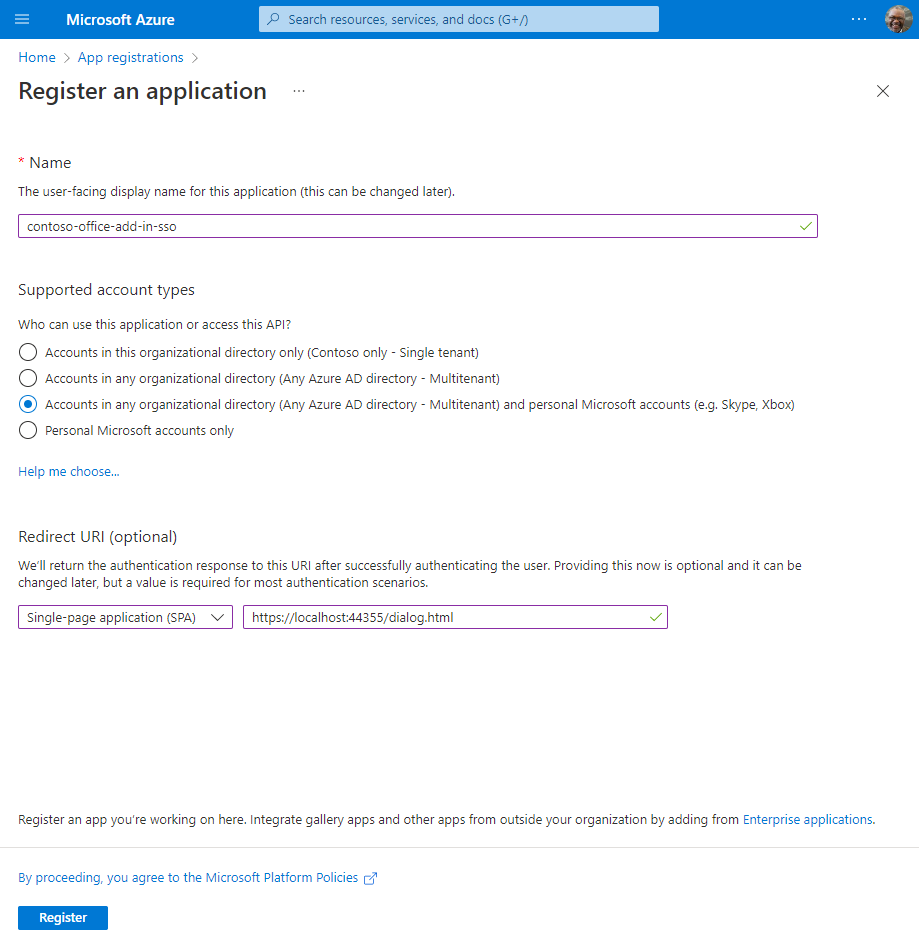
- Set Name to
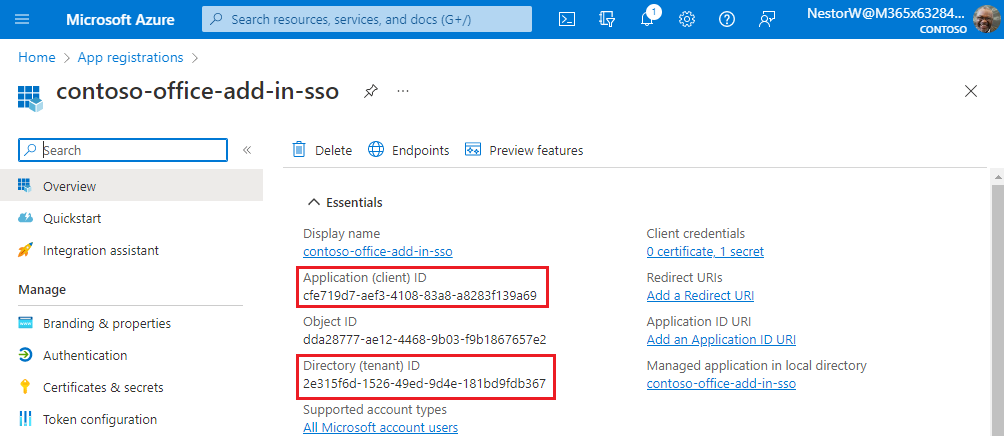
Select Register. A message is displayed stating that the application registration was created.

Copy and save the values for the Application (client) ID and the Directory (tenant) ID. You'll use both of them in later procedures.
Add a client secret
Sometimes called an application password, a client secret is a string value your app can use in place of a certificate to identity itself.
From the left pane, select Certificates & secrets. Then on the Client secrets tab, select New client secret.
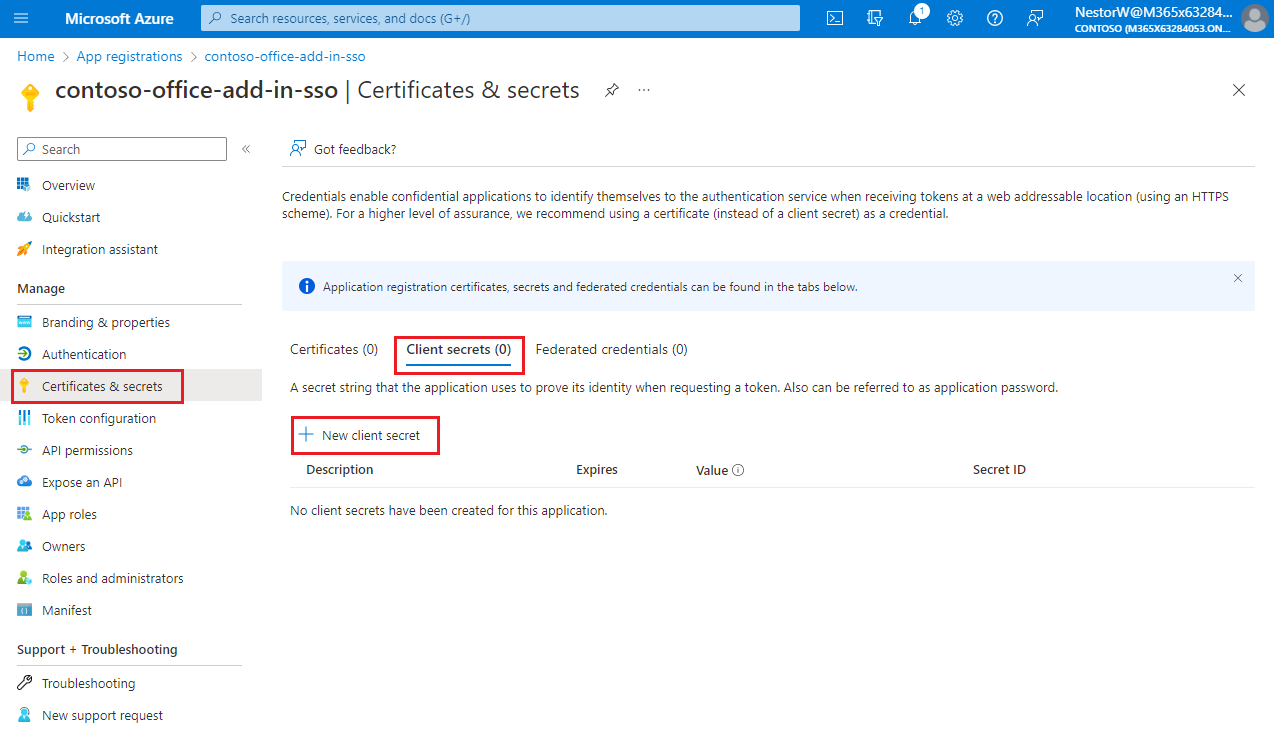
The Add a client secret pane appears.
Add a description for your client secret.
Select an expiration for the secret or specify a custom lifetime.
- Client secret lifetime is limited to two years (24 months) or less. You can't specify a custom lifetime longer than 24 months.
- Microsoft recommends that you set an expiration value of less than 12 months.

Select Add. The new secret is created and the value is temporarily displayed.
Important
Record the secret's value for use in your client application code. This secret value is never displayed again after you leave this pane.
Expose a web API
From the left pane, select Expose an API.
The Expose an API pane appears.
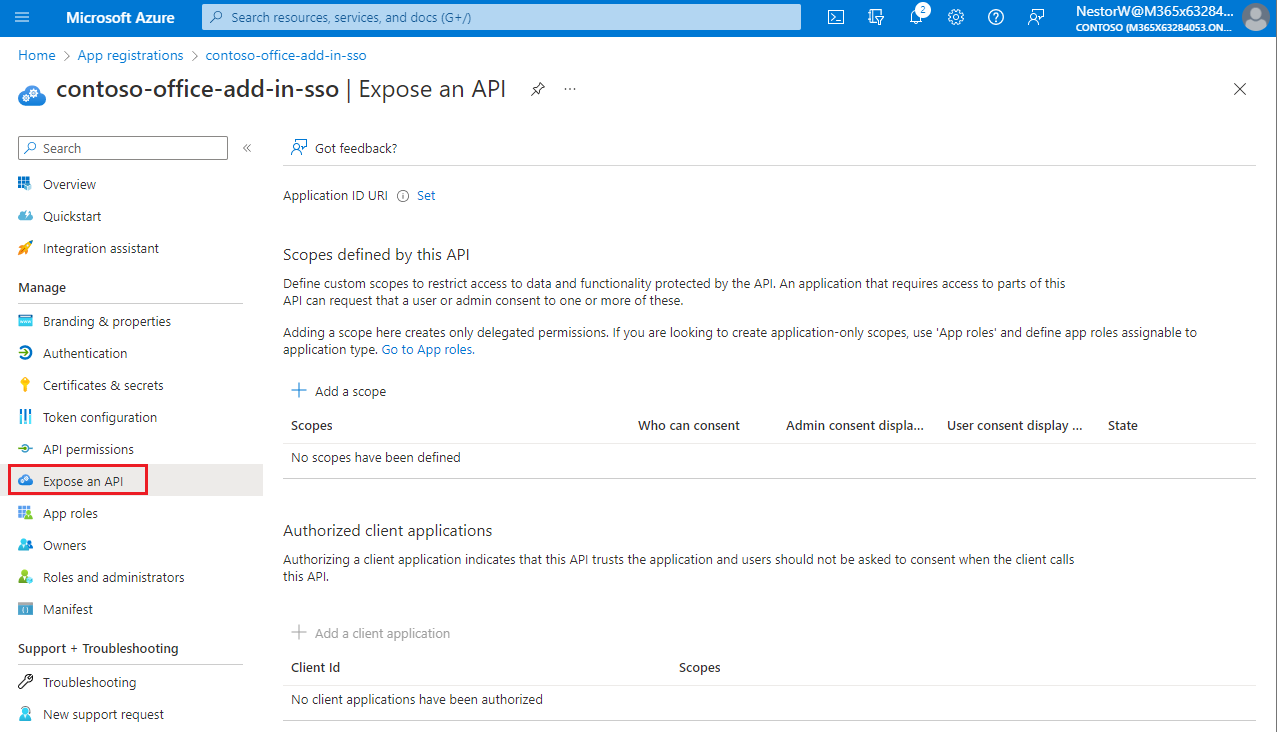
Select Set to generate an application ID URI.
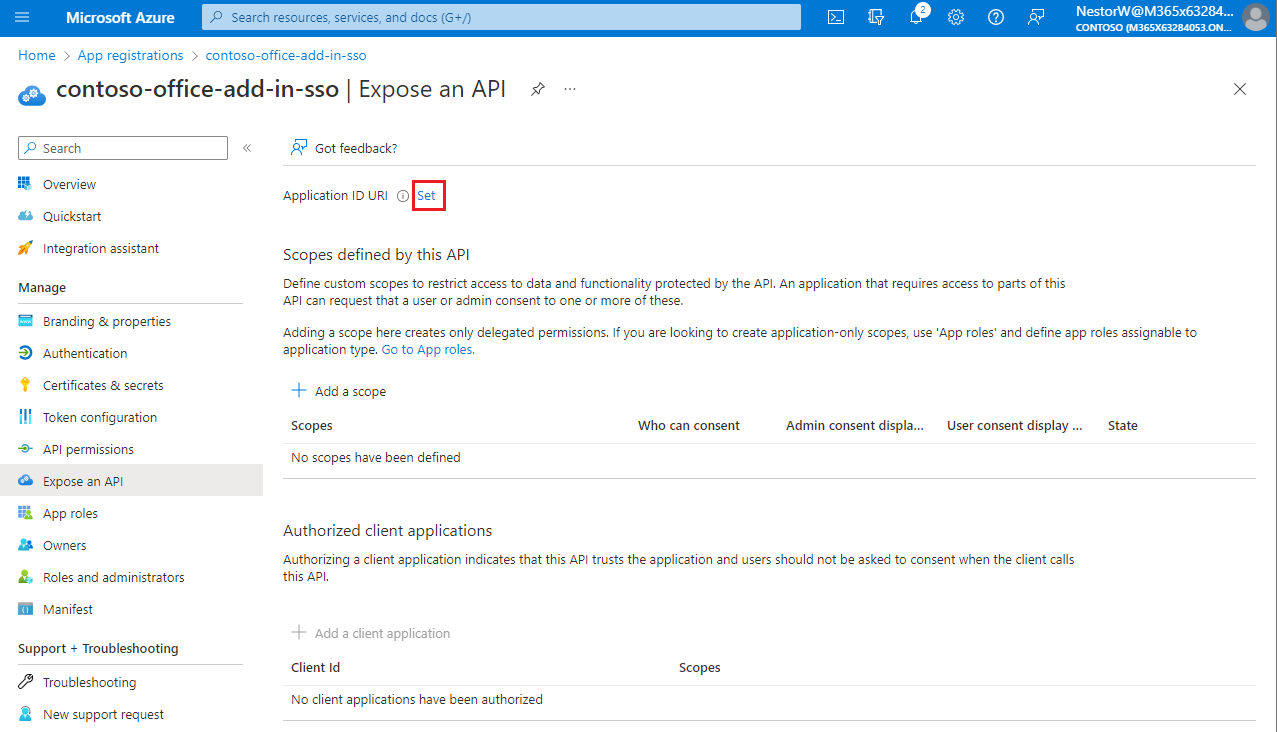
The section for setting the application ID URI appears with a generated Application ID URI in the form
api://<app-id>.Update the application ID URI to
api://<fully-qualified-domain-name>/<app-id>.
- The Application ID URI is pre-filled with app ID (GUID) in the format
api://<app-id>. - The application ID URI format should be:
api://<fully-qualified-domain-name>/<app-id> - Insert the
fully-qualified-domain-namebetweenapi://and<app-id>(which is a GUID). For example,api://contoso.com/<app-id>. - If you're using localhost, then the format should be
api://localhost:<port>/<app-id>. For example,api://localhost:3000/c6c1f32b-5e55-4997-881a-753cc1d563b7.
For additional application ID URI details, see Application manifest identifierUris attribute.
Note
If you get an error saying that the domain is already owned but you own it, follow the procedure at Add your custom domain name to your tenant to register it, and then repeat this step. (This error can also occur if you are not signed in with credentials of an admin in the Microsoft 365 tenancy. See step 2. Sign out and sign in again with admin credentials and repeat the process from step 3.)
- The Application ID URI is pre-filled with app ID (GUID) in the format
Add a scope
On the Expose an API page, select Add a scope.
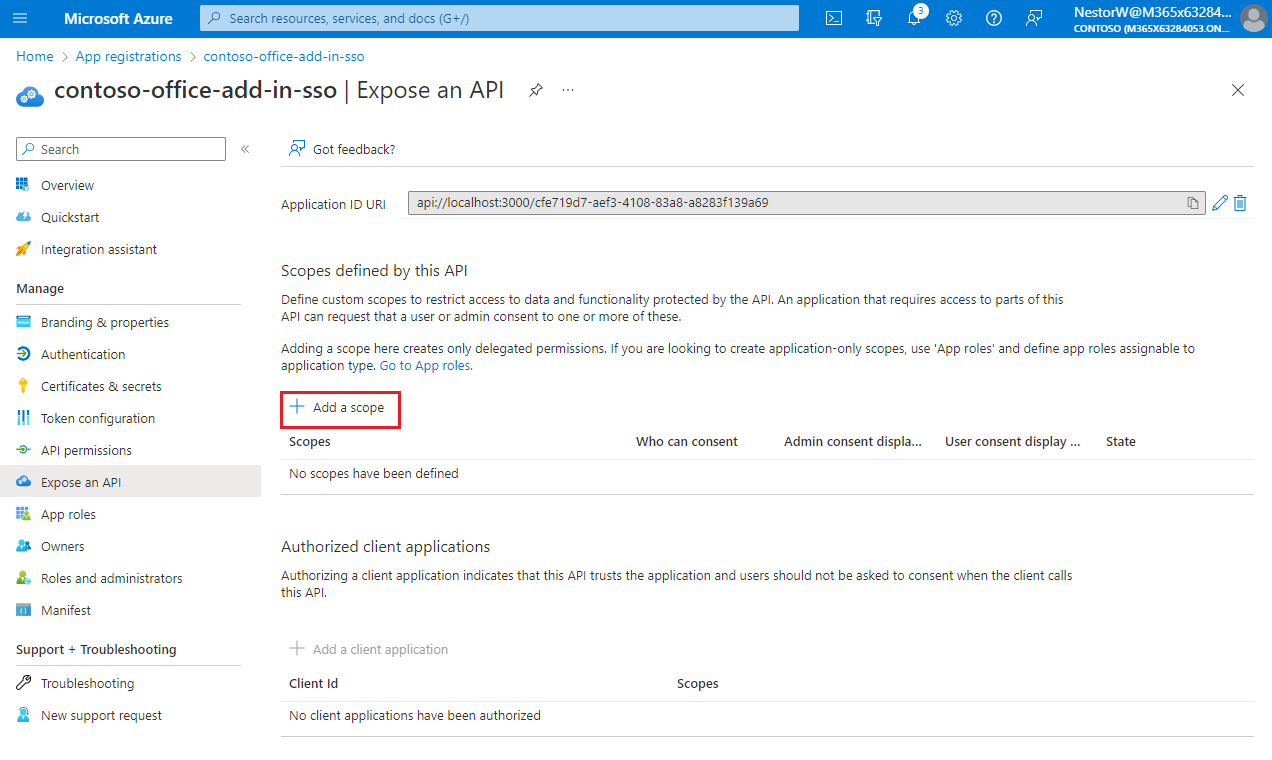
The Add a scope pane opens.
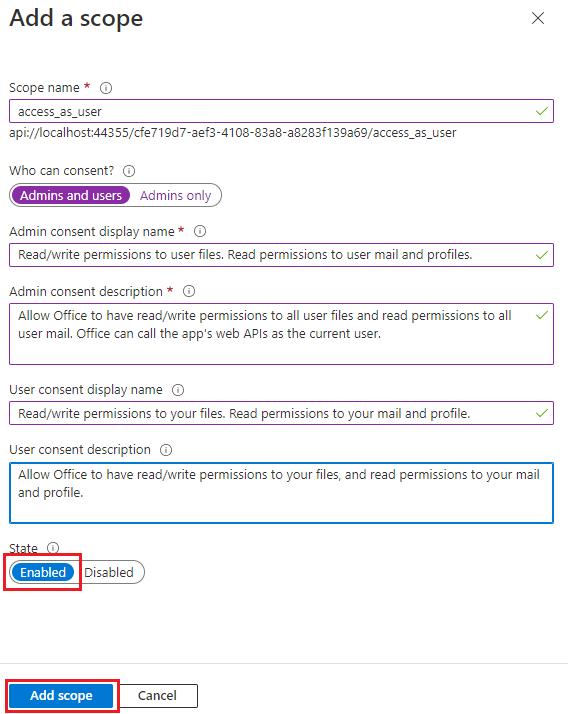
In the Add a scope pane, specify the scope's attributes. The following table shows example values for and Outlook add-in requiring the
profile,openid,Files.ReadWrite, andMail.Readpermissions. Modify the text to match the permissions your add-in needs.Field Description Values Scope name The name of your scope. A common scope naming convention is resource.operation.constraint.For SSO this must be set to access_as_user.Who can consent Determines if admin consent is required or if users can consent without an admin approval. For learning SSO and samples, we recommend you set this to Admins and users.
Select Admins only for higher-privileged permissions.Admin consent display name A short description of the scope's purpose visible to admins only. Read/write permissions to user files. Read permissions to user mail and profiles.Admin consent description A more detailed description of the permission granted by the scope that only admins see. Allow Office to have read/write permissions to all user files and read permissions to all user mail. Office can call the app's web APIs as the current user.User consent display name A short description of the scope's purpose. Shown to users only if you set Who can consent to Admins and users. Read/write permissions to your files. Read permissions to your mail and profile.User consent description A more detailed description of the permission granted by the scope. Shown to users only if you set Who can consent to Admins and users. Allow Office to have read/write permissions to your files, and read permissions to your mail and profile.Set the State to Enabled, and then select Add scope.
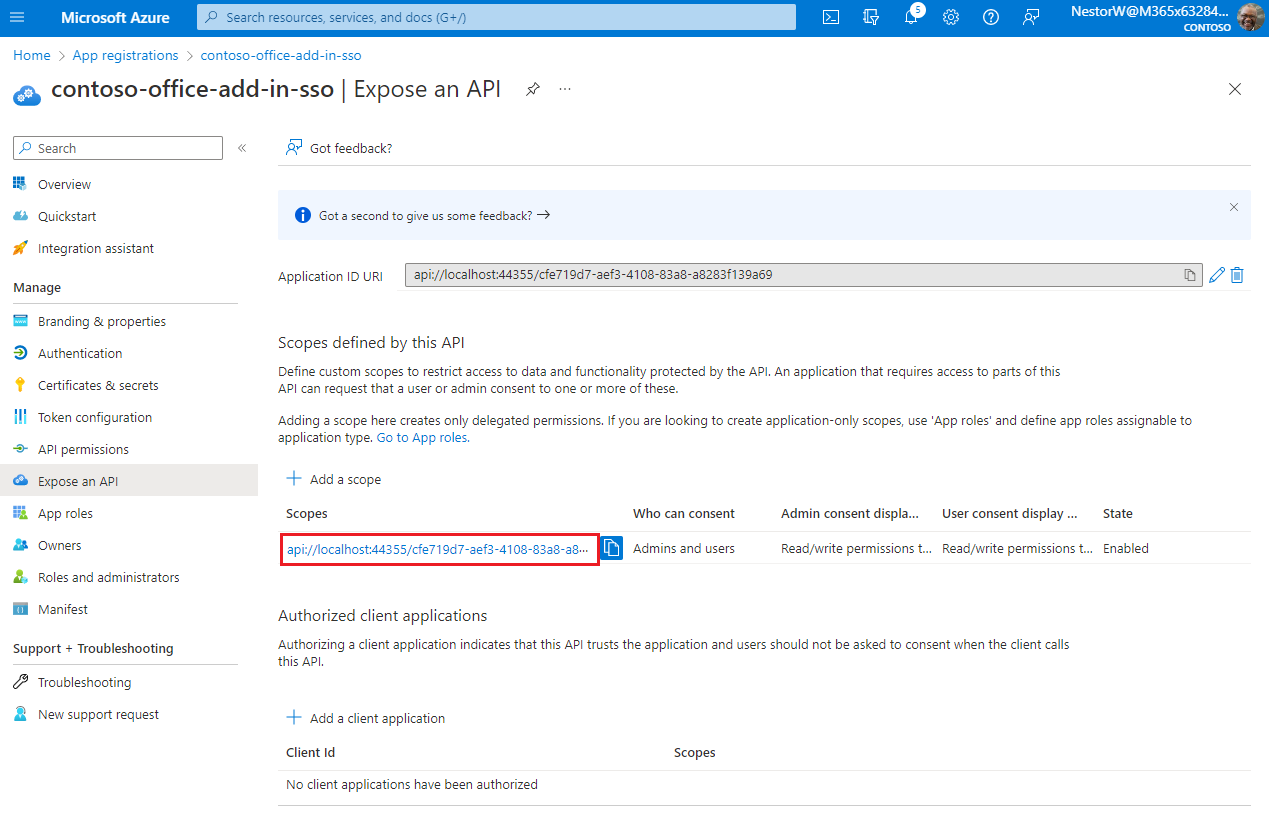
The new scope you defined displays on the pane.
Note
The domain part of the Scope name displayed just below the text field should automatically match the Application ID URI set in the previous step, with
/access_as_userappended to the end; for example,api://localhost:6789/c6c1f32b-5e55-4997-881a-753cc1d563b7/access_as_user.Select Add a client application.
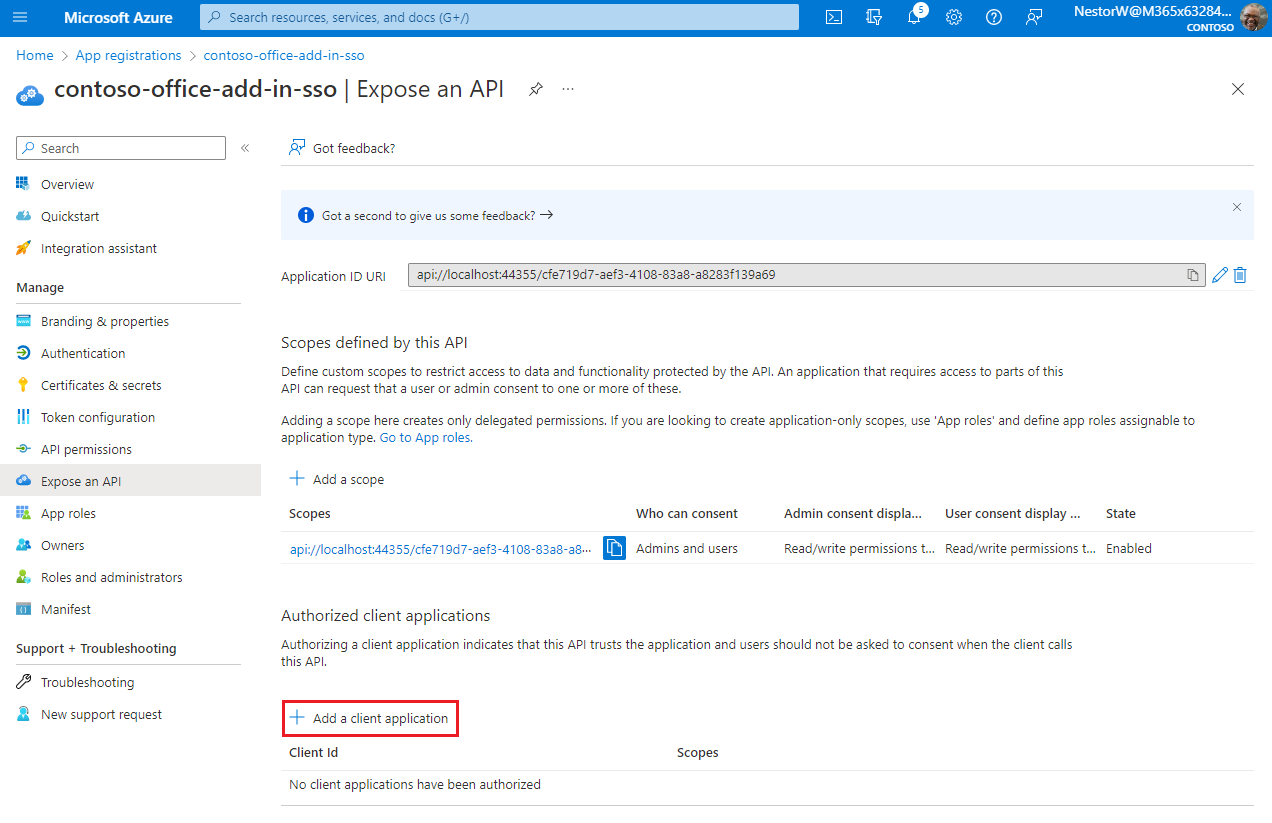
The Add a client application pane appears.
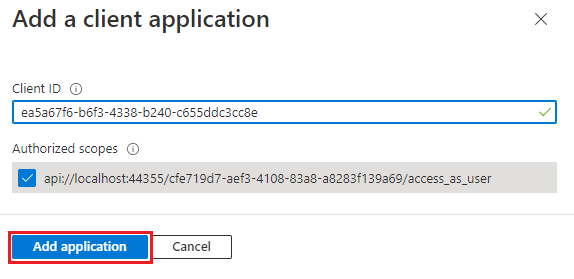
In the Client ID enter
ea5a67f6-b6f3-4338-b240-c655ddc3cc8e. This value pre-authorizes all Microsoft Office application endpoints. If you also want to pre-authorize Office when used inside of Microsoft Teams, add1fec8e78-bce4-4aaf-ab1b-5451cc387264(Microsoft Teams desktop and Teams mobile) and5e3ce6c0-2b1f-4285-8d4b-75ee78787346(Teams on the web).Note
The
ea5a67f6-b6f3-4338-b240-c655ddc3cc8eID pre-authorizes Office on all the following platforms. Alternatively, you can enter a proper subset of the following IDs if, for any reason, you want to deny authorization to Office on some platforms. If you do so, leave out the IDs of the platforms from which you want to withhold authorization. Users of your add-in on those platforms will not be able to call your Web APIs, but other functionality in your add-in will still work.d3590ed6-52b3-4102-aeff-aad2292ab01c(Microsoft Office)93d53678-613d-4013-afc1-62e9e444a0a5(Office on the web)bc59ab01-8403-45c6-8796-ac3ef710b3e3(Outlook on the web)
In Authorized scopes, select the
api://<fully-qualified-domain-name>/<app-id>/access_as_usercheckbox.Select Add application.
Add Microsoft Graph permissions
From the left pane, select API permissions.
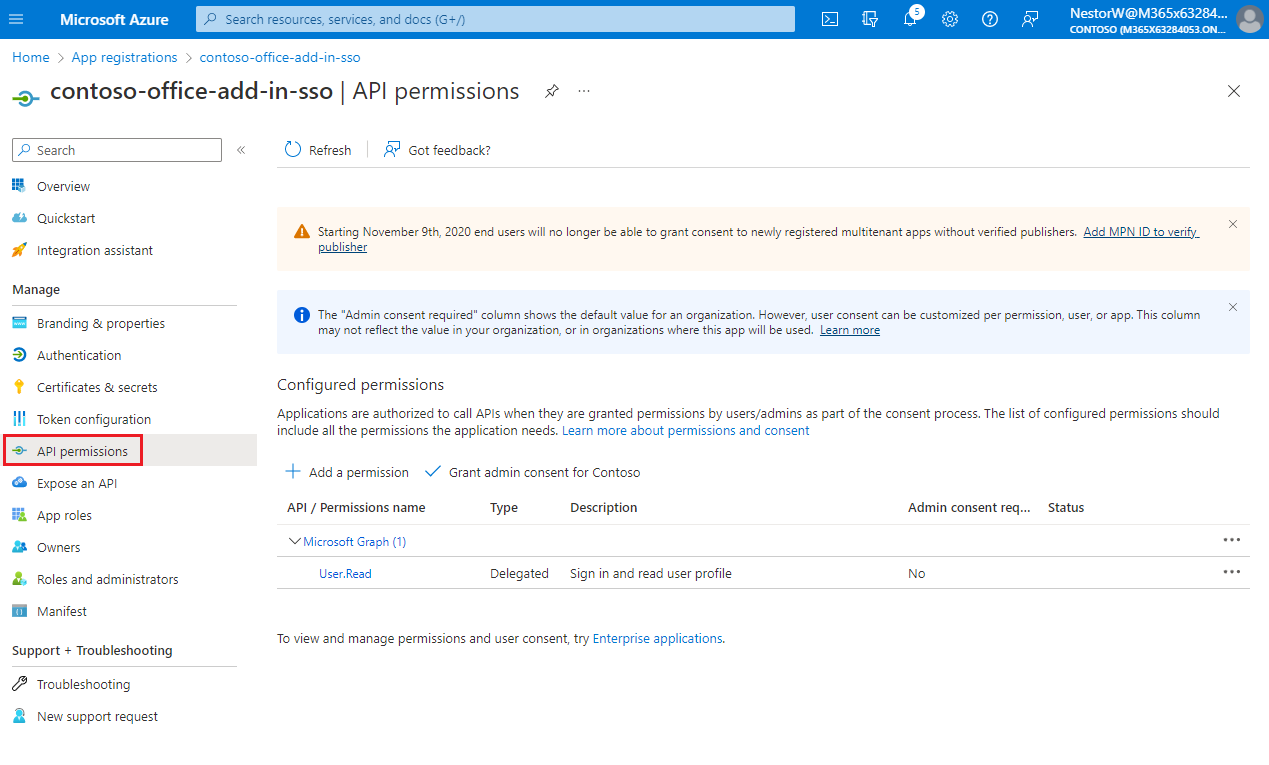
The API permissions pane opens.
Select Add a permission.
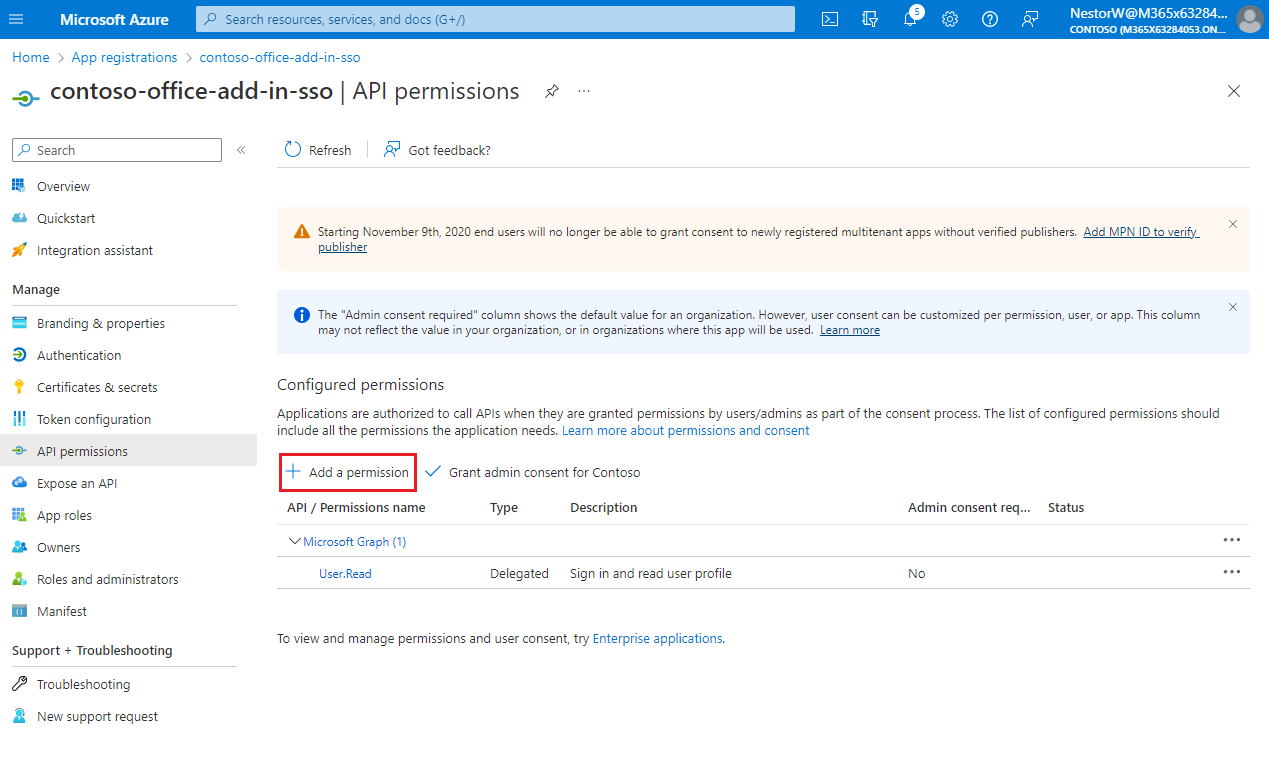
The Request API permissions pane opens.
Select Microsoft Graph.
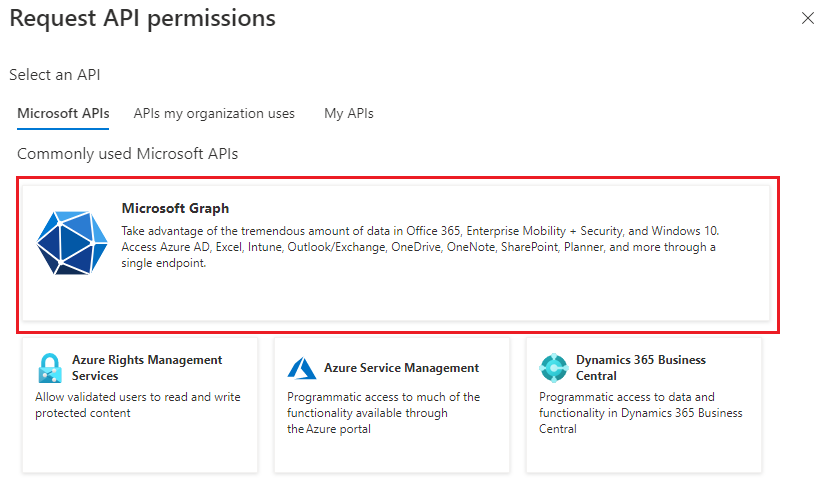
Select Delegated permissions.

In the Select permissions search box, search for the permissions your add-in needs. For example, for an Outlook add-in, you might use
profile,openid,Files.ReadWrite, andMail.Read.Note
The
User.Readpermission may already be listed by default. It's a good practice to only request permissions that are needed, so we recommend that you uncheck the box for this permission if your add-in doesn't actually need it.Select the checkbox for each permission as it appears. Note that the permissions will not remain visible in the list as you select each one. After selecting the permissions that your add-in needs, select Add permissions.
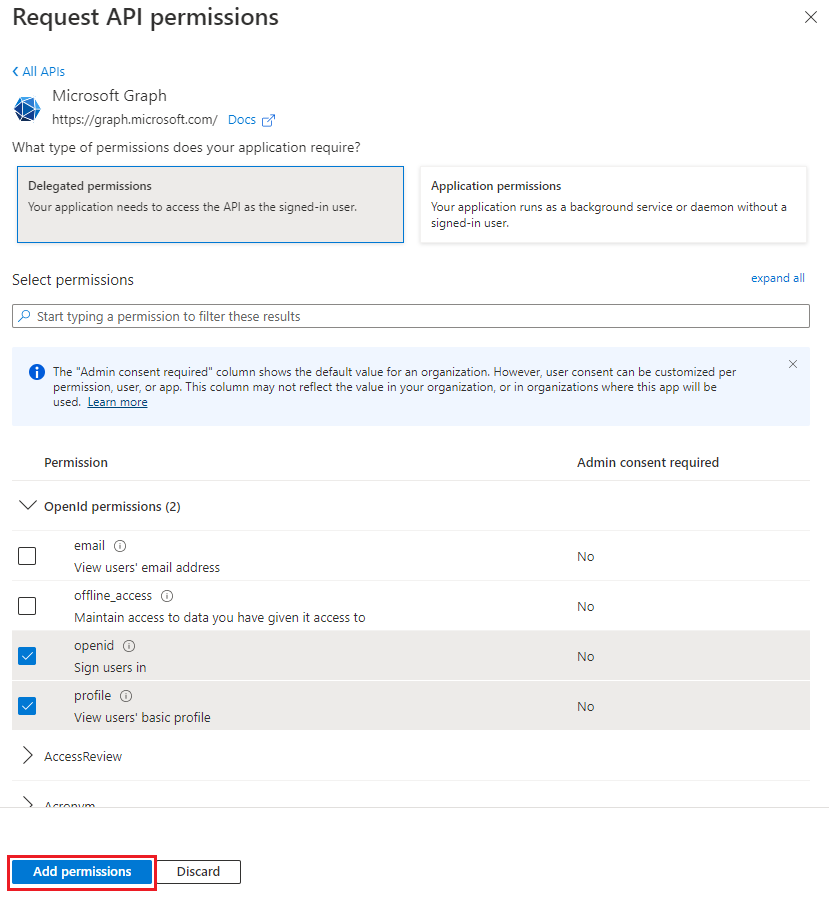
Select Grant admin consent for [tenant name]. Select Yes for the confirmation that appears.
Configure access token version
You must define the access token version that is acceptable for your app. This configuration is made in the Microsoft Entra ID application manifest.
Define the access token version
The access token version can change if you chose an account type other than Accounts in any organizational directory (Any Azure AD directory - Multitenant) and personal Microsoft accounts (e.g. Skype, Xbox). Use the following steps to ensure the access token version is correct for Office SSO usage.
From the left pane, select Manifest.
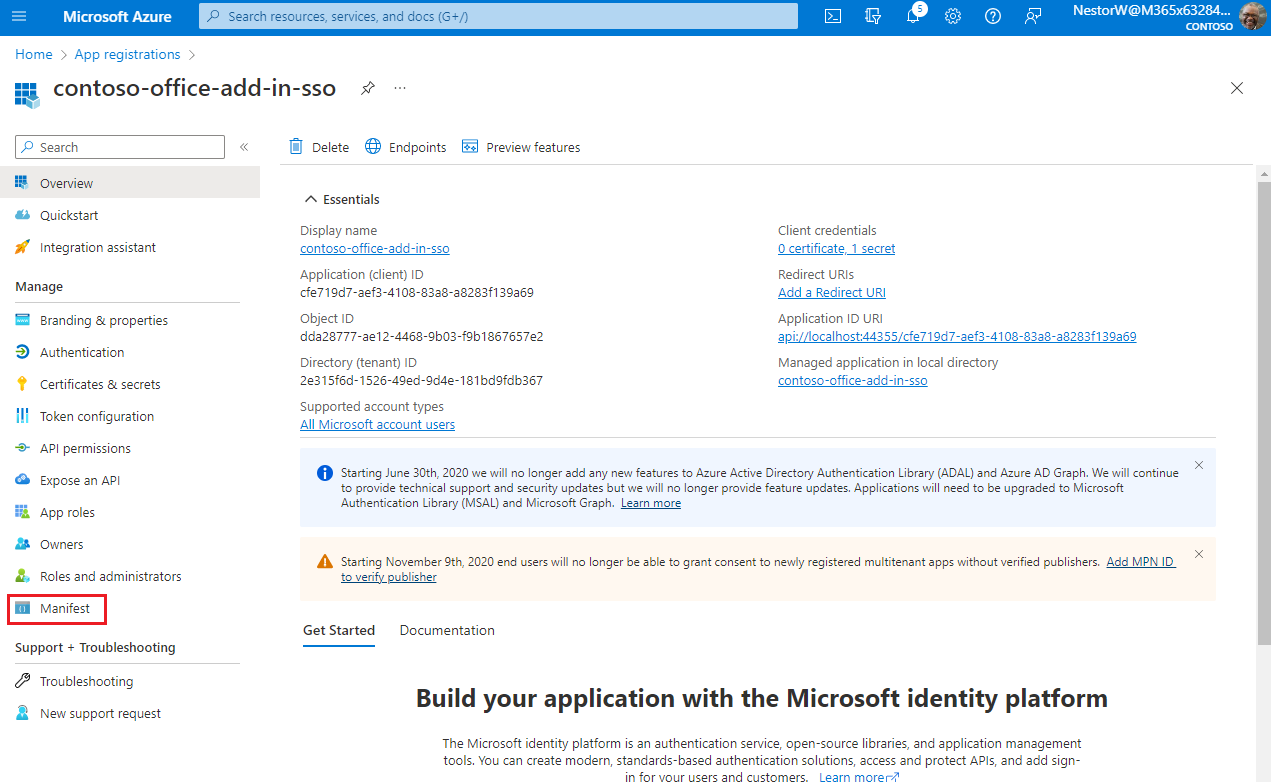
The Microsoft Entra ID application manifest appears.
Enter 2 as the value for the
requestedAccessTokenVersionproperty (in theapiobject).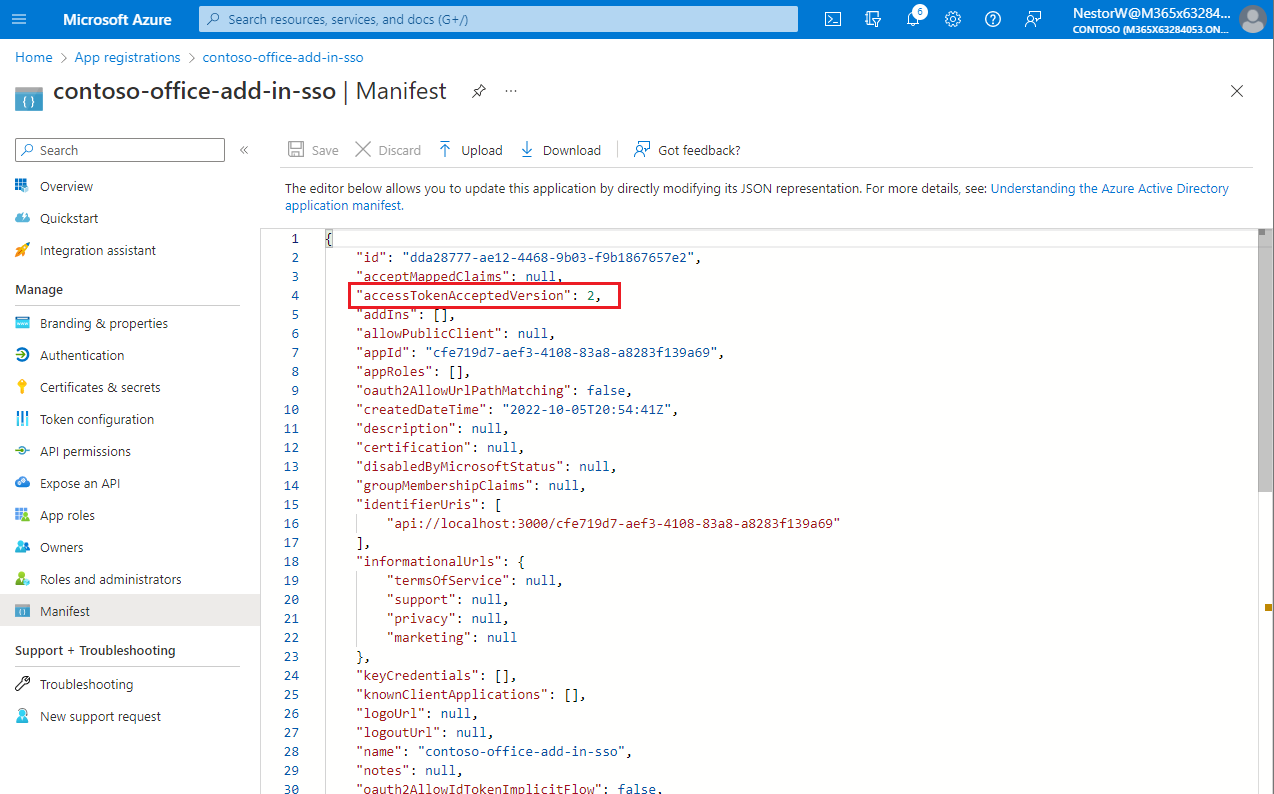
Select Save.
A message pops up on the browser stating that the manifest was updated successfully.

Congratulations! You've completed the app registration to enable SSO for your Office add-in.
Configure the add-in
Open the
\Beginfolder in the cloned project in your code editor.Open the
.ENVfile and use the values that you copied earlier from the Office-Add-in-NodeJS-SSO app registration. Set the values as follows:Name Value CLIENT_ID Application (client) ID from app registration overview page. CLIENT_SECRET Client secret saved from Certificates & Secrets page. The values should not be in quotation marks. When you are done, the file should be similar to the following:
CLIENT_ID=8791c036-c035-45eb-8b0b-265f43cc4824
CLIENT_SECRET=X7szTuPwKNts41:-/fa3p.p@l6zsyI/p
NODE_ENV=development
SERVER_SOURCE=<https://localhost:3000>
Open the add-in manifest file "manifest\manifest_local.xml" and then scroll to the bottom of the file. Just above the
</VersionOverrides>end tag, you'll find the following markup.<WebApplicationInfo> <Id>$app-id-guid$</Id> <Resource>api://localhost:3000/$app-id-guid$</Resource> <Scopes> <Scope>Files.Read</Scope> <Scope>profile</Scope> <Scope>openid</Scope> </Scopes> </WebApplicationInfo>Replace the placeholder "$app-id-guid$" in both places in the markup with the Application ID that you copied when you created the Office-Add-in-NodeJS-SSO app registration. The "$" symbols are not part of the ID, so don't include them. This is the same ID you used for the CLIENT_ID in the .ENV file.
Note
The
<Resource>value is the Application ID URI you set when you registered the add-in. The<Scopes>section is used only to generate a consent dialog box if the add-in is sold through Microsoft Marketplace.Open the
\public\javascripts\fallback-msal\authConfig.jsfile. Replace the placeholder "$app-id-guid$" with the application ID that you saved from the Office-Add-in-NodeJS-SSO app registration you created previously.Save the changes to the file.
Code the client-side
Call our web server REST API
In your code editor, open the file
public\javascripts\ssoAuthES6.js. It already has anOffice.onReadycall to assign a handler to the add-in's only button.In the
getFileNameListfunction, replaceTODO 1with the following code. About this code, note:- The function
getFileNameListis called when the user chooses the Get OneDrive File Names button on the task pane. - It calls the
callWebServerAPIfunction specifying which REST API to call. This returns JSON containing a list of file names from the user's OneDrive. - The JSON is passed to the
writeFileNamesToOfficeDocumentfunction to list the file names in the document.
try { const jsonResponse = await callWebServerAPI('GET', '/getuserfilenames'); if (jsonResponse === null) { // Null is returned when a message was displayed to the user // regarding an authentication error that cannot be resolved. return; } await writeFileNamesToOfficeDocument(jsonResponse); showMessage('Your OneDrive filenames are added to the document.'); } catch (error) { console.log(error.message); showMessage(error.message); }- The function
In the
callWebServerAPIfunction, replaceTODO 2with the following code. About this code, note:- The function calls
getAccessTokenwhich is our own function that encapsulates using Office SSO or MSAL fallback as necessary to get the token. If it returns a null token, a message was shown for an auth error condition that cannot be resolved, so the function also returns null. - The function uses the
fetchAPI to call the web server and if successful, returns the JSON body.
const accessToken = await getAccessToken(authSSO); if (accessToken === null) { return null; } const response = await fetch(path, { method: method, headers: { 'Content-Type': 'application/json', 'Authorization': 'Bearer ' + accessToken, }, }); // Check for success condition: HTTP status code 2xx. if (response.ok) { return response.json(); }- The function calls
In the
callWebServerAPIfunction, replaceTODO 3with the following code. About this code, note:- This code handles the scenario where the SSO token expired. If so we need to call
Office.auth.getAccessTokento get a refreshed token. The simplest way is to make a recursive call which results in a new call toOffice.auth.getAccessToken. TheretryRequestparameter ensures the recursive call is only attempted once. - The
TokenExpiredErrorstring is set by our web server whenever it detects an expired token.
// Check for fail condition: Is SSO token expired? If so, retry the call which will get a refreshed token. const jsonBody = await response.json(); if ( authSSO === true && jsonBody != null && jsonBody.type === 'TokenExpiredError' ) { if (!retryRequest) { return callWebServerAPI(method, path, true); // Try the call again. The underlying call to Office JS getAccessToken will refresh the token. } else { // Indicates a second call to retry and refresh the token failed. authSSO = false; return callWebServerAPI(method, path, true); // Try the call again, but now using MSAL fallback auth. } }- This code handles the scenario where the SSO token expired. If so we need to call
In the
callWebServerAPIfunction, replaceTODO 4with the following code. About this code, note:- The
Microsoft Graphstring is set by our web server whenever a Microsoft Graph call fails.
// Check for fail condition: Did we get a Microsoft Graph API error, which is returned as bad request (403)? if (response.status === 403 && jsonBody.type === 'Microsoft Graph') { throw new Error('Microsoft Graph error: ' + jsonBody.errorDetails); }- The
In the
callWebServerAPIfunction, replaceTODO 5with the following code.// Handle other errors. throw new Error( 'Unknown error from web server: ' + JSON.stringify(jsonBody) );In the
getAccessTokenfunction, replaceTODO 6with the following code. About this code, note:authSSOtracks if we are using SSO, or using MSAL fallback. If SSO is used, the function callsOffice.auth.getAccessTokenand returns the token.- Errors are handled by the
handleSSOErrorsfunction which will return a token if it switches to fallback MSAL authentication. - Fallback authentication uses the MSAL library to sign in the user. The add-in itself is an SPA, and uses an SPA app registration to access the web server.
if (authSSO) {
    try {
        // Get the access token from Office host using SSO.
        // Note that Office.auth.getAccessToken modifies the options parameter. Create a copy of the object
        // to avoid modifying the original object.
        const options = JSON.parse(JSON.stringify(ssoOptions));
        const token = await Office.auth.getAccessToken(options);
        return token;
    } catch (error) {
        console.log(error.message);
        return handleSSOErrors(error);
    }
} else {
    // Get access token through MSAL fallback.
    try {
        const accessToken = await getAccessTokenMSAL();
        return accessToken;
    } catch (error) {
        console.log(error);
        throw new Error(
            'Cannot get access token. Both SSO and fallback auth failed. ' +
                error
        );
    }
}
In the
handleSSOErrorsfunction, replaceTODO 7with the following code. For more information about these errors, see Troubleshoot SSO in Office Add-ins.switch (error.code) { case 13001: // No one is signed into Office. If the add-in cannot be effectively used when no one // is logged into Office, then the first call of getAccessToken should pass the // `allowSignInPrompt: true` option. Since this sample does that, you should not see // this error. showMessage( 'No one is signed into Office. But you can use many of the add-ins functions anyway. If you want to log in, press the Get OneDrive File Names button again.' ); break; case 13002: // The user aborted the consent prompt. If the add-in cannot be effectively used when consent // has not been granted, then the first call of getAccessToken should pass the `allowConsentPrompt: true` option. showMessage( 'You can use many of the add-ins functions even though you have not granted consent. If you want to grant consent, press the Get OneDrive File Names button again.' ); break; case 13006: // Only seen in Office on the web. showMessage( 'Office on the web is experiencing a problem. Please sign out of Office, close the browser, and then start again.' ); break; case 13008: // Only seen in Office on the web. showMessage( 'Office is still working on the last operation. When it completes, try this operation again.' ); break; case 13010: // Only seen in Office on the web. showMessage( "Follow the instructions to change your browser's zone configuration." ); break;Replace
TODO 8with the following code. For any errors that can't be handled the code switches to fallback authentication using MSAL.default: //recursive call. // For all other errors, including 13000, 13003, 13005, 13007, 13012, and 50001, fall back // to MSAL sign-in. showMessage('SSO failed. Trying fallback auth.'); authSSO = false; return getAccessToken(false); } return null; // Return null for errors that show a message to the user.
Code the web server REST API
The web server provides REST APIs for the client to call. For example, the REST API /getuserfilenames gets a list of filenames from the user's OneDrive folder. Each REST API call requires an access token by the client to ensure the correct client is accessing their data. The access token is exchanged for a Microsoft Graph token through the On-Behalf-Of flow (OBO). The new Microsoft Graph token is cached by the MSAL library for subsequent API calls. It's never sent outside of the web server. For more information, see Middle-tier access token request
Create the route and implement On-Behalf-Of flow
Open the file
routes\getFilesRoute.jsand replaceTODO 9with the following code. About this code, note:- It calls
authHelper.validateJwt. This ensures the access token is valid and hasn't been tampered with. - For more information, see Validating tokens.
router.get( "/getuserfilenames", authHelper.validateJwt, async function (req, res) { // TODO 10: Exchange the access token for a Microsoft Graph token // by using the OBO flow. } );- It calls
Replace
TODO 10with the following code. About this code, note:- It only requests the minimum scopes it needs, such as
files.read. - It uses the MSAL
authHelperto perform the OBO flow in the call toacquireTokenOnBehalfOf.
try { const authHeader = req.headers.authorization; let oboRequest = { oboAssertion: authHeader.split(' ')[1], scopes: ["files.read"], }; // The Scope claim tells you what permissions the client application has in the service. // In this case we look for a scope value of access_as_user, or full access to the service as the user. const tokenScopes = jwt.decode(oboRequest.oboAssertion).scp.split(' '); const accessAsUserScope = tokenScopes.find( (scope) => scope === 'access_as_user' ); if (!accessAsUserScope) { res.status(401).send({ type: "Missing access_as_user" }); return; } const cca = authHelper.getConfidentialClientApplication(); const response = await cca.acquireTokenOnBehalfOf(oboRequest); // TODO 11: Call Microsoft Graph to get list of filenames. } catch (err) { // TODO 12: Handle any errors. }- It only requests the minimum scopes it needs, such as
Replace
TODO 11with the following code. About this code, note:- It constructs the URL for the Microsoft Graph API call and then makes the call via the
getGraphDatafunction. - It returns errors by sending an HTTP 500 response along with details.
- On success it returns the JSON with the filename list to the client.
// Minimize the data that must come from MS Graph by specifying only the property we need ("name") // and only the top 10 folder or file names. const rootUrl = '/me/drive/root/children'; // Note that the last parameter, for queryParamsSegment, is hardcoded. If you reuse this code in // a production add-in and any part of queryParamsSegment comes from user input, be sure that it is // sanitized so that it cannot be used in a Response header injection attack. const params = '?$select=name&$top=10'; const graphData = await getGraphData( response.accessToken, rootUrl, params ); // If Microsoft Graph returns an error, such as invalid or expired token, // there will be a code property in the returned object set to a HTTP status (e.g. 401). // Return it to the client. On client side it will get handled in the fail callback of `makeWebServerApiCall`. if (graphData.code) { res .status(403) .send({ type: "Microsoft Graph", errorDetails: "An error occurred while calling the Microsoft Graph API.\n" + graphData, }); } else { // MS Graph data includes OData metadata and eTags that we don't need. // Send only what is actually needed to the client: the item names. const itemNames = []; const oneDriveItems = graphData["value"]; for (let item of oneDriveItems) { itemNames.push(item["name"]); } res.status(200).send(itemNames); } // TODO 12: Check for expired token.- It constructs the URL for the Microsoft Graph API call and then makes the call via the
Replace
TODO 12with the following code. This code specifically checks if the token expired because the client can request a new token and call again.} catch (err) { // On rare occasions the SSO access token is unexpired when Office validates it, // but expires by the time it is used in the OBO flow. Microsoft identity platform will respond // with "The provided value for the 'assertion' is not valid. The assertion has expired." // Construct an error message to return to the client so it can refresh the SSO token. if (err.errorMessage.indexOf('AADSTS500133') !== -1) { res.status(401).send({ type: "TokenExpiredError", errorDetails: err }); } else { res.status(403).send({ type: "Unknown", errorDetails: err }); } }
The sample must handle both fallback authentication through MSAL and SSO authentication through Office. The sample will try SSO first, and the authSSO boolean at the top of the file tracks if the sample is using SSO or has switched to fallback auth.
Run the project
Ensure that you have some files in your OneDrive so that you can verify the results.
Open a command prompt in the root of the
\Beginfolder.Run the command
npm installto install all package dependencies.Run the command
npm startto start the middle-tier server.You need to sideload the add-in into an Office application (Excel, Word, or PowerPoint) to test it. The instructions depend on your platform. There are links to instructions at Sideload an Office Add-in for Testing.
In the Office application, on the Home ribbon, select the Show Add-in button in the SSO Node.js group to open the task pane add-in.
Click the Get OneDrive File Names button. If you're logged into Office with either a Microsoft 365 Education or work account, or a Microsoft account, and SSO is working as expected the first 10 file and folder names in your OneDrive for Business are inserted into the document. (It may take as much as 15 seconds the first time.) If you're not logged in, or you're in a scenario that doesn't support SSO, or SSO isn't working for any reason, you'll be prompted to sign in. After you sign in, the file and folder names appear.
Note
If you were previously signed into Office with a different ID, and some Office applications that were open at the time are still open, Office may not reliably change your ID even if it appears to have done so. If this happens, the call to Microsoft Graph may fail or data from the previous ID may be returned. To prevent this, be sure to close all other Office applications before you press Get OneDrive File Names.
Stop running the project
When you're ready to stop the middle-tier server and uninstall the add-in, follow these instructions:
Run the following command to stop the middle-tier server.
npm stopTo uninstall or remove the add-in, see the specific sideload article you used for details.
Security notes
The
/getuserfilenamesroute ingetFilesroute.jsuses a literal string to compose the call for Microsoft Graph. If you change the call so that any part of the string comes from user input, sanitize the input so that it cannot be used in a Response header injection attack.In
app.jsthe following content security policy is in place for scripts. You may want to specify additional restrictions depending on your add-in security needs."Content-Security-Policy": "script-src https://appsforoffice.microsoft.com https://ajax.aspnetcdn.com https://alcdn.msauth.net " + process.env.SERVER_SOURCE,
Always follow security best practices in the Microsoft identity platform documentation.
Office Add-ins