Plan an Azure Application offer
Azure Application is the offer type to sell and deploy solutions hosted in your customer's Azure tenant. Azure applications automate the deployment and configuration of your application by using Azure Resource Manager (ARM) template to include VMs, containers, networking, storage, and many other Azure resources. Azure Application offers can be configured as Solution Templates or Managed Applications:
Managed applications plans are transactable in the commercial marketplace and can be managed by the publisher or the customer. When managed by the publisher, an identity in the publisher's tenant has access to the resource group in the customer subscription. Customer access can be fully enabled or restricted by using deny assignments and allowed actions.
Solution templates aren't transactable in the commercial marketplace, but they can be used to deploy paid VM offers that are billed through the commercial marketplace. Use the solution template plan type when your solution uses an ARM template for deployment and isn't transacted via Marketplace. An Azure application offer can include multiple plans and plan types.
Note
Pricing for your Managed Application using the per-month or metered billing price must only account for the management fee (and may not be used for IP/software costs, Azure infrastructure, or add-ons. Use the underlying virtual machine or container offer to transact IP/software costs.
Listing options
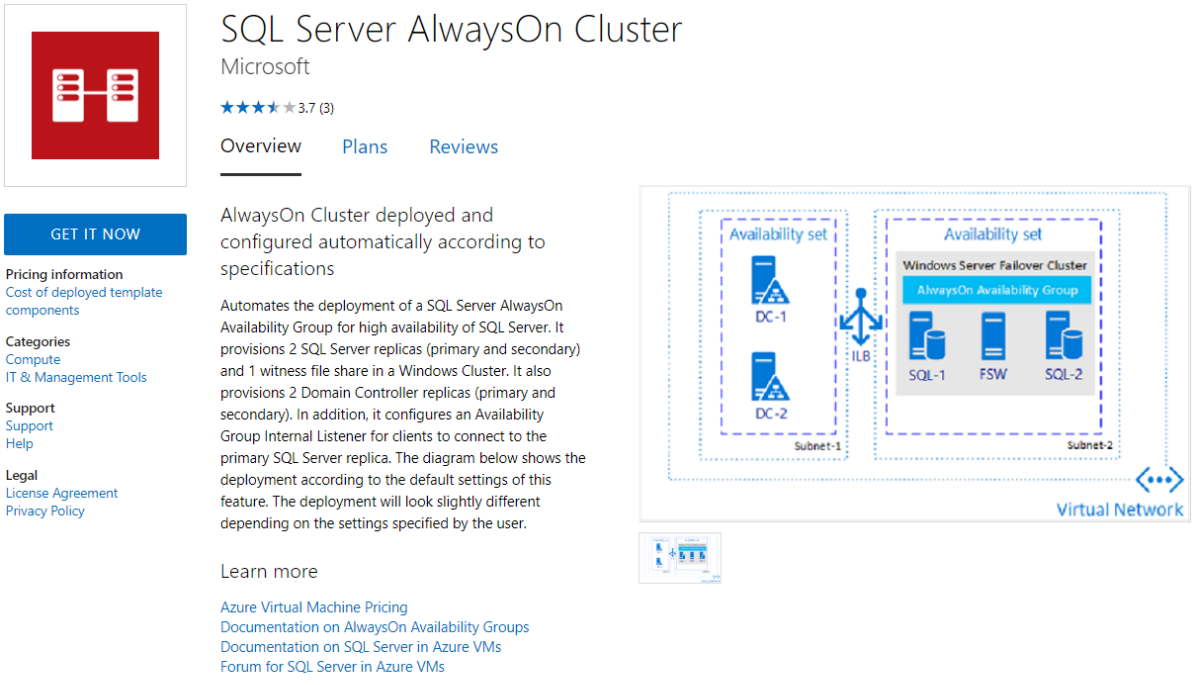
After your offer is published, the listing options for your offer appear as a button in the upper-left corner of your offer's listing page. For example, the following screenshot shows an offer listing page in Azure Marketplace with the Get It Now button.
Customer leads
The commercial marketplace collects leads with customer information so you can access them in the Referrals workspace in Partner Center. Leads include information such as customer details along with the offer name, ID, and online store where the customer found your offer.
You can also choose to connect your CRM system to your offer. The commercial marketplace supports Dynamics 365, Marketo, and Salesforce, along with the option to use an Azure table or configure an HTTPS endpoint using Power Automate. For detailed guidance, see Customer leads from your commercial marketplace offer.
Categories and subcategories
You can choose at least one and up to two categories for grouping your offer into the appropriate commercial marketplace search areas. You can choose up to two subcategories for each primary and secondary category. For a full list of categories and subcategories, see Offer Listing Best Practices.
Legal contracts
To simplify the procurement process for customers and reduce legal complexity for software vendors, Microsoft offers a standard contract you can use for your offers in the commercial marketplace. When you offer your software under the standard contract, customers only need to read and accept it one time, and you don't have to create custom terms and conditions.
If you choose to use the standard contract, you can add universal amendment terms and up to 10 custom amendments to the standard contract. You can also use your own terms and conditions instead of the standard contract. You'll manage these details in the Properties page. For detailed information, see Standard contract for Microsoft commercial marketplace.
Note
After you publish an offer using the standard contract for the commercial marketplace, you can't use your own custom terms and conditions. It is an "or" scenario. You either offer your solution under the standard contract or your own terms and conditions. If you want to modify the terms of the standard contract you can do so through Standard Contract Amendments.
Offer listing details
When you create a new Azure Application offer in Partner Center, you'll enter text, images, optional videos, and other details on the Offer listing page. Customers see this information when they discover your offer listing in Azure Marketplace, as shown in the following example.
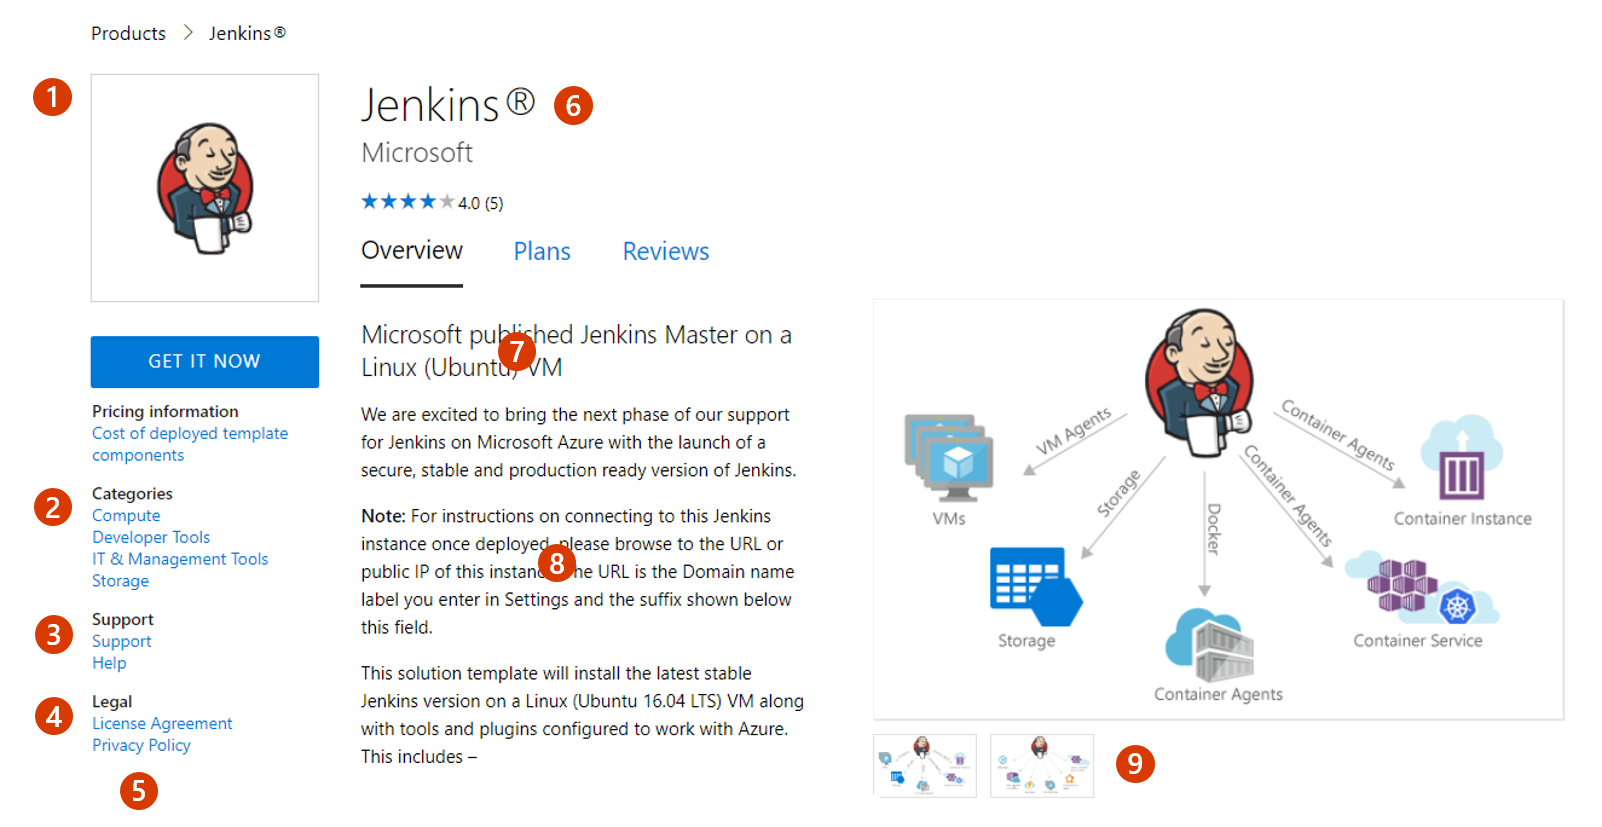
Call-out descriptions
- Logo
- Categories
- Support address (link)
- Terms of use
- Privacy policy address (link)
- Offer name
- Summary
- Description
- Screenshots/videos
The following screenshot shows how offer information appears in the Azure portal:

Call-out descriptions
- Title
- Description
- Useful links
- Screenshots
Note
Offer listing content isn't required to be in English if the offer description begins with the phrase "This application is available only in [non-English language]".
To help create your offer more easily, prepare some of these items ahead of time. The following items are required unless otherwise noted.
Name: This name appears as the title of your offer listing in the commercial marketplace. The name can be trademarked. It can't contain emojis (unless they're the trademark and copyright symbols) and must be limited to 200 characters.
Search results summary: Describe the purpose or function of your offer as a single sentence, in plain text with no line breaks, in 100 characters or less. This summary is used in the commercial marketplace listing search results.
Short description: Provide up to 256 characters of plain text. This summary appears on your offer's details page.
Description: This description displays in the Azure Marketplace listing overview. Consider including a value proposition, key benefits, intended user base, any category or industry associations, in-app purchase opportunities, the customer need or pain that the offer addresses, any required disclosures, and a link to learn more.
This text box has rich text editor controls that you can use to make your description more engaging. You can also use HTML tags to format your description. You can enter up to 5,000 characters of text in this box, which includes HTML markup and spaces. For more tips, see Write a great app description and HTML tags supported in the commercial marketplace offer descriptions.
Search keywords (optional): Provide up to three search keywords that customers can use to find your offer in the online store. For best results, also use these keywords in your description. You don't need to include the offer Name and Description. That text is automatically included in search.
Privacy policy link: The URL for your company's privacy policy. You must provide a valid privacy policy and are responsible for ensuring your app complies with privacy laws and regulations.
Useful links (optional): You can provide links to various resources for users of your offer. For example, forums, FAQs, and release notes.
Contact information: You must designate the following contacts from your organization:
- Support contact: Provide the name, phone, and email for Microsoft partners to use when your customers open tickets. You must also include the URL for your support website.
- Engineering contact: Provide the name, phone, and email for Microsoft to use directly when there are problems with your offer. This contact information isn't listed in the commercial marketplace.
- CSP Program contact (optional): Provide the name, phone, and email if you opt in to the Cloud Solution Provider (CSP) program, so those partners can contact you with any questions. You can also include a URL to your marketing materials.
Media – Logos: Provide a PNG file for the Large size logo. Partner Center uses this to create a Small and a Medium logo. You can optionally replace logo files later.
- Large (from 216x216 to 350x350 px, required).
- Medium (90x90 px, optional).
- Small (48x48 px, optional).
These logos are used in different places in the online stores:
- The Small logo appears in Azure Marketplace search results.
- The Medium logo appears when you create a new resource in Microsoft Azure.
- The Large logo appears on your offer listing page in Azure Marketplace.
Follow these guidelines for your logos:
- The Azure design has a simple color palette. Limit the number of primary and secondary colors on your logo.
- The theme colors of the portal are white and black. Don't use these colors as the background color for your logo. Use a color that makes your logo prominent in the portal. We recommend simple primary colors.
- If you use a transparent background, make sure that the logo and text aren't white, black, or blue.
- The look and feel of your logo should be flat and avoid gradients in the logo or background. Don't place text on the logo, not even your company or brand name. Blurry images will cause your submission to be rejected.
- Make sure the logo isn't stretched.
Media - Screenshots (optional): We recommend that you add screenshots that show how your offer works. You can add up to five screenshots with the following requirements that show how your offer works:
- 1280x720 pixels
- .PNG file
- Must include a caption
Media – Videos (optional): You can add up to five videos with the following requirements that demonstrate your offer:
- Name.
- URL: Must be hosted on YouTube or Vimeo only.
- Thumbnail: 1280x720 .PNG file
Note
Your offer must meet the general commercial marketplace certification policies to be published to the commercial marketplace.
Preview audience
A preview audience can access your offer before being published live in the online stores in order to test the end-to-end functionality before you publish it live.
Note
A preview audience differs from a private plan. A private plan is one you make available only to a specific audience you choose. This enables you to negotiate a custom plan with specific customers.
You define the preview audience using Azure subscription IDs, along with an optional description for each. Neither of these fields can be seen by customers.
Technical configuration
For managed applications that emit metering events using the Marketplace metering service APIs, you must provide the identity that your service uses when emitting metering events.
For managed applications that emit metering events using the Marketplace metering service APIs, you must provide the identity that your service uses when emitting metering events.
- Microsoft Entra tenant ID (required): Inside the Azure portal, you must create a Microsoft Entra app so we can validate the connection between our two services is behind an authenticated communication. To find the tenant ID for your Microsoft Entra app, to the App registrations pane in your Microsoft Entra ID. In the Display name column, select the app. Then look for Properties, and then for the Directory (tenant) ID (for example
50c464d3-4930-494c-963c-1e951d15360e). - Microsoft Entra application ID (required): You also need your application ID and an authentication key. To find your application ID, go to the App registrations pane in your Microsoft Entra ID. In the Display name column, select the app and then look for the Application (client) ID (for example
50c464d3-4930-494c-963c-1e951d15360e). To find the authentication key, go to Settings and select Keys. You need to provide a description and duration and will then be provided a number value.
Note
The Azure application ID will be associated to your publisher ID and can only be re-used within this publisher account.
More sales opportunities
You can choose to opt into Microsoft-supported marketing and sales channels. When creating your offer in Partner Center, you'll see two tabs toward the end of the process:
- Resell through CSPs: Use this option to allow Microsoft Cloud Solution Providers (CSP) partners to resell your solution as part of a bundled offer. To learn more, see Cloud Solution Provider program.
- Co-sell with Microsoft: This option lets Microsoft sales teams consider your IP co-sell eligible solution when evaluating their customers' needs. For detailed information on how to prepare your offer for evaluation, see Co-sell option in the commercial marketplace. For details about IP co-sell requirements, see Requirements for co-sell status. For more information about marketing your offer through the Microsoft CSP partner channels, see Cloud Solution Providers.
To learn more, see Grow your cloud business with Azure Marketplace.
Plans
Azure Application offers require at least one plan. A plan defines the solution scope and limits, and the associated pricing, if applicable. You can create multiple plans for your offer to give your customers different technical and pricing options.
For general guidance about plans, including pricing models, and private plans, see Plans and pricing for commercial marketplace offers. The following sections discuss more information specific to Azure Application plans.
Types of plans
Note
Pricing for your Managed Application using the per-month or metered billing price must only account for the management fee and may not be used for IP/software costs, Azure infrastructure, or add-ons). Use the underlying virtual machine or container offer to transact IP/software costs. There are two kinds of Azure application plans: solution template and managed application. Both plan types support automating the deployment and configuration of a solution beyond a single virtual machine (VM). You can automate the process of providing multiple resources, including VMs, networking, and storage resources to provide complex solutions, such as IaaS solutions. Both plan types can employ many different kinds of Azure resources, including but not limited to VMs.
Managed application plans enable you to sell managed services and deliver a solution via marketplace. Managed applications have the same capabilities as solution template plans, with some key differences:
The resources are deployed to a resource group that can be managed by the publisher. The resource group is present in the consumer's subscription, but an identity in the publisher's tenant has access to the resource group.
The publisher can configure the resource group to give customers full or restricted access to the resource group.
Monthly and Billing Metered Transactions are supported through the commercial marketplace. As a publisher you can use Private offers to create custom priced deals with custom durations and terms. To learn more, see Create a private offer for a customer.
- Use the managed application plan type to sell managed services deployed as Azure applications via marketplace or when you or your customer require that the solution is managed by a partner.
Solution template plans are one of the main ways to publish a solution in the commercial marketplace. Solution template plans aren't transactable in the commercial marketplace, but they can be used to deploy paid VM offers that are billed through the commercial marketplace. Use the solution template plan type when the customer will manage the solution and the transactions are billed through another plan. For more information about building solution templates, see What is Azure Resource Manager?
Usage of Azure Kubernetes Service (AKS) and containers in managed application
Solution templates: The Solution Template offers aren't changeable by the publisher after customer deployment. Therefore, containers and Azure Kubernetes Service (AKS) resources aren't currently supported for Solution templates.
Managed applications: To learn how to reference Container offers in a Managed application, see Reference Kubernetes Apps in Azure Apps.
Rules and known issues for AKS and containers in managed applications
- AKS Node Resource Group doesn't inherit the Deny Assignments as a part of the Azure Managed Application. This means the customer has full access to the AKS Node Resource Group that the AKS resource creates when it's included in the managed application while the Managed Resource Group will have the proper Deny Assignments.
Related content
- To plan a solution template, see Plan a solution template for an Azure application offer.
- To plan an Azure managed application, see Plan an Azure managed application for an Azure application offer.
Video tutorials and hands-on labs
Feedback
Coming soon: Throughout 2024 we will be phasing out GitHub Issues as the feedback mechanism for content and replacing it with a new feedback system. For more information see: https://aka.ms/ContentUserFeedback.
Submit and view feedback for