Note
Access to this page requires authorization. You can try signing in or changing directories.
Access to this page requires authorization. You can try changing directories.
There are a few different ways to use Excel data to create a canvas app.
In Excel, it's important to format your data as a table rather than just a range of cells. This makes it easier for Power Apps to read and interact with the data. To do this, select your data and select Insert > Table in Excel. This ensures that Power Apps can recognize and use the data effectively. More information: Formatted as a table in Excel.
To create an app using Excel data, select one of the following options in Power Apps.
| Create options using Excel | Benefits | Navigation |
|---|---|---|
| Import an external Excel or .CSV file to Power Apps | Uploaded Excel data generates a Dataverse table. With Dataverse's standard and custom tables, you can securely store your data in the cloud. These tables enable you to define your organization's data in a way that is tailored to your business needs, making it easier to use within your apps. | Select Start with Data > Create new tables > Import an Excel file or .CSV option. |
| Connect to an external Excel file and use it to create a canvas app. Your data stay where it is. | Using the Excel connector in Power Apps provides a straightforward, and fast method to create and deploy apps with data stored in Excel. It's especially advantageous for makers that already use Excel and want to enhance its functionality with minimal effort. Makers benefit from cloud access, easy data manipulation, rapid prototyping, and no need for a complex database setup. | Select Start with Data > Connect external data > From Excel. |
| Create a blank canvas app and then add Excel data | You have complete flexibility, control, and customization. It allows you to design an app that meets your exact specifications without being limited by predesigned templates, providing greater creative freedom and adaptability to suit your unique needs | On the left navigation pane, select Create > Start with a blank canvas. |
Import an external Excel file
When you import your Excel data to Power Apps, it doesn't just stay as an Excel file. Instead, it gets converted into a Dataverse table. This conversion lets your data be more easily integrated and managed within Power Apps, offering more powerful features compared to using Excel alone. More information: Why use Dataverse?
Sign in to Power Apps.
Select Start with Data > Create new tables > Import an Excel file or .CSV.
Select Select from device and navigate to the location where your Excel file is saved, and upload it.
The maximum file size limit is 5 GB.
When the table is created, select a column name or the table name to edit the properties to suit your needs. If there are values in cells that are incompatible with the selected data type when changing column data types, those values are removed when the table is generated. More information: Create and edit tables using Power Apps
Select Row ownership and choose how you want to manage row ownership.
When you're done, select Save and open app. The system uploads the first 20 rows of data so you can start reviewing the data in your app. The remaining data is uploaded in the background.
Known issues
- The current data upload process doesn't take into account the environment data format setting.
Connect to an external Excel file from Power Apps
Store the Excel file in a cloud storage service like Dropbox, Google Drive, OneDrive, or OneDrive for Business because Power Apps can only connect to Excel files that are stored in the cloud.
Power Apps has an Excel connector that allows you to access your Excel data. There are two versions available:
The older version connects to Excel files stored in specific locations, such as OneDrive for Business.
We recommend that you use the newer version, called Excel Online (Business), which offers greater flexibility by accessing a wider variety of cloud-based file storage services.
- Sign in to Power Apps.
- Depending on how you want to create your app, from the home screen, select one of the following options:
- To create a single-page gallery app with a responsive layout, choose either:
- Start with data > Connect to external data > From Excel.
- Start with page design > Gallery connected to external data > From Excel.
- To create a three screen mobile app, select Start with an app template > From Excel.
- To create a single-page gallery app with a responsive layout, choose either:
- Only one connection is shown at a time. To select a different connection, select the ... button to switch connection or add a new connection.
- Enter the file location and select the table.
- When you're done, select Create app.
For more information about how to share Excel data, see Sharing Excel tables.
Create a blank canvas app and add Excel data
Create a blank canvas app and then use Excel data that's formatted as a table as the source of the app's information.
Follow the example below to create an app with two screens where users can view (browse) the data from an Excel file on one screen, and on another screen, they can interact with (add, modify, or remove) that data. The data interaction features, such as creating, updating, and deleting records, are built into the second screen of the app.
Prerequisites
Copy this data and paste it into an Excel file.
StartDay StartTime Volunteer Backup Saturday 10am-noon Vasquez Kumashiro Saturday noon-2pm Ice Singhal Saturday 2pm-4pm Myk Mueller Sunday 10am-noon Li Adams Sunday noon-2pm Singh Morgan Sunday 2pm-4pm Batye Nguyen Format the table in Excel and name it Schedule so that Power Apps can parse the information.
Save the file under the name eventsignup.xlsx, close it, and then upload it to a cloud-storage account such as OneDrive.
Important
You can use your own Excel file and review this example for general concepts only. However, the data in the Excel file must be formatted as a table.
Create a blank app and connect to data
Sign in to Power Apps.
On the left navigation pane, select Create > Start with a blank canvas.
Select the Phone size layout.
The app opens in Power Apps Studio where you can add data and start building the app.
In the middle of the screen, select Connect to data.
In the Data pane, select Add data. Select the connection for your cloud-storage account if it appears. Otherwise, follow these steps to add a connection such as OneDrive:
In the search box, enter OneDrive and select it.
Select Add a connection.
On the connection pane, select Connect.
If prompted, provide your credentials for that account.
Under Choose an Excel file, find and then select the eventsignup.xlsx that you saved earlier.
Under Choose a table, select the checkbox for Schedule, and then select Connect.
In the upper-right corner of the Data pane, close it by selecting the close icon (X).
Create the view screen
On the command bar, select New screen > List.
A screen is added with several default controls, such as a search box and a Gallery control. The gallery covers the entire screen under the search box.
At the top of the new screen, select the [Title] Label and rename it to View records.

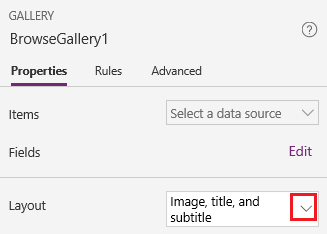
In the Tree view, select BrowseGallery1.
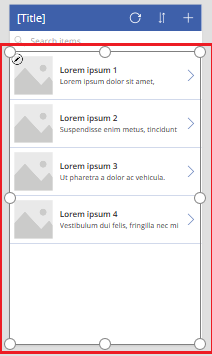
In the gallery's Properties pane, set the Layout to Title, subtitle, and body.
In the formula bar, replace CustomGallerySample with Schedule, and replace both instances of SampleText with Volunteer.
On the right edge of the formula bar, select the Expand formula bar down arrow, and then select Format text.
The formula matches this example:
SortByColumns(
    Search(
        Schedule,
        TextSearchBox1.Text,
        "Volunteer"
    ),
    "Volunteer",
    If(
        SortDescending1,
        SortOrder.Descending,
        SortOrder.Ascending
    )
)
In the Properties pane, select Edit next to the Fields label.
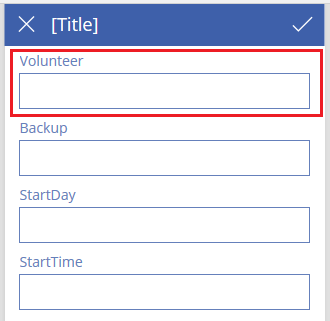
In the Title2 box, select Volunteer, in the Subtitle2 box, select StartDay, and in the Body1 box, select StartTime.
In the upper-right corner of the Data pane, close it by selecting the close icon (X).
Users can sort and filter the gallery by volunteer name based on the SortByColumns and Search functions in that formula.
- If a user types at least one letter in the search box, the gallery shows only those records for which the Volunteer field contains the text that the user typed.
- If a user selects the sort button (between the refresh button and the plus button in the title bar), the gallery shows the records in ascending or descending order (depending on how many times the user selects the button) based on the Volunteer field.
For more information about these and other functions, see the formula reference.
Create the change screen
On the command bar, select New screen > Form.
In the Tree view, select EditForm1.
On the Properties pane, select the down arrow next to Data source, and then select Schedule in the list that appears.
Under the data source that you specified, select Edit fields.
In the Fields pane, select Add field, select the check box for each field, and then select Add.
Select the arrow next to the name of each field to collapse it, and then drag the Volunteer field up so that it appears at the top of the list of fields.
In the upper-right corner of the Fields pane, close it by selecting the close icon (X).
Set the Item property of the form to this expression in the formula bar:
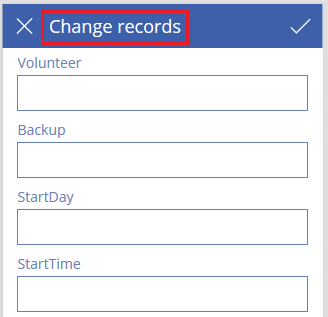
BrowseGallery1.SelectedAt the top of the screen, select the Label control, and then replace [Title] with Change records.
Delete and rename screens
In the Tree view, select the ellipsis (...) for Screen1, and then select Delete.
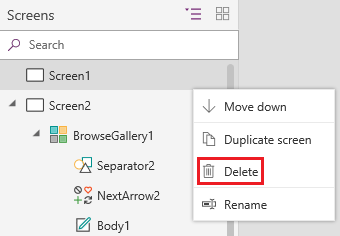
Select the ellipsis (...) for Screen2, select Rename, and then type or paste ViewScreen.
Select the ellipsis (...) for Screen3, select Rename, and then type or paste ChangeScreen.
Configure icons on the view screen
Near the top of the ViewScreen, select the circular arrow icon.

Set the OnSelect property for that icon to this formula:
Refresh(Schedule)When the user selects this icon, the data from Schedule refreshes from the Excel file.
For more information about this and other functions, see formula reference.
In the upper-right corner of the ViewScreen, select the plus icon.

Set the OnSelect property for that icon to this formula:
NewForm(EditForm1);Navigate(ChangeScreen,ScreenTransition.None)When the user selects this icon, ChangeScreen appears with each field empty, so the user can create a record more easily.
Select the right-pointing arrow for the first record in the gallery.
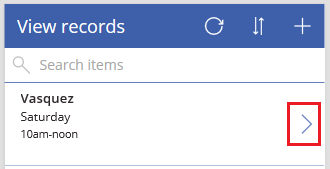
Set the OnSelect property for the arrow to this formula:
EditForm(EditForm1); Navigate(ChangeScreen, ScreenTransition.None)When the user selects this icon, ChangeScreen appears with each field showing the data for the selected record, so the user can edit or delete the record more easily.
Configure icons on the change screen
On ChangeScreen, select the "X" icon in the upper left corner.

Set the OnSelect property for that icon to this formula:
ResetForm(EditForm1);Navigate(ViewScreen, ScreenTransition.None)When the user selects this icon, any changes made in this screen are discarded, and the view screen opens.
In the upper-right corner, select the checkmark icon.

Set the OnSelect property for the checkmark to this formula:
SubmitForm(EditForm1); Navigate(ViewScreen, ScreenTransition.None)When the user selects this icon, any changes made in this screen are saved, and the view screen opens.
On the Insert tab, select Icons, and then select the Trash icon.
Set the new icon's Color property to White and move the new icon so it appears next to the checkmark icon.

Set the Visible property for the trash icon to this formula:
EditForm1.Mode = FormMode.EditThis icon appears only when the form is in Edit mode, not in New mode.
Set the OnSelect property for the trash icon to this formula:
Remove(Schedule, BrowseGallery1.Selected); Navigate(ViewScreen, ScreenTransition.None)
When the user selects this icon, the selected record is deleted from the data source and the view screen opens.
Test the app
Select the ViewScreen, and then preview the app by pressing F5 or select Preview.

Type or paste one or more letters in the search box to filter the list based on the volunteer's name.
Select the sort icon one or more times to show the data in ascending or descending order based on the volunteer's name.
Add a record.
Update the record that you added, and then save the changes.
Update the record that you added, and then cancel the changes.
Delete the record that you added.
Close Preview mode by pressing Esc or selecting the close icon in the upper-right corner.
Next steps
- Press Ctrl+S to save your app in the cloud so you can run it from other devices.
- Share the app so other people can run it.