Note
Access to this page requires authorization. You can try signing in or changing directories.
Access to this page requires authorization. You can try changing directories.
The PDF function in Power Apps generates a PDF document from the contents of a screen or certain types of controls. You can pass the generated file to an action connector—for example, to send it in an email using the Office 365 Outlook connector—or to a Power Automate flow as part of an automation scenario.
Important
- This is an experimental feature. Experimental features aren't meant for production use and may have restricted functionality. These features are available before an official release so that customers can get early access and provide feedback. Understand experimental, preview, and retired features in canvas apps.
- You must turn on the PDF function in Settings > Upcoming features > Experimental. As an experimental feature, it's disabled by default.
- Send your feedback in the Power Apps experimental features community forum.
Turn on the PDF function
Since the PDF function is an experimental feature, it's turned off by default. To use it in your apps, you need to turn it on manually.
Sign in to Power Apps and create a canvas app or open an existing app.
In Power Apps Studio, on the command bar, select Settings.
Select Upcoming features.
On the Experimental tab, turn on PDF function.
Use the PDF function to generate a PDF file
In the following example, we use the PDF function in the OnSelect property of a button to generate a PDF file. You can also use the PDF function in OnVisible, OnHidden, or any other behavior property.
Select an existing button or add a new button to your canvas app.
In the button's
OnSelectproperty, add the PDF function and enter the target of the function as a parameter. Enter the formula:PDF(SubmitInspectionScreen);In this example, we're targeting the screen
SubmitInspectionScreento generate a PDF file from the contents of our sample app's Inspection screen. Replace it with the name of a screen in your app.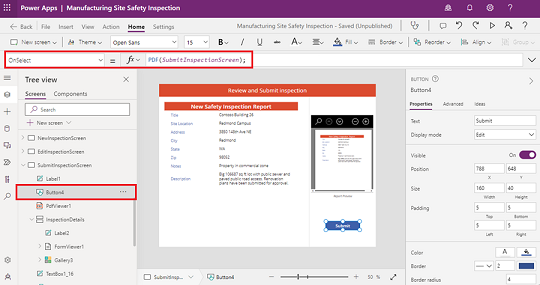
Select Save and publish.
Play the app and select the button you added. The PDF file is generated and stored in memory for future use. The following section suggests a few ways to work with the PDF file in your app.
The PDF function can only target the screen that's currently visible. You can pass the entire screen, as in our example, or enter more parameters to specify a container or gallery to limit the content to pass.
Work with the generated PDF file
You can use the generated PDF file in many ways. Here are a few, using the example in the previous section.
View the file with the PDF viewer control
In your canvas app, select the button that you created in the previous example or add a new button.
In the button's
OnSelectproperty, enter the following formula, replacingSubmitInspectionScreenwith the name of a screen in your app:Set(myPDF, PDF(SubmitInspectionScreen));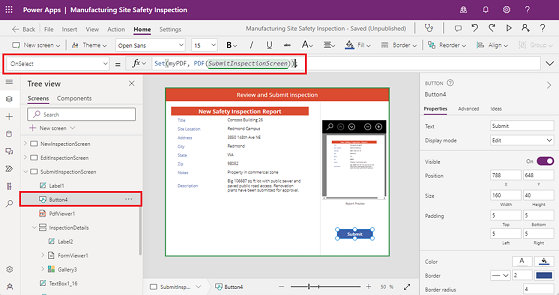
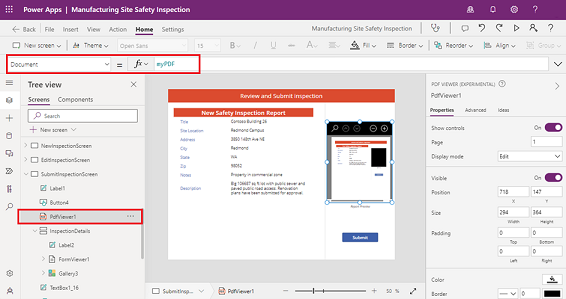
Select Insert > PDF viewer (experimental).
From the properties list, select the Document property and then enter myPDF in the formula bar.
Select Save and publish.
Play the app and select the button you added. The PDF file is generated, stored in the variable myPDF, and visible in the PDF viewer control.
The PDF viewer control appears as a black shape inside the generated PDF file. To exclude the control from the generated file, place the content you want to turn into a PDF file inside a container or gallery and target that instead of the screen; for example,PDF(Container1) or PDF(Gallery1).
Use an action connector
In this example, we generate a PDF file that we send as an email attachment using the Office 365 Outlook connector.
In your canvas app, select the button that you created in the previous example or add a new button.
In the button's
OnSelectproperty, enter the following formula:Office365Outlook.SendEmailV2( "sample@email.com", "New Safety Inspection" "A new safety inspection has been submitted for your review. Please see attached.", { Attachments: Table( { Name: "submittedInspection.pdf", ContentBytes: PDF(SubmitInspectionScreen) } ) } );
Select Save and publish.
Play the app and select the button you added. The PDF file is generated, and an email is sent to the specified email address with the generated PDF file attached.
Use in a Power Automate flow
In this example, we generate a PDF file and pass it to a Power Automate flow that stores the file in a document library using the SharePoint connector. This example replaces the default PowerApps trigger in Power Automate with the PowerApps (V2) trigger.
Create a flow to use in your app
In your canvas app, select the button that you created in the previous example or add a new button.
In the app authoring menu, select Power Automate > Create new flow.
Select Create from blank.
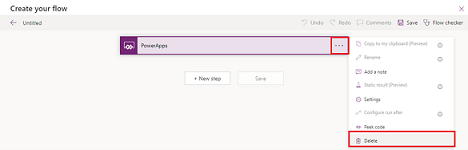
To delete the default PowerApps trigger, select the trigger menu (…), and then select Delete.
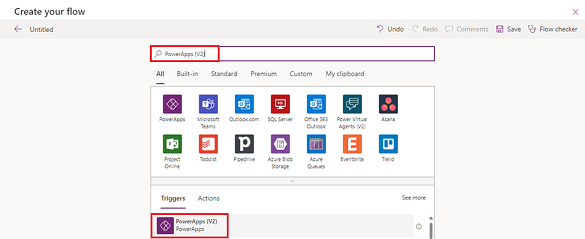
Search for and select PowerApps (V2).
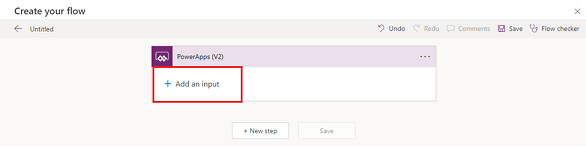
Select the PowerApps V2 trigger to expand the node, and then select Add an input.
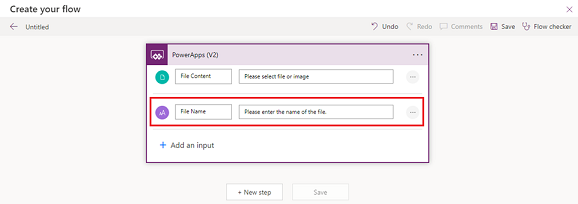
Select File as the type of user input.
Select Add an input again, and then select Text as the type of user input.
Rename the input File Name and change the description to Please enter the name of the file.
Add the SharePoint connector to the flow
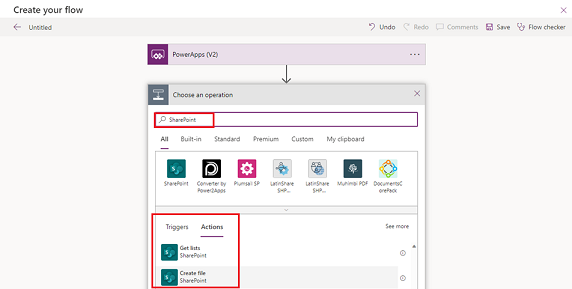
Select New step to add an action. Search for SharePoint and select Create file.
In Site Address, select a SharePoint site that you have permission to add files to.
In Folder Path, select a document library that you have permission to add files to.
Select the File Name input. In the Dynamic content tab, select a file name under PowerApps (V2).
Select the File Content input, and then select File Content in the list.
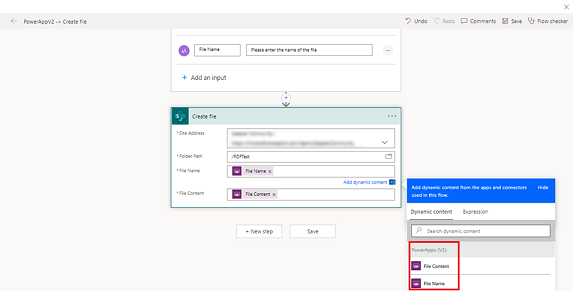
Select Save, and then select the x in the upper-right corner to close the Power Automate window.
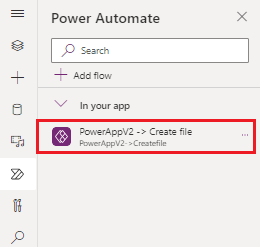
The Power Automate pane refreshes, and the new PowerApps (V2) flow, Create file, appears in the list.
Add the flow to a button in your app
Select the button in your app canvas. In the button's
OnSelectproperty, enter the following formula, replacing the flow name and generated PDF file name with your own:'PowerAppV2->Createfile'.Run( "NewInspectionReport.pdf", { file: { name: "NewInspectionReport.pdf", contentBytes: PDF(InspectionDetails) } } );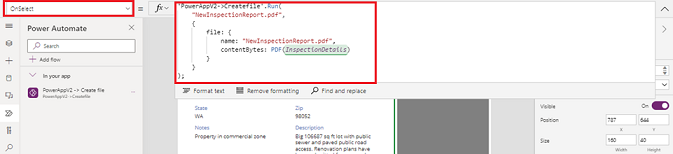
Select Save and publish.
Play the app and select the button you added. The Power Automate flow runs and adds the generated PDF file into the document library.