Note
Access to this page requires authorization. You can try signing in or changing directories.
Access to this page requires authorization. You can try changing directories.
Import data stored somewhere else into your model-driven app using the import feature in Power Apps.
Every table requires columns that must exist in your input file. You should download an Excel template, add your data, and then import the file to your app. The template saves time and effort. Don't add or modify columns in the template to avoid issues during the import.
Before you import a file, make sure the column headings match the column names in your app. During the import process, the system tries to map the column names from your input file to the column names in the app. If they don't match, then you have to manually map the fields or you might run into issues during the import process.
If you're an advanced user and know the required columns for a given Dataverse table, define your own Excel, CSV, or XML source file and then follow the steps in this article on how to import data to your app. These file formats are supported:
- Excel workbook (.xlsx)
- Comma-separated values (.csv)
- XML Spreadsheet 2003 (.xml)
The maximum file size allowed for .zip files is 32 MB. For the other file formats, the maximum file size allowed is 8 MB.
Download an Excel template
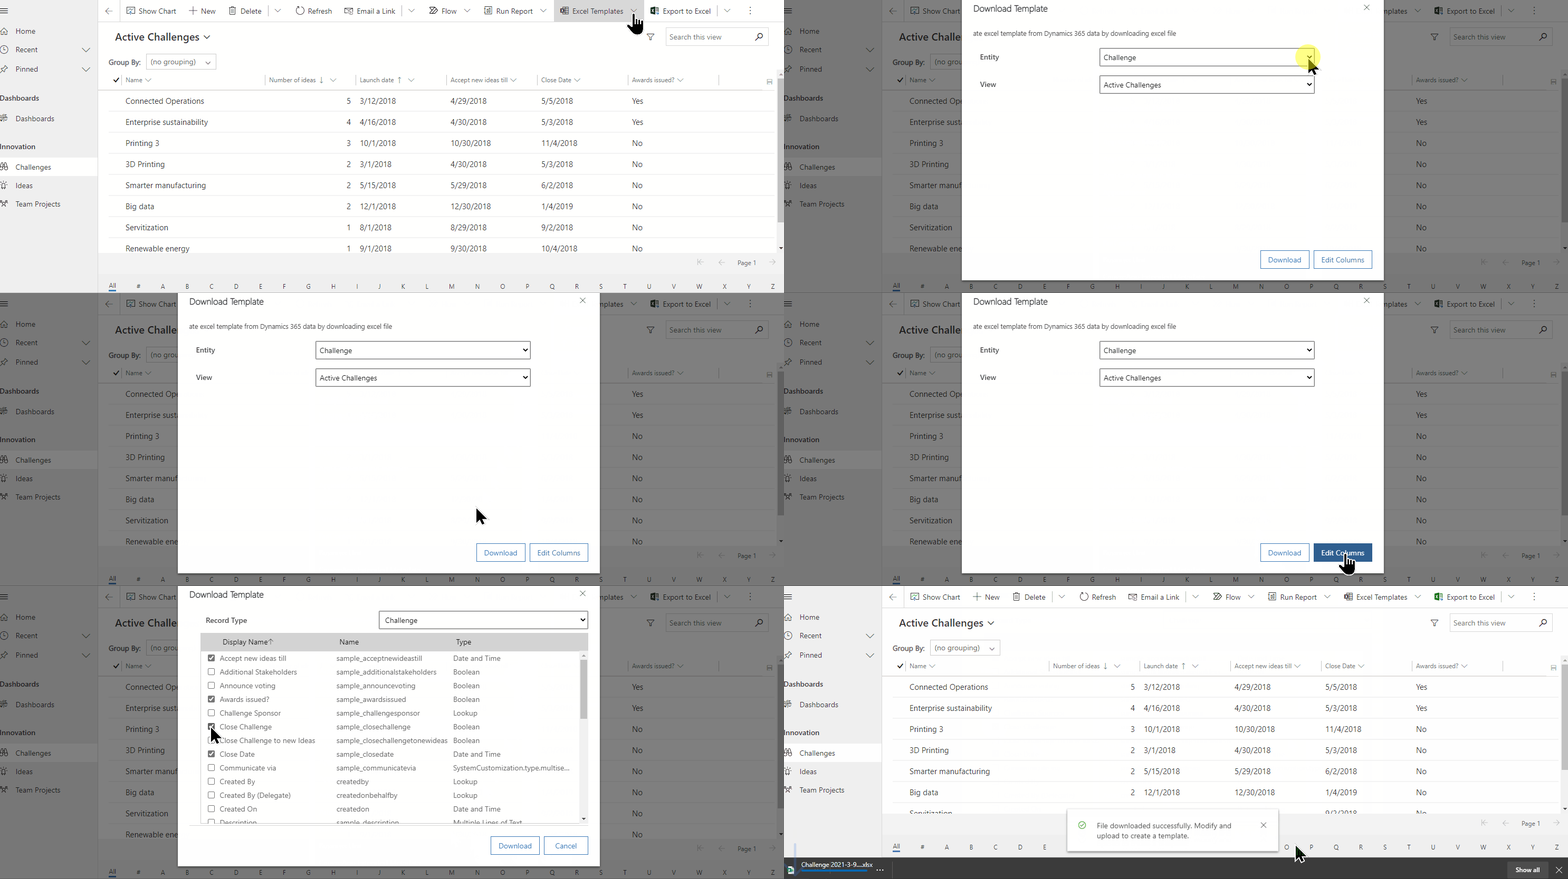
To avoid mapping issues, you should use an Excel template that you can download from your app. Once the template is downloaded, add your data and then import the file back to your app. Remember don't add or modify columns in the template to avoid issues during the import process.
Open your app and from the left nav select a table.
On the command bar, select Excel Templates > Download Template.
Select the table type and view to download or select Edit Columns and choose the rows to include in the template.
Select Download.
Import your data
Use the template that you downloaded in the previous step (modified with your data) and import the file to your app.
Open an app and from the left nav select a table.

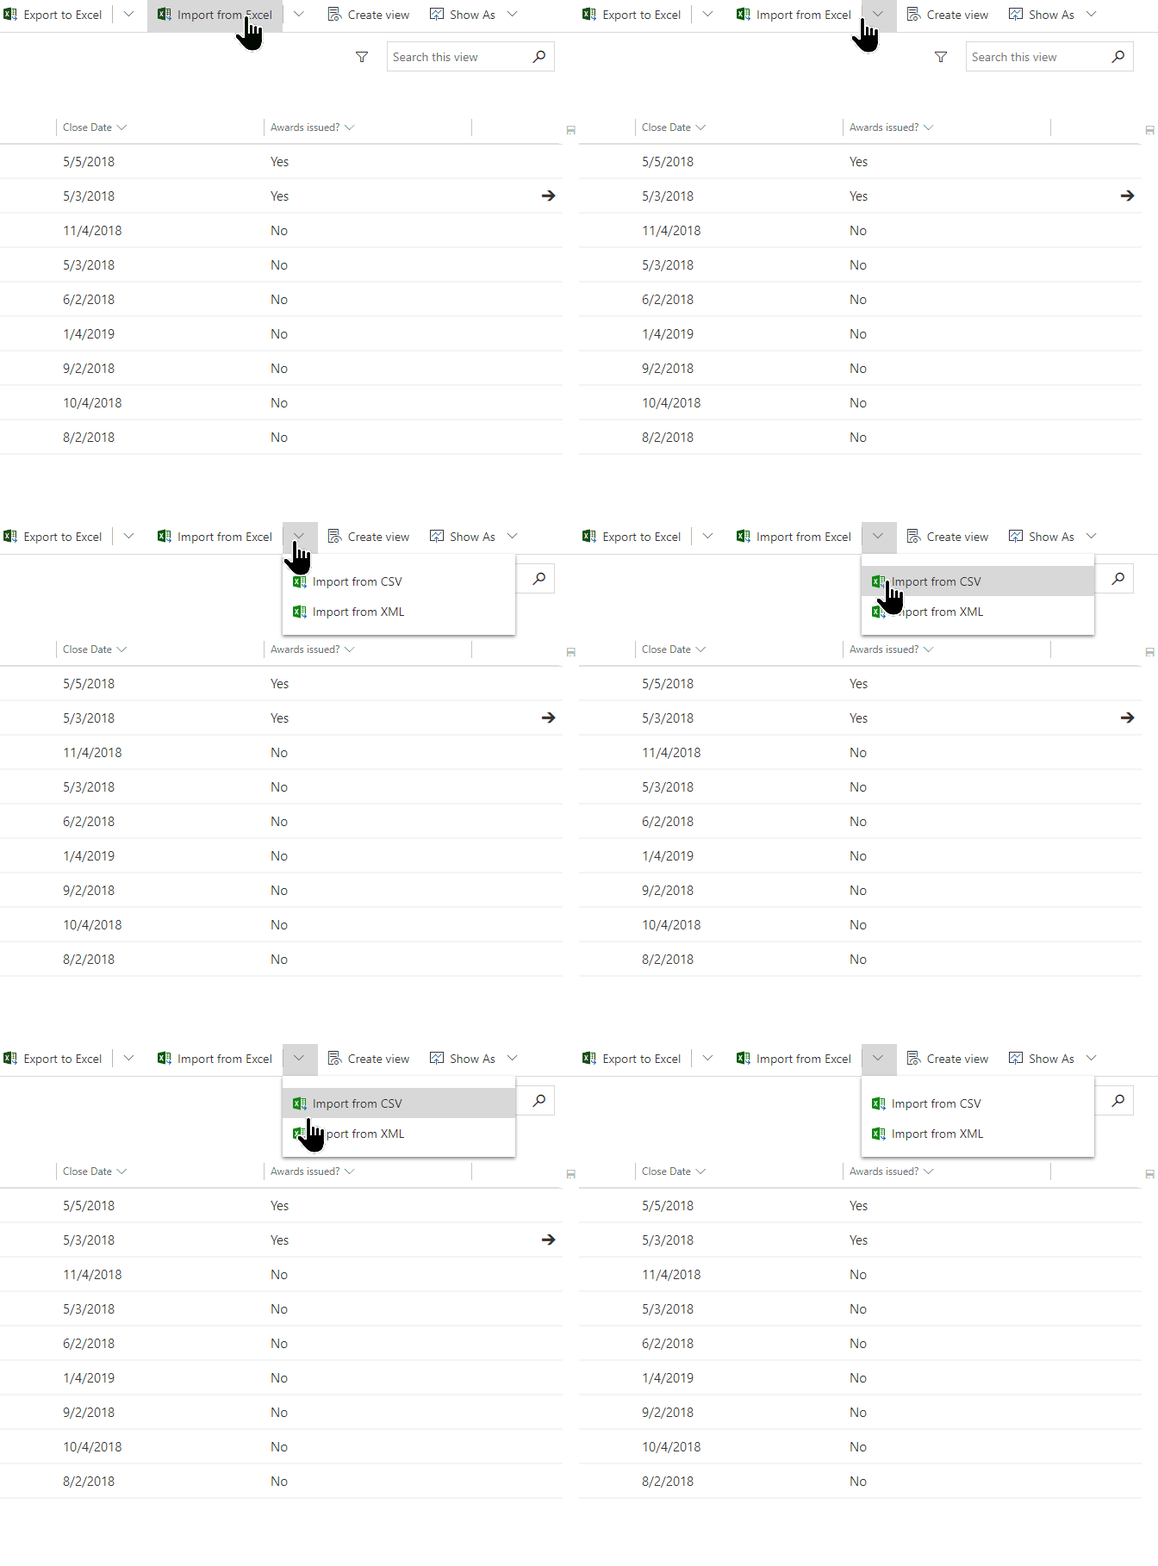
On the command bar, select the file type to import from:
- Import from Excel: Select Import from Excel if you're using an Excel template.
- Import from CSV
- Import from XML
Select Choose File and browse to the folder where the file is saved. Select the file, select Open, and then select Next.
Tip
You can only import one file at a time. To bring in more files, run the wizard again.
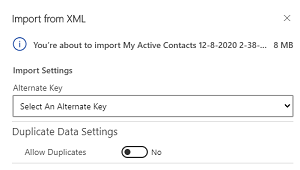
Select whether to Allow Duplicates or not. More information, see Set up duplicate detection rules to keep your data clean.
For CSV and XML files (skip this step if you're importing an Excel file):
For a CSV file: Select the drop-down list and select the data delimiter and field delimiter that's used for the CSV file.
For CSV or XML file: If you have an alternate key defined, select it from the alternate Key drop-down list. The alternate key is used to uniquely identify and update rows during import. More information: Define alternate keys to reference rows.
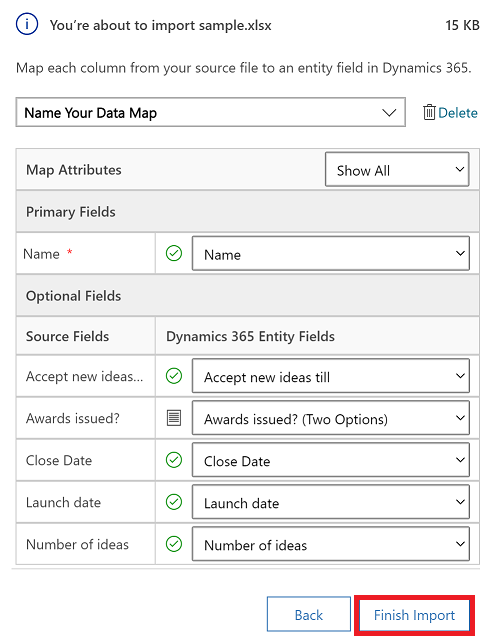
Select Review Mapping and verify the columns (fields) are mapped correctly. If everything looks good, select Finish Import.
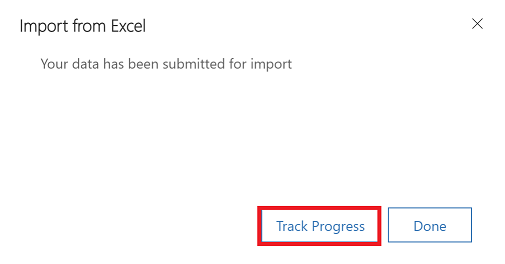
Select Track Progress to see the progress of the import.
Review mapping
When you import a file, it's important to review the column headings and verify that they match the columns (fields) in your app.
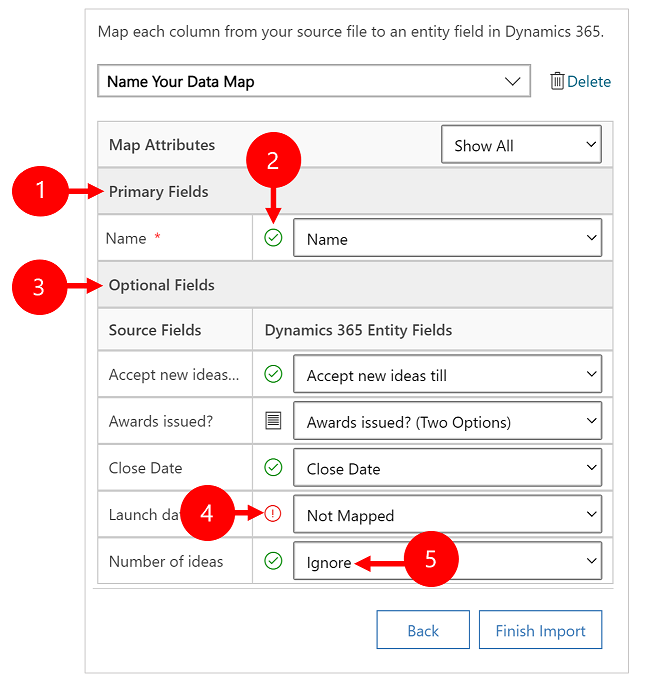
Legend:
Primary Fields: Shows all the required columns for the table that must be mapped for the data to be imported successfully. If the column headings of your source file match the column display names, these columns are automatically mapped.
Mapped columns: Correctly mapped columns are shown with a green check mark.
Optional Fields: These are optional column headings in your source file. If the column headings match the column display names, the columns are automatically selected in the corresponding drop-down lists.
Unmatched columns: If the column headings don't match, the unmapped columns are shown with a red exclamation point. To map the column correctly, select a column to map to the unmapped column heading of your file.
Ignore (For Optional Fields only): Choose Ignore from the drop-down list. Data from ignored columns aren't imported into your app.
Option set
If any column in your source file includes a fixed set of values, you must map the column to a column of type Option Set. A column of this type has values such as Yes and No or Low and High.
To do this, select the  button next to the option set column, select the values, and then select OK.
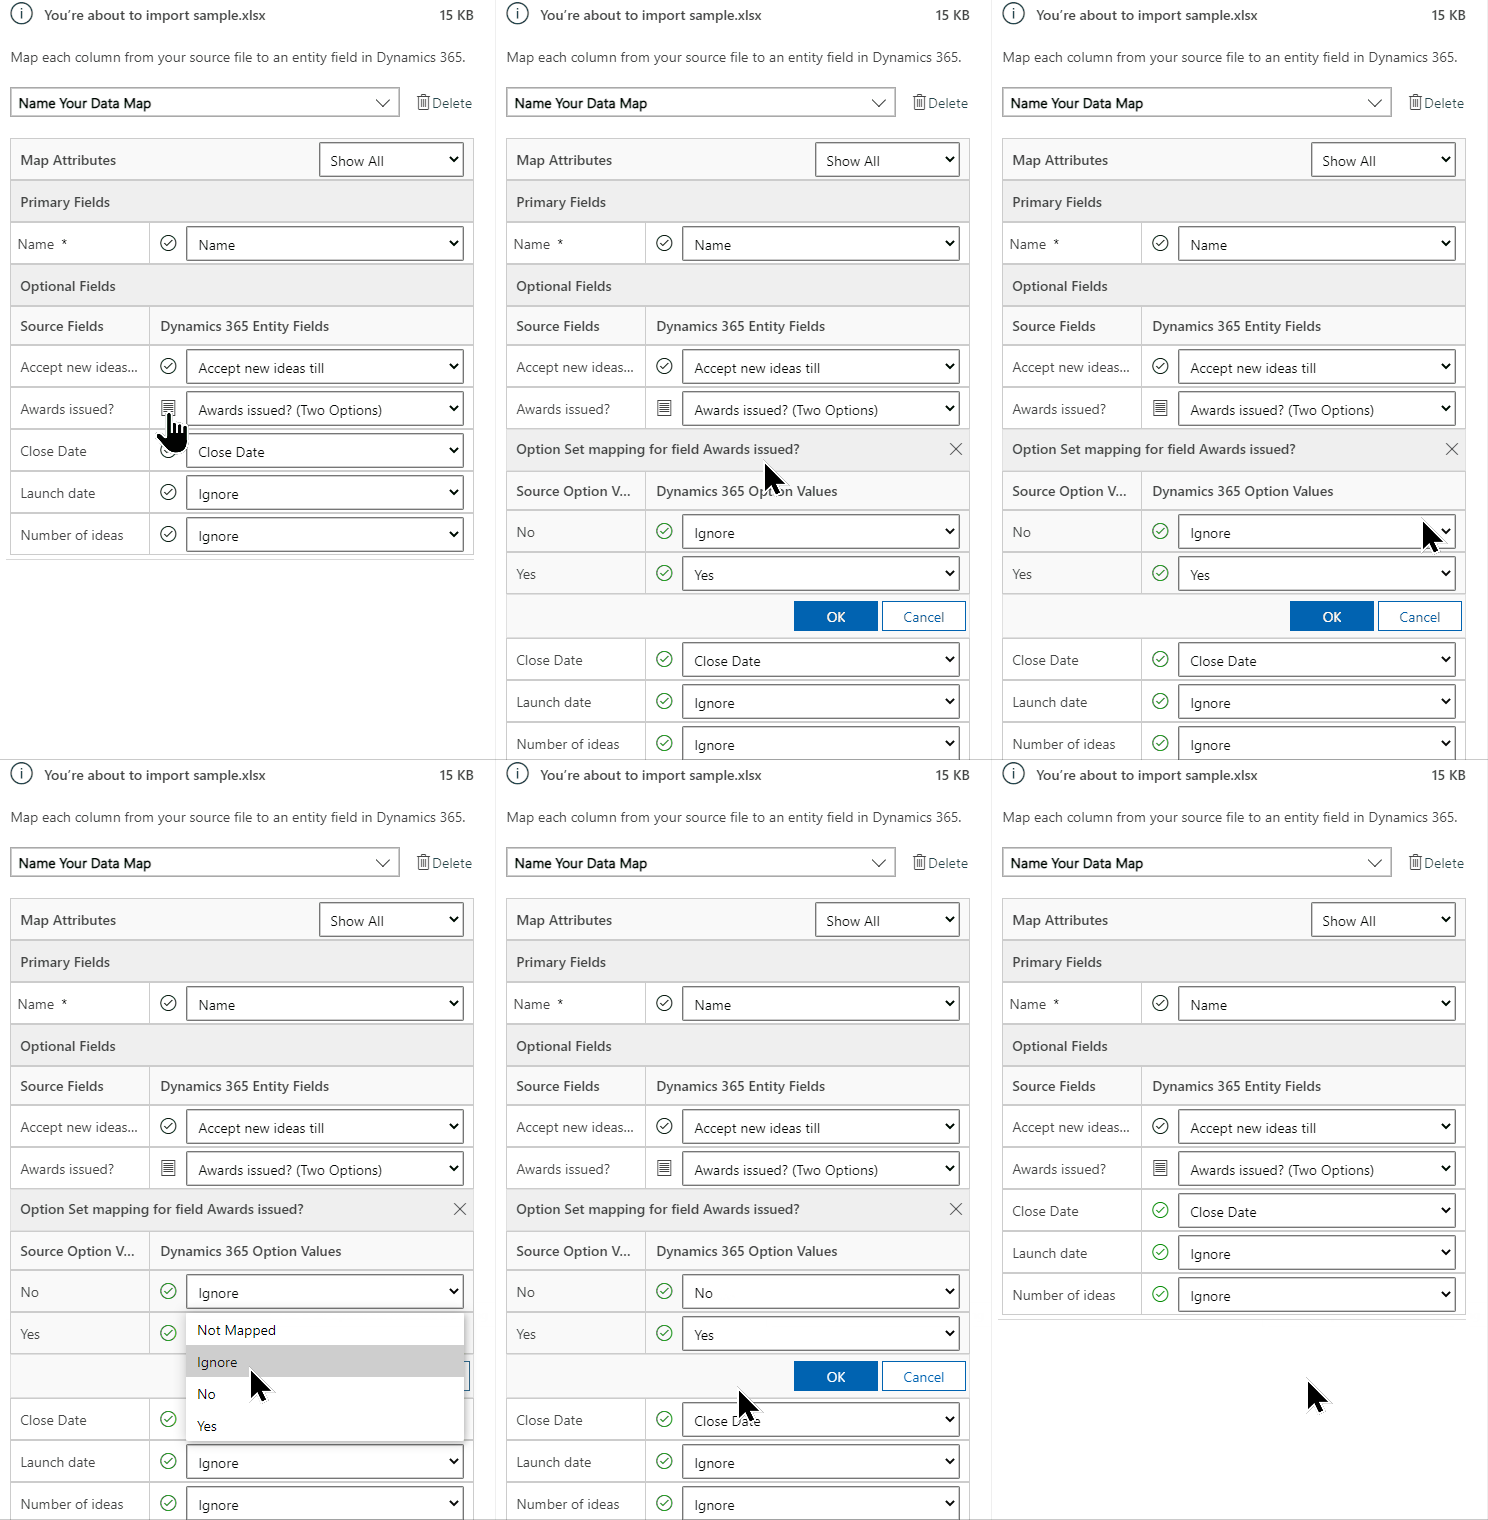
The option values drop-down list combines the values available in the incoming file with those already in your app. For example:
- Values in import file: Low, High
- Values already in your app: Cold, Warm, Hot
- Resulting target values: Cold, Warm, Hot, Low, High
After import, the import wizard will add all mapped values in your app, but will drop unmapped values from the import file that aren't yet in your app. For example, you could map the "Low" source value to the "Cold" target value, but map the "High" source value to the (new) "High" target value. Based on these mappings, the import wizard creates "High" as a target value in your app. It doesn't create "Low" as a target value in your app because you didn't map any source to this target value.
Note
You can map a column in your source file to a "Two Options" or "Multiselect Option Set" column. When mapping to a "Multiselect Option Set," if your source file includes values not available in your app, new values may be created in Dataverse if the import mapping is set to NotMapped. If the mapping is set to Ignore, the record can be successfully imported. And, for "Multi-Select Option Set" fields, the values are not imported, and no new values are created in the target environment.
Map lookup columns
If some data in your source file references other existing rows in your app, you must map the column in the source file to a lookup column in your app.
For example, you might want to import a file named Leads.csv, which contains customer rows. The Customer column in Leads.csv contains the associated account or contact data. To map this, select the Lookup Reference button next to the lookup column. The Lookup Reference section opens and lists the tables related to the current table.
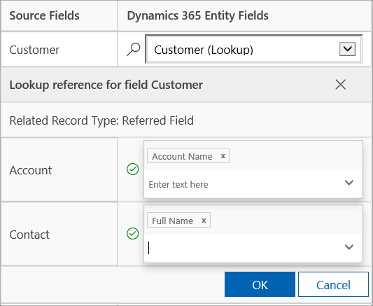
For each table, select the columns to search during import to retain the relationships between the rows, and then select OK.
Save mapping settings
To save the mapping settings for next time, enter a name in the Name your data map box. This way, the next time you import a similar set of data, you'll be able to use the same mapping.

Open the import log
After you initiate an import, you can monitor the status of the import job and view results in the import log.
In the last step of the import wizard, select Track Progress to view the progress of the import job.

If you missed this step, append the following code to your app URL: &newWindow=true&pagetype=entitylist&etn=importfile&viewid=a2927069-e4dc-4e8f-8fb1-d2f6c40c427e&viewType=1039.
For example, if your app URL is https://org12345.crm.dynamics.com/main.aspx?appid=00001111-aaaa-2222-bbbb-3333cccc4444, then the URL to view the import log is https://org12345.crm.dynamics.com/main.aspx?appid=00001111-aaaa-2222-bbbb-3333cccc4444&newWindow=true&pagetype=entitylist&etn=importfile&viewid=a2927069-e4dc-4e8f-8fb1-d2f6c40c427e&viewType=1039.
View the status of an import, and correct errors
After the import is complete, you can view the records that were successfully imported, failed to import, or were partially imported.
On the My Imports page, monitor the progress of the import.
The Status column shows the status of the import. The status progresses through these values:
- Submitted
- Parsing
- Transforming
- Importing
- Completed
Note
For tables that include a self-referencing lookup, relationships are resolved in two phases during the Importing stage. In the first phase, the base records are created. In the second phase, the self-references are updated to ensure data integrity.
After the import is complete, the Success, Failures, and Partial Failures columns show the number of records that were successfully imported, failed to import, or were partially imported.
Select an import job to view the records that didn't import or were partially imported.
Select appropriate tabs to see information about failures, success, or partial failure of records during import.
On the Failures tab, export rows that failed to import to a new file. Select Export Error Rows.
Correct the errors in this file, and then import it.
Delete imported records
You can delete the import file and imported records if you want to reimport the data or you don't need the data for some reason.
Select the import file that you want to delete, followed by one of the following actions:
Delete import source file. This option deletes the import log file and its details.
Delete imported records. This option deletes all records that were imported from the selected file.
Delete All. This option deletes the import file along with the records that were imported from the import file.
Limitations
- Excel Import isn't supported with Virtual tables or Elastic tables
- Excel import updates fields from the primary table but ignores fields from related tables.
- Excel import jobs run in parallel only when the file size is under 1 MB. Files larger than 1 MB are processed sequentially to avoid resource exhaustion.
Note
To enable parallel processing, keep each file under 1 MB. For .zip files, the decompressed size must also be under 1 MB. Note that files with special characters may have a calculated size that exceeds 1 MB even if the original file appears smaller.