Note
Access to this page requires authorization. You can try signing in or changing directories.
Access to this page requires authorization. You can try changing directories.
The Power Pages site visibility setting lets you control who can access your website. Make the site private to restrict access to specific people in your organization. If you make the site public, anyone with the link can access it.
Important
- All sites you create in Power Pages are private by default.
- Be cautious when editing a public site. Changes are visible to external users immediately.
- Websites in developer environments can't be made public.
Difference between a private site and a public site
Only site makers and organization users who the maker granted access to can view private sites. Site visitors need to authenticate with the organization's Microsoft Entra ID identity provider to view site contents.
Tip
Set the visibility to private to limit access while your site is in development.
Anyone on the Internet can view public sites anonymously or when they're authenticated with an identity provider. Public websites are production sites that are fully operational for customers to use. A notification reminds you when you edit a public site in the design studio, Portal Management app, Visual Studio Code editor, or the Microsoft Power Platform CLI.
Change site visibility
When a site is ready to go live, set the site visibility to public. Change the site visibility back to private anytime so only the makers of the site and selected users have access.
When you change the site visibility, the website restarts. It can take a few minutes to reflect the change.
- Sign in to Power Pages and edit your site.
- In the left panel, select Security.
- Under Manage, select Site visibility.
- On the This site is card, select Public or Private.
Site visibility for a non-production site
Your tenant admin can control whether makers are allowed to make non-production sites public. When this governance control blocks public access:
- The option to change a non-production site from Private to Public is unavailable.
- You see an Access restricted message in the Site visibility pane.
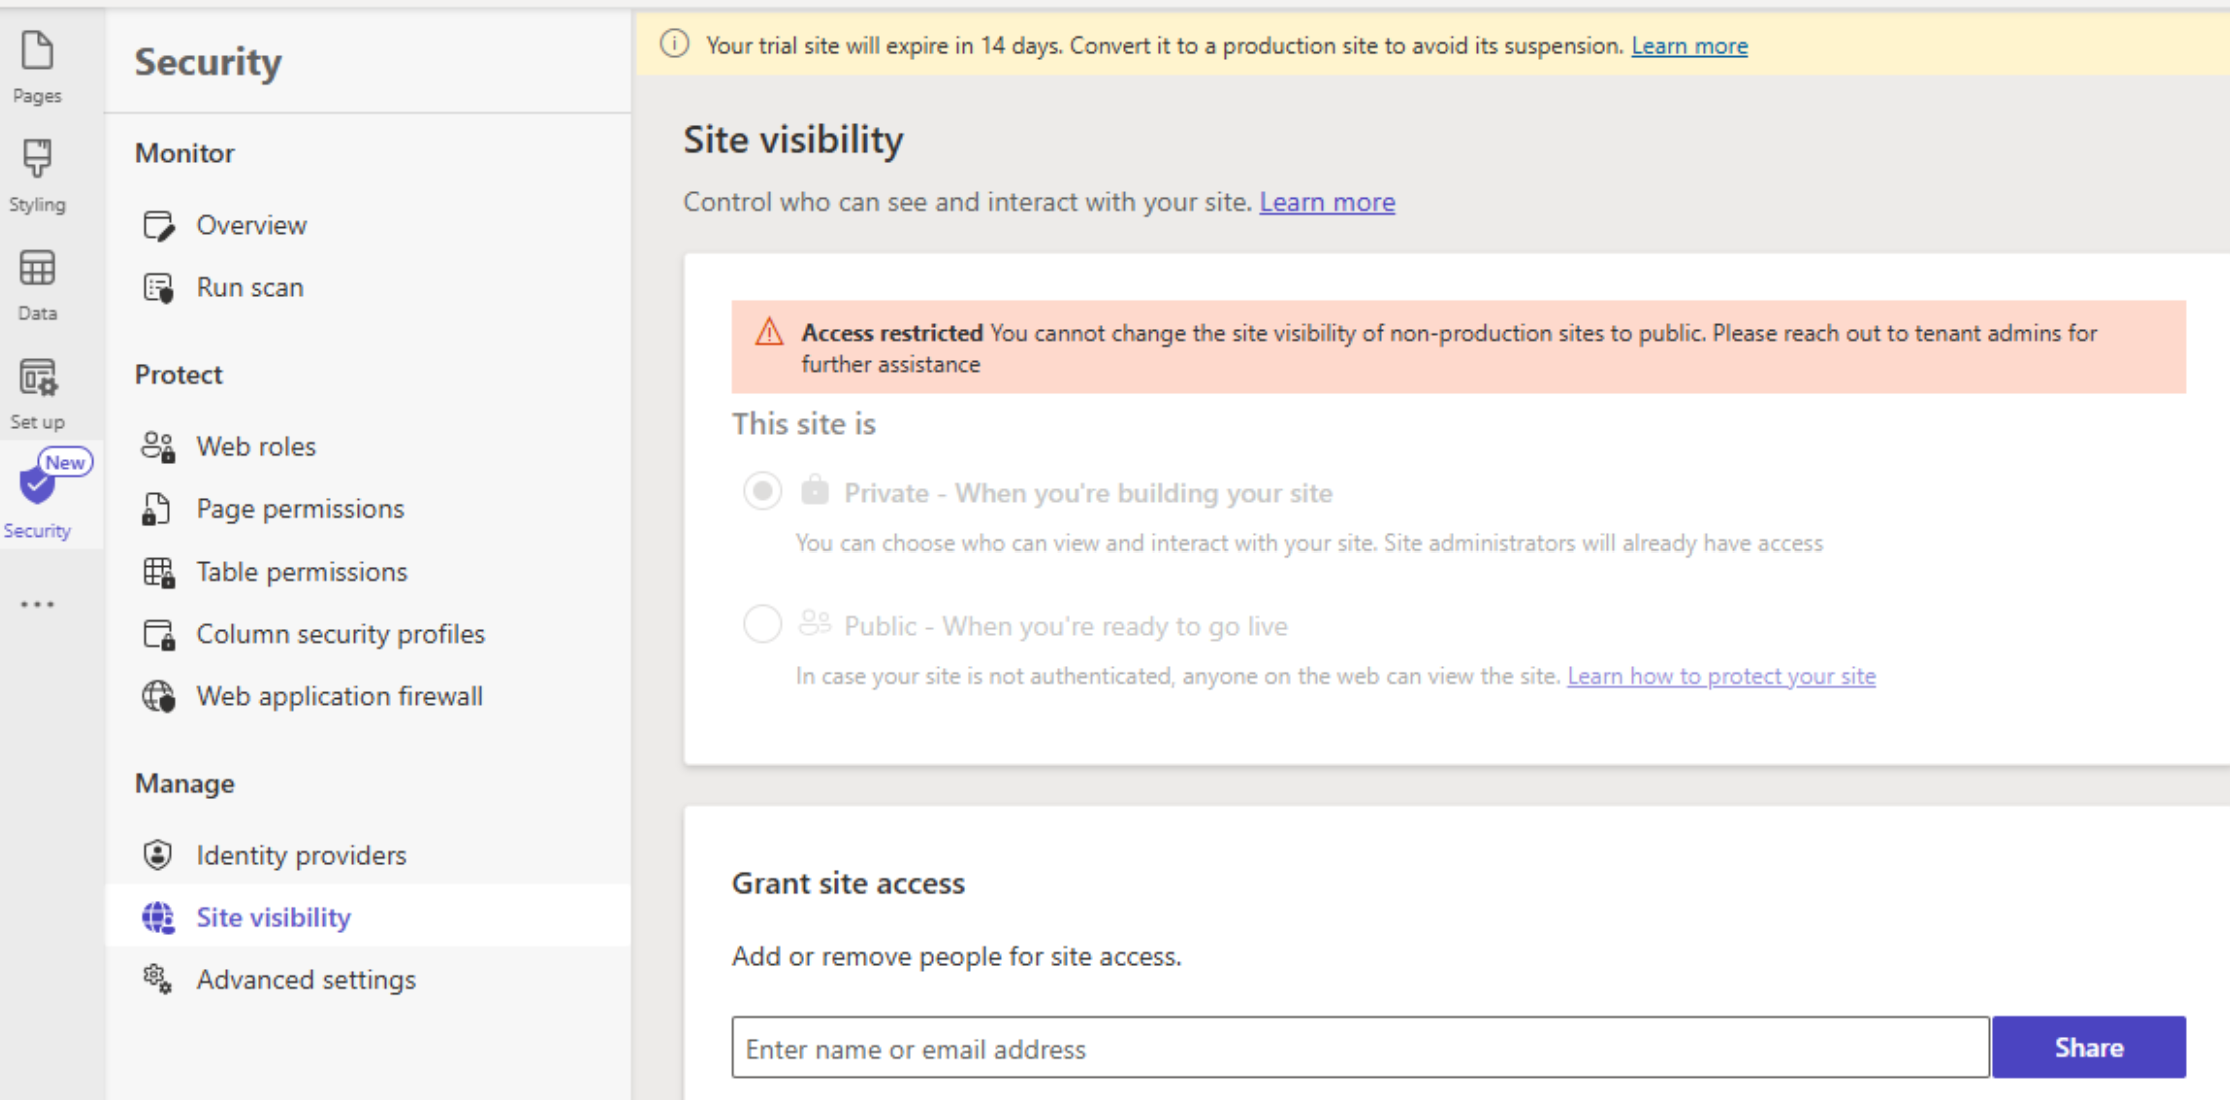
This restriction applies to non-production private sites. It doesn't change site visibility behavior for production sites.
Note
If a non-production site was already Public before the restriction was applied, the site remains public. If you change it back to Private, you might not be able to switch it to Public again while the restriction is in effect.
If you need a non-production site to be public, contact your tenant admin and ask them to update the governance control for your environment. Learn more in Control site visibility for non-production sites.
Grant access to a private site
If your site is private, use the site visibility page to grant access to up to 50 organization users. Users with the System administrator role in your site's environment already have permissions to view the site by default, so you don't need to grant them access.
- Sign in to Power Pages and edit your site.
- In the left side panel, select Security.
- In the Manage section, select Site visibility.
- In the Grant site access card, enter the names or email addresses of the users you want to grant access to.
- Select Share.
Note
- Users configured to access the private site are stored in an environment variable. Any Dataverse security role with permission to modify the environment variable can add or remove user access to the private site.
- Users granted access to a private site aren't automatically authenticated. Learn more in Provide access to external audiences.
Permissions required to change site visibility
Your security role and tenant security settings determine whether you can change a site's visibility.
Service admins who are members of any of the following Microsoft Entra roles can change the site visibility:
When the tenant-level setting enableSystemAdminsToChangeSiteVisibility is set to true, members of the System administrator security role can change the site visibility.
If the tenant-level setting enableSystemAdminsToChangeSiteVisibility is set to false, members of the System administrator security role must be a member of an exclusive security group in Microsoft Entra that has the permissions to manage site visibility.
Change the tenant-level setting
You can use a PowerShell script to change the tenant-level setting enableSystemAdminsToChangeSiteVisibility.
Get the current value of the tenant-level setting by using the Get-TenantSettings command. For example:
$myTenantSettings = Get-TenantSettings
$ myTenantSettings.powerPlatform.powerPages
Note
The Get-TenantSettings command doesn't list tenant settings whose value is null. The default value of the tenant-level setting enableSystemAdminsToChangeSiteVisibility is null, so it doesn't appear the first time you run the script. After you set its value to true or false, the setting appears in the list. When the value of the tenant setting is null, system administrators can change the site visibility.
To set a value for enableSystemAdminsToChangeSiteVisibility, use the Set-TenantSettings command. The following example sets the value to false:
$requestBody = @{
    powerPlatform = @{
        powerPages = @{
            enableSystemAdminsToChangeSiteVisibility = $false
        }
    }
}
Set-TenantSettings -RequestBody $requestBody
Delegate site visibility control
When you don't want all system administrators to be able to change site visibility, set enableSystemAdminsToChangeSiteVisibility to false. Then delegate site visibility management to a select set of users.
Add system administrators to a security group in Microsoft Entra ID, and give the group site visibility permissions.
Manage site visibility permissions in the Power Platform admin center:
In the Power Platform admin center, select Manage.
Select Power Pages.
Select your website, and then select Manage.
In the Security section, select Manage site visibility permissions.
Add the security group that includes the specific system administrators you want to delegate site visibility control to.
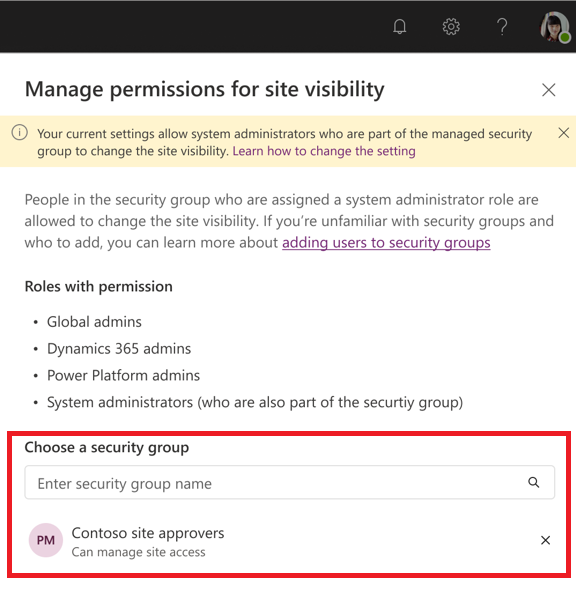
After you add the security group, all system administrators in the group can manage site visibility. System administrators who aren't in the group see the site visibility section disabled.
Known issues
Microsoft Entra authentication is on by default when a website is provisioned. A private Power Pages website doesn't work if you turn off Microsoft Entra authentication. Set the site visibility to public before turning off Microsoft Entra authentication.