Install and set up the Hardware Request and Management template
Enterprise templates for Power Platform are enterprise-ready solutions that are designed to be installed, customized, deployed, and managed by a centralized team at your organization to support common governance and security practices.
Establish a centralized team that consists of key stakeholders, product owners, and Power Platform admins and developers. Be sure to review Power Platform best-practices and administration resource links and to develop plans that suit your organization's needs.
More information:
- Power Platform adoption best practices
- Administer Microsoft Power Platform
- Working with enterprise systems
As a Microsoft Power Platform admin, follow the steps outlined in this article to install and set up the Hardware Request and Management template.
Step 1: Review prerequisites
Review the requirements, identify opportunities and develop a plan of action that suits your organization's needs.
Confirm licensing
Confirm your organization has the necessary licensing to use enterprise templates. You need:
One of the following Power Apps plans:
- Power Apps Premium
- Power Apps per app
- Power Apps per app pay-as-you-go-meter
- Power Apps use rights included with Dynamics 365 licenses
Note
Power Apps use rights included with Microsoft 365 and Office 365 licenses will not suffice to install the template.
- A Power BI Pro or higher license. More information: Pricing and Product Comparison
More information: Microsoft Power Platform Licensing Guide
Tip
A free Developer Plan combined with a free Power BI in Microsoft Fabric free account is a great way to install the template for evaluation purposes.
More information: Power Apps Developer Plan
Set up environments and data policies
It's important to have a cohesive environment and data policy strategy for enterprise templates. To successfully install and manage the Hardware Request and Management template, confirm these resources and practices are in place.
Administrators - Be sure admins with the necessary privileges are available to coordinate to assign licensing and create environments.
Microsoft Entra ID Global or tenant User Administrator to assign Power Apps or Power BI licensing
Power Platform Administrator to create environments
More information: Microsoft Power Platform admin
Environments - Follow application lifecycle management (ALM) best practices in creating and managing environments. Create and prepare a Power Platform developer environment specifically for the Hardware Request and Management solution files. Also consider:
The Power Platform environment is set up with a Dataverse database
Environment Maker security role privileges, at a minimum, are assigned to the user who installs the solutions in that environment
More information: Environments overview
Data loss prevention policies - Ensure the environment has access to connectors used by the template:
- Microsoft Dataverse
- Office 365 Outlook
- Office 365 Users
- Approvals
- Microsoft Teams
- Cards for Power Apps
More information: Data loss prevention policies
Step 2: Create connections
Cloud flows need specific connection references to work correctly. Connection references are included in the solution, but connectors often need to be manually set up.
The installation requires several connections. It's best to create connections before importing the template to make the import smoother. If you create the connections during import, you have to jump back and forth between browser windows. Existing connections can also be used.
To create connections in advance, take these steps:
Go to Power Apps
Go to Connections and select + New Connection for the following connections:
After you create all your connections, your list should look like this example:
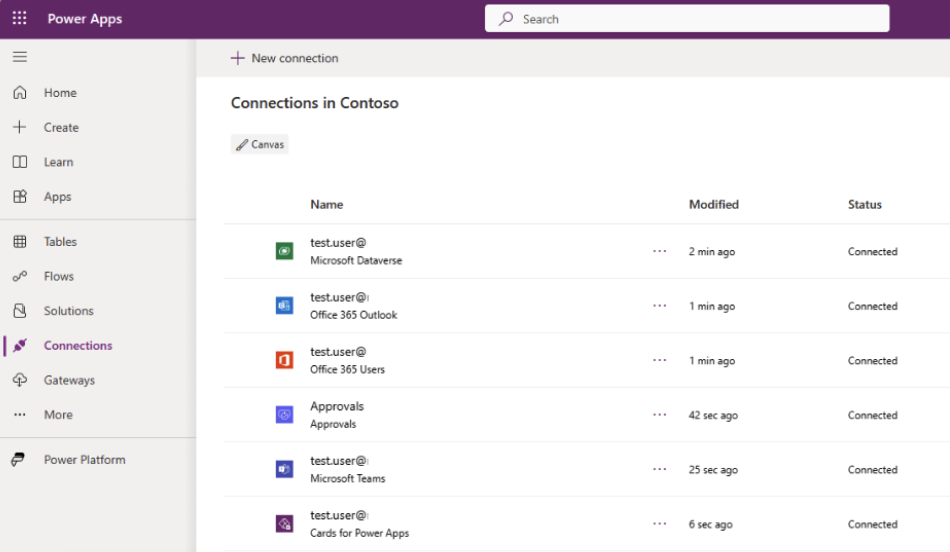 More information: Manage connections in canvas apps
Step 3: Install Approvals solution
The Hardware Request and Management template leverages Power Automate Approvals to approve or reject the request. By default, Power Platform environments are not setup with the required Approvals database that gets created the first time a flow with the Approvals connector is run in that environment by an administrator. Perform these steps to create the Approvals database:
- Go to the Power Automate maker portal and select your targeted deployment environment.
- Select + Create on left pane.
- Select Instant cloud flow underneath the Start from blank section.
- Choose Manually trigger a flow and then select Create.
- Select + New step.
- Search on Approvals and choose Create an approval.
- Enter the following properties on the Create an approval step:
- Approval type – Approve/Reject – First to respond
- Title – Test
- Assigned to – select your email address
- Select Save.
- Select Test Manually and then Test again.
- Select Continue and then Run flow, followed by Done.
- Delete the flow you just created, as it is no longer needed.
Note
It can take a few minutes for the database provisioning to complete, and you'll notice this delay the first time you run this flow. Once this first-time flow run is complete, subsequent approval flows will be faster.
More information: Get started with Power Automate approvals
Step 4: Install solution files
There are two solution installation options available for you to consider:
- You can select the Get it now button on the template's AppSource offer page and it automatically takes you to an install window in the Power Platform admin center.
- You can download either a managed or an unmanaged version of the solution files and manually import them into your environment according to your organization's requirements.
Tip
Go to the Templates-for-Power-Platform GitHub project site to log your questions or issues and get support for the Hardware Request and Management template.
Install from AppSource
You can easily access and install the Hardware Request and Management template from AppSource, a Microsoft digital storefront. Take these steps to go through the AppSource install process:
- Go to the Hardware Request and Management template on AppSource and select Get it now. This takes you to the Install Hardware Request and Management Template window in the Power Platform admin center.
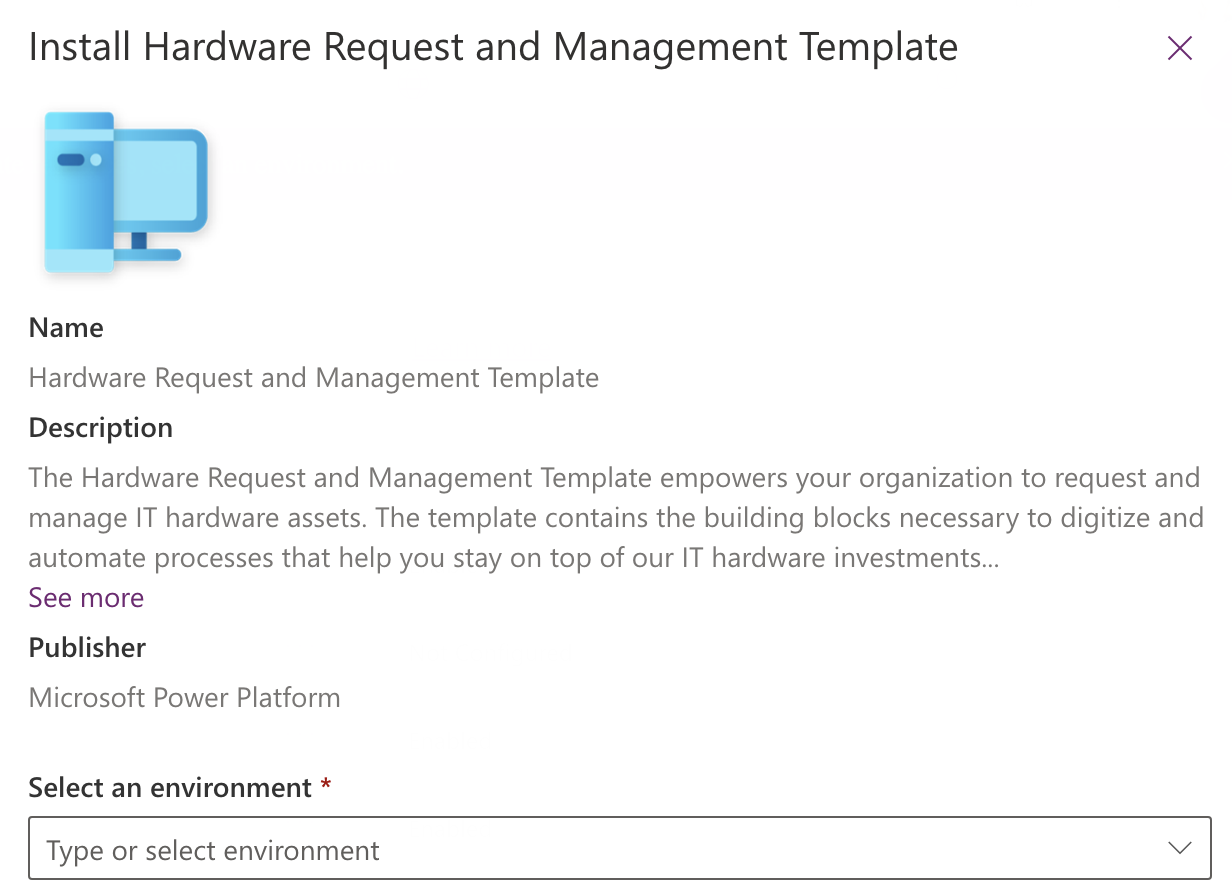
- Select the developer environment that you prepared for the template.
- Agree to the Terms and Privacy Statements by checking the boxes.
- Select Install and view the installation status. After the installation is complete, the status shows as Installed.
More information: AppSource
Important
Two solutions are always installed in your environment:
- IT Base contains common foundational components that all information technology (IT) solutions use. This includes components that enable localization capabilities. By sharing this across solutions, common strings can be localized once in the base solution and all dependent solutions get the benefit.
- Hardware Request and Management contains all the components needed to enable the implementation of the Hardware Request and Management program within an organization.
Download and manually install solution files
You also have the option to download managed or unmanaged solution files and manually install into your prepared environment according to your organization's requirements:
Download the following Managed or Unmanaged solution files:
Go to Power Apps and select the environment you prepared for the solution.
Select Solutions on the left pane.
Select Import solution.
Browse for and select either the managed or unmanaged version of the mpa_ITBase file downloaded in previous step.
Select Next.
Select Import. This starts the import process of the IT Base solution
Wait for the IT Base solution to finish importing. The import process takes a few minutes and once it's complete you're notified with a Success message.
Browse for and select either the managed or unmanaged version of the mpa_HardwareRequestAndManagement file downloaded in previous step.
Select Next and Next again.
For each of the connections listed, select the existing connection that was created in the previous step.
Select Next.
Ignore entering values for the environment variables as that will be completed in an additional step later. Since the apps have not been imported into the environment yet, we are unable to capture what their URL values are at the moment.
Select Import which will start the import process of the Hardware Request and Management solution. Wait for the Hardware Request and Management solution to finish importing. The import process takes a few minutes and once it's complete you're notified with a Success message.
More information: Solution concepts
Step 5: Update environment variables and connection references
Environment variables support your application lifecycle management (ALM) strategy as you migrate the template across environments. Environment variables store keys and values for information that is contextual to the environment the solution is in. Two environment variables holding a reference to the Power Apps URL's need to be populated to support Outlook and Teams notifications.
Additionally, connection references allow makers to configure flows that allow connections to be managed centrally vs. coupled to the flow. This also supports your ALM strategy since you don't need to introduce customizations or solution layers as your flows migrate across environments.
To update environment variables, take these steps:
Go to Power Apps and select the environment that contains the Hardware Request and Management solutions.
Select apps on the left pane.
Go to the Hardware Request canvas app row, vertical ellipsis > Details > Hardware Request Details. Copy the URL to a notepad.
Repeat the same process to copy the Hardware Request and Management Model-driven app URL to a notepad.
Note
If you manually installed an unmanaged version of Hardware Request and Management solution file from GitHub, there is no need to create a new solution to add the environment variable and connection references to. Simply edit these components directly in the existing unmanaged solution file.
Select Solutions on the left pane.
Select + New solution and populate the properties.
Select Add existing > More > Environment variable.
Select both the Hardware Request and Management URL and Hardware Request App URL variables.
Select Next and then Add.
Note
If you manually imported either the managed or unmanaged version of the Hardware Request and Management solution file from GitHub, there is no need to add and update Connection References as those were set during the original import process.
Only Add and update connection references if you installed from AppSource. Skip to step 13 in this section.
Select Add existing > More > Connection References
Multiselect the following connection references:
- Hardware Request and Management – Approvals
- Hardware Request and Management – Cards for Power Apps
- Hardware Request and Management – Dataverse
- Hardware Request and Management – Teams
- Hardware Request and Management – Office 365 Outlook
Select Next and then Add.
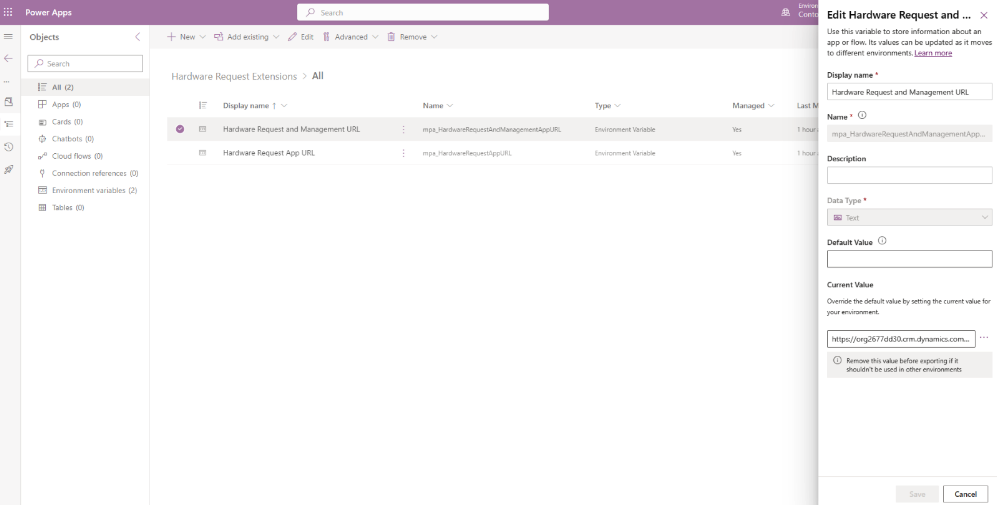
Select the Hardware Request and Management URL environment variable.
Select + New value under the Current Value section.
Paste the URL value previously copied to your notepad in the current value field and select Save.
Repeat steps 12-15 of this section for the Hardware Request App URL environment variable.
 More information: Use environment variables in solutions
Step 6: Share and set cloud flows to on
Some of the cloud flows may be off by default because the environment variables set in Step 5 are not populated yet. Additionally, it is important for some flows to run under a user's context when invoking actions like starting a Teams group chat, generating an approval or sending an email notification.
Configure run-only user privileges
Perform these steps to ensure certain flows run under the user's context:
Go to Power Apps and select the environment you installed the solution in
Select Solutions on the left pane and select the Hardware Request and Management solution
Select Cloud flows
Take these steps for each flow:
- Select the flow and select Edit under the Run only users section in the lower right corner
- Set up the security groups.
- If the solution is being deployed enterprise wide, search for an All Company security group.
- If the solution is being deployed to a security group that contains specific members who will use the apps then select that security group.
- Ensure the Connections Used all say Provided by run-only user
- Select Save
Configure run-only user privileges for each of these flows:
- Create Initial Assets From Request
- New Hardware Request Submitted For Approval
- Notify Deliver Complete
- Notify Purchase Complete
- Notify Received Complete
- Notify Request Complete
- Notify Review Complete
- Set Assets As Delivered With Refresh Date
More information: Share a cloud flow
Turn on cloud flows
To turn on cloud flows that were not on by default when installing the solution from AppSource, take these steps:
Go to Power Apps and select the environment you installed the solution in.
Select Solutions on the left pane and select the unmanaged solution you created in the previous step for the environment variables.
Select Add Existing > More > Connection Reference and select the following connection references:
- Hardware Request and Management – Approvals
- Hardware Request and Management - Cards for Power Apps
- Hardware Request and Management – Dataverse
- Hardware Request and Management - Microsoft Teams
- Hardware Request and Management - Office 365 Outlook
Select Add
For each of the Connection References, select to edit the properties and choose the Connection in the drop-down list previously created.
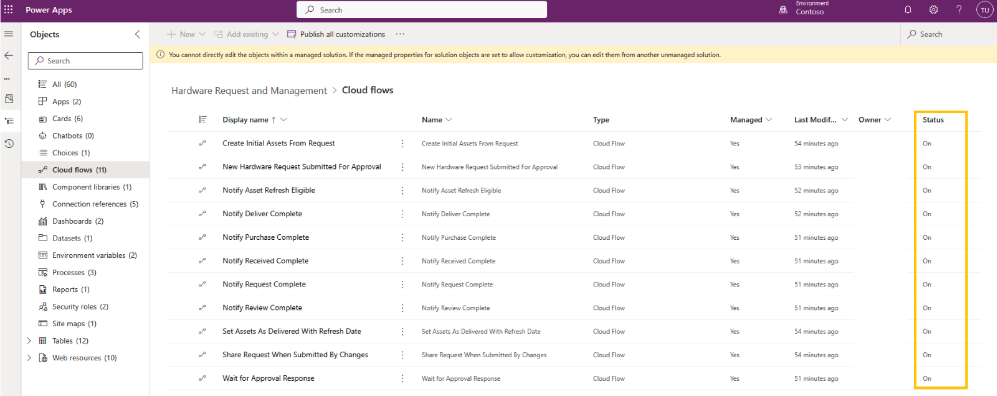
Select Solutions in the left pane and select the Hardware Request and Management solution.
Select Cloud flows.
Perform the following steps for each of the flows whose status is Off:
- Select the flow row
- Select Turn on at the top of the screen
Turn on cloud flows for each of these flows:
- New Hardware Request Submitted For Approval
- Notify Asset Refresh Eligible
- Notify Deliver Complete
- Notify Purchase Complete
- Notify Received Complete
- Notify Request Complete
- Notify Review Complete
- Wait for Approval Response
Step 7: Share the apps
Access to both the Hardware Request and the Hardware Management apps can be controlled by either assigning directly to user(s) or security groups.
Take the following steps to share the Hardware Request app with users:
Go to Power Apps and select the environment you installed the solution in.
Select Solutions on the left pane and select the Hardware Request and Management solution from the list.
Select Apps.
Go to the Hardware Request app row and then the three dots.
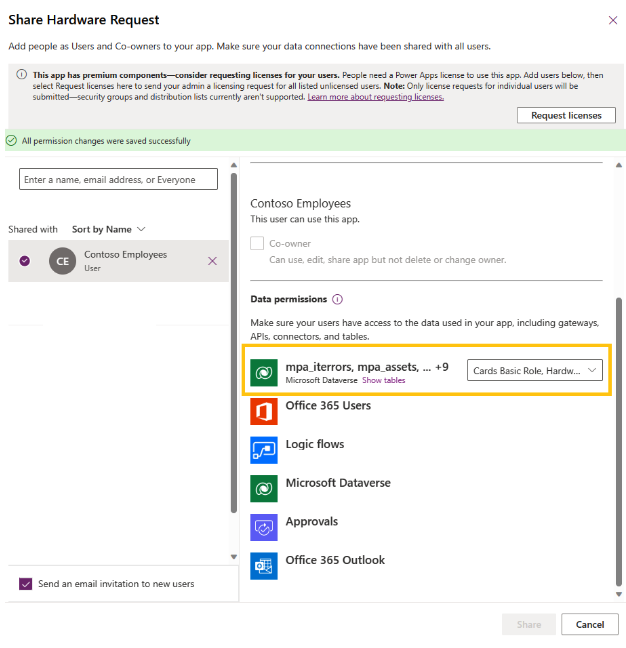
Select Share.
Search for either the users in your environment and/or Microsoft Entra ID Security Group that contains the members you want to share the app with.
Under the Data permissions section, assign the following security roles next to the Dataverse connection:
- Approvals User
- Basic User (Under Standard roles at the bottom)
- Cards Basic Role
- IT Base User
- Hardware Request and Management – Employee
Select Share
Take the following steps to share the Hardware Management app with users:
Select the Hardware Request and Management app row and next the ellipsis (three vertical dots) and then select Share
Search for either the users in your environment and/or Microsoft Entra ID Security Group that contain the members you want to share the app with
Under the Data permissions section, assign the following security roles next to the Dataverse connection:
- Approvals User
- Basic User
- Cards Basic Role
- IT Base User
- Power BI workspace viewer
- Hardware Request and Management – Business Administrator
Select Share
Important
Be sure to uncheck the Send an email invitation to new users if you do not want to send an email notification once broadly shared.
Note
If Hardware Request and Management apps aren't shared with you and you cannot access them directly from Power Apps, please contact your admin.
Step 8: Enable Dataverse search (optional)
Dataverse search delivers fast and comprehensive search results in a single list, sorted by relevance. Find hardware request and asset data quickly by enabling Dataverse search in the environment that you deploy the template in. To enable Dataverse search, follow these steps:
- Go to Power Platform admin center.
- Select Environments on the left pane and then select the environment where the solution was installed.
- Select Settings at the top of the screen.
- Expand the Product section and select Features.
- Underneath the Search section:
- Set the Dataverse search option to On
- Set the Use quick find view of an entity for searching on grids and sub-grids to On
More information: Configure Dataverse search to improve search results and performance
Step 9: Enable copilot (optional)
Microsoft Copilot for Power Apps model-driven apps is a next-generation AI assistant for app admins to get insights about the data in their apps through conversation in natural language. As a Hardware Request and Management admin, you can leverage Copilot to help you get insights on data. As a Power Platform admin, take these steps to enable Copilot and manage behavior settings for all users in the selected environment:
- Go to the Power Platform admin center.
- Select Environments on the left pane and then select the environment where you want to enable Copilot for model-driven app users.
- Select Settings.
- Expand the Product section and select Features to turn on Copilot.
- In the Copilot section, set the value for Allow users to analyze data using an AI-powered chat experience in canvas and model-driven apps to On.
- Select Save.
- Next, go back to Settings.
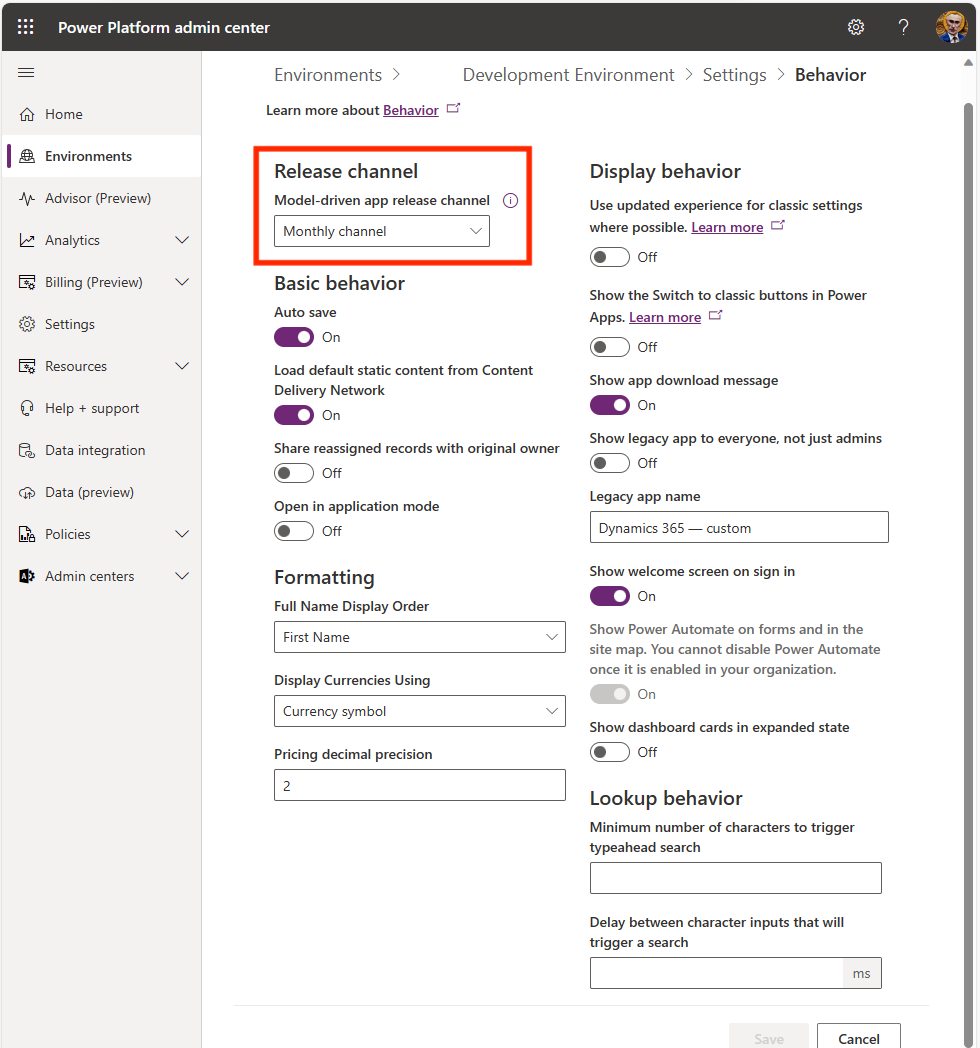
- Expand the Product section and select Behavior to manage behavior settings.
- In the Release channel section, select Monthly channel from the dropdown.
- Select Save.
Step 10: Enable auditing (optional)
While not required, we recommend enabling the audit setting in your environment so it's easy to see who creates and updates records. To do this:
- Go to the Power Platform admin center.
- Select Environments on the left pane and then select the environment where the solution was installed.
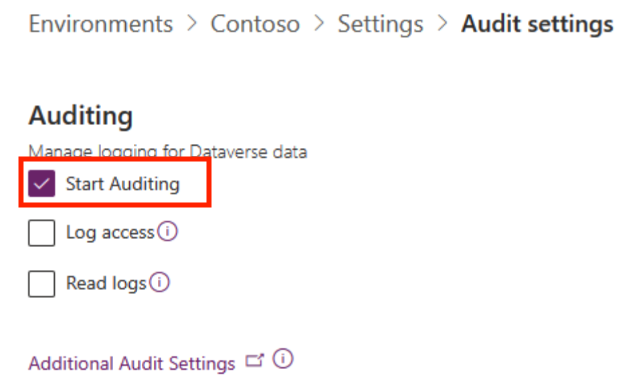
- Expand Audit and logs and select Audit settings
- In the Auditing section,select Start Auditing
Step 11: Support more languages
All fields are globalized so that they display date, time and number formats according to your browser's language setting. All strings in the Hardware Request canvas app are defaulted to English. However, the canvas apps are localization ready. This means all Text, Accessible Label, Tool Tip, HintText, InputPlaceHolderText, and Notifications have Power Fx functions built in to check whether a localized string is present for the user's logged-in browser language code. These strings are administered and maintained via one of the administrator apps.
The most efficient way to load and maintain these values is by using the Export to Excel Online capability available in the administrator app in bulk rather than manually entering each one.
To create localized strings:
- Go to Power Apps.
- Select Apps.
- Open either the IT Template Administrator or Hardware Request and Management Model-driven app.
- Select Export to Excel and then open in Excel Online.
- Create or update rows with the following attributes:
| Field | Examples | Description |
|---|---|---|
| English value | Cancel | The English version of the string that serves as the string key that the application will always look up to see if there's a corresponding localized value to display. |
| Language | de | The language ISO code of the display value. The apps will automatically look up to see if there are localized strings to display based upon the user's browser language code. |
| Localized value | Abbrechen | The localized string value to display for the given English value. |
| String type | Label | Not required, but helps categorize what control/property the string is, noting that one localization entry can support multiple property types so just choose the primary property type in that situation. |
Tip
A CSV file is available for download on the GitHub Templates for Power Platform site. It contains all the app default English strings. You can import the CSV file into your environment using the Import data capability that is part of the administrator app. Although not required for English-only deployments, importing this file helps you quickly identify the localization strings that you need to prepare for your required language.
To further accelerate the string localization creation process, create a cloud flow to trigger off the Dataverse English imported localization records selected in the Administrator app. This flow can use AI Builder action steps to automatically translate the English records to your target language and directly load them into the Localizations table.
More information: Use the text translation prebuilt model in Power Automate
More information: Build global support into canvas apps
Next step
Feedback
Coming soon: Throughout 2024 we will be phasing out GitHub Issues as the feedback mechanism for content and replacing it with a new feedback system. For more information see: https://aka.ms/ContentUserFeedback.
Submit and view feedback for