TripPin part 3 - Navigation tables
This multi-part tutorial covers the creation of a new data source extension for Power Query. The tutorial is meant to be done sequentially—each lesson builds on the connector created in previous lessons, incrementally adding new capabilities to your connector.
In this lesson, you will:
- Create a navigation table for a fixed set of queries
- Test the navigation table in Power BI Desktop
This lesson adds a navigation table to the TripPin connector created in the previous lesson. When your connector used the OData.Feed function (Part 1), you received the navigation table “for free”, as derived from the OData service’s $metadata document. When you moved to the Web.Contents function (Part 2), you lost the built-in navigation table. In this lesson, you take a set of fixed queries you created in Power BI Desktop and add the appropriate metadata for Power Query to popup the Navigator dialog for your data source function.
See the Navigation Table documentation for more information about using navigation tables.
Defining fixed queries in the connector
A simple connector for a REST API can be thought of as a fixed set of queries, each returning a table. These tables are made discoverable through the connector’s navigation table. Essentially, each item in the navigator is associated with a specific URL and set of transformations.
You start by copying the queries you wrote in Power BI Desktop (in the previous lesson) into your connector file. Open the TripPin project in Visual Studio Code, and paste the Airlines and Airports queries into the TripPin.pq file. You can then turn those queries into functions that take a single text parameter:
GetAirlinesTable = (url as text) as table =>
    let
        source = TripPin.Feed(url & "Airlines"),
        value = source[value],
        toTable = Table.FromList(value, Splitter.SplitByNothing(), null, null, ExtraValues.Error),
        expand = Table.ExpandRecordColumn(toTable, "Column1", {"AirlineCode", "Name"}, {"AirlineCode", "Name"})
    in
        expand;

GetAirportsTable = (url as text) as table =>
    let
        source = TripPin.Feed(url & "Airports"),
        value = source[value],
        #"Converted to Table" = Table.FromList(value, Splitter.SplitByNothing(), null, null, ExtraValues.Error),
        #"Expanded Column1" = Table.ExpandRecordColumn(#"Converted to Table", "Column1", {"Name", "IcaoCode", "IataCode", "Location"}, {"Name", "IcaoCode", "IataCode", "Location"}),
        #"Expanded Location" = Table.ExpandRecordColumn(#"Expanded Column1", "Location", {"Address", "Loc", "City"}, {"Address", "Loc", "City"}),
        #"Expanded City" = Table.ExpandRecordColumn(#"Expanded Location", "City", {"Name", "CountryRegion", "Region"}, {"Name.1", "CountryRegion", "Region"}),
        #"Renamed Columns" = Table.RenameColumns(#"Expanded City",{{"Name.1", "City"}}),
        #"Expanded Loc" = Table.ExpandRecordColumn(#"Renamed Columns", "Loc", {"coordinates"}, {"coordinates"}),
        #"Added Custom" = Table.AddColumn(#"Expanded Loc", "Latitude", each [coordinates]{1}),
        #"Added Custom1" = Table.AddColumn(#"Added Custom", "Longitude", each [coordinates]{0}),
        #"Removed Columns" = Table.RemoveColumns(#"Added Custom1",{"coordinates"}),
        #"Changed Type" = Table.TransformColumnTypes(#"Removed Columns",{{"Name", type text}, {"IcaoCode", type text}, {"IataCode", type text}, {"Address", type text}, {"City", type text}, {"CountryRegion", type text}, {"Region", type text}, {"Latitude", type number}, {"Longitude", type number}})
    in
        #"Changed Type";
Next you'll import the mock navigation table query you wrote that creates a fixed table linking to these data set queries. Call it TripPinNavTable:
TripPinNavTable = (url as text) as table =>
    let
        source = #table({"Name", "Data"}, {
            { "Airlines", GetAirlinesTable(url) },
            { "Airports", GetAirportsTable(url) }
        })
    in
        source;
Finally you declare a new shared function, TripPin.Contents, that's used as your main data source function. You also remove the Publish value from TripPin.Feed so that it no longer shows up in the Get Data dialog.
[DataSource.Kind="TripPin"]
shared TripPin.Feed = Value.ReplaceType(TripPinImpl, type function (url as Uri.Type) as any);

[DataSource.Kind="TripPin", Publish="TripPin.Publish"]
shared TripPin.Contents =  Value.ReplaceType(TripPinNavTable, type function (url as Uri.Type) as any);
Note
Your extension can mark multiple functions as shared, with or without associating them with a DataSource.Kind. However, when you associate a function with a specific DataSource.Kind, each function must have the same set of required parameters, with the same name and type. This is because the data source function parameters are combined to make a 'key' used for looking up cached credentials.
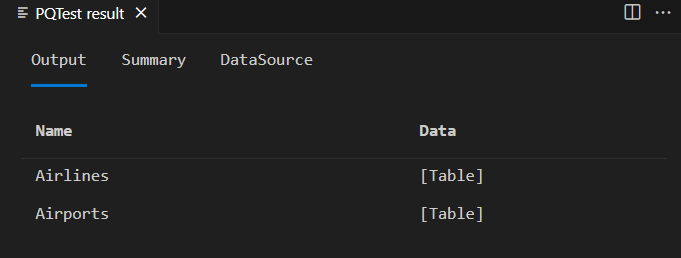
Build your connector after finalizing all the changes and test your TripPin.Contents function using the TripPin.query.pq file. You can continue to use the previously created credential or you can set a new one and then evaluate your current Power Query file.
TripPin.Contents("https://services.odata.org/v4/TripPinService/")
Creating a navigation table
Use the handy Table.ToNavigationTable function to format your static table into something that Power Query recognizes as a navigation table. Since this function isn't part of Power Query's standard library, you need to copy its source code into your .pq file.
With this helper function in place, next update your TripPinNavTable function to add the navigation table fields.
TripPinNavTable = (url as text) as table =>
    let
        source = #table({"Name", "Data", "ItemKind", "ItemName", "IsLeaf"}, {
            { "Airlines", GetAirlinesTable(url), "Table", "Table", true },
            { "Airports", GetAirportsTable(url), "Table", "Table", true }
        }),
        navTable = Table.ToNavigationTable(source, {"Name"}, "Name", "Data", "ItemKind", "ItemName", "IsLeaf")
    in
        navTable;
Running your test query again, after building your connector again, gives you a similar result as last time—with a few more columns added.
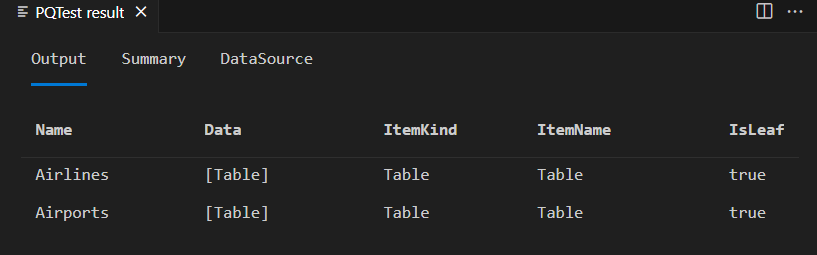
Note
You don't see the Navigator window appear in the PQTest result window of Visual Studio Code. The M Query Output window always displays the underlying table.
If you copy your extension over to your Power BI Desktop custom connector and invoke the new function from the Get Data dialog, your navigator appears.

If you right select on the root of the navigation tree and select Edit, you see the same table as you did within Visual Studio.

Conclusion
In this tutorial, you added a Navigation Table to your extension. Navigation Tables are a key feature that makes connectors easier to use. In this example your navigation table only has a single level, but the Power Query UI supports displaying navigation tables that have multiple dimensions (even when they're ragged).