Note
Access to this page requires authorization. You can try signing in or changing directories.
Access to this page requires authorization. You can try changing directories.
Makers can choose the columns displayed in the form header. Form headers have two main visual components, the form header and the flyout for the form header.
Form header
The form header is used to display common columns that are important for the table. Form headers can't display columns that use unsupported controls. More information: Controls that can be displayed on the form header
Most controls that can't be displayed in form header can be displayed in the form header flyout.
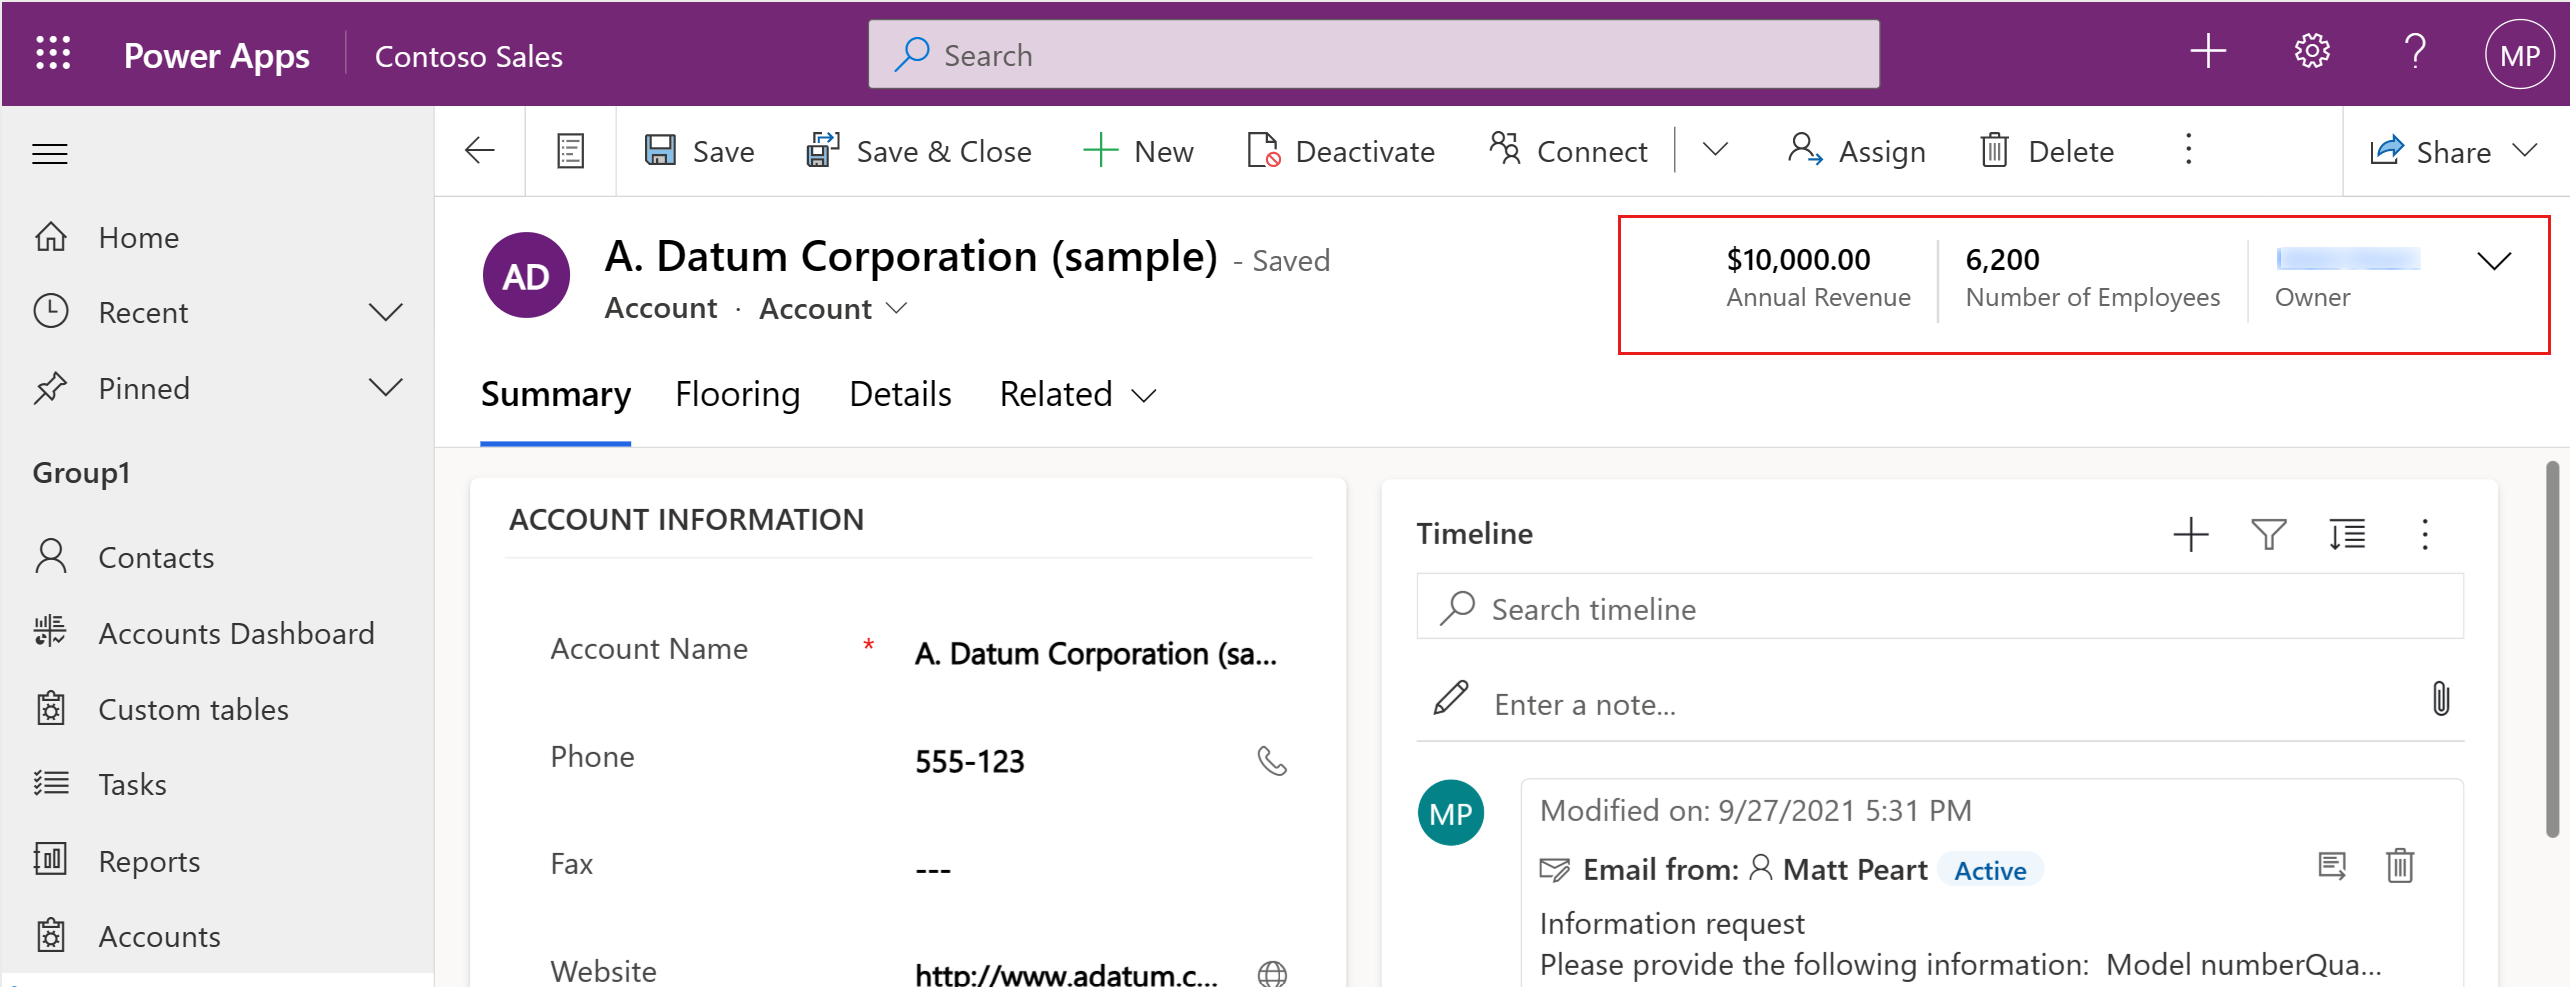
Form header flyout
The form header flyout displays when a user selects the chevron located to the right of the form header, which can display more information otherwise hidden in the form header. The header flyout enables users to edit column values.
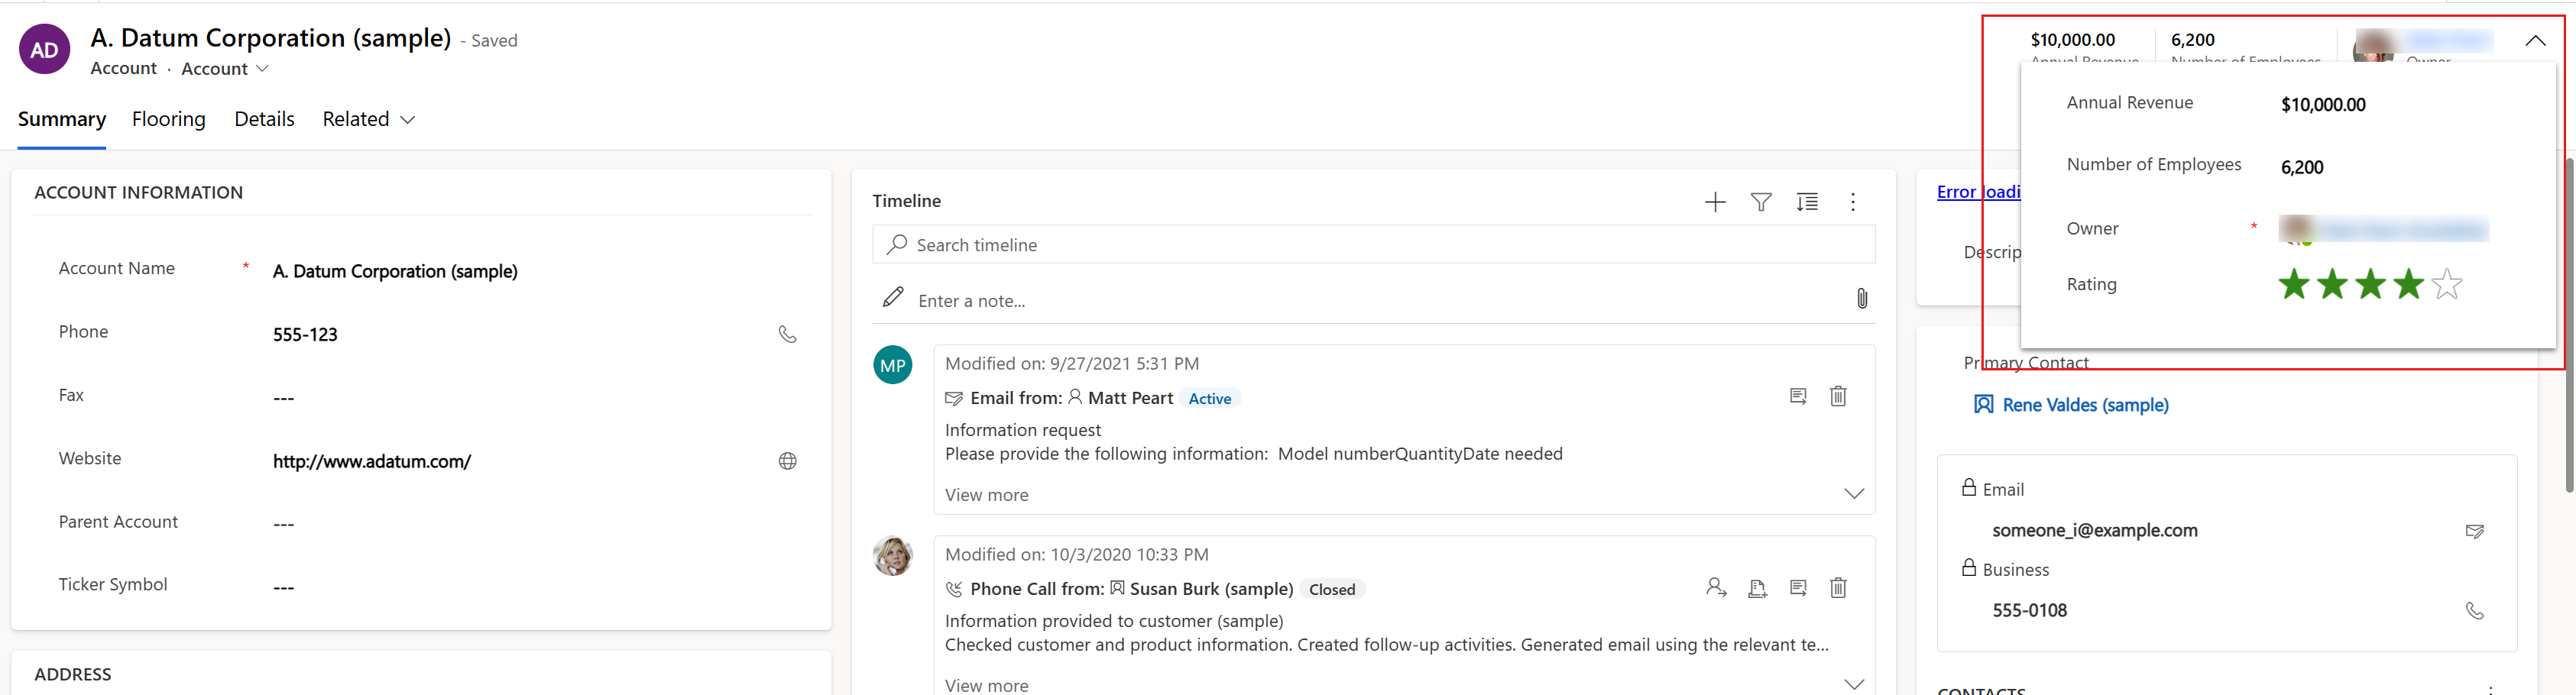
The header flyout displays all header columns including the four columns that are directly displayed in the header. By default, the header flyout is available for display, but makers can hide it if needed.
Show or hide the header flyout
To show or hide the header flyout for a model-driven form, follow these steps:
- Open the form designer to create or edit a form.
- Select the form header in the form preview or use the tree view to select it.
- In the right property pane, select Show header flyout to make the header flyout visible or clear it to hide the header flyout.
- In the command bar, select Save to save the form, or select Publish to save and make your changes visible to users.
Note
- Use the new form designer. The classic form designer doesn't provide the ability to show or hide the header flyout.
- An image for a table is displayed in the header only when the Primary Image attribute is defined for the table and the form property Show image in the form is enabled. More information: Image columns.
- Developers can specify an image for a table by using the EntityMetadata.PrimaryImageAttribute attribute.
High-density header
Model-driven app forms use a high-density form header to ensure that key information is always visible to users. High-density headers also make sure the record title never truncates and long record titles are displayed using multiple lines. Similarly, the high-density header also ensures that up to four column values are directly visible in the header and never truncated or hidden.
To ensure that key information is always visible, the framework displays up to four read-only column values and users can't directly edit the column values in the header. Visualizations such as custom components or web resources don't render on the header, but are available in the flyout.
Controls that can be displayed on the form header
Columns set to these controls can be displayed in the main body of a high-density header:
checkboxdatetimedecimaldurationemailaddressfloatintegerlanguagepickerlookupmoneyphonenumberpicklistregardingtextboxtickertimezonepicklist
These controls are replaced with a simplified version in the header. Thus, not all control features are available. For example, for lookup controls, just a link is rendered and control options like Use Main Form Dialog for Edit aren't supported.
Any other type of control, including custom Power Apps Component Framework controls or web resources, aren't displayed.
To show these unsupported controls or have full functionality of controls, add them to the form header flyout instead of the form header.
Form designer messages related to form headers
When you edit forms using the new or classic form designer, you might see messages related to form headers. Below, you can find details on each message and why you're seeing it.
We've upgraded your form to show a high density header that displays more data. You can edit this setting in the properties of the header
This message is displayed in the form designer when a maker creates a new main form (including via the Save-as action) or edits a main form that hasn't previously been configured for header density.
The framework defaults to high-density header and this message helps makers become aware of that behavior. Makers can override the framework default at any time by manually configuring the form header density as outlined earlier.
This form isn't using high density header, access the setting in the header properties. High density header helps display more data
This message is displayed in the form designer when a maker opens a main form for editing that is configured to use low-density header.
The message helps increase awareness about the high-density header and its benefits.
Column moved to header flyout: The header supports displaying up to four read-only column values. The column [field display name] will now only be available from the flyout
This message is displayed in the form designer when a form is using high-density header with the header flyout visible.
High-density header displays read-only values of the first four columns in the header. When makers add a column in the header in the top four positions, it causes an existing column that was directly displayed in the header to become extended and visible only in the header flyout.
The message informs the maker of the change and confirms whether to proceed with the action.
Header column limit exceeded: The header supports displaying up to four read-only column values. Remove unused columns to add more
This message is displayed in the form designer when a form is using high-density header with the header flyout hidden.
High-density header displays read-only values of up to four columns in the header. Because the header flyout is hidden, users are unable to see the additional columns.
The message informs the maker that there are already four columns in the header and prevents adding additional columns in the header that users won't be able to see.
Header doesn't display custom components: The header supports displaying up to four read-only column values. Remove the custom component from the column before adding it to the header
This message is displayed in the form designer when a form is using high-density header with the header flyout hidden.
High-density header displays read-only values of columns in the header. Because the header flyout is hidden, users are unable to see any custom components associated with the columns in the header.
The message informs the maker that they're trying to add a column with an associated custom component to the header and they must remove the custom component before adding the column to the header. This is because users won't be able to see the custom component in the header.
Header displays read-only column values: The header supports displaying up to four read-only column values. To provide editability to the user, add the column to a section in the form
This message is displayed in the form designer when a form is using high density header with the header flyout hidden.
High-density header displays read-only values of columns in the header. Because the header flyout is hidden, users will be unable to edit column values.
The message informs the maker that any columns added to the header will be read-only and that any columns they want users to edit should also be added to a section in the form.
Header column values aren't editable: Moving a column from the body to the header will display as a read-only value. To maintain editability, copy the column to the header
This message is displayed in the form designer only for forms using high-density header with the header flyout hidden.
High-density header displays read-only values of columns in the header. Because the header flyout is hidden, users will be unable to edit column values.
The message informs the maker that they're trying to move a column from the form body to the form header. Doing so will make it read-only. It gives the maker the choice of moving the column to the header or adding a copy of the column to the header. Moving the column to the header will make the column unavailable in the original location on the form body for users to edit. Adding a copy of the column to the header will leave the column in the original location as-is, ensuring that users can continue to edit it within the form body.
This form is using high density header. For the best authoring experience with this form, use the new form designer
This message is displayed in the classic form designer when a maker opens a main form for editing and it's configured to use high-density header.
The classic form designer doesn't provide a WYSIWYG authoring experience. It also doesn't detect and prevent or warn makers about the implications of changes they make to the form header. For example, when you edit a form that's using high-density header with the header flyout hidden, the classic form designer won't prevent makers from adding more than four columns to the header even though these columns won't be available to users.
The message informs the maker that when editing a form that's using high-density header, they should use the new form designer. This helps ensure the maker is aware of the impact of their changes to the form header.
See also
Overview of the model-driven form designer
Create, edit, or configure forms using the form designer
Add, configure, move, or delete columns on a form
Add, configure, move, or delete components on a form
Add, configure, move, or delete sections on a form
Add, configure, move, or delete tabs on a form
Add and configure a subgrid component on a form
Add and configure a quick view component on a form
Configure a lookup component on a form
Using the tree view in the form designer
Create and edit columns