Unlike other connection methods using the Exchange Online PowerShell module, you can't run the connection commands in a Windows PowerShell session on your local computer. Instead, you connect in the context of the Azure resource that's associated with the managed identity (for example, an Azure automation account or an Azure Virtual Machine).
The rest of this article explains how to connect using managed identity, and the requirements for creating and configuring the proper resources with managed identities in Azure.
Note
In Exchange Online PowerShell, you can't use the procedures in this article with the following Microsoft 365 Group cmdlets:
After that, as a test, you can start with as simple, low-impact command in the runbook before moving on to more complex commands or scripts. For example:
PowerShell
Get-AcceptedDomain | Format-Table Name
After you've successfully created, saved, and published the PowerShell runbook, do the following steps to run it in the future:
After that, as a test, you can start with as simple, low-impact command in the runbook before moving on to more complex commands or scripts. For example:
PowerShell
Get-AcceptedDomain | Format-Table Name
After you've successfully created the PowerShell runbook, do the following steps to run it in the future:
Step 1: Create a resource with system-assigned managed identity
If you're going to use an existing resource that's already configured with system-assigned managed identity, you can skip to the next step. The following resource types are supported:
Azure Automation accounts
Azure virtual machines (VMs)
Create Azure Automation accounts with system-assigned managed identities
When you create the Automation account, system-assigned managed identity is selected by default on the Advanced tab of the details of the Automation account.
<AutomationAccountName> is the unique name for the new Automation account.
<ResourceGroupName> is the name of the existing resource group that you want to use. Valid values are visible in the output of the command: Get-AzResourceGroup.
<Location> is a valid value from the command: Get-AzLocation | Format-Table Name.
Step 2: Store the system-assigned managed identity in a variable
Use the following syntax to store the Id (GUID) value of the managed identity in a variable that you'll use in the upcoming steps in Azure Az PowerShell.
To verify that the variable was captured successfully, run the command $MI_ID. The output should be a GUID value (for example, 9f164909-3007-466e-a1fe-28d20b16e2c2).
Step 3: Add the Exchange Online PowerShell module to the managed identity
Add the Exchange Online PowerShell module to Azure Automation accounts with system-assigned managed identities
Tip
If the following procedure in the Azure portal doesn't work for you, try the New-AzAutomationModule command in Azure PowerShell that's described after the Azure portal procedure.
In the details flyout that opens, start typing "Modules" in the Search box, and then select Modules from results.
On the Modules flyout that opens, select Add a module.
On the Add a module page that opens, configure the following settings:
Upload a module file: Select Browse from gallery.
PowerShell module file: Select Click here to browse from gallery:
In the Browse Gallery page that opens, start typing "ExchangeOnlineManagement" in the Search box, press Enter, and then select ExchangeOnlineManagement from the results.
On the details page that opens, select Select to return to the Add a module page.
Runtime version: Select 5.1 or 7.1 (Preview). To add both versions, repeat the steps in this section to add and select the other runtime version for the module.
When you're finished, select Import.
Back on the Modules flyout, start typing "ExchangeOnlineManagement" in the Search box to see the Status value. When the module import is complete, the value is Available.
To add the module to the Automation account in Azure PowerShell, use the following syntax:
<ResourceGroupName> is the name of the resource group that's already assigned to the Automation account.
<AutomationAccountName> is the name of the Automation account.
<LatestModuleVersion> is the current version of the ExchangeOnlineManagement module. To see the latest General Availability (GA; non-Preview) version of the module, run the following command in Windows PowerShell: Find-Module ExchangeOnlineManagement. To see the latest Preview release, run the following command: Find-Module ExchangeOnlineManagement -AllowPrerelease.
Currently, the PowerShell procedures don't give you a choice for the runtime version (it's 5.1).
During the import, the ProvisioningState property will have the value Creating. When the module import is complete, the value will change to Succeeded.
$MI_ID is the Id (GUID) value of the managed identity that you stored in a variable in Step 2.
$AppRoleID is the Id (GUID) value of the Exchange.ManageAsApp API permission that's the same in every organization.
$ResourceID is the Id (GUID) value of the Office 365 Exchange Online resource in Microsoft Entra ID. The AppId value is the same in every organization, but the Id value is different in every organization.
For detailed syntax and parameter information, see the following articles:
Assign the Office 365 Exchange Online > Exchange.ManageAsApp API permission to the application using the "Modify the app manifest" method as described in Step 2: Assign API permissions to the application.
After you do these steps, run the Get-MgServicePrincipal command again to confirm that the Office 365 Exchange Online resource is available in Microsoft Entra ID.
For even more information, run the following command to verify that the Exchange.ManageAsApp API permission (dc50a0fb-09a3-484d-be87-e023b12c6440) is available in the Office 365 Exchange Online resource:
¹ The Global Administrator and Exchange Administrator roles provide the required permissions for any task in Exchange Online PowerShell. For example:
Recipient management.
Security and protection features. For example, anti-spam, anti-malware, anti-phishing, and the associated reports.
The Security Administrator role does not have the necessary permissions for those same tasks.
² Microsoft recommends that you use roles with the fewest permissions. Using lower permissioned accounts helps improve security for your organization. Global Administrator is a highly privileged role that should be limited to emergency scenarios when you can't use an existing role.
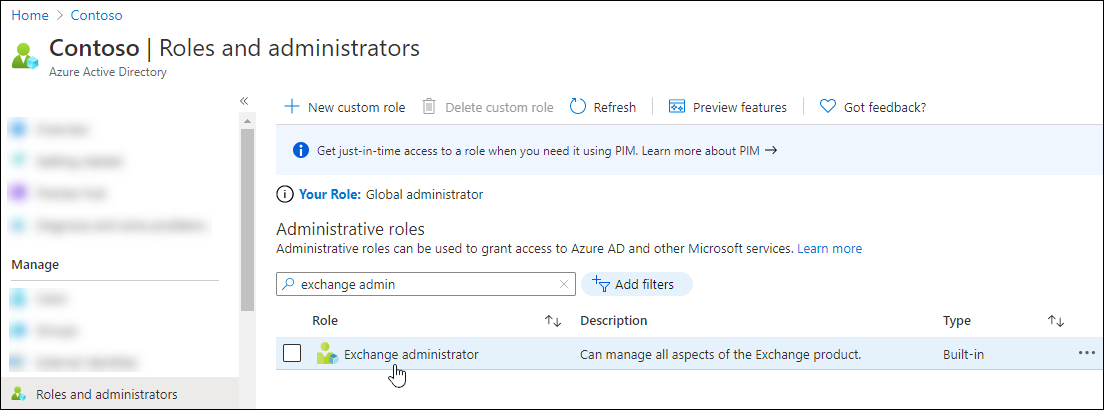
In Microsoft Entra admin center at https://portal.azure.com/, start typing roles and administrators in the Search box at the top of the page, and then select Microsoft Entra roles and administrators from the results in the Services section.
On the Roles and administrators page, find and select one of the supported roles by clicking on the name of the role (not the check box) in the results. For example, find and select the Exchange administrator role.
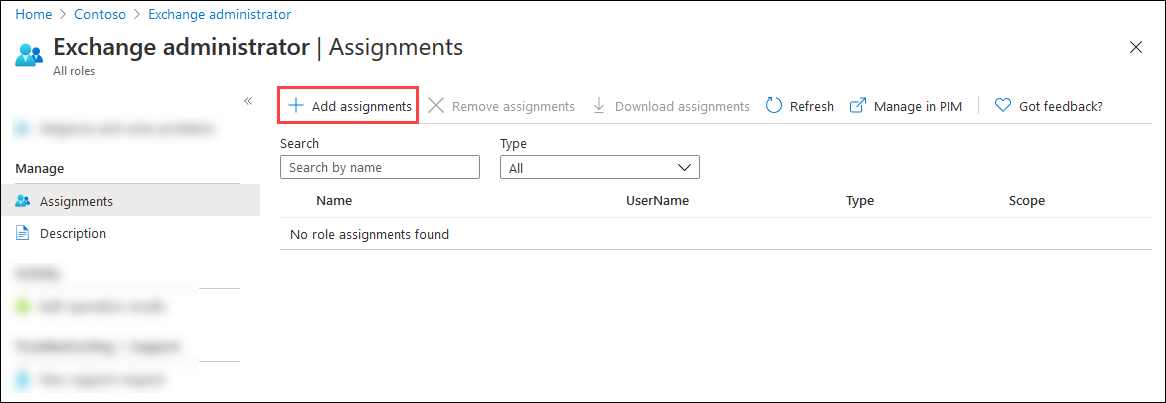
On the Assignments page that opens, select Add assignments.
In the Add assignments flyout that opens, find and select the managed identity you created or identified in Step 1.
When you're finished, select Add.
Back on the Assignments page, verify that the role has been assigned to the managed identity.
To assign a role to the managed identity in Microsoft Graph PowerShell, do the following steps:
Run the following command to connect to Microsoft Graph PowerShell with the required permissions:
If you already have an existing user-assigned managed identity that you're going to use, you can skip to the next step to create a resource with the user-assigned managed identity.
<UserAssignedManagedIdentityName> is the unique name for the user-assigned managed identity.
<ResourceGroupName> is the name of the existing resource group that you want to use. Valid values are visible in the output of the command: Get-AzResourceGroup.
<Location> is a valid value from the command: Get-AzLocation | Format-Table Name.
Step 2: Create a resource with user-assigned managed identity
If you're going to use an existing resource that's already configured with user-assigned managed identity, you can skip to the next step. The following resource types are supported:
Azure Automation accounts
Azure Virtual Machines (VMs)
Create Azure Automation accounts with user-assigned managed identities
<UserAssignedMI> is the name of the user-assigned managed identity that you want to use.
<MIResourceGroupName> is the name of the resource group that's assigned to the user-assigned managed identity. Valid values are visible in the output of the command: Get-AzResourceGroup.
<AutomationAccountName> is the unique name for the new Automation account.
<ResourceGroupName> is the name of the resource group that you want to use, which could be the same value as <MIResourceGroupName>.
<Location> is a valid value from the command: Get-AzLocation | Format-Table Name.
Step 3: Store the user-assigned managed identity in a variable
Use the following syntax in Azure Az PowerShell to store the ClientId value of the user-assigned managed identity in variable that you'll use in the upcoming steps:
To verify that the variable was captured successfully, run the command $MI_ID. The output should be a GUID value (for example, bf6dcc76-4331-4942-8d50-87ea41d6e8a1).
Although the managed identity values were obtained differently for user-assigned vs. system-assigned, we're using the same variable name in the command ($MI_ID), so the command works for both types of managed identities.
Step 6: Assign Microsoft Entra roles to the managed identity
In the Azure portal, be sure to select the user-assigned managed identity as the managed identity to assign the Microsoft Entra role to (not the automation account itself).
The PowerShell command works for both user-assigned and system-assigned managed identities. Although the managed identity values were obtained differently for user-assigned vs. system-assigned, we're using the same variable name in the command ($MI_ID).
This module enables you to handle Microsoft Entra ID tasks, including RBAC, user/group management, PowerShell cmdlets, and AD DS object synchronization. You'll effectively utilize and manage Microsoft Entra ID in your organization after completing this module.