Note
Access to this page requires authorization. You can try signing in or changing directories.
Access to this page requires authorization. You can try changing directories.
Overview
This article demonstrates common scenarios using the Azure Queue Storage service. The scenarios covered include inserting, peeking, getting, and deleting queue messages. Code for creating and deleting queues is also covered.
The examples in this article are written in Python and use the Azure Queue Storage client library for Python. For more information on queues, see the Next steps section.
What is Queue storage?
Azure Queue storage is a service for storing large numbers of messages that can be accessed from anywhere in the world via authenticated calls using HTTP or HTTPS. A single queue message can be up to 64 KB in size, and a queue can contain millions of messages, up to the total capacity limit of a storage account. Queue storage is often used to create a backlog of work to process asynchronously.
Queue service concepts
The Azure Queue service contains the following components:
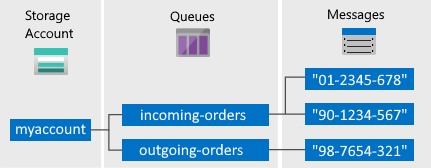
Storage Account: All access to Azure Storage is done through a storage account. For more information about storage accounts, see Storage account overview.
Queue: A queue contains a set of messages. All messages must be in a queue. Note that the queue name must be all lowercase. For information on naming queues, see Naming Queues and Metadata.
Message: A message, in any format, of up to 64 KB. The maximum time that a message can remain in the queue is 7 days. For version 2017-07-29 or later, the maximum time-to-live can be any positive number, or -1 indicating that the message doesn't expire. If this parameter is omitted, the default time-to-live is seven days.
URL format: Queues are addressable using the following URL format: http://
<storage account>.queue.core.windows.net/<queue>The following URL addresses a queue in the diagram:
http://myaccount.queue.core.windows.net/incoming-orders
Create an Azure storage account
The easiest way to create your first Azure storage account is by using the Azure portal. To learn more, see Create a storage account.
You can also create an Azure storage account by using Azure PowerShell, Azure CLI, or the Azure Storage Resource Provider for .NET.
If you prefer not to create a storage account in Azure at this time, you can also use the Azurite storage emulator to run and test your code in a local environment. For more information, see Use the Azurite emulator for local Azure Storage development.
Download and install Azure Storage SDK for Python
The Azure Storage SDK for Python requires Python v2.7, v3.3, or later.
Install via PyPI
To install via the Python Package Index (PyPI), type:
pip install azure-storage-queue
Note
If you are upgrading from the Azure Storage SDK for Python v0.36 or earlier, uninstall the older SDK using pip uninstall azure-storage before installing the latest package.
For alternative installation methods, see Azure SDK for Python.
Copy your credentials from the Azure portal
When the sample application makes a request to Azure Storage, it must be authorized. To authorize a request, add your storage account credentials to the application as a connection string. To view your storage account credentials, follow these steps:
Sign in to the Azure portal.
Locate your storage account.
In the storage account menu pane, under Security + networking, select Access keys. Here, you can view the account access keys and the complete connection string for each key.
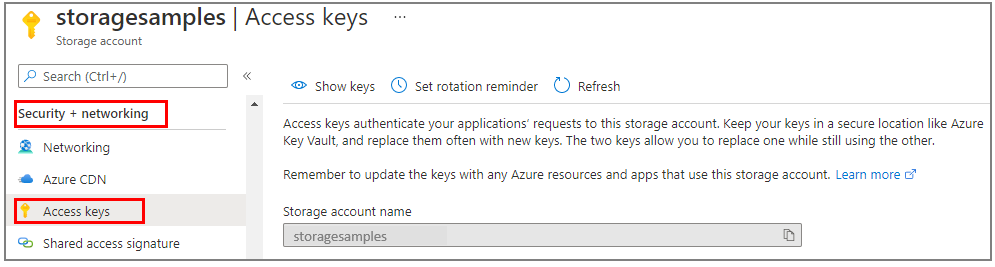
In the Access keys pane, select Show keys.
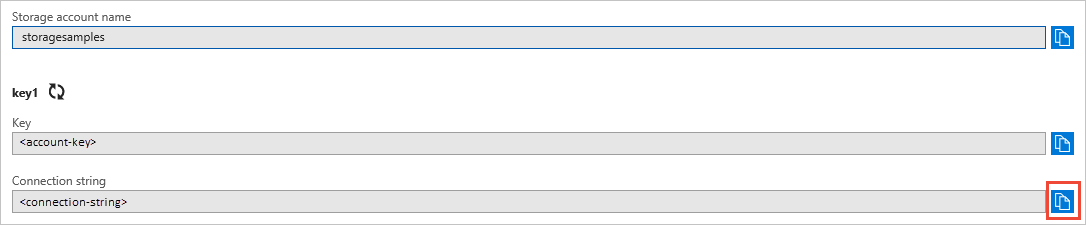
In the key1 section, locate the Connection string value. Select the Copy to clipboard icon to copy the connection string. You'll add the connection string value to an environment variable in the next section.
Configure your storage connection string
After you copy the connection string, write it to a new environment variable on the local machine running the application. To set the environment variable, open a console window, and follow the instructions for your operating system. Replace <yourconnectionstring> with your actual connection string.
setx AZURE_STORAGE_CONNECTION_STRING "<yourconnectionstring>"
After you add the environment variable in Windows, you must start a new instance of the command window.
Restart programs
After you add the environment variable, restart any running programs that will need to read the environment variable. For example, restart your development environment or editor before you continue.
Configure your application to access Queue Storage
The QueueClient object lets you work with a queue. Add the following code near the top of any Python file in which you wish to programmatically access an Azure queue:
from azure.storage.queue import (
        QueueClient,
        BinaryBase64EncodePolicy,
        BinaryBase64DecodePolicy
)

import os, uuid
The os package provides support to retrieve an environment variable. The uuid package provides support for generating a unique identifier for a queue name.
Create a queue
The connection string is retrieved from the AZURE_STORAGE_CONNECTION_STRING environment variable set earlier.
The following code creates a QueueClient object using the storage connection string.
# Retrieve the connection string from an environment
# variable named AZURE_STORAGE_CONNECTION_STRING
connect_str = os.getenv("AZURE_STORAGE_CONNECTION_STRING")

# Create a unique name for the queue
q_name = "queue-" + str(uuid.uuid4())

# Instantiate a QueueClient object which will
# be used to create and manipulate the queue
print("Creating queue: " + q_name)
queue_client = QueueClient.from_connection_string(connect_str, q_name)

# Create the queue
queue_client.create_queue()
Azure queue messages are stored as text. If you want to store binary data, setup Base64 encoding and decoding functions before putting a message in the queue.
Configure Base64 encoding and decoding functions when creating the client object.
# Setup Base64 encoding and decoding functions
base64_queue_client = QueueClient.from_connection_string(
                            conn_str=connect_str, queue_name=q_name,
                            message_encode_policy = BinaryBase64EncodePolicy(),
                            message_decode_policy = BinaryBase64DecodePolicy()
                        )
Insert a message into a queue
To insert a message into a queue, use the send_message method.
message = u"Hello World"
print("Adding message: " + message)
queue_client.send_message(message)
Peek at messages
You can peek at messages without removing them from the queue by calling the peek_messages method. By default, this method peeks at a single message.
# Peek at the first message
messages = queue_client.peek_messages()

for peeked_message in messages:
    print("Peeked message: " + peeked_message.content)
Change the contents of a queued message
You can change the contents of a message in-place in the queue. If the message represents a task, you can use this feature to update the status of the task.
The following code uses the update_message method to update a message. The visibility timeout is set to 0, meaning the message appears immediately and the content is updated.
messages = queue_client.receive_messages()
list_result = next(messages)

message = queue_client.update_message(
        list_result.id, list_result.pop_receipt,
        visibility_timeout=0, content=u'Hello World Again')

print("Updated message to: " + message.content)
Get the queue length
You can get an estimate of the number of messages in a queue.
The get_queue_properties method returns queue properties including the approximate_message_count.
properties = queue_client.get_queue_properties()
count = properties.approximate_message_count
print("Message count: " + str(count))
The result is only approximate because messages can be added or removed after the service responds to your request.
Dequeue messages
Remove a message from a queue in two steps. If your code fails to process a message, this two-step process ensures that you can get the same message and try again. Call delete_message after the message has been successfully processed.
When you call receive_messages, you get the next message in the queue by default. A message returned from receive_messages becomes invisible to any other code reading messages from this queue. By default, this message stays invisible for 30 seconds. To finish removing the message from the queue, you must also call delete_message.
messages = queue_client.receive_messages()

for message in messages:
    print("Dequeueing message: " + message.content)
    queue_client.delete_message(message.id, message.pop_receipt)
There are two ways you can customize message retrieval from a queue. First, you can get a batch of messages (up to 32). Second, you can set a longer or shorter invisibility timeout, allowing your code more or less time to fully process each message.
The following code example uses the receive_messages method to get messages in batches. Then it processes each message within each batch by using a nested for loop. It also sets the invisibility timeout to five minutes for each message.
messages = queue_client.receive_messages(messages_per_page=5, visibility_timeout=5*60)

for msg_batch in messages.by_page():
   for msg in msg_batch:
      print("Batch dequeue message: " + msg.content)
      queue_client.delete_message(msg)
Delete a queue
To delete a queue and all the messages contained in it, call the delete_queue method.
print("Deleting queue: " + queue_client.queue_name)
queue_client.delete_queue()
Tip
Try the Microsoft Azure Storage Explorer
Microsoft Azure Storage Explorer is a free, standalone app from Microsoft that enables you to work visually with Azure Storage data on Windows, macOS, and Linux.
Next steps
Now that you've learned the basics of Queue Storage, follow these links to learn more.
For related code samples using deprecated Python version 2 SDKs, see Code samples using Python version 2.