Note
Access to this page requires authorization. You can try signing in or changing directories.
Access to this page requires authorization. You can try changing directories.
Overview
Azure Queue Storage provides cloud messaging between application components. In designing applications for scale, application components are often decoupled so they can scale independently. Queue Storage delivers asynchronous messaging between application components, whether they are running in the cloud, on the desktop, on an on-premises server, or on a mobile device. Queue Storage also supports managing asynchronous tasks and building process work flows.
About this tutorial
This tutorial shows how to write .NET code for some common scenarios using Azure Queue Storage. Scenarios covered include creating and deleting queues and adding, reading, and deleting queue messages.
Estimated time to complete: 45 minutes
Prerequisites
What is Queue storage?
Azure Queue storage is a service for storing large numbers of messages that can be accessed from anywhere in the world via authenticated calls using HTTP or HTTPS. A single queue message can be up to 64 KB in size, and a queue can contain millions of messages, up to the total capacity limit of a storage account. Queue storage is often used to create a backlog of work to process asynchronously.
Queue service concepts
The Azure Queue service contains the following components:
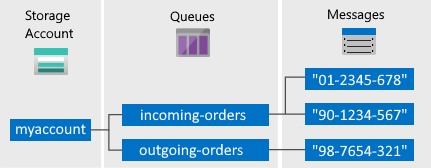
Storage Account: All access to Azure Storage is done through a storage account. For more information about storage accounts, see Storage account overview.
Queue: A queue contains a set of messages. All messages must be in a queue. Note that the queue name must be all lowercase. For information on naming queues, see Naming Queues and Metadata.
Message: A message, in any format, of up to 64 KB. The maximum time that a message can remain in the queue is 7 days. For version 2017-07-29 or later, the maximum time-to-live can be any positive number, or -1 indicating that the message doesn't expire. If this parameter is omitted, the default time-to-live is seven days.
URL format: Queues are addressable using the following URL format: http://
<storage account>.queue.core.windows.net/<queue>The following URL addresses a queue in the diagram:
http://myaccount.queue.core.windows.net/incoming-orders
Create an Azure storage account
The easiest way to create your first Azure storage account is by using the Azure portal. To learn more, see Create a storage account.
You can also create an Azure storage account by using Azure PowerShell, Azure CLI, or the Azure Storage Resource Provider for .NET.
If you prefer not to create a storage account in Azure at this time, you can also use the Azurite storage emulator to run and test your code in a local environment. For more information, see Use the Azurite emulator for local Azure Storage development.
Set up your development environment
Next, set up your development environment in Visual Studio so you're ready to try the code examples in this guide.
Create a Windows console application project
In Visual Studio, create a new Windows console application. The following steps show you how to create a console application in Visual Studio 2019. The steps are similar in other versions of Visual Studio.
- Select File > New > Project
- Select Platform > Windows
- Select Console App (.NET Framework)
- Select Next
- In the Project name field, enter a name for your application
- Select Create
All code examples in this tutorial can be added to the Main() method of your console application's Program.cs file.
You can use the Azure Storage client libraries in any type of .NET application, including an Azure cloud service or web app, and desktop and mobile applications. In this guide, we use a console application for simplicity.
Use NuGet to install the required packages
You need to reference the following four packages in your project to complete this tutorial:
- Azure.Core library for .NET: This package provides shared primitives, abstractions, and helpers for modern .NET Azure SDK client libraries.
- Azure.Storage.Common client library for .NET: This package provides infrastructure shared by the other Azure Storage client libraries.
- Azure.Storage.Queues client library for .NET: This package enables working with Azure Queue Storage for storing messages that may be accessed by a client.
- System.Configuration.ConfigurationManager library for .NET: This package provides access to configuration files for client applications.
You can use NuGet to obtain these packages. Follow these steps:
- Right-click your project in Solution Explorer, and choose Manage NuGet Packages.
- Select Browse
- Search online for
Azure.Storage.Queues, and select Install to install the Azure Storage client library and its dependencies. This will also install the Azure.Storage.Common and Azure.Core libraries, which are dependencies of the queue library. - Search online for
System.Configuration.ConfigurationManager, and select Install to install the Configuration Manager.
Determine your target environment
You have two environment options for running the examples in this guide:
- You can run your code against an Azure Storage account in the cloud.
- You can run your code against the Azurite storage emulator. Azurite is a local environment that emulates an Azure Storage account in the cloud. Azurite is a free option for testing and debugging your code while your application is under development. The emulator uses a well-known account and key. For more information, see Use the Azurite emulator for local Azure Storage development and testing.
Note
You can target the storage emulator to avoid incurring any costs associated with Azure Storage. However, if you do choose to target an Azure Storage account in the cloud, costs for performing this tutorial will be negligible.
Get your storage connection string
The Azure Storage client libraries for .NET support using a storage connection string to configure endpoints and credentials for accessing storage services. For more information, see Manage storage account access keys.
Copy your credentials from the Azure portal
The sample code needs to authorize access to your storage account. To authorize, you provide the application with your storage account credentials in the form of a connection string. To view your storage account credentials:
Navigate to the Azure portal.
Locate your storage account.
In the Settings section of the storage account overview, select Access keys. Your account access keys appear, as well as the complete connection string for each key.
Find the Connection string value under key1, and click the Copy button to copy the connection string. You will add the connection string value to an environment variable in the next step.

For more information about connection strings, see Configure a connection string to Azure Storage.
Note
Your storage account key is similar to the root password for your storage account. Always be careful to protect your storage account key. Avoid distributing it to other users, hard-coding it, or saving it in a plain-text file that is accessible to others. Regenerate your key by using the Azure portal if you believe it may have been compromised.
The best way to maintain your storage connection string is in a configuration file. To configure your connection string, open the app.config file from Solution Explorer in Visual Studio. Add the contents of the <appSettings> element shown here. Replace connection-string with the value you copied from your storage account in the portal:
<configuration>
    <startup>
        <supportedRuntime version="v4.0" sku=".NETFramework,Version=v4.7.2" />
    </startup>
    <appSettings>
        <add key="StorageConnectionString" value="connection-string" />
    </appSettings>
</configuration>
For example, your configuration setting appears similar to:
<add key="StorageConnectionString" value="DefaultEndpointsProtocol=https;AccountName=storagesample;AccountKey=GMuzNHjlB3S9itqZJHHCnRkrokLkcSyW7yK9BRbGp0ENePunLPwBgpxV1Z/pVo9zpem/2xSHXkMqTHHLcx8XRA==EndpointSuffix=core.windows.net" />
To target the Azurite storage emulator, you can use a shortcut that maps to the well-known account name and key. In that case, your connection string setting is:
<add key="StorageConnectionString" value="UseDevelopmentStorage=true" />
Add using directives
Add the following using directives to the top of the Program.cs file:
using System; // Namespace for Console output
using System.Configuration; // Namespace for ConfigurationManager
using System.Threading.Tasks; // Namespace for Task
using Azure.Identity;
using Azure.Storage.Queues; // Namespace for Queue storage types
using Azure.Storage.Queues.Models; // Namespace for PeekedMessage
Create the Queue Storage client
The QueueClient class enables you to retrieve queues stored in Queue Storage. Here's one way to create the service client:
//-------------------------------------------------
// Create the queue service client
//-------------------------------------------------
public void CreateQueueClient(string queueName)
{
    // Get the connection string from app settings
    string connectionString = ConfigurationManager.AppSettings["StorageConnectionString"];

    // Instantiate a QueueClient which will be used to create and manipulate the queue
    QueueClient queueClient = new QueueClient(connectionString, queueName);
}
Tip
Messages that you send by using the QueueClient class, must be in a format that can be included in an XML request with UTF-8 encoding. Optionally, you can set the MessageEncoding option to Base64 to handle non-compliant messages.
Now you are ready to write code that reads data from and writes data to Queue Storage.
Create a queue
This example shows how to create a queue:
//-------------------------------------------------
// Create a message queue
//-------------------------------------------------
public bool CreateQueue(string queueName)
{
    try
    {
        // Get the connection string from app settings
        string connectionString = ConfigurationManager.AppSettings["StorageConnectionString"];

        // Instantiate a QueueClient which will be used to create and manipulate the queue
        QueueClient queueClient = new QueueClient(connectionString, queueName);

        // Create the queue
        queueClient.CreateIfNotExists();

        if (queueClient.Exists())
        {
            Console.WriteLine($"Queue created: '{queueClient.Name}'");
            return true;
        }
        else
        {
            Console.WriteLine($"Make sure the Azurite storage emulator running and try again.");
            return false;
        }
    }
    catch (Exception ex)
    {
        Console.WriteLine($"Exception: {ex.Message}\n\n");
        Console.WriteLine($"Make sure the Azurite storage emulator running and try again.");
        return false;
    }
}
Insert a message into a queue
To insert a message into an existing queue, call the SendMessage method. A message can be either a string (in UTF-8 format) or a byte array. The following code creates a queue (if it doesn't exist) and inserts a message:
//-------------------------------------------------
// Insert a message into a queue
//-------------------------------------------------
public void InsertMessage(string queueName, string message)
{
    // Get the connection string from app settings
    string connectionString = ConfigurationManager.AppSettings["StorageConnectionString"];

    // Instantiate a QueueClient which will be used to create and manipulate the queue
    QueueClient queueClient = new QueueClient(connectionString, queueName);

    // Create the queue if it doesn't already exist
    queueClient.CreateIfNotExists();

    if (queueClient.Exists())
    {
        // Send a message to the queue
        queueClient.SendMessage(message);
    }

    Console.WriteLine($"Inserted: {message}");
}
Peek at the next message
You can peek at the messages in the queue without removing them from the queue by calling the PeekMessages method. If you don't pass a value for the maxMessages parameter, the default is to peek at one message.
//-------------------------------------------------
// Peek at a message in the queue
//-------------------------------------------------
public void PeekMessage(string queueName)
{
    // Get the connection string from app settings
    string connectionString = ConfigurationManager.AppSettings["StorageConnectionString"];

    // Instantiate a QueueClient which will be used to manipulate the queue
    QueueClient queueClient = new QueueClient(connectionString, queueName);

    if (queueClient.Exists())
    {
        // Peek at the next message
        PeekedMessage[] peekedMessage = queueClient.PeekMessages();

        // Display the message
        Console.WriteLine($"Peeked message: '{peekedMessage[0].Body}'");
    }
}
Change the contents of a queued message
You can change the contents of a message in-place in the queue. If the message represents a work task, you could use this feature to update the status of the work task. The following code updates the queue message with new contents, and sets the visibility timeout to extend another 60 seconds. This saves the state of work associated with the message, and gives the client another minute to continue working on the message. You could use this technique to track multistep workflows on queue messages, without having to start over from the beginning if a processing step fails due to hardware or software failure. Typically, you would keep a retry count as well, and if the message is retried more than n times, you would delete it. This protects against a message that triggers an application error each time it is processed.
//-------------------------------------------------
// Update an existing message in the queue
//-------------------------------------------------
public void UpdateMessage(string queueName)
{
    // Get the connection string from app settings
    string connectionString = ConfigurationManager.AppSettings["StorageConnectionString"];

    // Instantiate a QueueClient which will be used to manipulate the queue
    QueueClient queueClient = new QueueClient(connectionString, queueName);

    if (queueClient.Exists())
    {
        // Get the message from the queue
        QueueMessage[] message = queueClient.ReceiveMessages();

        // Update the message contents
        queueClient.UpdateMessage(message[0].MessageId,
                message[0].PopReceipt,
                "Updated contents",
                TimeSpan.FromSeconds(60.0)  // Make it invisible for another 60 seconds
            );
    }
}
Dequeue the next message
Dequeue a message from a queue in two steps. When you call ReceiveMessages, you get the next message in a queue. A message returned from ReceiveMessages becomes invisible to any other code reading messages from this queue. By default, this message stays invisible for 30 seconds. To finish removing the message from the queue, you must also call DeleteMessage. This two-step process of removing a message assures that if your code fails to process a message due to hardware or software failure, another instance of your code can get the same message and try again. Your code calls DeleteMessage right after the message has been processed.
//-------------------------------------------------
// Process and remove a message from the queue
//-------------------------------------------------
public void DequeueMessage(string queueName)
{
    // Get the connection string from app settings
    string connectionString = ConfigurationManager.AppSettings["StorageConnectionString"];

    // Instantiate a QueueClient which will be used to manipulate the queue
    QueueClient queueClient = new QueueClient(connectionString, queueName);

    if (queueClient.Exists())
    {
        // Get the next message
        QueueMessage[] retrievedMessage = queueClient.ReceiveMessages();

        // Process (i.e. print) the message in less than 30 seconds
        Console.WriteLine($"Dequeued message: '{retrievedMessage[0].Body}'");

        // Delete the message
        queueClient.DeleteMessage(retrievedMessage[0].MessageId, retrievedMessage[0].PopReceipt);
    }
}
Use the Async-Await pattern with common Queue Storage APIs
This example shows how to use the Async-Await pattern with common Queue Storage APIs. The sample calls the asynchronous version of each of the given methods, as indicated by the Async suffix of each method. When an async method is used, the Async-Await pattern suspends local execution until the call completes. This behavior allows the current thread to do other work, which helps avoid performance bottlenecks and improves the overall responsiveness of your application. For more details on using the Async-Await pattern in .NET, see Async and Await (C# and Visual Basic)
//-------------------------------------------------
// Perform queue operations asynchronously
//-------------------------------------------------
public async Task QueueAsync(string queueName)
{
    // Get the connection string from app settings
    string connectionString = ConfigurationManager.AppSettings["StorageConnectionString"];

    // Instantiate a QueueClient which will be used to manipulate the queue
    QueueClient queueClient = new QueueClient(connectionString, queueName);

    // Create the queue if it doesn't already exist
    await queueClient.CreateIfNotExistsAsync();

    if (await queueClient.ExistsAsync())
    {
        Console.WriteLine($"Queue '{queueClient.Name}' created");
    }
    else
    {
        Console.WriteLine($"Queue '{queueClient.Name}' exists");
    }

    // Async enqueue the message
    await queueClient.SendMessageAsync("Hello, World");
    Console.WriteLine($"Message added");

    // Async receive the message
    QueueMessage[] retrievedMessage = await queueClient.ReceiveMessagesAsync();
    Console.WriteLine($"Retrieved message with content '{retrievedMessage[0].Body}'");

    // Async delete the message
    await queueClient.DeleteMessageAsync(retrievedMessage[0].MessageId, retrievedMessage[0].PopReceipt);
    Console.WriteLine($"Deleted message: '{retrievedMessage[0].Body}'");

    // Async delete the queue
    await queueClient.DeleteAsync();
    Console.WriteLine($"Deleted queue: '{queueClient.Name}'");
}
Use additional options for dequeuing messages
There are two ways you can customize message retrieval from a queue. First, you can get a batch of messages (up to 32). Second, you can set a longer or shorter invisibility timeout, allowing your code more or less time to fully process each message.
The following code example uses the ReceiveMessages method to get 20 messages in one call. Then it processes each message using a foreach loop. It also sets the invisibility timeout to five minutes for each message. Note that the five minutes starts for all messages at the same time, so after five minutes have passed since the call to ReceiveMessages, any messages which have not been deleted will become visible again.
//-----------------------------------------------------
// Process and remove multiple messages from the queue
//-----------------------------------------------------
public void DequeueMessages(string queueName)
{
    // Get the connection string from app settings
    string connectionString = ConfigurationManager.AppSettings["StorageConnectionString"];

    // Instantiate a QueueClient which will be used to manipulate the queue
    QueueClient queueClient = new QueueClient(connectionString, queueName);

    if (queueClient.Exists())
    {
        // Receive and process 20 messages
        QueueMessage[] receivedMessages = queueClient.ReceiveMessages(20, TimeSpan.FromMinutes(5));

        foreach (QueueMessage message in receivedMessages)
        {
            // Process (i.e. print) the messages in less than 5 minutes
            Console.WriteLine($"De-queued message: '{message.Body}'");

            // Delete the message
            queueClient.DeleteMessage(message.MessageId, message.PopReceipt);
        }
    }
}
Get the queue length
You can get an estimate of the number of messages in a queue. The GetProperties method returns queue properties including the message count. The ApproximateMessagesCount property contains the approximate number of messages in the queue. This number is not lower than the actual number of messages in the queue, but could be higher.
//-----------------------------------------------------
// Get the approximate number of messages in the queue
//-----------------------------------------------------
public void GetQueueLength(string queueName)
{
    // Get the connection string from app settings
    string connectionString = ConfigurationManager.AppSettings["StorageConnectionString"];

    // Instantiate a QueueClient which will be used to manipulate the queue
    QueueClient queueClient = new QueueClient(connectionString, queueName);

    if (queueClient.Exists())
    {
        QueueProperties properties = queueClient.GetProperties();

        // Retrieve the cached approximate message count.
        int cachedMessagesCount = properties.ApproximateMessagesCount;

        // Display number of messages.
        Console.WriteLine($"Number of messages in queue: {cachedMessagesCount}");
    }
}
Delete a queue
To delete a queue and all the messages contained in it, call the Delete method on the queue object.
//-------------------------------------------------
// Delete the queue
//-------------------------------------------------
public void DeleteQueue(string queueName)
{
    // Get the connection string from app settings
    string connectionString = ConfigurationManager.AppSettings["StorageConnectionString"];

    // Instantiate a QueueClient which will be used to manipulate the queue
    QueueClient queueClient = new QueueClient(connectionString, queueName);

    if (queueClient.Exists())
    {
        // Delete the queue
        queueClient.Delete();
    }

    Console.WriteLine($"Queue deleted: '{queueClient.Name}'");
}
Next steps
Now that you've learned the basics of Queue Storage, follow these links to learn about more complex storage tasks.
- View the Queue Storage reference documentation for complete details about available APIs:
- View more feature guides to learn about additional options for storing data in Azure.
- Get started with Azure Table Storage using .NET to store structured data.
- Get started with Azure Blob Storage using .NET to store unstructured data.
- Connect to SQL Database by using .NET (C#) to store relational data.
- Learn how to simplify the code you write to work with Azure Storage by using the Azure WebJobs SDK.
For related code samples using deprecated .NET version 11.x SDKs, see Code samples using .NET version 11.x.