Run STAR-CCM+ with Microsoft HPC Pack on a Linux RDMA cluster in Azure
Important
Classic VMs will be retired on March 1, 2023.
If you use IaaS resources from ASM, please complete your migration by March 1, 2023. We encourage you to make the switch sooner to take advantage of the many feature enhancements in Azure Resource Manager.
For more information, see Migrate your IaaS resources to Azure Resource Manager by March 1, 2023.
This article shows you how to deploy a Microsoft HPC Pack cluster on Azure and run a CD-adapco STAR-CCM+ job on multiple Linux compute nodes that are interconnected with InfiniBand.
Note
Azure has two different deployment models for creating and working with resources: Resource Manager and classic. This article covers using both models, but Microsoft recommends that most new deployments use the Resource Manager model.
Microsoft HPC Pack provides features to run a variety of large-scale HPC and parallel applications, including MPI applications, on clusters of Microsoft Azure virtual machines. HPC Pack also supports running Linux HPC applications on Linux compute-node VMs that are deployed in an HPC Pack cluster. For an introduction to using Linux compute nodes with HPC Pack, see Get started with Linux compute nodes in an HPC Pack cluster in Azure.
Set up an HPC Pack cluster
Download the HPC Pack IaaS deployment scripts from the Download Center and extract them locally.
Azure PowerShell is a prerequisite. If PowerShell is not configured on your local machine, please read the article How to install and configure Azure PowerShell.
At the time of this writing, the Linux images from the Azure Marketplace (which contains the InfiniBand drivers for Azure) are for SLES 12, CentOS 6.5, and CentOS 7.1. This article is based on the usage of SLES 12. To retrieve the name of all Linux images that support HPC in the Marketplace, you can run the following PowerShell command:
get-azurevmimage | ?{$_.ImageName.Contains("hpc") -and $_.OS -eq "Linux" }
The output lists the location in which these images are available and the image name (ImageName) to be used in the deployment template later.
Before you deploy the cluster, you have to build an HPC Pack deployment template file. Because we're targeting a small cluster, the head node will be the domain controller and host a local SQL database.
The following template will deploy such a head node, create an XML file named MyCluster.xml, and replace the values of SubscriptionId, StorageAccount, Location, VMName, and ServiceName with yours.
<?xml version="1.0" encoding="utf-8" ?>
<IaaSClusterConfig>
  <Subscription>
    <SubscriptionId>99999999-9999-9999-9999-999999999999</SubscriptionId>
    <StorageAccount>mystorageaccount</StorageAccount>
  </Subscription>
  <Location>North Europe</Location>
  <VNet>
    <VNetName>hpcvnetne</VNetName>
    <SubnetName>subnet-hpc</SubnetName>
  </VNet>
  <Domain>
    <DCOption>HeadNodeAsDC</DCOption>
    <DomainFQDN>hpc.local</DomainFQDN>
  </Domain>
  <Database>
    <DBOption>LocalDB</DBOption>
  </Database>
  <HeadNode>
    <VMName>myhpchn</VMName>
    <ServiceName>myhpchn</ServiceName>
    <VMSize>Standard_D4</VMSize>
  </HeadNode>
  <LinuxComputeNodes>
    <VMNamePattern>lnxcn-%0001%</VMNamePattern>
    <ServiceNamePattern>mylnxcn%01%</ServiceNamePattern>
    <MaxNodeCountPerService>20</MaxNodeCountPerService>
    <StorageAccountNamePattern>mylnxstorage%01%</StorageAccountNamePattern>
    <VMSize>A9</VMSize>
    <NodeCount>0</NodeCount>
    <ImageName>b4590d9e3ed742e4a1d46e5424aa335e__suse-sles-12-hpc-v20150708</ImageName>
  </LinuxComputeNodes>
</IaaSClusterConfig>
Start the head-node creation by running the PowerShell command in an elevated command prompt:
.\New-HPCIaaSCluster.ps1 -ConfigFile MyCluster.xml
After 20 to 30 minutes, the head node should be ready. You can connect to it from the Azure portal by clicking the Connect icon of the virtual machine.
You might eventually have to fix the DNS forwarder. To do so, start DNS Manager.
- Right-click the server name in DNS Manager, select Properties, and then click the Forwarders tab.
- Click the Edit button to remove any forwarders, and then click OK.
- Make sure that the Use root hints if no forwarders are available check box is selected, and then click OK.
Set up Linux compute nodes
You deploy the Linux compute nodes by using the same deployment template that you used to create the head node.
Copy the file MyCluster.xml from your local machine to the head node, and update the NodeCount tag with the number of nodes that you want to deploy (<=20). Be careful to have enough available cores in your Azure quota, because each A9 instance will consume 16 cores in your subscription. You can use A8 instances (8 cores) instead of A9 if you want to use more VMs in the same budget.
On the head node, copy the HPC Pack IaaS deployment scripts.
Run the following Azure PowerShell commands in an elevated command prompt:
Run Add-AzureAccount to connect to your Azure subscription.
If you have multiple subscriptions, run Get-AzureSubscription to list them.
Set a default subscription by running the Select-AzureSubscription -SubscriptionName xxxx -Default command.
Run .\New-HPCIaaSCluster.ps1 -ConfigFile MyCluster.xml to start deploying Linux compute nodes.
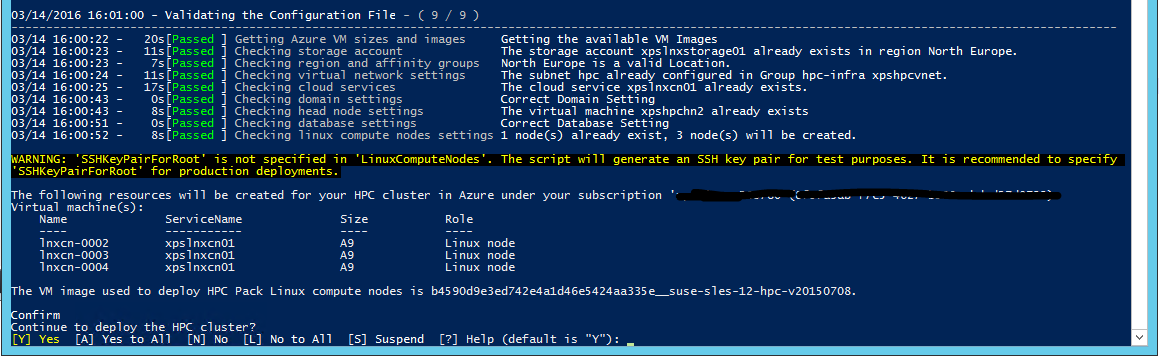
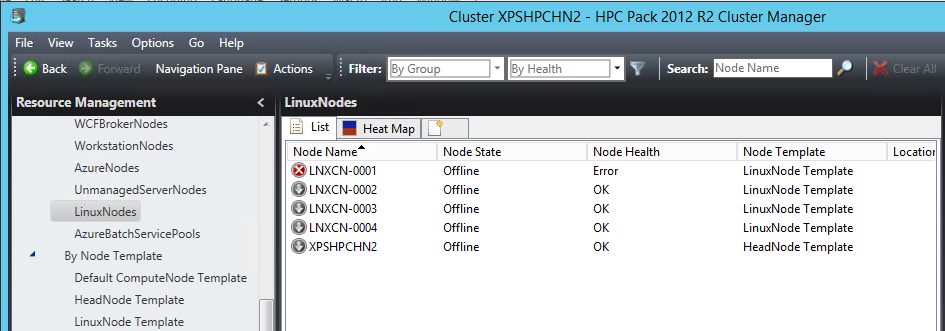
Open the HPC Pack Cluster Manager tool. After few minutes, Linux compute nodes will regularly appear in list of cluster compute nodes. With the classic deployment mode, IaaS VMs are created sequentially. So if the number of nodes is important, getting them all deployed can take a significant amount of time.
Now that all nodes are up and running in the cluster, there are additional infrastructure settings to make.
Set up an Azure File share for Windows and Linux nodes
You can use the Azure File service to store scripts, application packages, and data files. Azure File provides CIFS capabilities on top of Azure Blob storage as a persistent store. Be aware that this is not the most scalable solution, but it is the simplest one and doesn’t require dedicated VMs.
Create an Azure File share by following the instructions in the article Get started with Azure File storage on Windows.
Keep the name of your storage account as saname, the file share name as sharename, and the storage account key as sakey.
Mount the Azure File share on the head node
Open an elevated command prompt and run the following command to store the credentials in the local machine vault:
cmdkey /add:<saname>.file.core.windows.net /user:<saname> /pass:<sakey>
Then, to mount the Azure File share, run:
net use Z: \\<saname>.file.core.windows.net\<sharename> /persistent:yes
Mount the Azure File share on Linux compute nodes
One useful tool that comes with HPC Pack is the clusrun tool. You can use this command-line tool to run the same command simultaneously on a set of compute nodes. In our case, it's used to mount the Azure File share and persist it to survive reboots. In an elevated command prompt on the head node, run the following commands.
To create the mount directory:
clusrun /nodegroup:LinuxNodes mkdir -p /hpcdata
To mount the Azure File share:
clusrun /nodegroup:LinuxNodes mount -t cifs //<saname>.file.core.windows.net/<sharename> /hpcdata -o vers=2.1,username=<saname>,password='<sakey>',dir_mode=0777,file_mode=0777
To persist the mount share:
clusrun /nodegroup:LinuxNodes "echo //<saname>.file.core.windows.net/<sharename> /hpcdata cifs vers=2.1,username=<saname>,password='<sakey>',dir_mode=0777,file_mode=0777 >> /etc/fstab"
Install STAR-CCM+
Azure VM instances A8 and A9 provide InfiniBand support and RDMA capabilities. The kernel drivers that enable those capabilities are available for Windows Server 2012 R2, SUSE 12, CentOS 6.5, and CentOS 7.1 images in the Azure Marketplace. Microsoft MPI and Intel MPI (release 5.x) are the two MPI libraries that support those drivers in Azure.
CD-adapco STAR-CCM+ release 11.x and later is bundled with Intel MPI version 5.x, so InfiniBand support for Azure is included.
Get the Linux64 STAR-CCM+ package from the CD-adapco portal. In our case, we used version 11.02.010 in mixed precision.
On the head node, in the /hpcdata Azure File share, create a shell script named setupstarccm.sh with the following content. This script will be run on each compute node to set up STAR-CCM+ locally.
Sample setupstarcm.sh script
    #!/bin/bash
    # setupstarcm.sh to set up STAR-CCM+ locally

    # Create the CD-adapco main directory
    mkdir -p /opt/CD-adapco

    # Copy the STAR-CCM package from the file share to the local directory
    cp /hpcdata/StarCCM/STAR-CCM+11.02.010_01_linux-x86_64.tar.gz /opt/CD-adapco/

    # Extract the package
    tar -xzf /opt/CD-adapco/STAR-CCM+11.02.010_01_linux-x86_64.tar.gz -C /opt/CD-adapco/

    # Start a silent installation of STAR-CCM without the FLEXlm component
    /opt/CD-adapco/starccm+_11.02.010/STAR-CCM+11.02.010_01_linux-x86_64-2.5_gnu4.8.bin -i silent -DCOMPUTE_NODE=true -DNODOC=true -DINSTALLFLEX=false

    # Update memory limits
    echo "*               hard    memlock         unlimited" >> /etc/security/limits.conf
    echo "*               soft    memlock         unlimited" >> /etc/security/limits.conf
Now, to set up STAR-CCM+ on all your Linux compute nodes, open an elevated command prompt and run the following command:
clusrun /nodegroup:LinuxNodes bash /hpcdata/setupstarccm.sh
While the command is running, you can monitor the CPU usage by using the heat map of Cluster Manager. After few minutes, all nodes should be correctly set up.
Run STAR-CCM+ jobs
HPC Pack is used for its job scheduler capabilities in order to run STAR-CCM+ jobs. To do so, we need the support of a few scripts that are used to start the job and run STAR-CCM+. The input data is kept on the Azure File share first for simplicity.
The following PowerShell script is used to queue a STAR-CCM+ job. It takes three arguments:
- The model name
- The number of nodes to be used
- The number of cores on each node to be used
Because STAR-CCM+ can fill the memory bandwidth, it's usually better to use fewer cores per compute nodes and add new nodes. The exact number of cores per node will depend on the processor family and the interconnect speed.
The nodes are allocated exclusively for the job and can’t be shared with other jobs. The job is not started as an MPI job directly. The runstarccm.sh shell script will start the MPI launcher.
The input model and the runstarccm.sh script are stored in the /hpcdata share that was previously mounted.
Log files are named with the job ID and are stored in the /hpcdata share, along with the STAR-CCM+ output files.
Sample SubmitStarccmJob.ps1 script
    Add-PSSnapin Microsoft.HPC -ErrorAction silentlycontinue
    $scheduler="headnodename"
    $modelName=$args[0]
    $nbCoresPerNode=$args[2]
    $nbNodes=$args[1]

    #---------------------------------------------------------------------------------------------------------
    # Create a new job; this will give us the job ID that's used to identify the name of the uploaded package in Azure
    #
    $job = New-HpcJob -Name "$modelName $nbNodes $nbCoresPerNode" -Scheduler $scheduler -NumNodes $nbNodes -NodeGroups "LinuxNodes" -FailOnTaskFailure $true -Exclusive $true
    $jobId = [String]$job.Id

    #---------------------------------------------------------------------------------------------------------
    # Submit the job
    $workdir =  "/hpcdata"
    $execName = "$nbCoresPerNode runner.java $modelName.sim"

    $job | Add-HpcTask -Scheduler $scheduler -Name "Compute" -stdout "$jobId.log" -stderr "$jobId.err" -Rerunnable $false -NumNodes $nbNodes -Command "runstarccm.sh $execName" -WorkDir "$workdir"


    Submit-HpcJob -Job $job -Scheduler $scheduler
Replace runner.java with your preferred STAR-CCM+ Java model launcher and logging code.
Sample runstarccm.sh script
    #!/bin/bash
    echo "start"
    # The path of this script
    SCRIPT_PATH="$( dirname "${BASH_SOURCE[0]}" )"
    echo ${SCRIPT_PATH}
    # Set the mpirun runtime environment
    export CDLMD_LICENSE_FILE=1999@flex.cd-adapco.com

    # mpirun command
    STARCCM=/opt/CD-adapco/STAR-CCM+11.02.010/star/bin/starccm+

    # Get node information from ENVs
    NODESCORES=(${CCP_NODES_CORES})
    COUNT=${#NODESCORES[@]}
    NBCORESPERNODE=$1

    # Create the hostfile file
    NODELIST_PATH=${SCRIPT_PATH}/hostfile_$$
    echo ${NODELIST_PATH}

    # Get every node name and write into the hostfile file
    I=1
    NBNODES=0
    while [ ${I} -lt ${COUNT} ]
    do
        echo "${NODESCORES[${I}]}" >> ${NODELIST_PATH}
        let "I=${I}+2"
        let "NBNODES=${NBNODES}+1"
    done
    let "NBCORES=${NBNODES}*${NBCORESPERNODE}"

    # Run STAR-CCM with the hostfile argument
    #
    ${STARCCM} -np ${NBCORES} -machinefile ${NODELIST_PATH} \
        -power -podkey "<yourkey>" -rsh ssh \
        -mpi intel -fabric UDAPL -cpubind bandwidth,v \
        -mppflags "-ppn $NBCORESPERNODE -genv I_MPI_DAPL_PROVIDER=ofa-v2-ib0 -genv I_MPI_DAPL_UD=0 -genv I_MPI_DYNAMIC_CONNECTION=0" \
        -batch $2 $3
    RTNSTS=$?
    rm -f ${NODELIST_PATH}

    exit ${RTNSTS}
In our test, we used a Power-On-Demand license token. For that token, you have to set the $CDLMD_LICENSE_FILE environment variable to 1999@flex.cd-adapco.com and the key in the -podkey option of the command line.
After some initialization, the script extracts--from the $CCP_NODES_CORES environment variables that HPC Pack set--the list of nodes to build a hostfile that the MPI launcher uses. This hostfile will contain the list of compute node names that are used for the job, one name per line.
The format of $CCP_NODES_CORES follows this pattern:
<Number of nodes> <Name of node1> <Cores of node1> <Name of node2> <Cores of node2>...`
Where:
<Number of nodes>is the number of nodes allocated to this job.<Name of node_n_...>is the name of each node allocated to this job.<Cores of node_n_...>is the number of cores on the node allocated to this job.
The number of cores ($NBCORES) is also calculated based on the number of nodes ($NBNODES) and the number of cores per node (provided as parameter $NBCORESPERNODE).
For the MPI options, the ones that are used with Intel MPI on Azure are:
-mpi intelto specify Intel MPI.-fabric UDAPLto use Azure InfiniBand verbs.-cpubind bandwidth,vto optimize bandwidth for MPI with STAR-CCM+.-mppflags "-ppn $NBCORESPERNODE -genv I_MPI_DAPL_PROVIDER=ofa-v2-ib0 -genv I_MPI_DAPL_UD=0 -genv I_MPI_DYNAMIC_CONNECTION=0"to make Intel MPI work with Azure InfiniBand, and to set the required number of cores per node.-batchto start STAR-CCM+ in batch mode with no UI.
Finally, to start a job, make sure that your nodes are up and running and are online in Cluster Manager. Then from a PowerShell command prompt, run this:
.\ SubmitStarccmJob.ps1 <model> <nbNodes> <nbCoresPerNode>
Stop nodes
Later on, after you're done with your tests, you can use the following HPC Pack PowerShell commands to stop and start nodes:
    Stop-HPCIaaSNode.ps1 -Name <prefix>-00*
    Start-HPCIaaSNode.ps1 -Name <prefix>-00*
Next steps
Try running other Linux workloads. For example, see: