Note
Access to this page requires authorization. You can try signing in or changing directories.
Access to this page requires authorization. You can try changing directories.
If you want to build manually CNTK from source code on Windows using Visual Studio 2017, this page is for you.
If you are looking for any other kind of support to setup a CNTK build environment or installing CNTK on your system, you should go here instead.
Note
This page assumes that you are trying to build CNTK's master branch.
64-bit OS
CNTK requires a 64-bit Windows installation. We tested the build process on Windows 8.1, Windows 10, and Windows Server 2012 R2 and later. Other environments are not officially supported. For compatibility issues check CNTK Production Build and Test configuration.
Environment Variables and Components
Building CNTK on your system requires the definition and configuration of various environment variables. An overview of environment variables used by the Windows build of CNTK can be found on this page. In addition, this page gives an overview of required and optional components for building CNTK as well as their default install location.
Visual Studio 2017
Install Microsoft Visual Studio 2017 for Windows. A link to the download can be found here.
The Community Version of Visual Studio 2017 is sufficient to build CNTK.
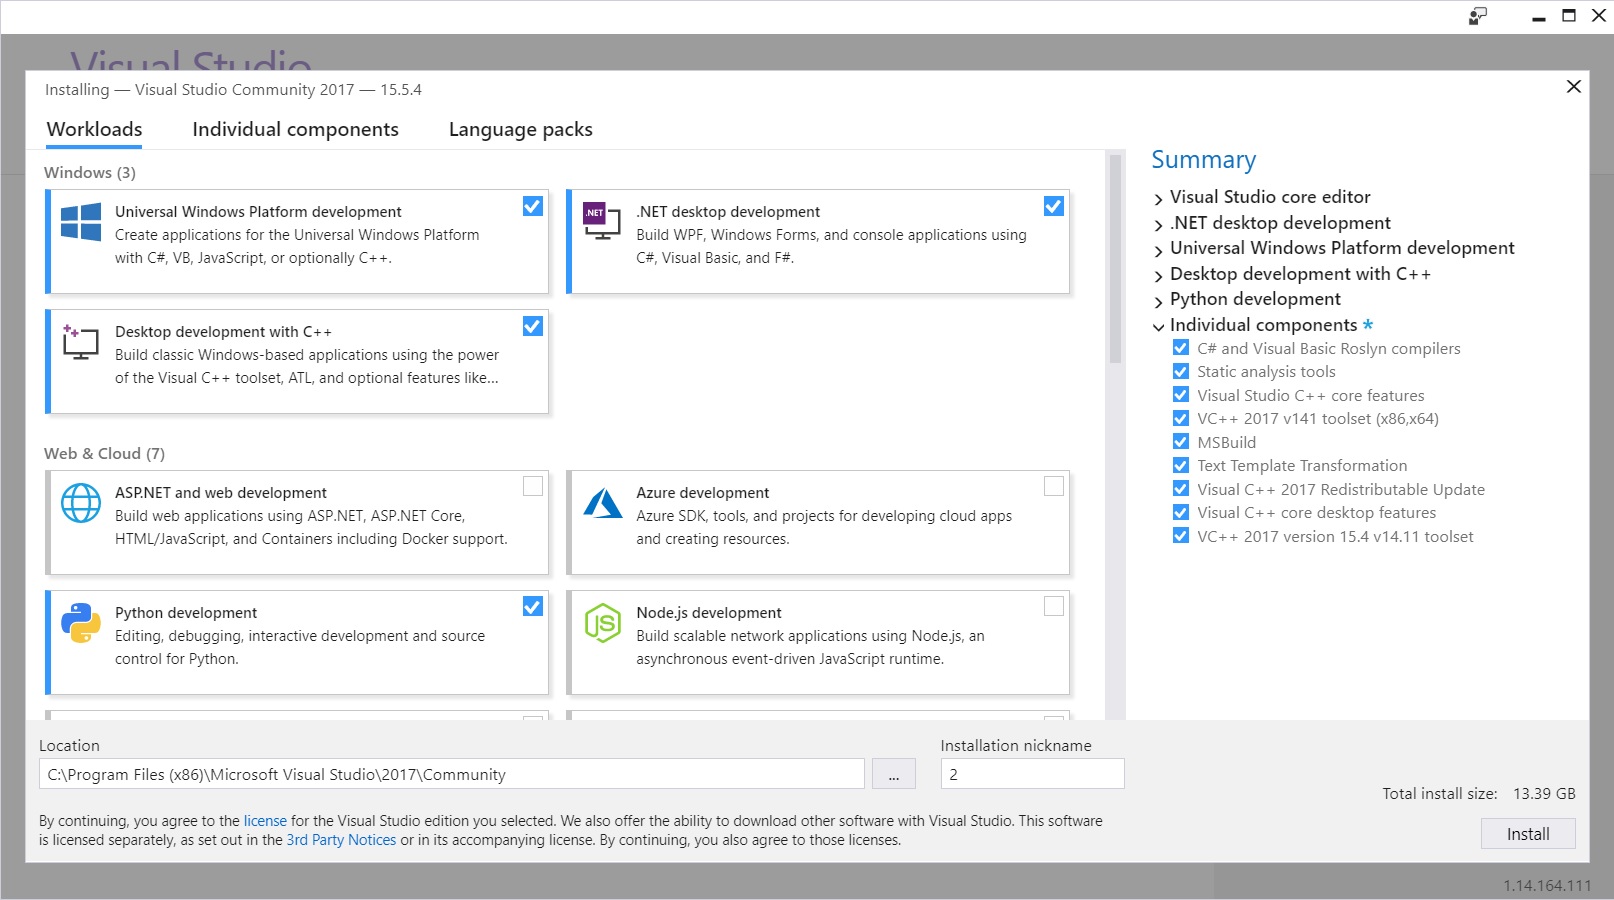
During the installation process, please select 'Universal Windows Platform development', '.NET desktop development', 'Desktop development with C++', and 'Python development' workloads:
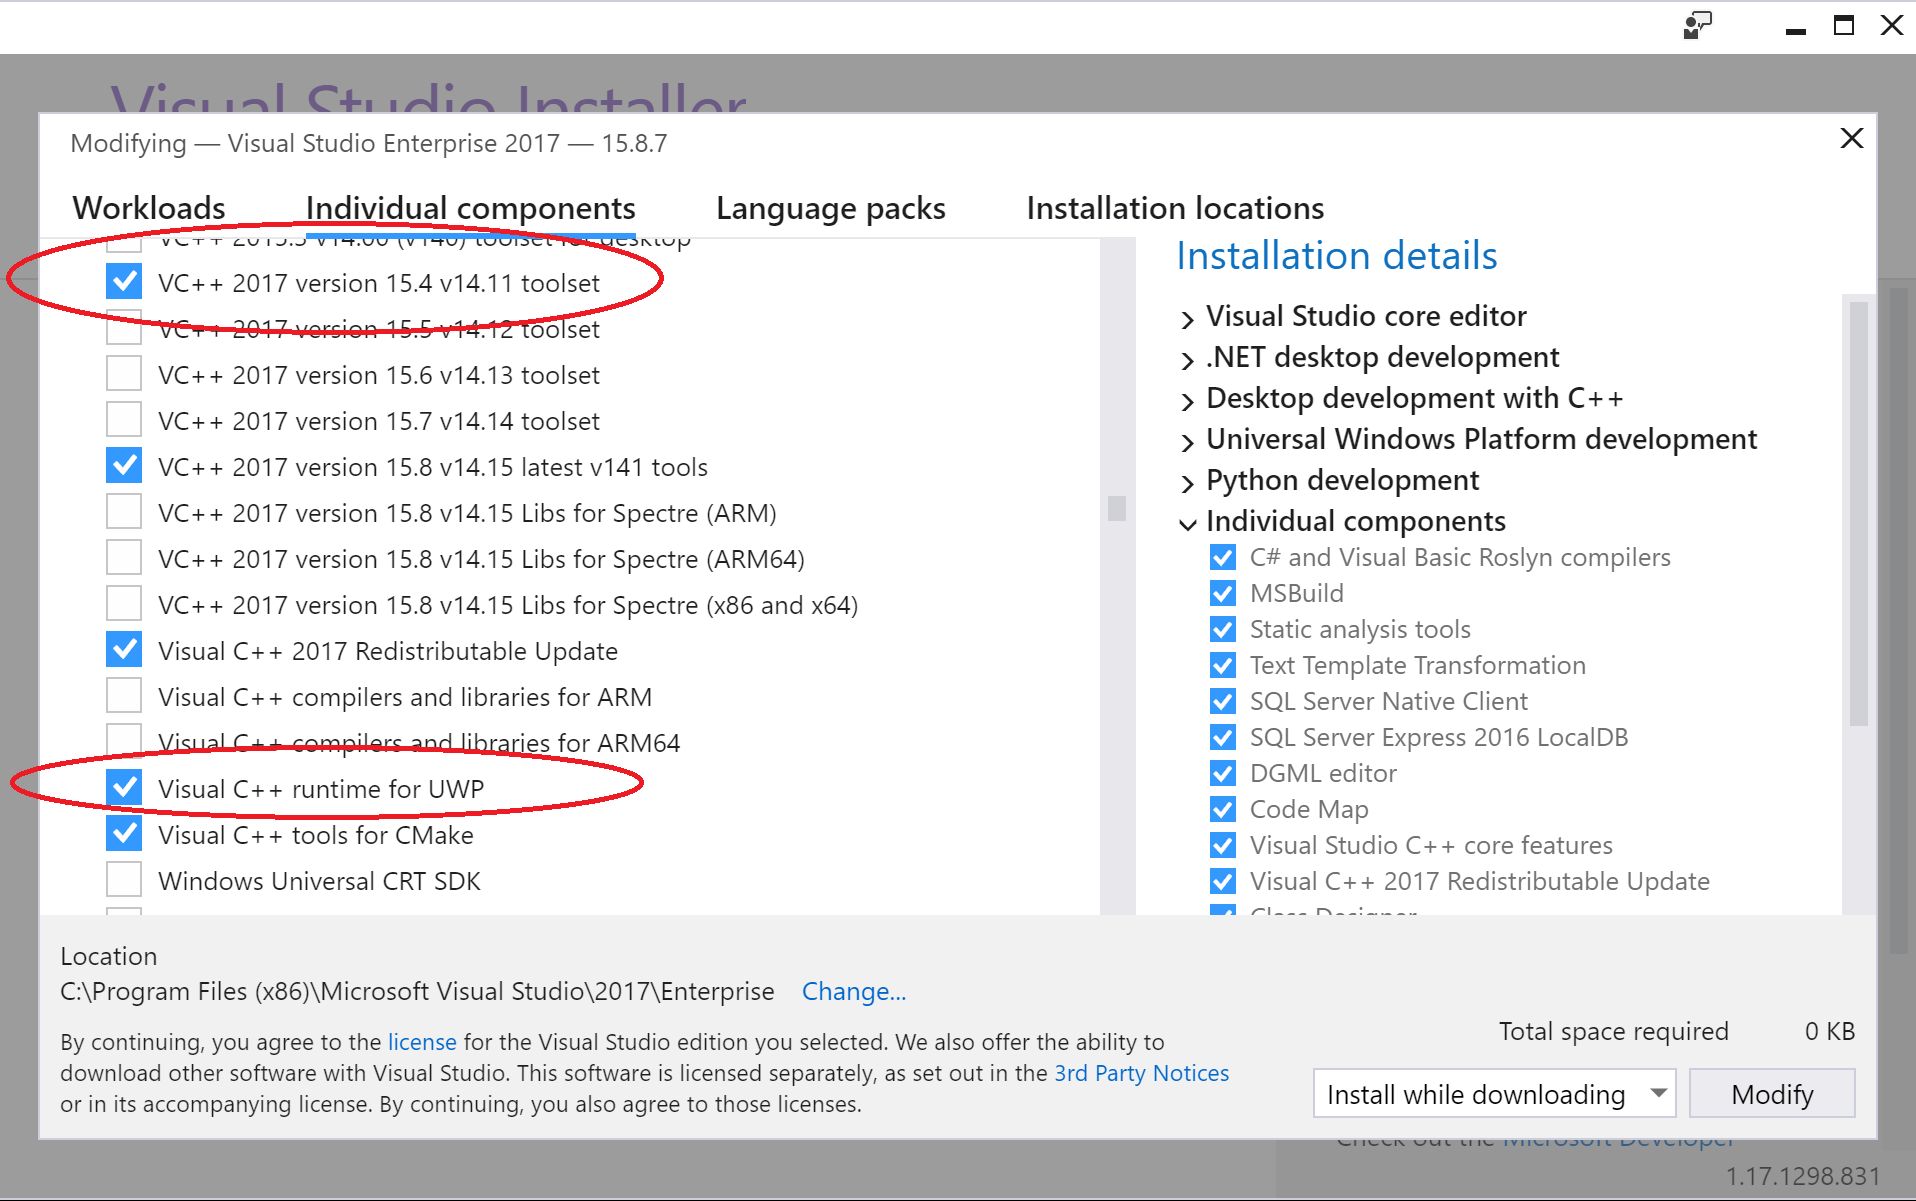
Besides, On the individual components screen make sure you add 'VC++ 2017 version 15.4 v14.11 toolset' and 'Visual C++ runtime for UWP' to your installation:
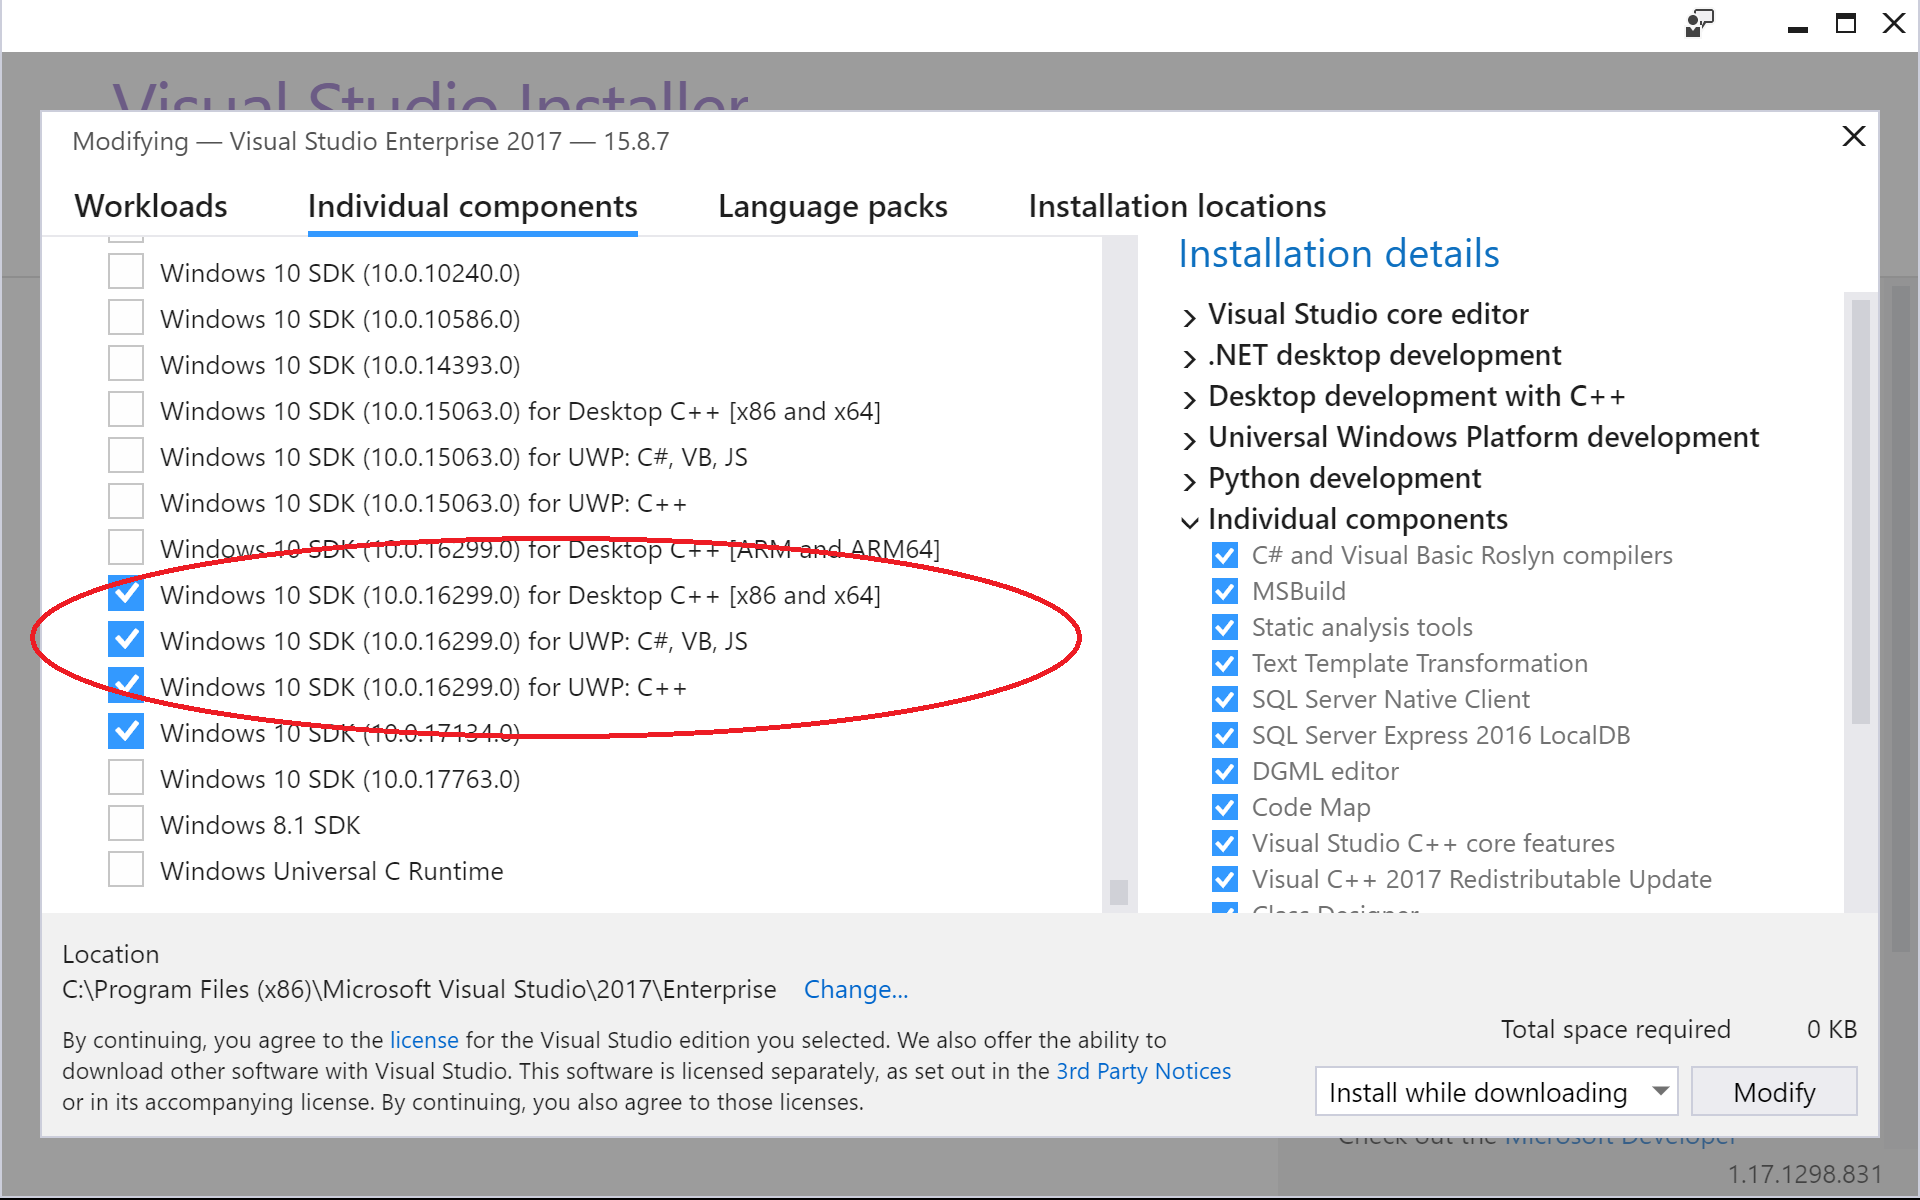
Lastly, add 'Windows 10 SDK (10.0.16299.0) for Desktop C++ [x86 and x64]':
Preexisting Visual Studio 2017 installation
You are required to have the 'VC++ 2017 version 15.4 v14.11 toolset', 'Visual C++ runtime for UWP' and 'Windows 10 SDK (10.0.16299.0) for Desktop C++ [x86 and x64]' installed on your system. To check open the Windows "Control Panel -> Programs -> Programs and Features' and select 'Visual Studio Community 2017' from the list of installed programs. This will start the Visual Studio setup again and allows you to make sure the aforementioned components are installed on your system (see picture above).
Note
If VS2017INSTALLDIR environment variable was not set by the Visual Studio installer, set it manually. The exact installation directory depends on both the version (2017 in this case) and offering (Community, Enterprise, etc) of Visual Studio, according to the following pattern: C:\Program Files (x86)\Microsoft Visual Studio\<version>\<offering>.
For Visual Studio 2017 Enterprise edition, run:
setx VS2017INSTALLDIR "C:\Program Files (x86)\Microsoft Visual Studio\2017\Enterprise"
For Visual Studio 2017 Community edition, run:
setx VS2017INSTALLDIR "C:\Program Files (x86)\Microsoft Visual Studio\2017\Community"
Git
Git is required to work with the CNTK code base. You may use the following tools:
Git for Windows. This is the standard command line client for Git, which we will use on this page to describe the enlisting in the CNTK repository.
A Git client is available as a part of the Visual Studio 2017 installation. Read the blog post Microsoft Application Lifecycle Management about using the built-in Git client.
Enlisting in the CNTK GitHub repository
Here we assume you installed Git for Windows. We assume you installed Git using the default options in the Git installer (Especially 'Use Git from the Windows Command Prompt' and with the option "Checkout Windows-style, commit UNIX-style line endings" at the "Configuring line endings" prompt enabled.
Create a clone of the CNTK source code in c:\repos\cntk directory. If you prefer a different location, you will need to adjust the commands accordingly.
Open a standard windows command shell, and execute these command
c: && md \repos && cd \repos
git clone --recursive https://github.com/Microsoft/cntk
cd cntk
This puts all the required source code for a standard build onto your system. If you plan on making modifications to the CNTK code, you should read the information on Developing and Testing.
The submodule Multiverso is used to enable DataParallelASGD for training. If you don't need DataParallelASGD support, then add the environment variable CNTK_ENABLE_ASGD and set its value to false. E.g. run this in a CMD prompt, and then reopen your CMD shell(s) and Visual Studio to pick up the change:
setx CNTK_ENABLE_ASGD false
MKL
The default CNTK math library is the Intel Math Kernel Library (Intel MKL). Follow this page to install it
MKL-DNN
Download MKL-DNN source and build with MKL_PATH as target path. Check build instructions in Setup MKL-DNN on Windows
Set the environment variable
MKL_PATHto the directory, e.g.:
setx MKL_PATH c:\local\mklml-mkldnn-0.14
MS-MPI
Install version 7 (7.0.12437.6) of Microsoft MPI (MS-MPI) from this download page, marked simply as "Version 7" in the page title. Click on the Download button, and then select both msmpisdk.msi and MSMpiSetup.exe.
Boost
Follow these steps to install the Boost Library on your system:
- Download and install Boost version 1.60 (you need the
msvc-14.0binaries) from this download location on Sourceforge. - Set the environment variable
BOOST_INCLUDE_PATHto your Boost installation, e.g.:
setx BOOST_INCLUDE_PATH c:\local\boost_1_60_0-msvc-14.0
- Set the environment variable
BOOST_LIB_PATHto the Boost libraries, e.g.:
setx BOOST_LIB_PATH c:\local\boost_1_60_0-msvc-14.0\lib64-msvc-14.0
- To integrate the Boost test framework into Visual Studio you can install a runner for Boost tests in Visual Studio from the Visual Studio Gallery.
Protobuf
You need a version of Protobuf 3.1.0 compiled for CNTK. You can compile this version by yourself, or use an already (precompiled) prepared version of Protobuf 3.1.0 (described on this page). If you want to build the Protobuf library for CNTK on your system, you can find the details here
Download the ZIP file containing the precompiled version of Protobuf for CNTK from this location
Extract the archive to a folder on your local disk, e.g. to C:\local\protobuf-3.1.0-vs15 and set the environment variable PROTOBUF_PATH pointing to that location, e.g.:
setx PROTOBUF_PATH c:\local\protobuf-3.1.0-vs15
GPU Specific Packages
This section outlines the packages you need to setup in order for CNTK to leverage NVIDIA GPUs.
If you do NOT intend to use any GPUs with CNTK and will rely on the CPU only, you may skip directly to the next general section. Otherwise proceed to this page.
Set the environment variable CUDNN_PATH pointing to that location, e.g.:
setx CUDNN_PATH C:\local\cudnn-9.0-v7.0\cuda
Set the environment variable CUB_PATH pointing to that location, e.g.:
setx CUB_PATH c:\local\cub-1.7.4\
OPTIONAL. SWIG.
If you want to take advantage of CNTK from Python, you will need to install SWIG. SWIG is also a requirement to build the CNTK Evaluation libraries (for C#/.NET or Java).
Please download the version SWIG 3.0.10 from this site.
Extract the archive to a folder on your local disk, e.g. to C:\local\swigwin-3.0.10 and set the environment variable SWIG_PATH pointing to that location, e.g.:
setx SWIG_PATH C:\local\swigwin-3.0.10
Quick installation check: If you followed the instruction above and used the same paths, the command dir C:\local\swigwin-3.0.10\swig.exe will succeed and show one file.
OPTIONAL. OpenCV
CNTK 2.2 requires Open Source Computer Vision (OpenCV) to be installed but it is optional for CNTK 2.3. Follow this page for further steps.
Set the environment variable OPENCV_PATH_V31 pointing to the OpenCV build folder, e.g.
setx OPENCV_PATH_V31 c:\local\Opencv3.1.0\build
Quick installation check: If you followed the instruction above and used the same paths, the command dir C:\local\Opencv3.1.0\build will succeed.
OPTIONAL. zlib and libzip
If you plan to build the CNTK Image Reader you require zlib and libzip libraries.
zlib and libzip
The ZLib and LibZip are distributed in source code, you will need to recompile these packages, you can also use a precompiled version we created for your convenience (described in this section). To build the libraries yourself, you find detailed instructions here
Download the ZIP file containing the precompiled version of libzip/zlib compression library for CNTK from this location
Extract the archive to a folder on your local disk, e.g. to C:\local\zlib-vs15 and set the environment variable ZLIB_PATH pointing to that location, e.g.:
setx ZLIB_PATH c:\local\zlib-vs15
Quick installation check: If you followed the instruction above and used the same paths, the command dir C:\local\zlib-vs15\bin will succeed and show a couple of DLLs.
OPTIONAL. Anaconda Python Installation
If you plan to build CNTK with Python support, install SWIG if you have not done so yet. Also, you will need a Python environment. We use Anaconda Python for our default Python installation.
If you do not have an Anaconda installation: install Anaconda Python for Windows.
You can follow the standard configuration given in the install program (InstallationType=JustMe; AddToPath=No; RegisterPython=No). In the following we assume you installed Python Anaconda3 4.1.1 into C:\local\Anaconda3-4.1.1-Windows-x86_64.
OPTIONAL. CNTK UWP Build
Note
New in CNTK version 2.1.
If you want to build the CNTK Evaluation Library for UWP you need to follow the additional installation steps described here.
CNTK Python environments
CNTK supports Python 2.7, Python 3.5 and Python 3.6. We recommend you create a dedicated environment in your Python installation to work with CNTK. This way CNTK and the installed supporting packages won't impact any other Python project. We provide several files (yml-files) containing the description of required Python packages. The packages are located in the scripts\install\windows directory inside your CNTK clone. Please select the file matching your targeted Python version.
| Python version | Filename |
|---|---|
| Python 2.7 | conda-windows-cntk-py27-environment.yml |
| Python 3.5 | conda-windows-cntk-py35-environment.yml |
| Python 3.6 | conda-windows-cntk-py36-environment.yml |
As an example we create a Python 3.5 environment in an environment named cntk-py35. If you want a different environment name, please adjust the following steps accordingly. If you want to create a Python 2.7 or Python 3.6 environment, please adjust the name of the YML to match the Python version you intend to use.
The following assumes you cloned the CNTK source code from GitHub into the directory c:\repos\cntk.
- To create a new conda environment (e.g.
cntk-py35) and activate it, run the following commands from the Windows command shell:
    cd C:\local\Anaconda3-4.1.1-Windows-x86_64\scripts
    conda env create --file c:\repos\cntk\scripts\install\windows\conda-windows-cntk-py35-environment.yml  --name cntk-py35
    activate C:\local\Anaconda3-4.1.1-Windows-x86_64\envs\cntk-py35
If you have an environment (e.g. cntk-py35) you can update it with the latest required packages with the following commands:
    cd C:\local\Anaconda3-4.1.1-Windows-x86_64\scripts
    conda env update --file c:\repos\cntk\scripts\install\windows\conda-windows-cntk-py35-environment.yml --name cntk-py35
    activate C:\local\Anaconda3-4.1.1-Windows-x86_64\envs\cntk-py35
CNTK Environment Variables for Python
Before you start the build of CNTK and build the Python libraries for CNTK, you need to set/define environment variables CNTK_PY.._PATH and PYTHONPATH
CNTK_PY.._PATH
Set up build environment variables for your Python environment (choose at least one that applies):
    setx CNTK_PY36_PATH [paths for your Python 3.6 environment]
    setx CNTK_PY35_PATH [paths for your Python 3.5 environment]
    setx CNTK_PY27_PATH [paths for your Python 2.7 environment]
If you followed the installation so far, this would mean
setx CNTK_PY35_PATH C:\local\Anaconda3-4.1.1-Windows-x86_64\envs\cntk-py35
The value for the CNTK_PY36_PATH, CNTK_PY35_PATH, or CNTK_PY27_PATH environment variables can be determined by running in
conda ..activate cmd.exe [name-or-path-of-your-environment]
PYTHONPATH
PYTHONPATH sets the paths to the places Python will look for modules to import. If you build CNTK, you need to add the output path of the build process to this environment variable. If you cloned CNTK into c:\repos\cntk this will be
setx PYTHONPATH c:\repos\cntk\bindings\python;%PYTHONPATH%
OPTIONAL. Java
To build the Java bindings for the CNTK Evaluation library, install the SWIG tool if you have not done so yet. Also, a Java Development Kit (JDK) is required. Currently we use 64 bit JDK 8 (JDK Version 1.8.0_131).
Set the environment variable JAVA_HOME to point to the directory of Java installation. The following setting assumes that you have installed JDK 1.8.0_131 to C:\local\jdk1.8.0_131:
setx JAVA_HOME "c:\local\jdk1.8.0_131"
Uninstall previous CNTK versions
If you previously installed any version of the CNTK Python package on your machine, uninstall it by first removing any CNTK related paths in the PYTHONPATH environment variable. Do: echo %PYTHONPATH% to see its current value, and then use the setx command to set PYTHONPATH such that the CNTK related paths are gone. If that makes PYTHONPATH empty, so be it.
Do the uninstall: pip uninstall cntk
This concludes the installation portion. Let's continue with building CNTK
Building CNTK
Currently there's a compatibility issue between CUDA 9 and default VCTools in Visual Studio 2017. CNTK requires VCTools 14.11 to build with CUDA 9. To do that:
- Open Command Prompt
- call "%VS2017INSTALLDIR%\VC\Auxiliary\Build\vcvarsall.bat" amd64 -vcvars_ver=14.11
This will set VCTools to the CUDA 9 compatible version. From the Command Prompt, start CNTK.sln in the root of the cloned CNTK project from GitHub. If CNTK.sln runs with the default CUDA9-incompatible version of VCTools, there will be build errors like "1>c:\program files\nvidia gpu computing toolkit\cuda\v9.0\include\crt/host_config.h(133): fatal error C1189: #error: -- unsupported Microsoft Visual Studio version! Only the versions 2012, 2013, 2015 and 2017 are supported!"
If you just changed and environment variable, you should close any already opened Visual Studio instance, otherwise the content of changed environment variables will not be reflected inside Visual Studio.
- Right-click the CNTK Solution in Solution Explorer and select
Properties - In the opened window select
Configuration Propertiesand pressConfiguration Manager...button - In Configuration Manager select the desired configuration:
- Debug or Release
- GPU or CPU-only. CPU-only configurations are explicitly named. All other configurations imply GPU usage (i.e.
Releasemeans Release. GPU enabled mode) - You should always select CPU-only configurations if you have NOT installed the components required for GPU configurations
Build the CNTK solution. The components created by the build process are dependent on the prerequisites you installed, for details the page detailing Windows Environment Variables should be consulted.
If you build Python modules note:
- Python modules are only created in the
Releaseconfiguration - This will build the CNTK Python module inside
bindings\python\cntkand also produce a package (.whl) in a subfolderPythonof your build output folder (e.g.,x64\Release\Python) - Make sure your path includes the build output folder (e.g.,
x64\Release), and thatPYTHONPATHincludes thebindings\pythondirectory. This is contrary to the setup shown for the Pip package installation, here we will load the CNTK module from the CNTK repository clone, not as an installed package in your Python environment, hence also the difference in setting upPYTHONPATH.
Test of CNTK build functionality
To ensure that CNTK is working properly in your system, you can quickly run an example from the Hello World - Logistic Regression tutorial. This example trains a simple network and can be directed to use either CPU or GPU, which helps quickly ensure that CNTK is functioning properly.
Below we assume that the CNTK repository is cloned to c:\repos\cntk and build\x64\release was used as a sub-directory for the (Release) build.
- Open Command Prompt
- Provide the path to the CNTK binaries (via Environment Variable or for Command Prompt session using the first command below) and change to the
Tutorials\HelloWorld-LogisticRegressiondirectory:
set PATH=C:\repos\cntk\x64\release;%PATH%
cd C:\repos\cntk\Tutorials\HelloWorld-LogisticRegression
First try the example:
cntk configFile=lr_bs.cntk makeMode=false
If the sample runs, i.e. if there are no error messages, you will get an output related first to reading the configuration, followed by the output of the actual network training.
Trying CNTK with GPU
If you built CNTK for GPU usage, try using GPU by executing the following command:
cntk configFile=lr_bs.cntk makeMode=false deviceId=auto
Near the beginning of the output you should see a line confirming a GPU was used:
Model has 9 nodes. Using GPU 0.
Note that GPU ID may be different. The deviceId parameter defines what processor to use for computation.
deviceId=-1means use CPU. Default valuedeviceId=Xwhere X is an integer >=0 means use GPU X, i.e.deviceId=0means GPU 0, etc.deviceId=automeans use GPU, select GPU automatically
Trying the CNTK Python API
We assume that you created a CNTK Python environment (either through the install script or manually. Open a command prompt and activate your CNTK Python environment, e.g., by executing
activate cntk-py35
As a quick test change into the Tutorials\NumpyInterop folder and run python FeedForwardNet.py. After training you should see an output similar to this:
Finished Epoch [1]: loss = 0.297748 * 25600 2.383s (10742.8 samples per second)
 error rate on an unseen minibatch 0.040000
Debugging CNTK source code in Visual Studio
- If you want to use Python Tools, CNTK, and Visual Studio, see here
- To debug BrainScript in CNTK with Visual Studio, follow the steps here.
Contributing to CNTK code
If you plan modifications to the code you should read the information on Developing and Testing.