Windows Workflow Foundation: Guidance on Choosing the Right Root Workflow Type
By Zoiner Tejada, Hershey Technologies
Articles in this series
- Choosing the Right Workflow Root
- Job Requisition Workflows
- Replicators in Blog Monitoring Workflows
- Software Bug Reporting Workflows
- Calendar Scheduling Workflows
- Merchant Service Workflows
- Rules-Driven Workflows
- Final Thoughts
Published: September, 2008
Download the code for this article
In .NET 3.5, there are two root workflow types: Sequential Workflows and State Machine Workflows. This document is the first in a series of articles whose goal is to provide guidance to the WF developer on the selection of the root workflow type. Each root workflow type has its merits and is fundamentally designed differently according to needs dictated by the usage scenario. A goal of this guidance is prescriptive- to ensure that developers can be confident with their selection of root workflow knowing that they will not have to discard their State Machine Workflow design and switch to a Sequential Workflow or vice versa.
Series Introduction
To accomplish this goal in the most instructive way possible, this guidance will be broken down into a series of articles following a standard format. Each article will consist of a business scenario that guides the development of the user interface and the workflow definition. For each business scenario, the workflow will be implemented twice: once as a Sequential Workflow and once as a State Machine Workflow. A particular technical aspect of WF will be compared between both root workflows to provide insights such as which allows for an easier implementation of the scenario, when the result is a workflow more readable by non-developer users, how the task can be accomplished using both root workflows, and, when an exact translation is not possible, what workarounds exist. By the end of each article, the reader should have a sense for how WF can be applied to a real-world scenario, and also how to accomplish a WF technical task as it is expressed in each out of the box root workflow type.
Each article will ship complete with the source code for building the workflow definition, user interfaces and local services. To facilitate experimentation with these sample workflows, a complete Workflow Simulator hosting environment is provided. This article provides the initial implementation of the Workflow Simulator that will be used to investigate subsequent workflow definitions. If any updates to the Workflow Simulator are required to better illustrate the scenario, the will be documented in the article and the updated host made available.
Workflow Simulator
The Workflow Simulator is a Windows Presentation Foundation application that serves as the runtime environment for visualizing the execution of workflows as they react to input from the scenario specific user interface.
To run any of the workflows provided with the tutorial, follow these steps:
- Launch WorkflowSimulator.exe
- From the File menu, choose Open Workflow…
- Navigate to the assembly containing the workflow you wish to run and click Open.
- Follow the instructions in the left pane to see the execution in the right.
Note that for the current version of the Workflow Simulator, workflow assemblies and dependencies must be located in the same directory as the Workflow Simulator executable.
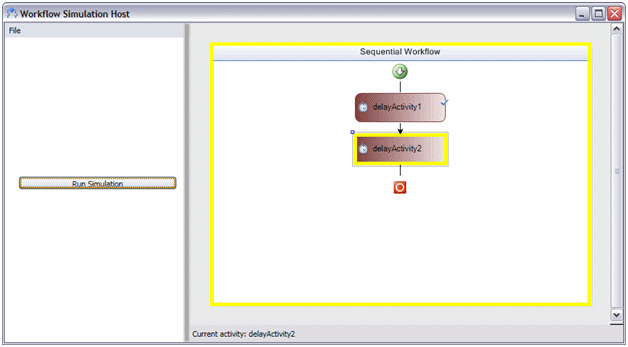
Figure 1- Workflow Simulation Host Running a Workflow
Loading and Running Workflows in the Simulator
The Workflow Simulator has quite a few features that augment its utility in exploring the dynamics of the root workflows. To begin with, the Workflow Simulator can open and execute any workflow defined in any assembly (by default these should be .DLL’s, but it can also open workflows compiled into EXEs). It is capable of displaying and running workflows not provided by this guidance (though some workflow may require hosting configuration not supported by the Workflow Simulator). By default, unless the workflow has a special attribute described later, the Workflow Simulator will display the workflow definition on the right and provide a button on the left which will execute the workflow.
Clicking Run Simulation button to execute the workflow, shows the currently executing activities highlighted in yellow (much like within the Visual Studio Workflow Debugger), with the single activity currently executing selected as well as named in the status bar at the bottom. In addition, activities that have completed execution will have a blue check mark glyph over their top right corner. For future scenarios, additional glyphs may be added that provide additional insight into the state of the executing activity.
Implementing Dynamic User Interfaces in the Simulator
Because each business scenario will differ in the type of information requested from the user, or in how the user interacts with the workflow, the Workflow Simulator provides a pluggable user interface. The choice of which interface to display is driven by the workflow definition that is opened. The user interface hosts any UIFrameworkElement that implements the IWorkflowUI (see Figure 2) which ensures the control can receive a reference to the WorkflowDiagram (the control responsible for rendering the workflow) when it is added to the main user interface.
public interface IWorkflowUI
{
         WorkflowDiagram WorkflowDiagram { get; set; }
}
Figure 2- The IWorkflowUI interface
With a reference to the WorkflowDiagram, the plugged-in user interface can connect to the local service registered by the workflow for supporting bi-directional communication in the scenario. This relationship between the user interface to display, local service to load, and workflow definition(as shown in Figure 3) is defined by an optional attribute on the workflow class: WorkflowSimulationUIAttribute simply specifies, in string form, the type name of the UI component and local service. The end result is that both user interface and plumbing are changed to support the scenario simply by opening the workflow assembly.
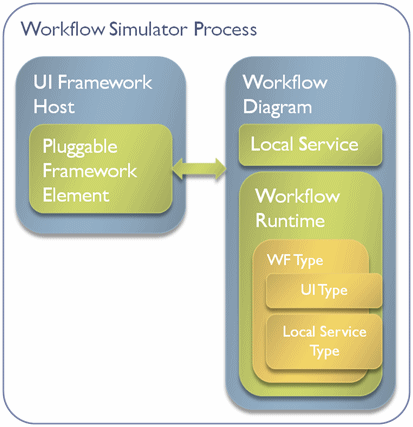
Figure 3 - Relationship between simulator components.
Initial comparison: Sequential and State Machine Workflows
The Sequential Workflow is geared towards a top to bottom, nearly linear execution. It is conceptually similar to what most consider would refer to as flow chart where activities execute in a predetermined order and are not revisited (outside of looping activities).
The State Machine Workflow supports execution patterns that have numerous well defined states and declares the transitions between them. The primary difference between the State Machine Workflow and the Sequential Workflow tends to be the pattern of execution in a State Machine Workflow is significantly less linear. All State machines may start with one state, the state that follows may be one of many where any visited state may be returned to and visited again.
Both types are semantically equivalent in their expressive power. For this initial article, we explore what activities are supported in each root workflow type and conclude with a simple example that demonstrates how a sequential workflow can be converted into an equivalent state machine workflow.
Base Activities Available to Workflow Types
One of the most important distinctions to make is which activities are supported by each root workflow type. Fortunately, the vast majority of out of the box activities are supported by both. The table below categorizes the provided activities by supported root workflow designer. Activities not listed are available for both Sequential and State Machine Workflows.
Table 1- Activities by Root Workflow Type
| Sequential Workflow Only | State Machine Workflow Only |
|---|---|
Listen |
SetState |
State |
|
StateInitialization |
|
StateFinalization |
This list is easily verified by opening up Visual Studio and then opening an instance of a Sequential Workflow or State Machine Workflow and reviewing the items listed in the Toolbox. This establishes a base line for which activities are available to each root workflow type, but it does not guarantee that semantically all activities fit or even work within that root workflow type. There are three such examples in this list that are available to both, but tend not to be used in a State Machine workflow:
- EventHandlingScope- This activity cannot be used within a State Machine Workflow. This restriction occurs because by definition each EventDriven sequence should start with an activity that handles an event (specifically implements IEventActivity) and the EventDriven sequence cannot contain any other event handling activities. EventHandlingScope does not implement this interface, is actually designed to support multiple event handling activities as its children, which violates the requirements of the EventDriven sequence.
- Replicator- The replicator is commonly used to spin off a number of instances of a sequence of activities, where the number of instances spun off is not known in advance.The replicator becomes unsupported within a State Machine’s EventDriven activity in the scenario where each instance is listening for an event. If the replicator contains no event handling activities, then it is supported within the EventDriven sequence of a State Machine.
- Parallel- This activity has the same issues as the Replicator does within the EventDriven sequence of State activity in a State Machine. The Parallel is capable of having multiple branches each waiting on the same or different events, which is counter to the single event handling activity requirement of the EventDriven activity.
Converting a Sequential to State Machine Workflow
As a simple example of the semantic equivalence between state machine workflows and sequential workflows, this article’s code includes a sample workflow that illustrates the conversion from a simple sequential workflow to a state machine that executes its activities sequentially. The sequential workflow in the code sample consists of two delay activities that each wait for two seconds, after which the workflow completes.
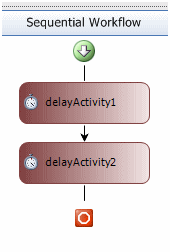
Figure 4 - Simple Sequential Workflow
The conversion to a State Machine is done by ensuring that each State has an EventDriven activity that contains a Delay activity followed by a SetState activity to the next State in the sequence.

Figure 5- Equivalent State Machine Workflow

Figure 6 - Detail of WaitForDelay1
Conclusion
This series will explore in depth the subtle implications of choosing one root workflow type over another with the goal of establishing which type is better suited for the particular scenario, but also highlight those cases where each root designer is semantically equivalent in its ability to express the implementation.