Windows Workflow Foundation: Job Requisition Workflows
By Zoiner Tejada, Hershey Technologies
Articles in this series
- Choosing the Right Workflow Root
- Job Requisition Workflows
- Replicators in Blog Monitoring Workflows
- Software Bug Reporting Workflows
- Calendar Scheduling Workflows
- Merchant Service Workflows
- Rules-Driven Workflows
- Final Thoughts
Published: October, 2008
Within many organizations, the process whereby a manager requests the creation of a new position (and the subsequent ability to hire for it) is referred to as the job requisition process. Typically the process begins when an authorized manager views a page on the intranet or launches an application that allows the manager to fill in the basic details of the job request and submit it for review. Upon submission, the system routes the job request to the superior of the requesting manager (often referred to as the senior manager), who reviews the request and ultimately approves or denies it. If approved, the request is subsequently routed to HR for a final approval. Ultimately this leads into the start of the hiring process to fill the created position such as posting job advertisements and contacting recruiters. A high level process flow is shown in Figure 1.

Figure 1 - Job Requisition Flow
Windows Workflow Foundation (WF) provides an implementation platform for inherently long running processes (e.g., each review step can take hours if not days), and naturally supports the routing of the Job Requisition for review and approval. This article describes a simplistic implementation of the Job Requisition workflow that can be executed within the workflow simulator. In addition, it covers the ramifications of Activity Execution Contexts in workflow design as part of the implementation of the Job Requisition Process. Both Sequential Workflow and State Machine Workflow implementation of the Job Requisition process will be demonstrated.
Scenario Requirements
For the simulation, we begin with a few requirements. First, the Job Requisition consists of the following five fields:
- Job Code – The short alphanumeric code which represents the type of job. Sample values include BA3 or DEV05.
- Job Description – The user friendly name of the position. Values might include Business Analyst or Senior Developer.
- Pay Grade – The categorization of salary associated with this position. Values might include A02, B05, and C06.
- Requested By – The name of manager who originally submitted the request.
- Current Status – The current status of the Job Requisition.
In addition, the flow of activity for this simulation is constrained to the following three major steps:
- Requesting manager submits requisition.
- Senior manager receives the requisition and approves or denies it.
- If approved, the requisition is routed to HR.
- If denied, the entire requisition is marked denied and the workflow completes.
- HR receives the requisition and approves or denies it.
- If approved, the requisition is marked approved and the workflow completes.
- If denied, the requisition is marked denied and the workflow completes.
Scenario Implementation
Irrespective of the underlying workflow type (e.g., Sequential or State Machine), the user interfaces presented to the users are five. First, the interface presented to the requesting manager allows all fields to be filled, and only the action to Submit (see Figure 2). Second, the interface presented to the Senior Manager displays all the fields in a read-only mode. This time, however, the user has the ability to Approve or Deny (see Figure 3). Finally, HR receives the same read-only view with the same options to Approve or Deny (see Figure 4). Across all three interfaces, the title of the panel is updated to reflect the current state of the job requisition. Finally, when the workflow completes, the final state of the job requisition appears as shown in Figure 5 and Figure 6.
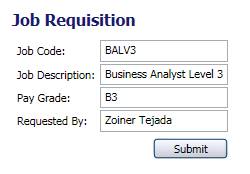
Figure 2 - Initial Request
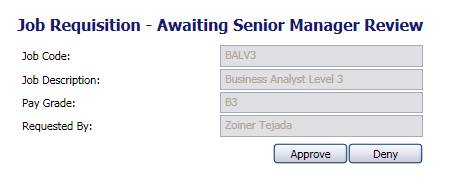
Figure 3 - Senior Manager Review
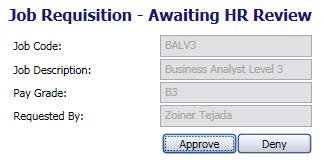
Figure 4 - HR Review
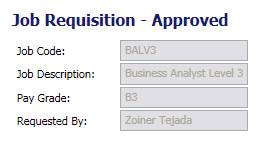
Figure 5 - After HR Approval
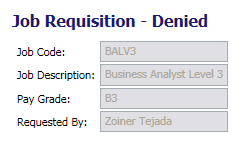
Figure 6 - After any denial
Sequential Workflow Implementation
The complete implementation of the job requisition workflow as Sequential Workflow is shown in Figure 7 and the text that follows describes the key points.
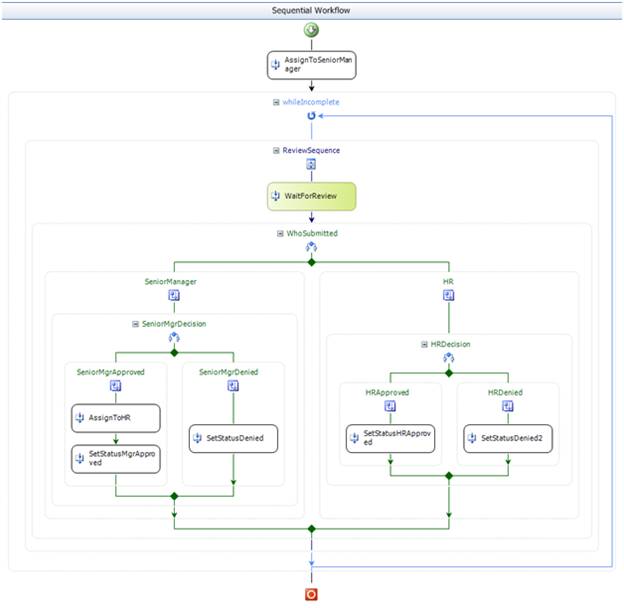
Figure 7 - JobReqSequential Implementation
In the sequential case, the workflow starts off by immediately assigning the job requisition to the senior manager. In the simulation, this is performed by a custom activity which simply sets the value of the AssignedTo property of the workflow.
Next, the workflow enters a While loop that effectively waits for two reviews to be submitted: the senior manager’s review and HR’s review. The WaitForReview activity is another custom activity (generated by the Workflow Communications Activity Generator or wca.exe) that derives from HandleExternalEvent. Its purpose is to handle the SubmitJobReqReview event and expose the review decision in a Status bindable property.
The WhoSubmitted IfElseBranchActivity examines the AssignedTo workflow property, and takes the left SeniorManager branch if the value is “Senior Manager” or the right HR branch otherwise. If the reviewer was the senior manager, then the workflow examines the Status value from the WaitForReview activity to determine if it was “Approved” or “Denied”. If approved, the AssignToHR custom activity simply sets the value of the AssignedTo workflow property to “HR”, and the SetStatusMgrApproved custom activity updates the CurrentStatus workflow property to “Senior Manager Approved”. The loop then continues, waiting for HR’s review.
If the senior manager denied the requisition, then the CurrentStatus workflow property is set to “Denied”. The While loop tests the value of CurrentStatus and only loops while the value is neither “Denied” nor “HR Approved”. Because the senior manager denied the request, the while loop will break and the workflow completes.
After HR submits their review, the process is similar, except that in both cases the workflow completes.
State Machine Workflow Implementation
With an understanding of the logic described by the While loop in the Sequential Workflow implementation, performing the State Machine implementation involves understanding how to build the equivalent loop around the SubmitJobReqReview event. State Machine workflows can only support event driven activities (such as HandleExternalEvent or the custom activity backing WaitForReview) within an EventDrivenActivity sequence. Moreover this activity must be the first activity in the sequence, and there can only be one such activity within that sequence. Therefore, we cannot place the While loop within an EventDriven sequence to wait for multiple events. Instead we can create a loop by controlling our state transitions. Figure 8 illustrates how the loop looks at a high level.
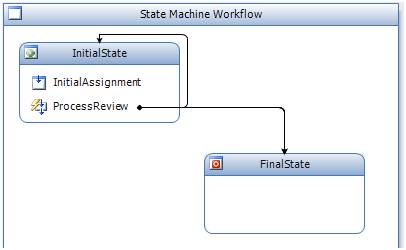
Figure 8 - Job Requisition Workflow Top Most View
Basically, when the workflow starts the InitialState is executed, followed by its StateInitializationActivity InitialAssignment which performs the AssignToSeniorManager function once. Recall that StateInitializationActivities are executed every time the state is executed, because of the loop from the ProcessReview EventDriveActivity, IntialAssignment may execute multiple times. It knows the difference between the first iteration and the subsequent ones because it checks the CurrentStatus workflow property, which has a value of “Awaiting Senior Manager Review” only following the initial submission (See Figure 9).
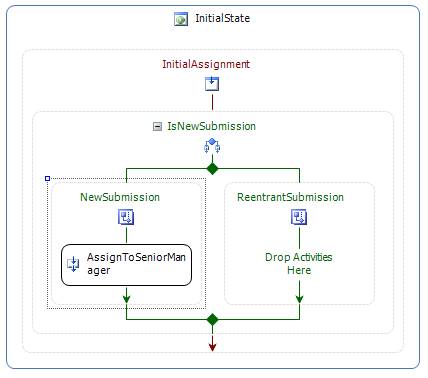
Figure 9 - Initial Assignment Initialization Activity Detail
The implementation of the ProcessReview EventDrivenActivity is almost identical to the body of the While loop in the Sequential Workflow. The primary difference is in the appearance of the SetState activities at the end of each IfElseBranchActivity that control looping back to InitialState or transitioning to FinalState (See Figure 10).
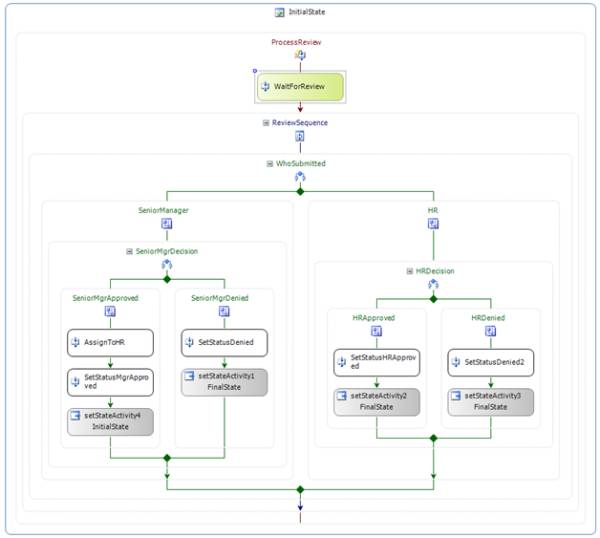
Figure 10 - Process Review EventDriven Detail
A Challenge of Context
In both aforementioned examples, the Status property from the WaitForReview activity is evaluated by a Declarative Rule Condition on an IfElseBranchActivity to determine what action to take in response to the senior manager or HR’s review. Figure 11 shows the WasApproved condition in the Sequential version when viewed from within the designer.
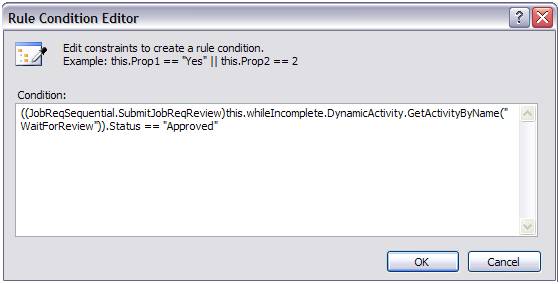
Figure 11 - Rule Condition in JobReqSequential
You might immediately ask, why can’t the rule simply access the Status property by accessing the WaitForReview activity directly? For example, you might consider this:
WaitForReview.Status == "Approved"
If you replace the condition with the aforementioned line, when you execute the workflow, you will find that it always seems to take the Denied branch. Why? The answer has to do with Activity Execution Contexts.
Activity Execution Contexts or AECs are like the stack allocated to a local method in procedural code. In a recursive operation, that single method will have multiple stacks, where each describes things like the value of local variables. In a similar vein, Activity Execution Contexts generally become a consideration when individual activities are repeated. When a composite activity repeats the execution of its children in some way, each iteration executes a cloned copy of those child activities (think of the child activities as being similar to local variables in the stack analogy). The way this cloning is accomplished, is by executing new instances of those children in a new AEC.
Therefore, the reason one cannot directly access the Status properly directly and get correct result is that direct access to this property retrieves the incorrect instance of the WorkflowReview activity. With direct access, you will be working against the default instance of the WorkflowReview activity, which has an empty Status value. There is one more wrinkle here. Items such as Declarative Rule Conditions, Code Conditions and the handler for Code Activities execute against the default AEC (the one the workflow starts in). Therefore anytime you have to access an instance of an activity contained within an AEC generating composite activity, you have to carefully navigate the tree of dynamic activities to ensure that you get the correct instance. This means using code like that shown in the WasApproved rule condition.
So what are the AEC generating activities that you need to be concerned with out of the box and how do you navigate them? Table 1 below lists each and the how you can interrogate to get at the latest instance.
Table 1 - AEC Generating Activities
| AEC Generating Activity | How to Access Dynamic Child Instance |
|---|---|
ConditionedActivityGroup |
GetDynamicActivity method |
EventHandlersActivity (Implicit child of EventHandlingScope) |
GetDynamicActivity method |
ReplicatorActivity |
DynamicActivities property |
StateActivity |
GetDynamicActivity method |
WhileActivity |
DynamicActivities property |
It is important to note, that while problem of locating the correct instance it exists, it does not affect properties whose values are acquired via a property bind. The infrastructure for binding dependency properties ensure that the correct instance is always used to return the value.
Of course, custom activities that spawn AEC’s may also provide their mechanism, and this is implementation specific.
If you desire to simplify the code written to access properties of a custom activity, one solution is to add an ActiveInstance property, whose implementation navigates the activity tree from the workflow root down through all the latest AEC instances, and whenever a AEC generating composite activity is encountered, one can execute the GetDynamicActivities method via reflection, which is present on all composite activities. See the associated file for the complete code.
The Real World Perspective
Note that in the real world, the design chosen for the workflow definition would likely be quite different. The looping pattern in this scenario was chosen because it illustrates how sequential and state machine workflows can express the same semantics (and even share implementation), but also because the loop creates a consistent AEC generating requirement for both root workflow types. In a production workflow, for instance, one might choose to use the Conditioned Activity Group to control the looping in a sequential workflow. Alternately one might build a much simpler state machine workflow that included four states (Initial, Sr. Manager Review, HR Review, Finished).
Exploring the Simulation Workflows
This article includes two simulation workflows: JobReqSequential and JobReqStateMachine that are the implementations of the job requisition workflow in sequential and state machine formats respectively. For guidance on where to get and how to run the Workflow Simulator, see Related Links section below. In addition, this article provides an update to the workflow simulator that allows you to visualize the number of activity contexts an activity is present within as the workflow executes and thus get a feel for how AEC’s and activity instances relate. Moreover, the simulator now includes an option for controlling the execution speed of the workflow instance, such that you can slow it down to actually see each activity execute or speed it up so that it executes at full speed (whereby you might not see each activity execute because it flashes by so quickly). These updates are shown in the Figure 12.
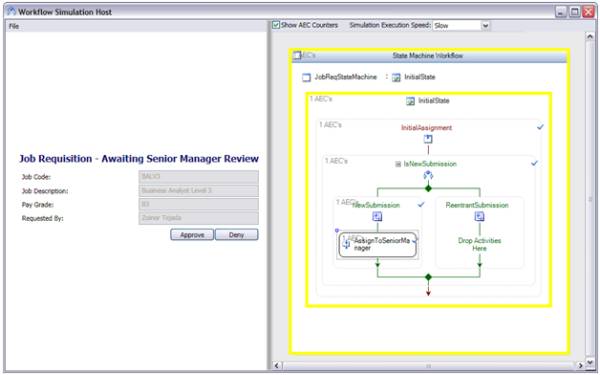
Figure 12 - Updated Simulator UI