Set your signature using Outlook event-based activation
Applies to: Outlook on Windows | Outlook on the web | Outlook on Mac (new UI)
Summary
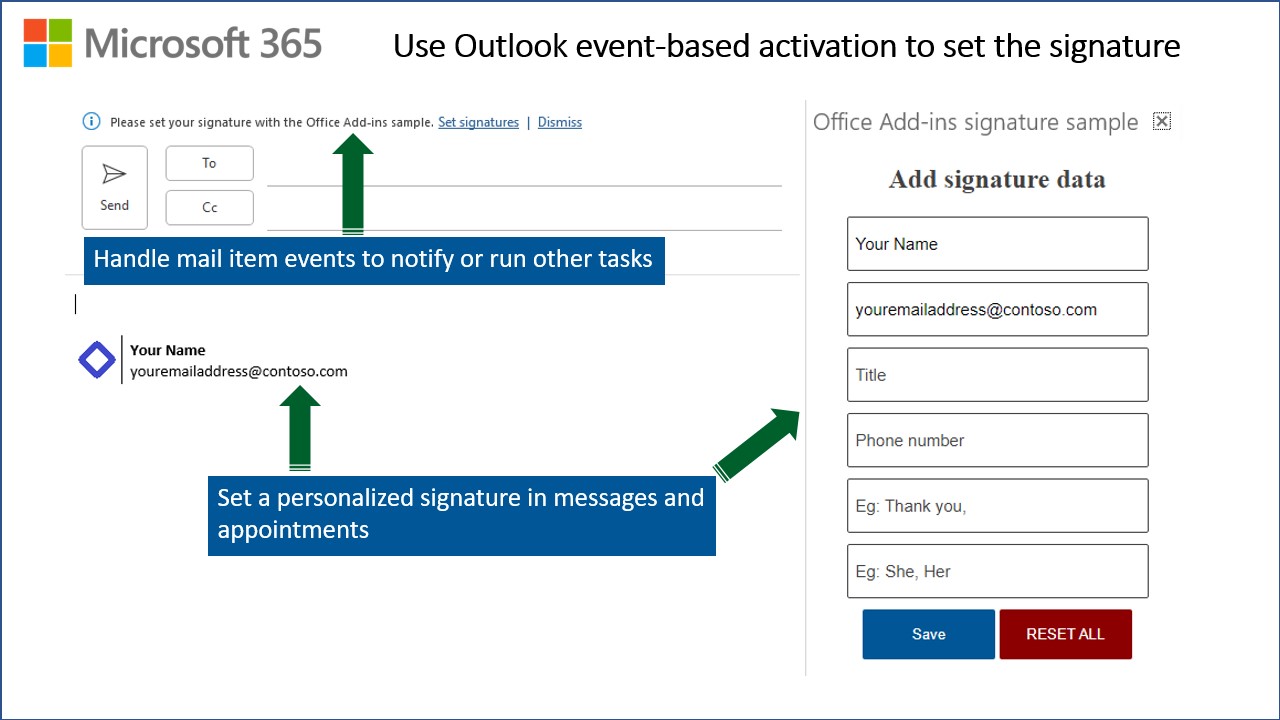
This sample uses event-based activation to run an Outlook add-in when the user creates a new message or appointment. The add-in can respond to events, even when the task pane isn't open. It also uses the setSignatureAsync API. If no signature is set, the add-in prompts the user to set a signature, and can then open the task pane for the user.
For documentation related to this sample, see Configure your Outlook add-in for event-based activation.
Features
- Use event-based activation to respond to events when the task pane isn't open.
- Set a signature for Outlook to use in messages and appointments.
Applies to
- Outlook
- Windows
- Web browser
- new Mac UI
Prerequisites
Microsoft 365
Note: If you don't have a Microsoft 365 subscription, you might qualify for a Microsoft 365 E5 developer subscription for development purposes through the Microsoft 365 Developer Program; for details, see the FAQ. Alternatively, you can sign up for a 1-month free trial or purchase a Microsoft 365 plan.
A recent version of npm and Node.js installed on your computer. These are required if you want to run the web server on localhost. To check if you have already installed these tools, run the commands
node -vandnpm -vin your terminal.(Optional) Teams Toolkit extension for VS Code if you want to deploy the sample to Microsoft Azure with the unified Microsoft 365 manifest.
Solution
| Solution | Author(s) |
|---|---|
| Use Outlook event-based activation to set the signature | Microsoft |
Version history
| Version | Date | Comments |
|---|---|---|
| 1.0 | 4-1-2021 | Initial release |
| 1.1 | 6-1-2021 | Update for GA of setSignature API |
| 1.2 | 7-27-2021 | Convert to GitHub hosting |
| 1.3 | 4-17-2023 | Add support for unified Microsoft 365 manifest |
Scenario: Event-based activation
In this scenario, the add-in helps the user manage their email signature, even when the task pane isn't open. When the user sends a new message, or creates a new appointment, the add-in displays an information bar prompting the user to create a signature. If the user chooses to set a signature, the add-in opens the task pane for the user to continue setting their signature.
Run the sample
There are multiple ways to run this sample.
Run the sample using GitHub as the web host
The quickest way to run the sample is to use GitHub as the web host.However you can't debug or change the source code. The add-in web files are served from this repo on GitHub.
- Download the manifest.xml file from this sample to a folder on your computer.
- Sideload the add-in manifest in Outlook on the web, on Windows, or on Mac by following the instructions in the article Sideload Outlook add-ins for testing.
Run the sample on localhost with the unified Microsoft 365 manifest
You can run the sample using the unified Microsoft 365 manifest which is currently in preview. We encourage you to experiment with the unified manifest, but don't use the unified manifest for production add-ins.
Clone or download this repository.
From the command line, or a terminal window, go to the project folder
/samples/outlook-set-signature.Run the following commands.
npm install
npm run start:unified
This will start the web server on localhost. When you want to stop the web server, run npm run stop:unified.
To debug task pane code, see Debug add-ins on Windows using Visual Studio Code and Microsoft Edge WebView2 (Chromium-based) and related articles.
Note: You can't debug event-based activation code using the unified manifest at this time.
Run the sample on localhost with manifest.xml
You can host the web server on localhost and use the manifest.xml file to sideload and run the sample. This supports debugging and production deployments.
Run the following commands.
npm install
npm run start
To debug event-based activation code, see Debug your event-based Outlook add-in
To debug task pane code, see Debug add-ins on Windows using Visual Studio Code and Microsoft Edge WebView2 (Chromium-based) and related articles.
Try it out
Once the add-in is loaded use the following steps to try out the functionality.
Open Outlook on Windows, on Mac, or in a browser.
Create a new message or appointment.
You should see a notification at the top of the message that reads: Please set your signature with the Office Add-ins sample.
Choose Set signatures. This will open the task pane for the add-in.
In the task pane fill out the fields for your signature data. Then choose Save.
The task pane will load a page of sample templates. You can assign the templates to a New Mail, Reply, or Forward action. Once you've assign the templates you want to use, choose Save.
The next time you create a message or appointment, you'll see the signature you selected applied by the add-in.
Deploy to Azure
This sample supports deployment to Azure with the unified manifest.
From Visual Studio Code
- Open Teams Toolkit, and sign into Azure by choosing
Sign in to Azureunder the ACCOUNTS section from sidebar. - After you sign in, select a subscription under your account.
- Choose
Provision in the cloudfrom the DEVELOPMENT section or open the command palette and select:Teams: Provision in the cloud. - Choose
Deploy to the cloudor open the command palette and select:Teams: Deploy to the cloud.
Once the sample is successfully deployed follow these steps:
- Open the
./webpack.config.jsfile. - Change the
urlProdconstant to use the endpoint of your new Azure deployment. The correct endpoint is listed in the VS Code OUTPUT window from running previous commands. Or you can go to your Azure portal and go to the new storage account. Then choose Data management > Static website and copy the Primary endpoint value. - Save the changes to
webpack.config.jsand run thenpm run buildcommand. This will generate a newmanifest.jsonfile in thedistfolder that will load the add-in resources from your storage account. - Run the command
npm run start:unified:prodto start Outlook and sideload the manifest.json from thedistfolder. Outlook will start and then load the sample add-in from the deployed storage account.
Key parts of this sample
The manifest configures a runtime that is loaded specifically to handle event-based activation.
Configure event-based activation in the manifest.xml file
The following <Runtime> element specifies an HTML page resource ID that loads the runtime on Outlook on the web and on Mac. The <Override> element specifies the JavaScript file instead, to load the runtime for Outlook on Windows. Outlook on Windows doesn't use the HTML page to load the runtime.
<Runtime resid="Autorun">
  <Override type="javascript" resid="runtimeJs"/>
...
<bt:Url id="Autorun" DefaultValue="https://officedev.github.io/Office-Add-in-samples/Samples/outlook-set-signature/src/runtime/HTML/autorunweb.html"></bt:Url>
<bt:Url id="runtimeJs" DefaultValue="https://officedev.github.io/Office-Add-in-samples/Samples/outlook-set-signature/src/runtime/Js/autorunshared.js"></bt:Url>
The add-in handles two events that are mapped to the checkSignature() function.
manifest.xml
<LaunchEvents>
  <LaunchEvent Type="OnNewMessageCompose" FunctionName="checkSignature" />
  <LaunchEvent Type="OnNewAppointmentOrganizer" FunctionName="checkSignature" />
</LaunchEvents>
Configure event-based activation in the unified manifest file
If you use the unified manifest, the manifest.json file it specifies an HTML page resource ID that loads the runtime on Outlook on the web and on Mac. The runtimes array includes a runtime entry that describes the event-based activation required. The code object identities the HTML file to load. It also identifies a Javascript file to load when using Outlook on Windows.
 "runtimes": [
                {
                    "requirements": {
                        "capabilities": [
                            {
                                "name": "Mailbox",
                                "minVersion": "1.5"
                            }
                        ]
                    },
                    "id": "runtime_1",
                    "type": "general",
                    "code": {
                        "page": "https://localhost:3000/autorunweb.html",
                        "script": "https://localhost:3000/autorunshared.js"
                    },
                    "lifetime": "short",
                    "actions": [
                        {
                            "id": "checkSignature",
                            "type": "executeFunction",
                            "displayName": "checkSignature"
                        }
                    ]
                },
...
The add-in handles two events that are mapped to the checkSignature() function. They are described in the autoRunEvents array. Note that the actionID must match an id specified in the previous actions array.
 "autoRunEvents": [
      {
          "requirements": {
              "capabilities": [
                  {
                      "name": "Mailbox",
                      "minVersion": "1.5"
                  }
              ],
              "scopes": [
                  "mail"
              ]
          },
          "events": [
              {
                  "type": "newMessageComposeCreated",
                  "actionId": "checkSignature"
              },
              {
                  "type": "newAppointmentOrganizerCreated",
                  "actionId": "checkSignature"
              }
          ]
      }
  ],
Handling the events and using the setSignatureAsync API
When the user creates a new message or appointment, Outlook will load the files specified in the manifest to handle the OnNewMessageCompose and OnNewAppointmentOrganizer events. Outlook on the web and on Mac will load the autorunweb.html page, which then also loads autorunweb.js and autorunshared.js.
The autorunweb.js file contains a version of the insert_auto_signature function used specifically when running on Outlook on the web. The setSignatureAsync() API cannot be used in Outlook on the web for appointments. Therefore, insert_auto_signature inserts the signature into a new appointment by directly writing to the body text of the appointment.
The autorunshared.js file contains the checkSignature function that handles the events from Outlook. It also contains additional code that is shared and loaded when the add-in is used in Outlook on the web, on Windows, and on Mac. In Outlook on Windows, this file is loaded directly and autorunweb.html and autorunweb.js aren't loaded.
The autorunshared.js file contains a version of the insert_auto_signature function that uses the setSignatureAsync() API to set the signature for both messages and appointments.
Note that you can use a similar pattern when handling events. If you need code that only applies to Outlook on the web, you can load it in a separate file like autorunweb.js. And for code that applies to Outlook on the web, on Windows, and on Mac, you can load it in a shared file like autorunshared.js.
Embedding images with the signature
Template A shows how to insert an image by embedding it in the signature. This will avoid the image being downloaded from your server when the signature is inserted into new mail items. The HTML uses the following <img> tag format with the src set to cid:imageFileName to embed the image.
str +=
    "<td style='border-right: 1px solid #000000; padding-right: 5px;'><img src='cid:" +
    logoFileName +
    "' alt='MS Logo' width='24' height='24' /></td>";
In the addTemplateSignature function, if template A is used, it will attach the image by calling the addFileAttachmentFromBase64Async() API. Then it calls the setSignatureAsync() API.
Referencing images from the signature
Template B shows how to reference an image from the HTML. It uses the <img> tag and references the web location.
 str +=
    "<td style='border-right: 1px solid #000000; padding-right: 5px;'><img src='https://officedev.github.io/Office-Add-in-samples/Samples/outlook-set-signature/assets/sample-logo.png' alt='Logo' /></td>";
This is a simpler approach as you don't need to attach the image. Although your web server will need to provide the image anytime Outlook needs it for a signature.
Task pane code
The task pane code is located under the taskpane folder of this project. The task pane HTML and JavaScript files only provide UI and functionality to let the user specify and save a signature.
editsignature.htmlis loaded when the task pane first opens. It lets the user enter details such as name and title for their signature.assignsignature.htmlis loaded when the user saves their details from theeditsignature.htmlpage. It lets the user assign the signature to actions such as "new email", "reply", and "forward.
Questions and feedback
- Did you experience any problems with the sample? Create an issue and we'll help you out.
- We'd love to get your feedback about this sample. Go to our Office samples survey to give feedback and suggest improvements.
- For general questions about developing Office Add-ins, go to Microsoft Q&A using the office-js-dev tag.
Copyright
Copyright (c) 2021 Microsoft Corporation. All rights reserved.
This project has adopted the Microsoft Open Source Code of Conduct. For more information, see the Code of Conduct FAQ or contact opencode@microsoft.com with any additional questions or comments.