Note
Access to this page requires authorization. You can try signing in or changing directories.
Access to this page requires authorization. You can try changing directories.
This article provides guidance on identifying and investigating phishing attacks within your organization. The step-by-step instructions help you take the required remedial action to protect information and minimize further risks.
This article contains the following sections:
- Prerequisites: Covers the specific requirements you need to complete before starting the investigation. For example, logging that should be turned on, roles and permissions required, among others.
- Workflow: Shows the logical flow that you should follow to perform this investigation.
- Checklist: Contains a list of tasks for each of the steps in the flow chart. This checklist can be helpful in highly regulated environments to verify completed items, or as a quality gate for yourself.
- Investigation steps: Includes a detailed step-by-step guidance for this specific investigation.
Prerequisites
Here are general settings and configurations you should complete before proceeding with the phishing investigation.
Account details
Before proceeding with the investigation, you should have the user name, user principal name (UPN), or the email address of the account that you suspect is compromised.
Microsoft 365 base requirements
Verify auditing settings
Verify that mailbox auditing on by default is turned on by running the following command in Exchange Online PowerShell:
Get-OrganizationConfig | Format-List AuditDisabled
The value False indicates that mailbox auditing is enabled for all mailboxes in the organization, regardless of the value of the AuditEnabled property on individual mailboxes. For more information, see Verify mailbox auditing on by default is turned on.
Message trace
Message trace logs are invaluable components that help to find the original source of the message and the intended recipients. You can use the message trace functionality in Exchange admin center (EAC) at https://admin.exchange.microsoft.com/#/messagetrace or with the Get-MessageTrace cmdlet in Exchange Online PowerShell.
Note
Message trace is also available in the Microsoft Defender portal at https://security.microsoft.com under Email & collaboration > Exchange message trace, but that's just a passthrough link to message trace in the EAC.
Several components of the message trace functionality are self-explanatory but Message-ID is a unique identifier for an email message and requires thorough understanding. To get the Message-ID for an email of interest, you need to examine the raw email headers.
Audit log search
You search the unified audit log to view all the activities of the user and admin in your Microsoft 365 organization.
Are the sign-in logs and/or audit logs exported to an external system?
Since most of the Microsoft Entra ID sign-in and audit data will get overwritten after 30 or 90 days, we recommend that you use Microsoft Sentinel, Azure Monitor, or an external security information and event management (SIEM) system.
Roles and permissions required
Permissions in Microsoft Entra ID
We recommend the account that does the investigation be at least a Security Reader.
Permissions in Microsoft 365
The Security Reader role in the Microsoft Defender portal or the Microsoft Purview compliance portal should give you sufficient permissions to search the relevant logs.
If you're unsure about the role to use, see Find the permissions required to run any Exchange cmdlet.
Microsoft Defender for Endpoint
If you have Microsoft Defender for Endpoint (MDE), you should use it for this flow. For more information, see Tackling phishing with signal-sharing and machine learning.
System requirements
Hardware requirements
The system should be able to run PowerShell.
Software requirements
The following PowerShell modules are required for the investigation of the cloud environment:
Microsoft Graph PowerShell module. For installation instructions, see Install the Microsoft Graph PowerShell SDK.
Exchange Online PowerShell module: For installation instructions, see Install and maintain the Exchange Online PowerShell module.
Microsoft Entra Incident Response PowerShell module: For installation instructions, see Microsoft Entra Incident Response PowerShell Module.
Workflow
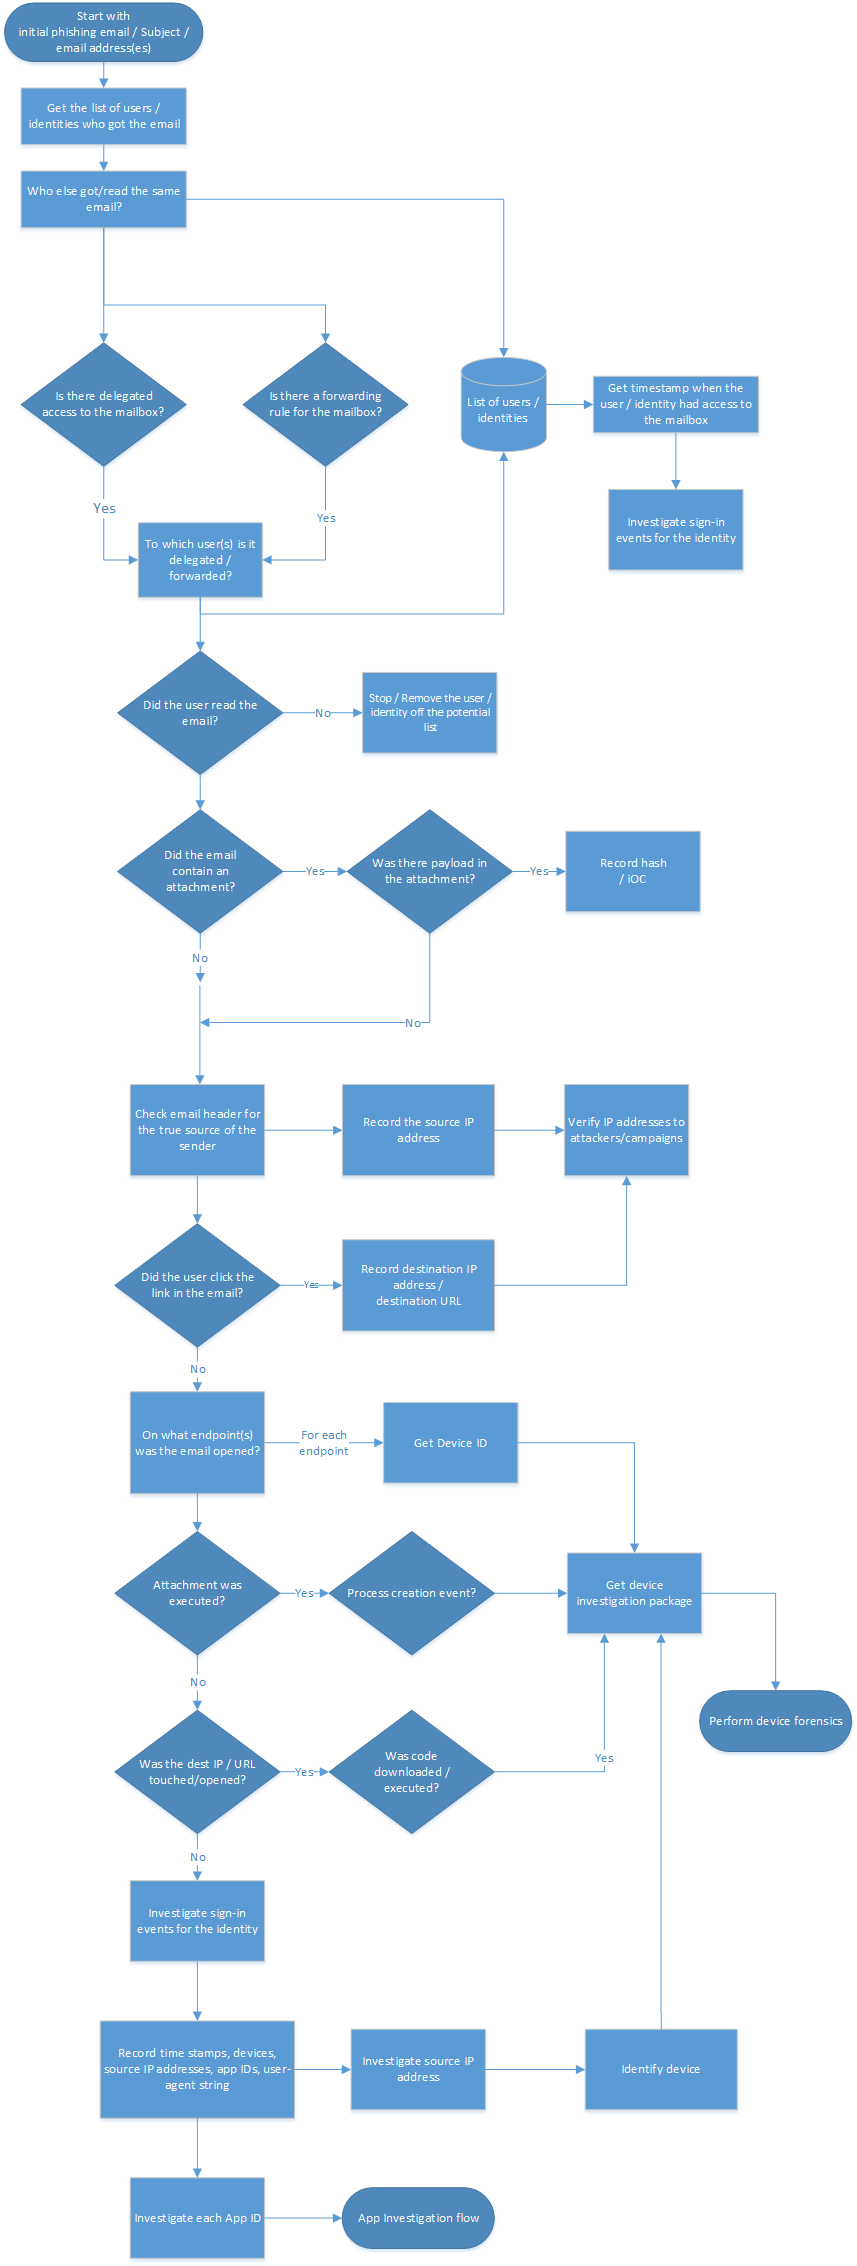
You can also:
- Download the phishing and other incident response playbook workflows as a PDF.
- Download the phishing and other incident response playbook workflows as a Visio file.
Checklist
This checklist helps you evaluate your investigation process and verify that the steps are completed during investigation:
| Review initial phishing email | |
| Get the list of users who got this email | |
| Get the latest dates when the user had access to the mailbox | |
| Is delegated access configured on the mailbox? | |
| Are there forwarding rules configured on the mailbox? | |
| Review your Exchange mail flow rules (transport rules | |
| Find the email messages | |
| Did the user read or open the email? | |
| Who else got the same email? | |
| Did the email contain an attachment? | |
| Was there a payload in the attachment? | |
| Check email header for true source of the sender | |
| Verify IP addresses to attackers/campaigns | |
| Did the user select links in the email? | |
| On what endpoint was the email opened? | |
| Was the attachment payload executed? | |
| Was the destination IP or URL touched or opened? | |
| Was malicious code executed? | |
| What sign-ins happened with the account for the federated scenario? | |
| What sign-ins happened with the account for the managed scenario? | |
| Investigate the source IP address | |
| Investigate the device ID found | |
| Investigate each App ID |
You can also download the phishing and other incident playbook checklists as an Excel file.
Investigation steps
For this investigation, you have a sample phishing email, or parts of the email. For example, you might have the sender's address, subject of the email, or parts of the message to start the investigation. Also make sure that you have completed and enabled all settings as recommended in the Prerequisites section.
Get the list of users / identities who got the email
As the first step, you need to get a list of users / identities who received the phishing email. The objective of this step is to record a list of potential users / identities that you'll later use to iterate through for more investigation steps. Refer to the Workflow section for a high-level flow diagram of the steps you need to follow during this investigation.
We don't give any recommendations in this playbook on how you want to record this list of potential users / identities. Depending on the size of the investigation, you can use an Excel book, a CSV file, or even a database for larger investigations. There are multiple ways to obtain the list of identities in a given tenant, and here are some examples.
Create a Content search in the Microsoft Purview compliance portal
Use the indicators to create and run a Content search. For instructions, see Create a content search.
For a full list of searchable email properties, see searchable email properties.
The following example returns messages that were received by users between April 13, 2022 and April 14, 2022 and that contain the words "action" and "required" in the subject line:
(Received:4/13/2022..4/14/2022) AND (Subject:'Action required')
The following example query returns messages sent by chatsuwloginsset12345@outlook.com and contain the exact phrase "Update your account information" in the subject line.
(From:chatsuwloginsset12345@outlook.com) AND (Subject:"Update your account information")
For more information, see how to search for and delete messages in your organization.
Use the Search-Mailbox cmdlet in Exchange Online PowerShell
You can also use the Search-Mailbox cmdlet in Exchange Online PowerShell to perform a specific query against a target mailbox of interest and copy the results to an unrelated destination mailbox.
The following example query searches Jane Smith mailbox for an email that contains the phrase Invoice in the subject and copies the results to IRMailbox in a folder named "Investigation."
Search-Mailbox -Identity "Jane Smith" -SearchQuery "Subject:Invoice" -TargetMailbox "IRMailbox" -TargetFolder "Investigation" LogLevel Full
In this example command, the query searches all tenant mailboxes for an email that contains the phrase "InvoiceUrgent" in the subject and copies the results to IRMailbox in a folder named "Investigation."
Get-Mailbox | Search-Mailbox -SearchQuery 'InvoiceUrgent vote' -TargetMailbox "IRMailbox" -TargetFolder "Investigation" -LogLevel Full
For detailed syntax and parameter information, see Search-Mailbox.
Is delegated access configured on the mailbox?
Use the following script to check whether delegated access is configured on the mailbox: https://github.com/OfficeDev/O365-InvestigationTooling/blob/master/DumpDelegatesandForwardingRules.ps1.
To create this report, run a small PowerShell script that gets a list of all your users. Then, use the Get-MailboxPermission cmdlet to create a CSV file of all the mailbox delegates in your tenancy.
Look for unusual names or permission grants. If you see something unusual, contact the mailbox owner to check whether it's legitimate.
Are there forwarding rules configured for the mailbox?
You need to check each identified mailbox for mailbox forwarding (also known as SMTP (Simple Mail Transfer Protocol)forwarding) or Inbox rules that forward email messages to external recipients (typically, newly created Inbox rules).
To check all mailboxes for mailbox forwarding, run the following command in Exchange Online PowerShell:
Get-Mailbox -RecipientTypeDetails UserMailbox -ResultSize unlimited | Format-Table -Auto MicrosoftOnlineServicesID,ForwardingSmtpAddress,DeliverToMailboxAndForward | Export-csv C:\Temp\Forwarding.csv -NoTypeInformationTo check for Inbox rules that were created in mailboxes between the specified dates, run the following command in Exchange Online PowerShell:
Search-UnifiedAuditLog -StartDate 12/16/2021 -EndDate 03/16/2022 -ResultSize 5000 -RecordType exchangeadmin -Operations New-InboxRule | Export-csv NoTypeInformation -Path c:\temp\Inboxrulesoutput.csvYou can also use the Auto-forwarded messages report in the Exchange admin center (EAC). For instructions, see Auto forwarded messages report in Exchange Online.
Notes:
- Look for unusual target locations, or any kind of external addressing.
- Look for forwarding rules with unusual key words in the criteria such as all mail with the word invoice in the subject. Contact the mailbox owner to check whether it's legitimate.
Review Inbox rules
Check for the removal of Inbox rules, considering the timestamps in proximity to your investigation. As an example, use the following command in Exchange Online PowerShell:
Search-UnifiedAuditLog -StartDate 12/16/2021 -EndDate 03/16/2022 -Operations Remove-InboxRule | Export-CSV NoTypeInformation -Path c:\temp\removedInboxRules.csv
Review Exchange mail flow rules (transport rules)
There are two ways to get the list of Exchange mail flow rules (also known as transport rules) in your organization:
- In the Exchange admin center or Exchange Online PowerShell. For instructions, see View or modify a mail flow rule.
- The Exchange transport rule report in the Exchange admin center. For instructions, see Exchange transport rule report in Exchange Online.
Look for new rules, or modified rules to redirect the mail to external domains. The number of rules should be known and relatively small. You can do an audit log search to determine who created the rule and from where they created it. If you see something unusual, contact the creator to determine if it's legitimate.
Get the latest dates when the user had access to the mailbox
In the Microsoft Defender portal or Microsoft Purview compliance portal, navigate to unified audit log. Under Activities in the drop-down list, you can filter by Exchange Mailbox Activities.
The capability to list compromised users is available in the Microsoft Defender portal.
This report shows activities that could indicate a mailbox is being accessed illicitly. It includes created or received messages, moved or deleted messages, copied or purged messages, sent messages using send on behalf or send as, and all mailbox sign ins. The data includes date, IP address, user, activity performed, the item affected, and any extended details.
Note
For this data to be recorded, you must enable the mailbox auditing option.
The volume of data included here could be substantial, so focus your search on users that would have high-impact if breached. Look for unusual patterns such as odd times of the day, or unusual IP addresses, and look for patterns such as high volumes of moves, purges, or deletes.
Did the user read / open the email?
There are two main cases here:
- The mailbox is in Exchange Online.
- The mailbox is in on-premises Exchange (Exchange hybrid).
Did the Exchange Online user open the email
Use the Search-Mailbox cmdlet in Exchange Online PowerShell to do a specific search query against a target mailbox of interest and copy the results to an unrelated destination mailbox.
The following example query searches Janes Smith's mailbox for an email that contains the phrase Invoice in the subject and copies the results to IRMailbox in a folder named Investigation.
Search-Mailbox -Identity "Jane Smith" -SearchQuery "Subject:Invoice" -TargetMailbox "IRMailbox" -TargetFolder "Investigation" LogLevel Full
The following sample query searches all tenant mailboxes for an email that contains the phrase InvoiceUrgent in the subject and copies the results to IRMailbox in a folder named Investigation.
Get-Mailbox | Search-Mailbox -SearchQuery 'InvoiceUrgent vote' -TargetMailbox "IRMailbox" -TargetFolder "Investigation" -LogLevel Full
Did the user open the email in Exchange hybrid
Use the Get-MessageTrackingLog cmdlet to search for message delivery information stored in the message tracking log. Here's an example:
Get-MessageTrackingLog -Server Mailbox01 -Start "03/13/2022 09:00:00" -End "03/15/2022 17:00:00" -Sender "john@contoso.com"
For detailed syntax and parameter information, see Get-MessageTrackingLog.
Who else got the same email?
There are two main cases here:
- The mailbox is in Exchange Online.
- The mailbox is in on-premises Exchange (Exchange hybrid).
The workflow is essentially the same as explained in the Get the list of users / identities who got the email section earlier in this article.
Find the email in Exchange Online
Use the Search-Mailbox cmdlet to perform a specific search query against a target mailbox of interest and copy the results to an unrelated destination mailbox.
This sample query searches all tenant mailboxes for an email that contains the subject InvoiceUrgent in the subject and copies the results to IRMailbox in a folder named Investigation.
Get-Mailbox | Search-Mailbox -SearchQuery "Subject:InvoiceUrgent" -TargetMailbox "IRMailbox" -TargetFolder "Investigation" -LogLevel Full
Find the email in on-premises Exchange
Use the Get-MessageTrackingLog cmdlet to search for message delivery information stored in the message tracking log. Here's an example:
Get-MessageTrackingLog -Server Mailbox01 -Start "03/13/2018 09:00:00" -End "03/15/2018 17:00:00" -MessageSubject "InvoiceUrgent"
For detailed syntax and parameter information, see Get-MessageTrackingLog.
Did the email contain an attachment?
There are two main cases here:
- The mailbox is in Exchange Online.
- The mailbox is in on-premises Exchange (Exchange hybrid).
Find out if the message contained an attachment in Exchange Online
If the mailbox is in Exchange Online, you have two options:
- Use the classic Search-Mailbox cmdlet
- Use the New-ComplianceSearch cmdlet
Use the Search-Mailbox cmdlet to perform a specific search query against a target mailbox of interest and copy the results to an unrelated destination mailbox. Here's an example:
Get-Mailbox -ResultSize unlimited | Search-Mailbox -SearchQuery attachment:trojan* -TargetMailbox "IRMailbox" -TargetFolder "Investigation" -LogLevel Full
For detailed syntax and parameter information, see Search-Mailbox.
The other option is to use the New-ComplianceSearch cmdlet. Here's an example:
New-ComplianceSearch -Name "Investigation" -ExchangeLocation "Research Department" -ContentMatchQuery "from:pilar@contoso.com AND hasattachment:true"
For detailed syntax and parameter information, see New-ComplianceSearch.
Find out if the message contained an attachment in on-premises Exchange
Note
In Exchange Server 2013, this procedure requires Cumulative Update 12 (CU12) or later. For more information, see this article.
Use the Search-Mailbox cmdlet to search for message delivery information stored in the message tracking log. Here's an example:
Search-Mailbox -Identity "Jane Smith"-SearchQuery AttachmentNames:attachment_name -TargetMailbox "IRMailbox" -TargetFolder "Investigation" -LogLevel Full
For detailed syntax and parameter information, see Search-Mailbox.
Was there a payload in the attachment?
Look for potential malicious content in the attachment. For example, PDF files, obfuscated PowerShell, or other script codes.
The View data by Email > Malware view in the Threat protection status report shows the number of incoming and outgoing messages that were detected as containing malware for your organization. For more information, see Threat protection status report: View data by Email > Malware.
Check email header for true source of the sender
Many of the components of the message trace functionality are self-explanatory but you need to thoroughly understand about Message-ID. The Message-ID is a unique identifier for an email message.
To obtain the Message-ID for an email of interest, you need to examine the raw email headers. For instructions on how to do this in Microsoft Outlook or Outlook on the Web (formerly known as Outlook Web App or OWA) see View internet message headers in Outlook
When viewing an email header, copy and paste the header information into an email header analyzer provided by MXToolbox or Azure for readability.
Headers Routing Information: The routing information provides the route of an email as its being transferred between computers.
Sender Policy Framework (SPF): An email validation to help prevent/detect spoofing. In the SPF record, you can determine which IP addresses and domains can send email on behalf of the domain.
SPF = Pass: The SPF TXT record determined the sender is permitted to send on behalf of a domain.
- SPF = Neutral
- SPF = Fail: The policy configuration determines the outcome of the message Sender IP
- SMTP Mail: Validate if this is a legitimate domain
For more information about SPF, see How Microsoft 365 uses SPF to prevent spoofing
Common Values: Here's a breakdown of the most commonly used and viewed headers, and their values. This is valuable information and you can use them in the Search fields in Threat Explorer.
- From address
- Subject
- Message ID
- To address
- Return-path address
Authentication-Results: You can find what your email client authenticated when the email was sent. It provides you with SPF and DKIM authentication.
Originating IP: The original IP can be used to determine if the IP is blocklisted and to obtain the geo location.
Spam Confidence Level (SCL): This determines the probability if an incoming email is spam.
- -1: Bypass most spam filtering from a safe sender, safe recipient, or safe listed IP address (trusted partner)
- 0, 1: Nonspam because the message was scanned and determined to be clean
- 5, 6: Spam
- 7, 8, 9: High confidence spam
The SPF record is stored within a DNS database and is bundled with the DNS lookup information. You can manually check the Sender Policy Framework (SPF) record for a domain by using the nslookup command:
Open the command prompt (Start > Run > cmd).
Type the command as:
nslookup -type=txt"a space, and then the domain/host name. For example:nslookup -type=txt domainname.com
Note
-all (reject or fail them - don't deliver the email if anything does not match), this is recommended.
Check if DKIM is enabled on your custom domains in Microsoft 365
You need to publish two CNAME records for every domain they want to add the domain keys identified mail (DKIM). See how to use DKIM to validate outbound email sent from your custom domain.
Check for domain-based message authentication, reporting, and conformance (DMARC)
You can use this feature to validate outbound email in Microsoft 365.
Verify IP addresses to attackers/campaigns
To verify or investigate IP addresses identified from the previous investigation steps, you can use any of these options:
- VirusTotal
- Microsoft Defender for Endpoint
- Public Sources:
- Ipinfo.io - Has a free option to obtain geo-location
- Censys.io - Has a free option to obtain information about what their passive scans of the internet know
- AbuseIPDB.com - Has a free option that provides some geolocation
- Ask Bing and Google - Search on the IP address
URL reputation
You can use any Windows 10 device and Microsoft Edge browser which uses the SmartScreen technology.
Here are a few third-party URL reputation examples:
As you investigate the IP addresses and URLs, look for and correlate IP addresses to indicators of compromise (IOCs) or other indicators, depending on the output or results and add them to a list of sources from the adversary.
Did the user select links in the email?
If the user clicked the link in the email (on-purpose or not), then this action typically leads to a new process creation on the device itself. Depending on the device this was performed, you need perform device-specific investigations. For example, Windows vs Android vs iOS. In this article, we have described a general approach along with some details for Windows-based devices. If you're using Microsoft Defender for Endpoint (MDE), then you can also use it for iOS and soon Android.
You can investigate these events using Microsoft Defender for Endpoint.
VPN/proxy logs Depending on the vendor of the proxy and VPN solutions, you need to check the relevant logs. Ideally you're forwarding the events to your SIEM or to Microsoft Sentinel.
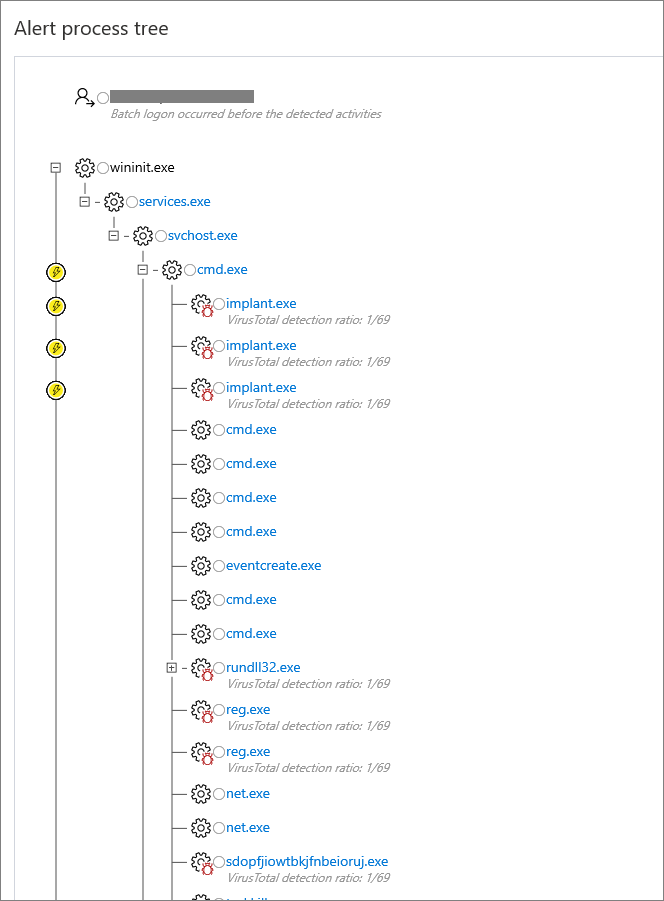
Using Microsoft Defender for Endpoint This is the best-case scenario, because you can use our threat intelligence and automated analysis to help your investigation. For more information, see how to investigate alerts in Microsoft Defender for Endpoint.
The Alert process tree takes alert triage and investigation to the next level, displaying the aggregated alerts and surrounding evidences that occurred within the same execution context and time period.
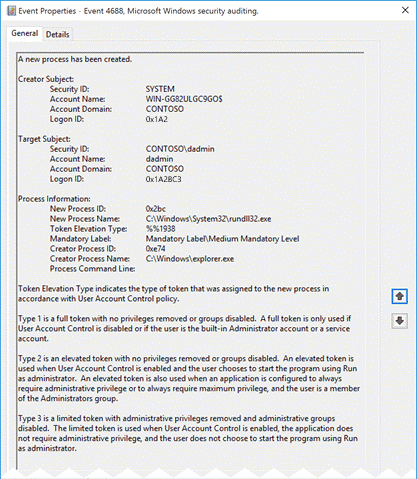
Windows-based client devices Make sure you have enabled the Process Creation Events option. Ideally, you should also enable command-line Tracing Events.
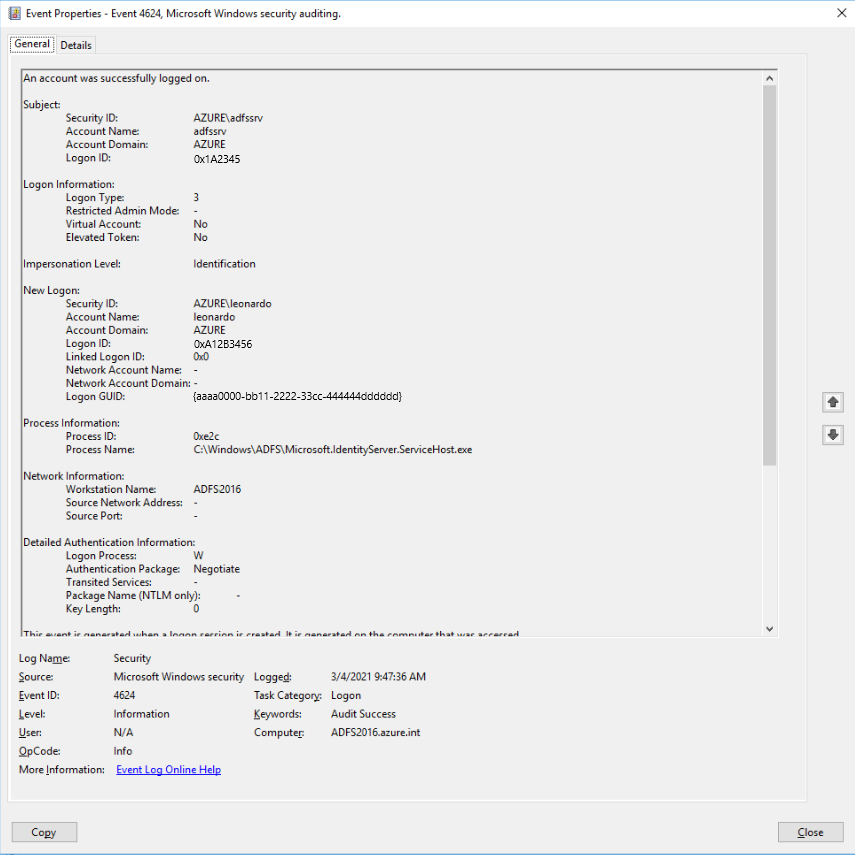
On Windows clients, which have the above-mentioned Audit Events enabled before the investigation, you can check Audit Event 4688 and determine the time when the email was delivered to the user:
On what endpoint was the email opened?
The tasks here are similar to the previous investigation step: Did the user select links in the email?
Was the attached payload executed?
The tasks here are similar to the previous investigation step: Did the user select links in the email?
Was the destination IP / URL touched or opened?
The tasks here are similar to the previous investigation step: Did the user select links in the email?
Was malicious code executed?
The tasks here are similar to the previous investigation step: Did the user select links in the email?
What sign-ins happened with the account?
Check the various sign-ins that happened with the account.
Federated scenario
The audit log settings and events differ based on the operating system (OS) Level and the Active Directory Federation Services (ADFS) Server version.
See the following sections for different server versions.
Server 2016 and newer
By default, ADFS in Windows Server 2016 has basic auditing enabled. With basic auditing, administrators can see five or less events for a single request. But you can raise or lower the auditing level by using this command:
Set-AdfsProperties -AuditLevel Verbose
For more information, see auditing enhancements to ADFS in Windows server.
If you have Microsoft Entra Connect Health installed, you should also look into the Risky IP report. The failed sign-in activity client IP addresses are aggregated through Web Application proxy servers. Each item in the Risky IP report shows aggregated information about failed AD FS sign-in activities that exceed the designated threshold.

For more information, see Risky IP report.
Windows Server 2016 and newer
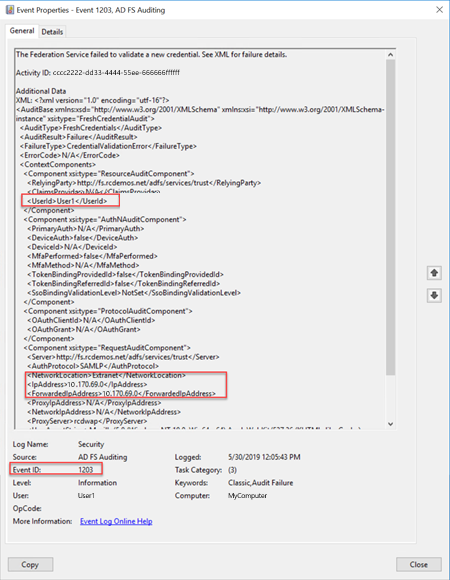
For the actual audit events, you need to look at the security events logs and you should look for events with look for Event ID 1202 for successful authentication events and 1203 for failures
Example for Event ID1202:
Event ID 1202 FreshCredentialSuccessAudit The Federation Service validated a new credential. See XML for details.
Example for Event ID 1203:
Event ID 1203 FreshCredentialFailureAudit The Federation Service failed to validate a new credential. See XML for failure details.
Managed scenario
Check the Microsoft Entra sign-in logs for one or more users you're investigating.
- Navigate to the Microsoft Entra admin center > Sign-in screen
- Check the sign-in activities
- Check the PowerShell function on GitHub
In the Microsoft Entra admin center, navigate to the Sign-ins screen and add/modify the display filter for the timeframe you found in the previous investigation steps and add the user name as a filter, as shown in this image.
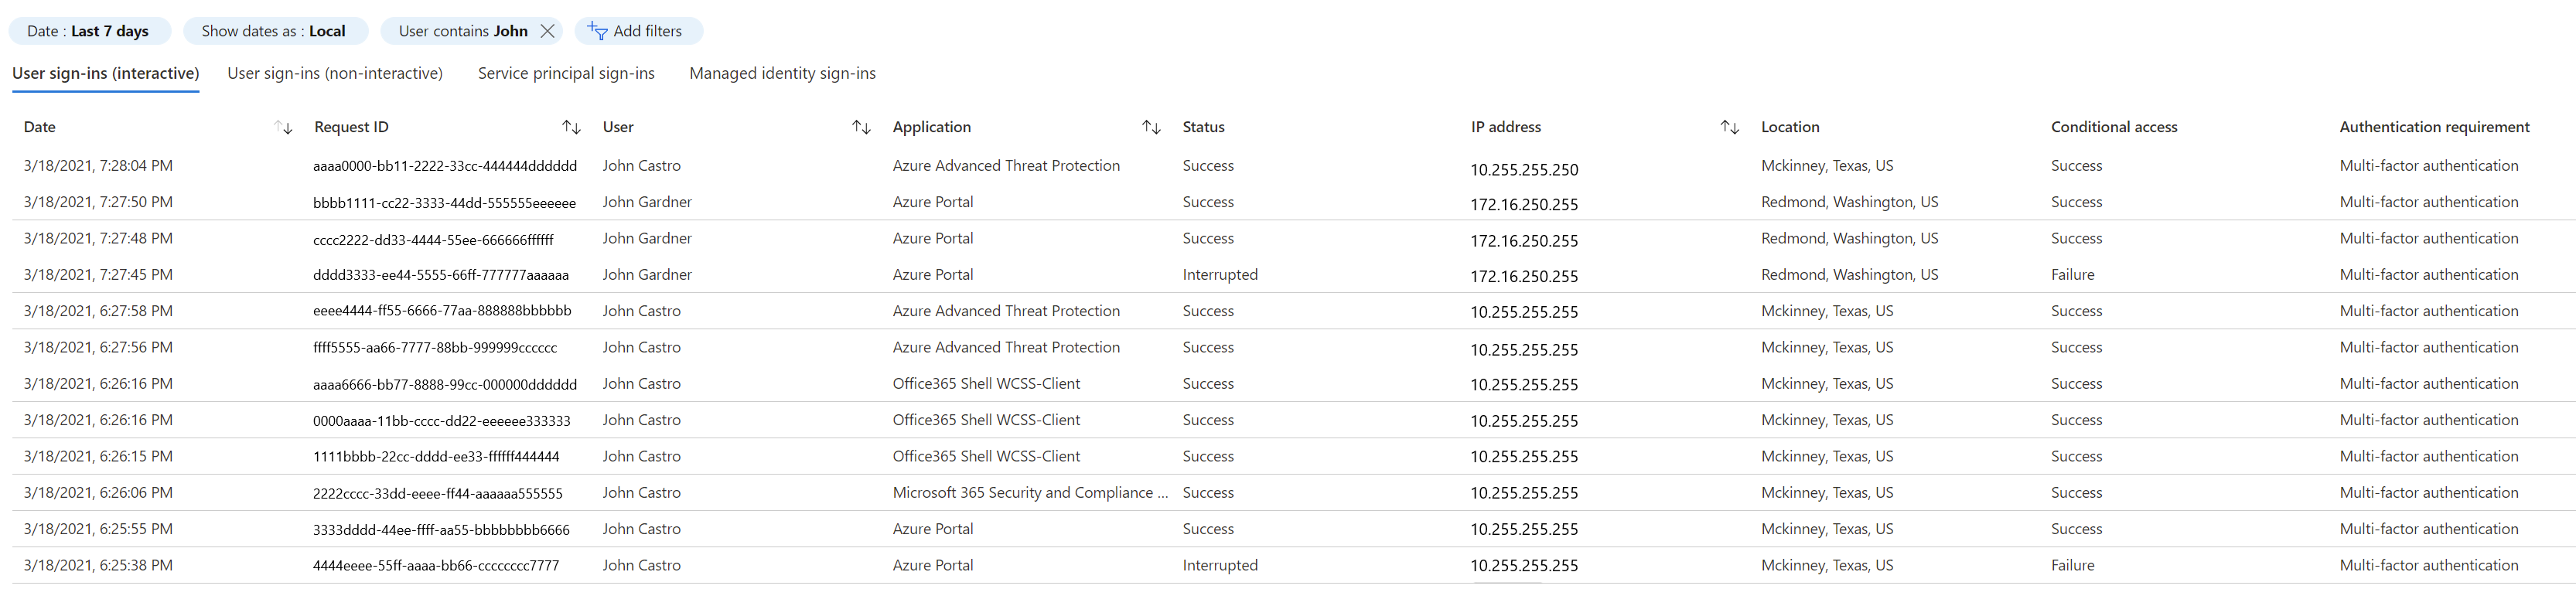
You can also search using Graph API. For example, filter on User properties and get lastSignInDate along with it. Search for a specific user to get the last signed in date for this user.
For example, https://graph.microsoft.com/beta/users?$filter=startswith(displayName,'Dhanyah')&$select=displayName,signInActivity
You can also use the Microsoft Graph PowerShell cmdlet Get-MgUser to conduct investigations. For example:
Get-MgAuditLogSignIn -Filter "userPrincipalName eq ‘johcast@contoso.com’" | Export-Csv -Path ".\UserSignInActivity.csv" -NoTypeInformation
Or, you can use this command:
Get-MgAuditLogSignIn -Filter "userPrincipalName eq ‘johcast@contoso.com’" | Export-Csv -Path ".\UserSignInActivity.csv" -NoTypeInformation
Investigate source IP address
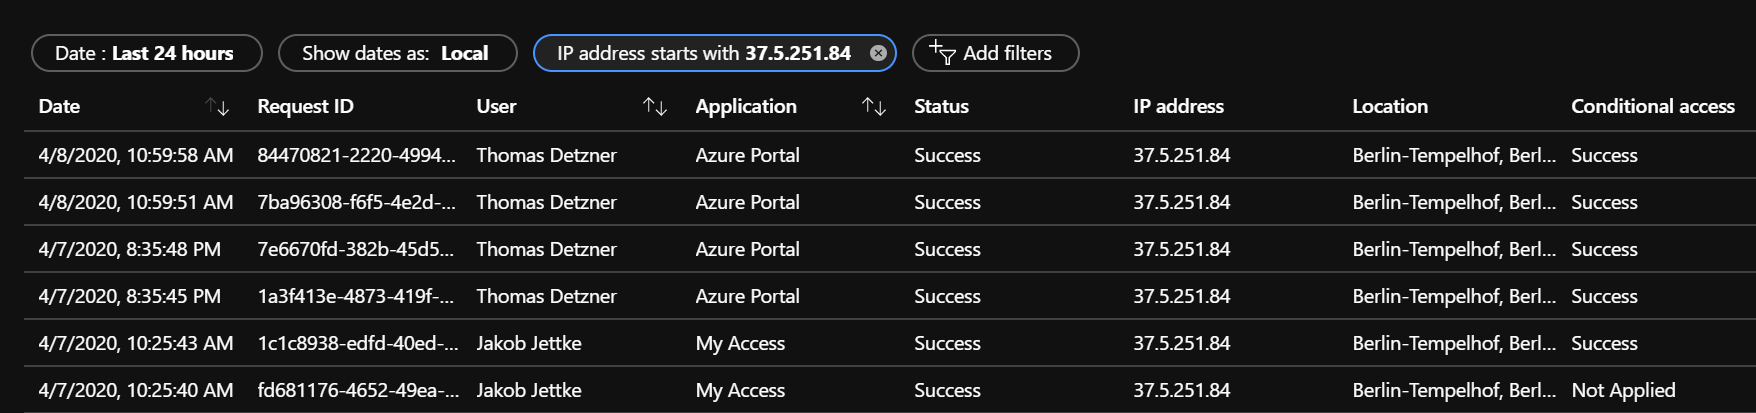
Based on the source IP addresses that you found in the Microsoft Entra sign-in log or the ADFS/Federation Server log files, investigate further to know from where the traffic originated.
Managed user
For a managed scenario, you should start looking at the sign-in logs and filter based on the source IP address:
```powershell
Connect-MgGraph -Scopes "AuditLog.Read.All", "Directory.Read.All"
$ipAddress = "1.2.3.4"
$fromDate = (Get-Date).AddDays(-29).ToString("yyyy-MM-ddTHH:mm:ssZ")
$toDate = (Get-Date).AddDays(-3).ToString("yyyy-MM-ddTHH:mm:ssZ")
Get-MgAuditLogSignIn -Filter "ipAddress eq '$ipAddress' and createdDateTime ge $fromDate and createdDateTime le $toDate" -All |
Select-Object UserPrincipalName, AppDisplayName, IPAddress, ResourceDisplayName, Status, CreatedDateTime |
Out-GridView -Title "Sign-ins from IP $ipAddress"
You can also use the Microsoft Graph PowerShell cmdlet Get-MgUser to conduct investigations. Learn more:Get-MgUser.
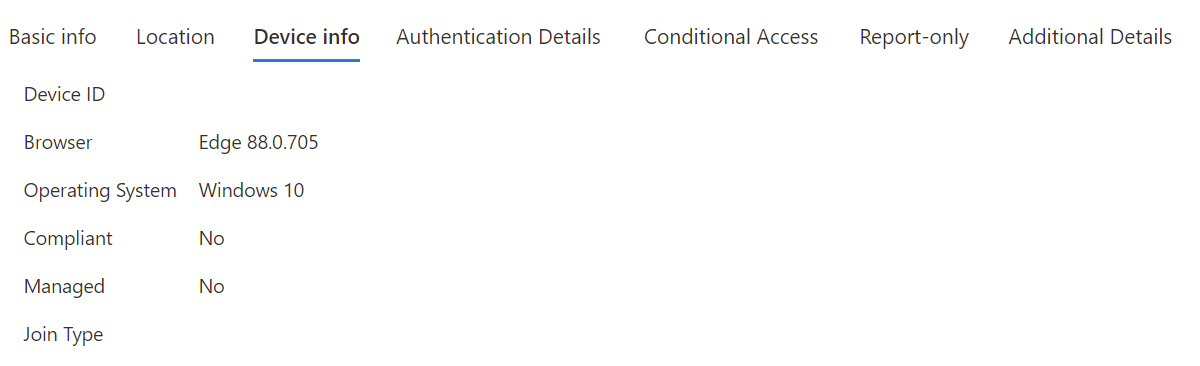
When you look into the results list, navigate to the Device info tab. Depending on the device used, you get varying output. Here are a few examples:
Example 1 - Unmanaged device (BYOD):
Example 2 - Managed device (Microsoft Entra join or Microsoft Entra hybrid join):
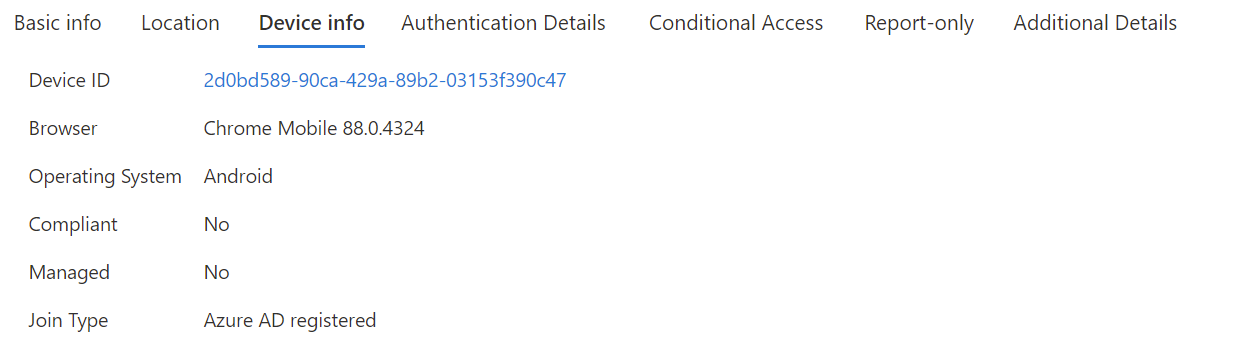
Check for the DeviceID if one is present. You should also look for the OS and the browser or UserAgent string.
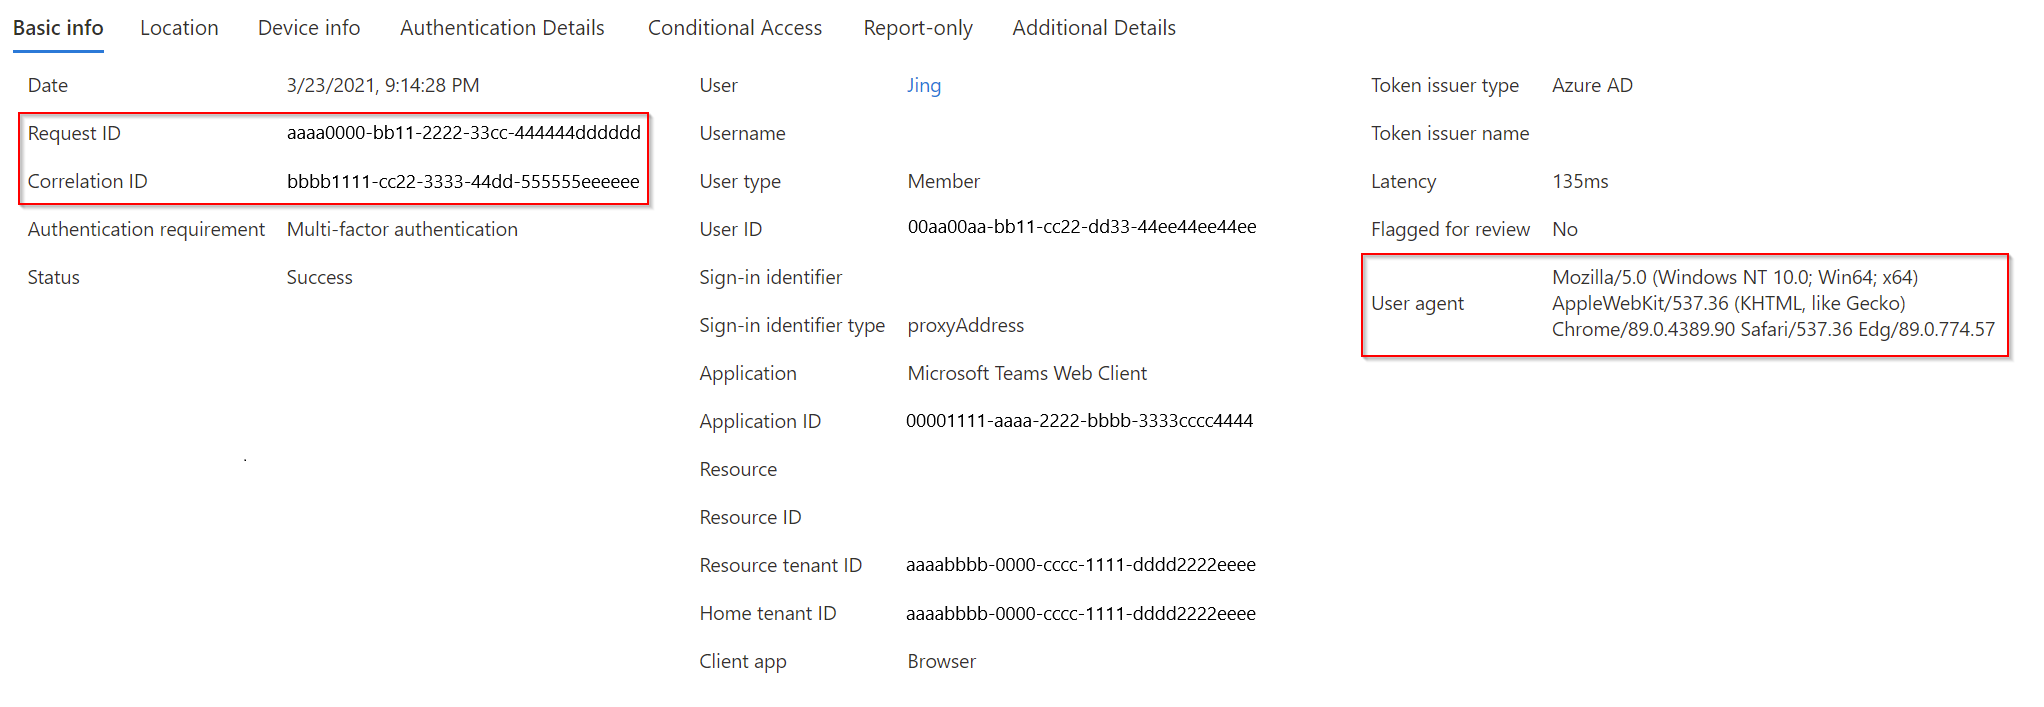
Record the CorrelationID, Request ID and timestamp. You should use CorrelationID and timestamp to correlate your findings to other events.
Federated user/application
Follow the same procedure that is provided for Federated sign-in scenario.
Look for and record the DeviceID, OS Level, CorrelationID, RequestID.
Investigate the identified DeviceID
This step is relevant for only those devices that are known to Microsoft Entra ID. For example, from the previous steps, if you found one or more potential device IDs, then you can investigate further on this device. Look for and record the DeviceID and Device Owner.
Investigate each AppID
Start with the sign-in logs and the app configuration of the tenant or the federation servers' configuration.
Managed scenario
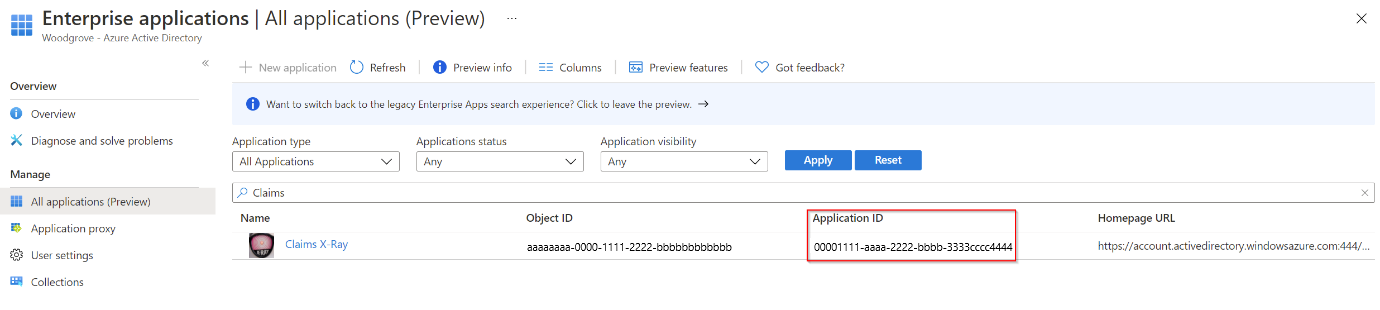
From the previously found sign-in log details, check the Application ID under the Basic info tab:
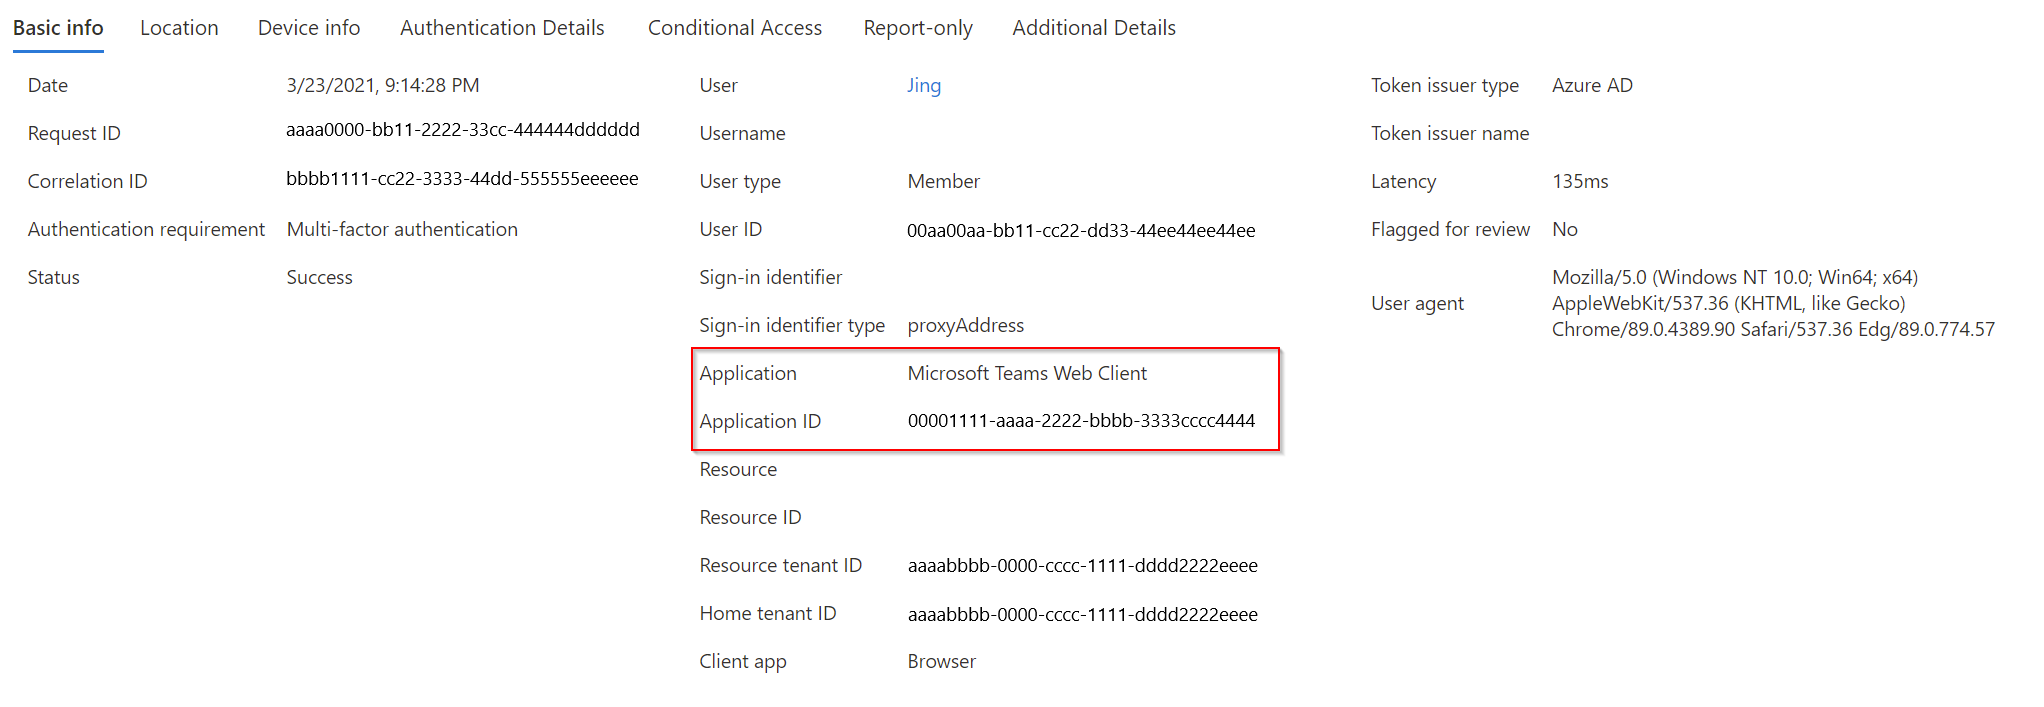
Note the differences between the Application (and ID) to the Resource (and ID). The application is the client component involved, whereas the Resource is the service / application in Microsoft Entra ID.
With this AppID, you can now perform research in the tenant. Here's an example:
Get-MgApplication -Filter "AppId eq '00001111-aaaa-2222-bbbb-3333cccc4444'"
Id                                       AppId                                    DisplayName

3af6dc4e-b0e5-45ec-8272-56f3f3f875ad     00001111-aaaa-2222-bbbb-3333cccc4444     Claims X-Ray
With this information, you can search in the Enterprise Applications portal. Navigate to All Applications and search for the specific AppID.
Extra incident response playbooks
Examine guidance for identifying and investigating these other types of attacks:
Incident response resources
- Overview for Microsoft security products and resources for new-to-role and experienced analysts
- Planning for your Security Operations Center (SOC)
- Microsoft Defender XDR incident response
- Microsoft Defender for Cloud (Azure)
- Microsoft Sentinel incident response
- Microsoft Incident Response team guide shares best practices for security teams and leaders
- Microsoft Incident Response guides help security teams analyze suspicious activity