Note
Access to this page requires authorization. You can try signing in or changing directories.
Access to this page requires authorization. You can try changing directories.
This article describes how to deploy your SharePoint Framework (SPFx) Application Customizer to SharePoint and see it working on modern SharePoint pages.
Be sure you've completed the procedures in the following articles before you begin:
- Build your first SharePoint Framework Extension (Hello World part 1)
- Use page placeholders from Application Customizer (Hello World part 2)
You can also follow these steps by watching the video on the Microsoft 365 Platform Communtiy (PnP) YouTube Channel:
There are few different ways on getting your SPFx extensions deployed and activated in SharePoint sites. The correct option depends on your business requirements and objectives. The primary options are as follows:
- Activate the extension on specific site(s) using the Feature Framework-based activation option once the solution is installed. This is the only model that supports site level assets getting created or deployed as part of the solution activation.
- Use the tenant-scoped deployment option and activate the extension on specific sites available SharePoint APIs and interfaces.
- Use the tenant-wide deployment option for extensions from app catalog. This capability was introduced in the SharePoint Framework v1.6.
Package the Hello World Application Customizer
In this example, we'll activate the extension in a single site. This means that we'll use the Feature Framework-based activation when the solution is being installed on the site.
In the console window, go to the extension project directory created in Build your first SharePoint Framework Extension (Hello World part 1).
cd app-extensionIf heft start is still running, stop it from running by selecting CTRL+C.
Unlike in Debug mode, to use an extension on modern SharePoint pages, you need to deploy and register the extension with SharePoint in Site collection, Site, or List scope. The scope defines where and how the Application Customizer is active. In this particular scenario, we'll register the Application Customizer by using the Site collection scope.
Before we package our solution, we want to include the code needed to automate the extension activation when the solution is installed on the site. In this case, we'll use Feature Framework elements to do these actions in the solution package, but you could also associate the Application Customizer to a SharePoint site by using the SharePoint REST or CSOM APIs as part of the site provisioning.
Install the solution package to the site where it should be installed so that the extension manifest allowed for execution.
Associate the Application Customizer to the planned scope. This can be done programmatically via the SharePoint REST or CSOM APIs, or by using the Feature Framework in the SharePoint Framework solution package. You need to associate the following properties in the
UserCustomActionobject at the site collection, site, or list level.- ClientSideComponentId: This is the identifier (GUID) of the SPFx extension that has been installed in the app catalog.
- ClientSideComponentProperties: This is an optional parameter that can be used to provide properties for the SPFx extension instance.
You can control the requirement to add a solution containing your extension to the site with the
skipFeatureDeploymentsetting in the ./config/package-solution.json file. Even though you wouldn't require the solution to be installed on the site, you need to associateClientSideComponentIdto specific objects for the extension to be visible.
Review the existing elements.xml file for SharePoint definitions
In the following steps, we'll review the CustomAction definition, which was automatically created for the solution as part of the scaffolding for enabling the solution on a site when it's installed.
Return to your solution package in Visual Studio Code (or to your preferred editor).
Open the ./sharepoint/assets/elements.xml file.
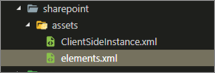
Review the existing XML structure in the elements.xml file. The ClientSideComponentId property was updated based on the unique ID of your Application Customizer defined in the ./src/extensions/helloWorld/HelloWorldApplicationCustomizer.manifest.json file.
The ClientSideComponentProperties property is set to the default structure and JSON properties for our extension. Notice the JSON is escaped so that it can be set within an XML attribute.
The configuration uses the specific location of ClientSideExtension.ApplicationCustomizer to define that this is an Application Customizer. Because this elements.xml is associated to a Web scoped feature by default, this CustomAction is automatically added to the Web.UserCustomAction property in the site where the solution is being installed.
Ensure that the configuration matches the changes made to the properties of the Application Customizer. Set the ClientSideComponentProperties property to the following HTML encoded JSON string that contains the property values:
{"Top":"Top area of the page","Bottom":"Bottom area in the page"}
What about ClientSideInstance.xml file in assets folder?
ClientSideInstance.xml file is used with Tenant Wide deployment of SharePoint Framework extensions. You can use this file to add an entry to the centralized Tenant-Wide Extensions list in the tenant app catalog site if you use the tenant-scoped deployment option. In this tutorial, we selected the solution to be installed at the site level, which means that this file will be ignored when solution is activated in the app catalog.
Tenant-Wide Extensions list can be used to automatically activate extensions in tenant from a centralized location. Tenant-wide deployment is supported for Application customizers and list view command sets. You can specify different target definitions, like activation based on the site type or list type.
For this tutorial, we don't need this file as we'll be activating solution in a specific site using feature XML based provisioning.
Tip
For more information, see: Tenant-wide Deployment of SharePoint Framework Extensions
Ensure that definitions are taken into account within the build pipeline
The ./config/package-solution.json file defines the package metadata. To ensure that the elements.xml file is taken into account while the solution is being packaged, the default scaffolding includes the required configuration to define a Feature Framework feature definition in the solution package.
The original elementManifests property in the ./config/package-solution.json file looks like this:
"assets": {
  "elementManifests": [
    "elements.xml",
    "clientsideinstance.xml"
  ]
}
Remove the entry for clientsideinstance.xml under elementManifests, as we don't need that for this tutorial:
"assets": {
  "elementManifests": [
    "elements.xml"
  ]
}
The ./config/package-solution.json now looks similar to the following example after the required edits:
{
  "$schema": "https://developer.microsoft.com/json-schemas/spfx-build/package-solution.schema.json",
  "solution": {
    "name": "app-extension-client-side-solution",
    "id": "65e15d73-515b-4d57-8c92-66ba5890c7b4",
    "version": "1.0.0.0",
    "includeClientSideAssets": true,
    "skipFeatureDeployment": true,
    "isDomainIsolated": false,
    "developer": {
      "name": "",
      "websiteUrl": "",
      "privacyUrl": "",
      "termsOfUseUrl": "",
      "mpnId": "Undefined-1.14.0"
    },
    "metadata": {
      "shortDescription": {
        "default": "app-extension description"
      },
      "longDescription": {
        "default": "app-extension description"
      },
      "screenshotPaths": [],
      "videoUrl": "",
      "categories": []
    },
    "features": [
      {
        "title": "Application Extension - Deployment of custom action",
        "description": "Deploys a custom action with ClientSideComponentId association",
        "id": "41b490c7-49f7-4db4-b7ea-c632d0fb9785",
        "version": "1.0.0.0",
        "assets": {
          "elementManifests": [
            "elements.xml"
          ]
        }
      }
    ]
  },
  "paths": {
    "zippedPackage": "solution/app-extension.sppkg"
  }
}
Deploy the extension to SharePoint Online and host JavaScript from local host
Now you're ready to deploy the solution to a SharePoint site and have the CustomAction associated on the site level.
In the console window, enter the following command to package your client-side solution that contains the extension so that we get the basic structure ready for packaging:
heft buildExecute the following command so that the solution package is created:
heft package-solutionThis command creates the following package: ./sharepoint/solution/app-extension.sppkg.
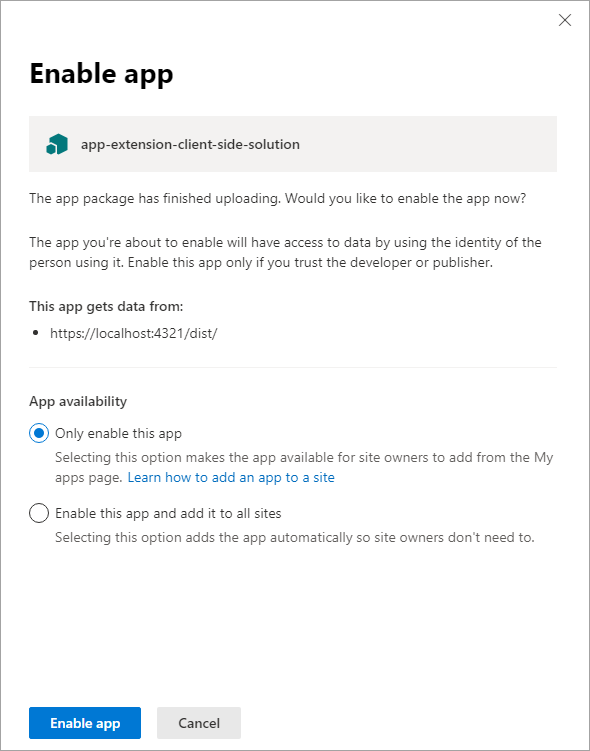
You now need to deploy the package to the app catalog. Go to your tenant's app catalog and upload or drag and drop the ./sharepoint/solution/app-extension.sppkg file into the Apps for SharePoint list. SharePoint displays a panel that asks you to enable the client-side solution.
We did not update the URLs for hosting the solution for this deployment, so the URL is still pointing to https://localhost:4321.
Select the Only enable this app radio button and then select the Enable app button.
Go back to your console and ensure that the solution is running. If it's not running, execute the following command in the solution folder:
heft start --nobrowserGo to the site where you want to test SharePoint asset provisioning. This could be any site collection in the tenant where you deployed this solution package.
Select the gear icon on the top navigation bar on the right, and then select Add an app to go to your Apps page.
In the Search box, enter app, and then select ENTER to filter your apps.
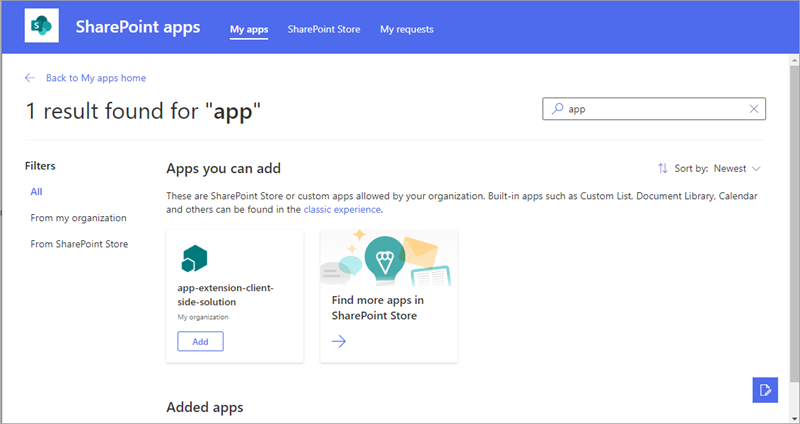
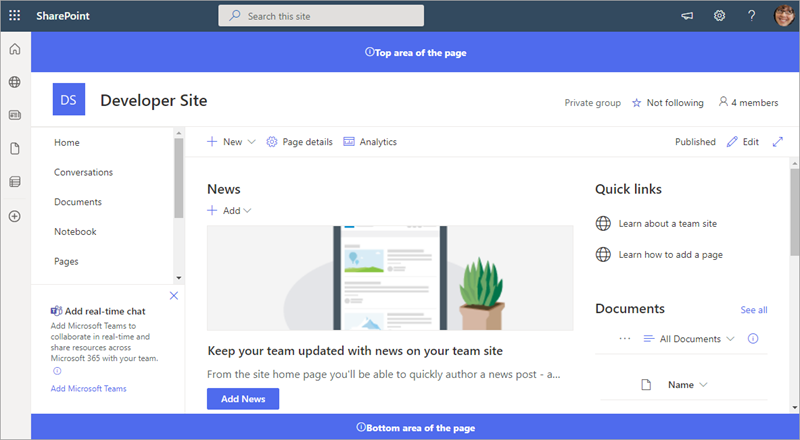
Select the app-extension-client-side-solution app to install the solution on the site. When the installation is completed, navigate back to the site where you installed the app.
You can now see the header and footer being rendered just like with the debug query parameters.
Next steps
Congratulations, you've deployed an extension to a modern SharePoint page from the app catalog!
You can continue building out your Hello World extension in the next topic, Host extension from Office 365 CDN (Hello World part 4), where you learn how to deploy and load the extension assets from a CDN instead of from localhost.