Exercise - Create an Office Add-in for Excel that implements single sign-on
In this exercise, you'll build an Excel add-in that adds a list of the recent emails received by the currently logged in user with Microsoft Graph in a worksheet. This process uses the single sign-on (SSO) authentication scheme.
Prerequisites
Developing Office Add-ins for Microsoft Excel requires the web client or the following desktop clients:
- Windows v16.0.12215.20006 (or higher)
- macOS v16.32.19102902 (or higher)
You'll use Node.js to create the custom Excel add-in in this module. The exercises in this module assume you have the following tools installed on your developer workstation:
Important
In most cases, installing the latest version of the following tools is the best option. The versions listed here were used when this module was published and last tested.
- Node.js - (the latest LTS version)
- NPM (installed with Node.js) - v6.x (or higher)
- Yeoman - v3.x (or higher)
- Yeoman Generator for Microsoft Office - v1.8.8
- Visual Studio Code
You must have the minimum versions of these prerequisites installed on your workstation.
Important
This exercise is written to work with the Yeoman Generator for Microsoft Office v1.8.8. Ensure you are using this version by installing a specific version using the command npm install generator-office@1.8.8 --global. Later versions of the generator removed and then changed the SSO project scaffolding that do not match the steps in this lab.
Important
The sample in this exercise is intended to be used only as a learning resource and is not intended to be used in a production scenario because it passes the OAuth token used to submit requests to Microsoft Graph back to the client to make the call directly.
As a best security practice, always use the server-side code to make Microsoft Graph calls, or other calls that require passing an access token. Never return the OBO token to the client to enable the client to make direct calls to Microsoft Graph. This helps protect the token from being intercepted or leaked. For more information on the proper protocol flow, see the OAuth 2.0 protocol diagram.
Create your add-in project
Run the following command to create an add-in project using the Yeoman generator:
yo office
Note
When you run the yo office command, you may receive prompts about the data collection policies of Yeoman and the Office Add-in CLI tools. Use the information that's provided to respond to the prompts as you see fit.
When prompted, provide the following information to create your add-in project:
- Select a project type: Office Add-in Task Pane project supporting single sign-on
- Select a script type: JavaScript
- What do you want to name your add-in? MyExcelSsoAddin
- Which Office client application would you like to support? Excel
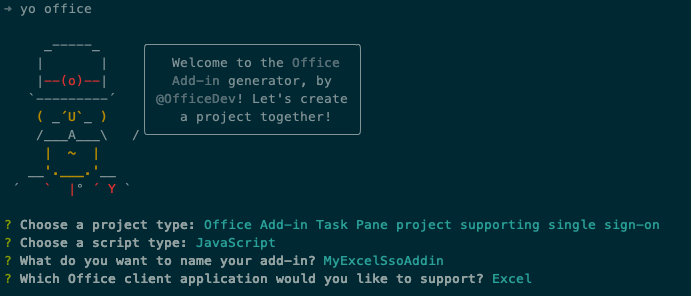
After you complete prompts, the generator creates the project and installs supporting Node components.
Register the Microsoft Entra app
Next, register the Microsoft Entra application and update the project to use the Microsoft Entra application.
Tip
For details on registering the Microsoft Entra application manually, see: Create a Node.js Office Add-in that uses single sign-on: Register the add-in with Azure AD v2.0 endpoint.
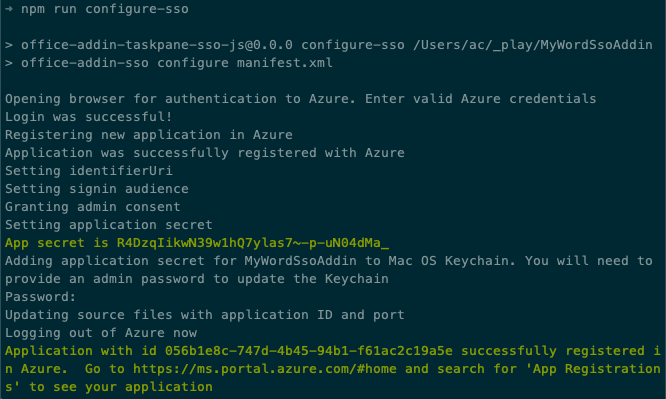
From the command prompt, ensure you're currently in the root folder of the project. Then execute the following command:
npm run configure-sso
The command will launch a browser and prompt you to sign in to Microsoft Entra ID. Ensure you sign in as a user that has permissions to register a Microsoft Entra application, such as a user assigned to the Global Administrator role.
After authenticating, the script will do the following tasks:
- Register the Microsoft Entra application
- Configure the application's audience and permissions settings
- Create a new client secret and save it to your developer workstations secret store
- Update the project with the Microsoft Entra application's client ID
Warning
The configure-sso command will fail if your Microsoft Entra tenant is configured for multi-factor authentication (MFA)/two-factor authentication. In this case, you'll need manually create the Microsoft Entra app registration as outlined in the Create a Node.js Office Add-in that uses single sign-on: Register the add-in with Azure AD v2.0 endpoint article.
Build and test the application
Run the following command in a command prompt to transpile and start the debugging process:
npm start
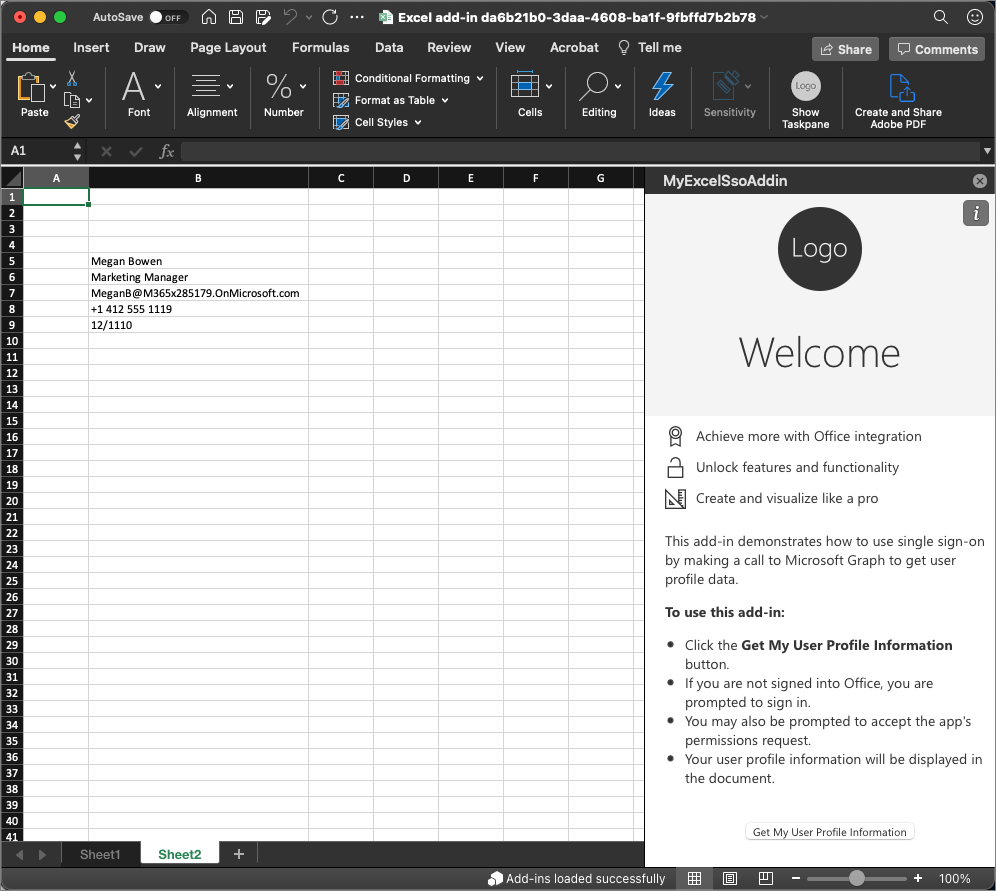
Test the add-in in the Excel desktop client
After a moment, the Excel will load with the add-in's button in the ribbon and loaded in the task pane.
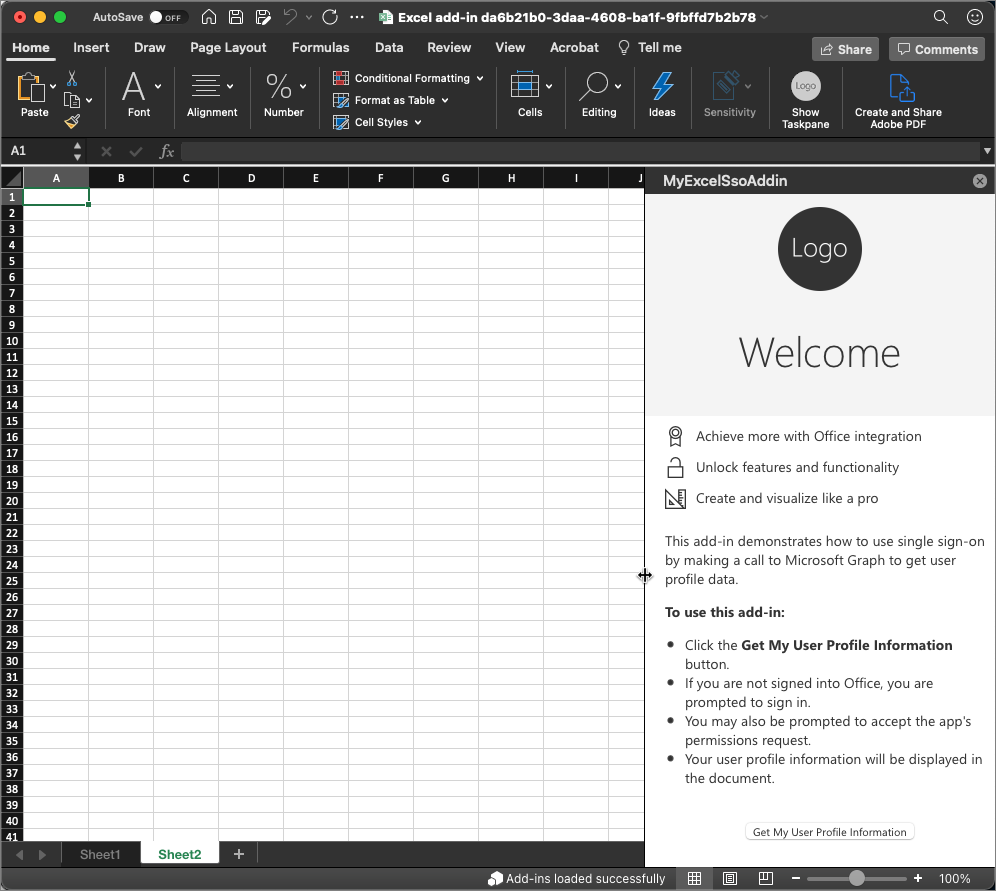
To test the add-in, select the Get my user profile information button.
If you aren't already signed in with your Office client, you'll be prompted to sign in.
After signing in, the add-in will retrieve your basic profile information from Microsoft Graph and add it to the document.
Update the app to show recent emails
Now, let's update the task pane app to add a list of the recent emails received by the currently logged in user with Microsoft Graph.
Update the Microsoft Entra app's permissions
The registered Microsoft Entra app must first be granted permissions to the app.
Open a browser and navigate to the Microsoft Entra admin center (https://aad.portal.azure.com). Sign in using a Work or School Account that has global administrator rights to the tenancy.
In the leftmost navigation, select Manage > API permissions.
Add a new permission by selecting Add a permission.
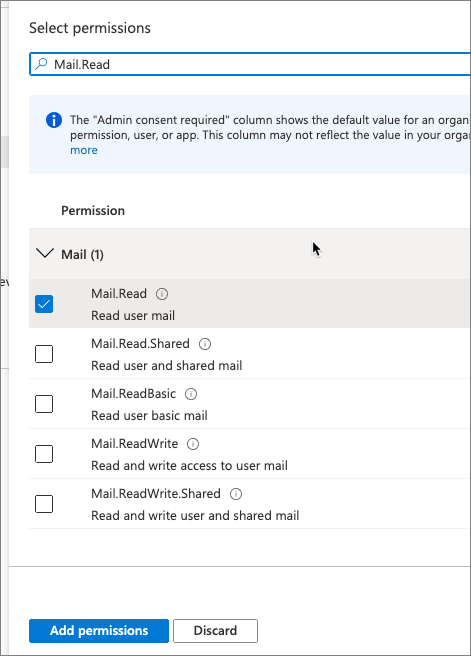
On the Select an API screen, select Microsoft Graph, then select Delegated permissions. Search for and select permission Mail.Read and select Add permissions.
Next, select the Grant admin consent for Contoso followed by accepting the confirmation prompt by selecting Yes.
Update the Excel task pane add-in
The next step is to update the code in the add-in.
Update the task pane
Locate and open the ./src/taskpane/taskpane.html.
Locate the following HTML element in the task pane:
<div class="ms-firstrun-instructionstep__welcome-body">
Locate the first bullet in the HTML and change span element's contents to:
<span class="ms-ListItem-primaryText">Click the <b>Get my last 10 emails</b> button.</span>
Locate the last bullet in the HTML and change span element's contents to:
<span class="ms-ListItem-primaryText">Your last 10 emails will be displayed in the document.</span>
Locate the button and change the text to: Get last 10 emails.
Update the task pane's code
Now, update the code that will get the user's last 10 emails.
Locate and open the ./src/helpers/ssoauthhelper.js file.
Find the following line in the getGraphData() method:
const response = await sso.makeGraphApiCall(exchangeResponse.access_token);
Delete this line and replace it with the following code. This code uses a different method in the SSO helper to submit a specific request to Microsoft Graph:
const endpoint = "/me/messages";
const urlParams = "?$select=receivedDateTime,subject,isRead&$orderby=receivedDateTime&$top=10";
const response = await sso.getGraphData(exchangeResponse.access_token, endpoint, urlParams);
Next, locate and open the ./src/helpers/documentHelper.js file.
Find the method writeDataToExcel(). You'll replace most the code in this method, but you do want to keep the basic structure. Delete the contents of the method and replace it with the following code:
return Excel.run(function(context) {
  const sheet = context.workbook.worksheets.getActiveWorksheet();

  // TODO

  return context.sync();
});
First, replace the // TODO with the following code to create a few column headings in the sheet:
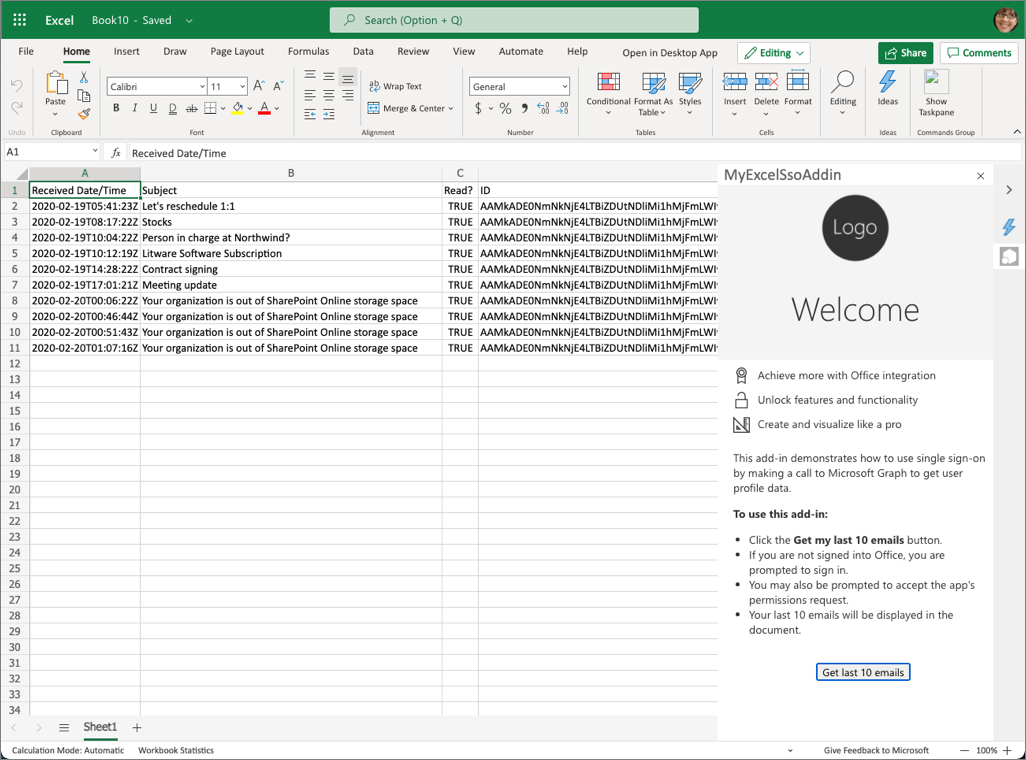
const rangeHeading = sheet.getRange("A1:D1");
rangeHeading.values = [["Received Date/Time", "Subject", "Read?", "ID"]];
Next, add the following code after the previous code you just added. This will take the results from the Microsoft Graph request and convert them to a multi-dimensional array to write it to the worksheet.
It then writes the results to the worksheet and formats the columns so all the data will be visible:
// convert data to a list
const mailResults = result.value;
for (let i = 0; i < mailResults.length; i++) {
  if (mailResults[i] !== null) {
    let innerArray = [];
    innerArray.push(mailResults[i].receivedDateTime);
    innerArray.push(mailResults[i].subject);
    innerArray.push(mailResults[i].isRead);
    innerArray.push(mailResults[i].id);

    let data = [];
    data.push(innerArray);
    let rangeData = sheet.getRange(`A${i+2}:D${i+2}`);
    rangeData.values = data;
  }
}

rangeHeading.format.autofitColumns();
Build and test the application
Run the following command in a command prompt to transpile and start the debugging process:
npm start
Test the add-in in Excel
After a moment, the Excel will load with the add-in's button in the ribbon and loaded in the task pane. Let's test this in the Excel web client.
Open a browser and navigate to the OneDrive (https://onedrive.com). Sign in using a Work or School Account.
Add a new Excel workbook by selecting the New button and then select Excel workbook.
Install the Excel add-in by sideloading it. From the ribbon, select Insert > Add-ins.
In the Office Add-ins dialog, select Upload My Add-in.
Select the manifest.xml file in the root of your project and select Upload.
Microsoft Word will sideload the add-in and display the Show Taskpane button in the ribbon, just like the desktop client.
Select the Show Taskpane button, then select the Get last 10 emails button.
Because you're already signed in, after a moment, you'll see the recent emails appear in the worksheet without having to sign in.