Exercise - Create an Office Add-in for Outlook that implements single sign-on
In this exercise, you'll build an Outlook add-in that adds a list of upcoming calendar events to the body of an email by the currently logged in user with Microsoft Graph. This process uses the single sign-on (SSO) authentication scheme.
Prerequisites
Developing Office Add-ins for Microsoft Outlook requires the web client or the following desktop clients:
- Windows v16.0.12215.20006 (or higher)
- macOS v16.32.19102902 (or higher)
You'll use Node.js to create the custom Outlook add-in in this module. The exercises in this module assume you have the following tools installed on your developer workstation:
Important
In most cases, installing the latest version of the following tools is the best option. The versions listed here were used when this module was published and last tested.
- Node.js - (the latest LTS version)
- NPM (installed with Node.js) - v6.x (or higher)
- Yeoman - v3.x (or higher)
- Yeoman Generator for Microsoft Office - v1.8.8
- Visual Studio Code
You must have the minimum versions of these prerequisites installed on your workstation.
Important
This exercise is written to work with the Yeoman Generator for Microsoft Office v1.8.8. Ensure you are using this version by installing a specific version using the command npm install generator-office@1.8.8 --global. Later versions of the generator removed and then changed the SSO project scaffolding that do not match the steps in this lab.
Important
The sample in this exercise is intended to be used only as a learning resource and is not intended to be used in a production scenario because it passes the OAuth token used to submit requests to Microsoft Graph back to the client to make the call directly.
As a best security practice, always use the server-side code to make Microsoft Graph calls, or other calls that require passing an access token. Never return the OBO token to the client to enable the client to make direct calls to Microsoft Graph. This helps protect the token from being intercepted or leaked. For more information on the proper protocol flow, see the OAuth 2.0 protocol diagram.
Create your add-in project
Run the following command to create an add-in project using the Yeoman generator:
yo office
Note
When you run the yo office command, you may receive prompts about the data collection policies of Yeoman and the Office Add-in CLI tools. Use the information that's provided to respond to the prompts as you see fit.
When prompted, provide the following information to create your add-in project:
- Select a project type: Office Add-in Task Pane project supporting single sign-on
- Select a script type: JavaScript
- What do you want to name your add-in? MyOutlookSsoAddin
- Which Office client application would you like to support? Outlook
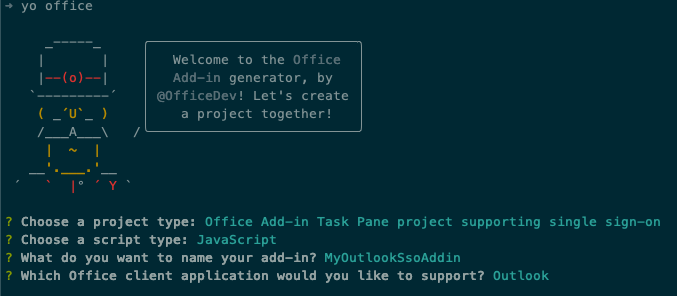
After you complete prompts, the generator creates the project and installs supporting Node components.
Register the Microsoft Entra app
Next, register the Microsoft Entra application and update the project to use the Microsoft Entra application.
Tip
For details on registering the Microsoft Entra application manually, see: Create a Node.js Office Add-in that uses single sign-on: Register the add-in with Azure AD v2.0 endpoint.
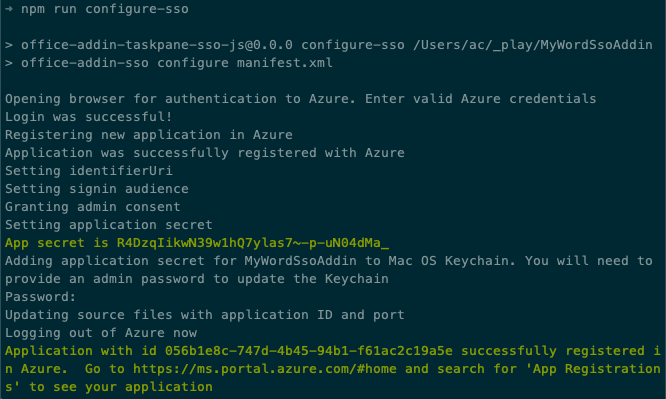
From the command prompt, ensure you're currently in the root folder of the project. Then execute the following command:
npm run configure-sso
The command will launch a browser and prompt you to sign in to Microsoft Entra ID. Ensure you sign in as a user that has permissions to register a Microsoft Entra application, such as a user assigned to the Global Administrator role.
After authenticating, the script will do the following tasks:
- Register the Microsoft Entra application
- Configure the application's audience and permissions settings
- Create a new client secret and save it to your developer workstations secret store
- Update the project with the Microsoft Entra application's client ID
Warning
The configure-sso command will fail if your Microsoft Entra tenant is configured for multi-factor authentication (MFA)/two-factor authentication. In this case, you'll need manually create the Microsoft Entra app registration as outlined in the Create a Node.js Office Add-in that uses single sign-on: Register the add-in with Azure AD v2.0 endpoint article.
Build and test the application
Run the following command in a command prompt to transpile and start the debugging process:
npm start
Test the add-in in the Outlook web client
Open a browser and navigate to the Outlook (https://outlook.office.com). Sign in using a Work or School Account.
Create a new message by selecting the New message button.
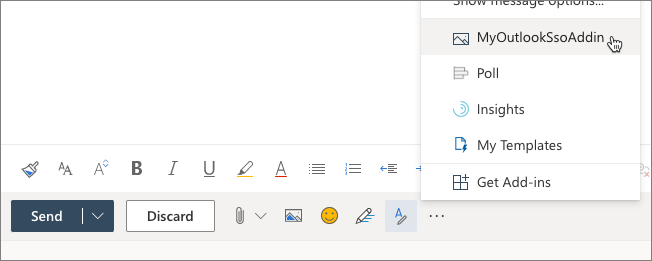
In the new message section, locate the ... button in the bottom of the new message on the same footer with the Send and Discard buttons.
Select the Get Add-ins menu item.

On the Add-Ins for Outlook dialog, select My add-ins from the left menu.
On the My add-ins screen, select the Add a custom add-in > Add from file... button.
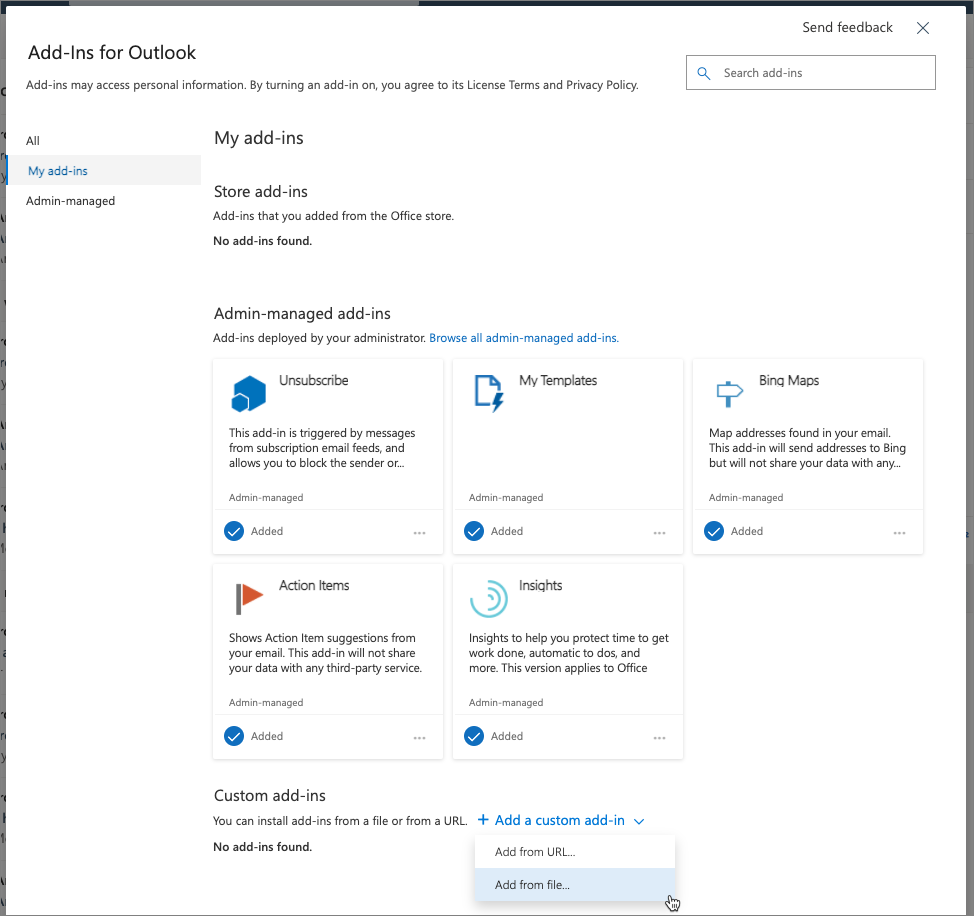
Select the manifest.xml file in the root of your project folder and select Upload.
When prompted, select the Install button on the Warning dialog.
Close the dialog and select the ... button at the bottom of the email. Notice your custom add-in now appears:
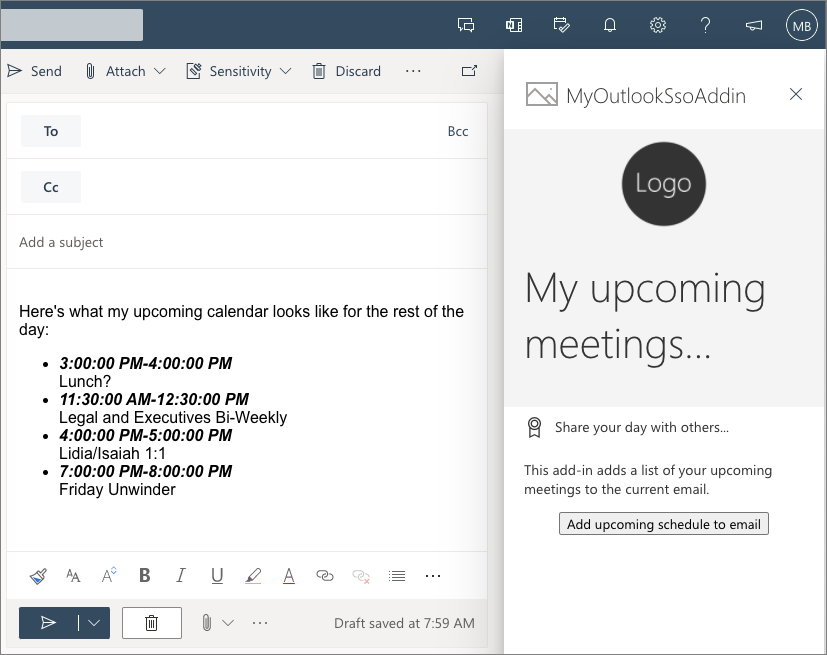
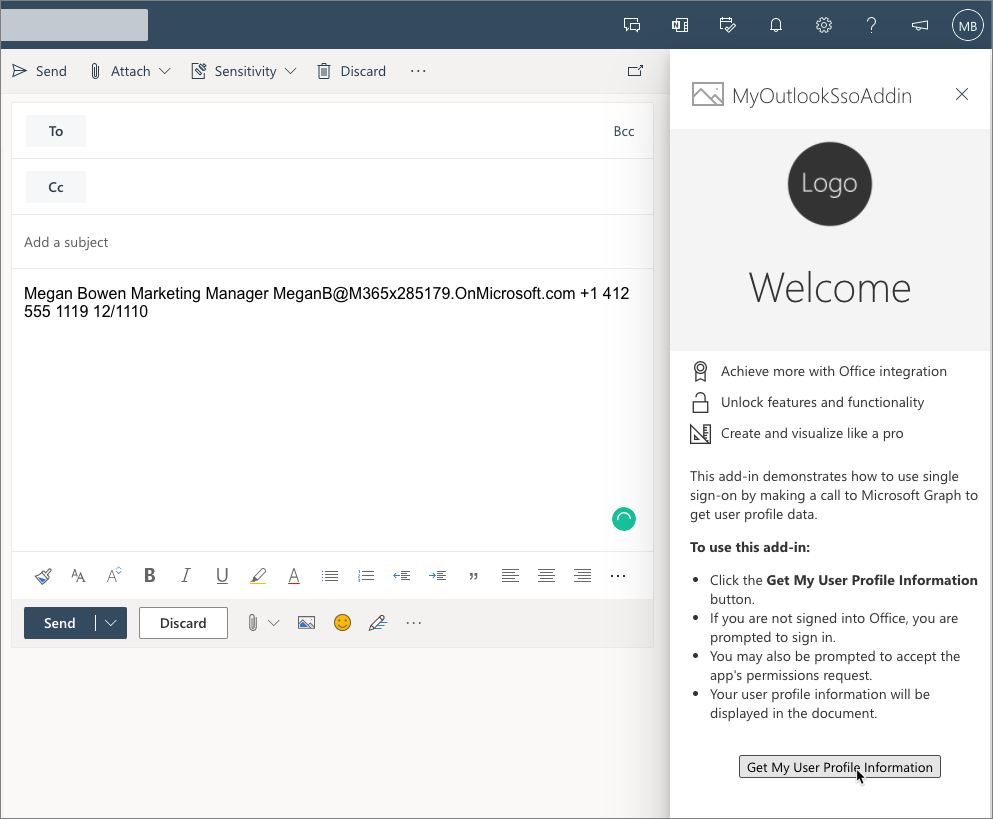
Select the add-in to open the task pane. When the task pane appears, select the Get My user profile information button.
Because you're already signed in, after a moment, you'll see the user's basic profile information appear in the email without having to sign in.
Update the app to show upcoming meetings
Now, let's update the task pane app display a list of upcoming meetings for the currently logged in user. This information will be collected with Microsoft Graph.
Update the task pane
Locate and open the ./src/taskpane/taskpane.html.
Replace the <body> element with the following HTML. This will update the task pane's rendering:
<body class="ms-font-m ms-welcome ms-Fabric">
  <header class="ms-welcome__header ms-bgColor-neutralLighter">
    <img width="90" height="90" src="../../assets/logo-filled.png" alt="Contoso" title="Contoso" />
    <h1 class="ms-font-su">My upcoming meetings... </h1>
  </header>
  <main class="ms-firstrun-instructionstep">
    <ul class="ms-List ms-welcome__features">
      <li class="ms-ListItem">
        <i class="ms-Icon ms-Icon--Ribbon ms-font-xl"></i>
        <span class="ms-font-m">Share your day with others...</span>
      </li>
    </ul>
    <section class="ms-firstrun-instructionstep__header">
      <h2 class="ms-font-m">This add-in adds a list of your upcoming meetings to the current email.</h2>
      <div class="ms-firstrun-instructionstep__header--image"></div>
    </section>
    <p align="center">
      <button id="getGraphDataButton" class="popupButton ms-Button ms-Button--primary"><span class="ms-Button-label">Add
          upcoming schedule to email</span></button>
    </p>
    </div>
  </main>
</body>
Update the task pane's code
Now, update the code that will get the user's next few calendar events.
Locate and open the ./src/helpers/ssoauthhelper.js file.
Find the following line in the getGraphData() method:
const response = await sso.makeGraphApiCall(exchangeResponse.access_token);
Delete this line and replace it with the following code. This code uses a different method in the SSO helper to submit a specific request to Microsoft Graph.
This query will get all the meetings on the current user's calendar from the current time for the next 24 hours:
const startDate = new Date();
let endDate = new Date(startDate);
endDate.setDate(startDate.getDate() + 1);

const endpoint = "/me/calendarview";
const urlParams = `?startdatetime=${ startDate.toISOString() }&enddatetime=${ endDate.toISOString() }&$select=subject,start,end`;

const response = await sso.getGraphData(exchangeResponse.access_token, endpoint, urlParams);
Next, locate, and open the ./src/helpers/documentHelper.js file.
Find the method writeDataToOutlook(). You'll replace the contents of this method to build an HTML string of the upcoming meetings returned from the Microsoft Graph request and add the list to the current email.
Replace the contents of the writeDataToOutlook() method with the following code:
let emailMessage = "";

result.value.forEach(function(meeting){
  let startDateTime = new Date(meeting.start.dateTime + "Z");
  let endDateTime = new Date(meeting.end.dateTime + "Z");
  emailMessage += `<li><strong><em>${startDateTime.toLocaleTimeString()}-${endDateTime.toLocaleTimeString()}</em></strong><br />${meeting.subject}</li>`;
});

// wrap meeting
emailMessage = `Here's what my upcoming calendar looks like for the rest of the day: <ul>${emailMessage}</ul>`;

Office.context.mailbox.item.body.setSelectedDataAsync(emailMessage, { coercionType: Office.CoercionType.Html });
Create a new Microsoft Entra application for the add-in
Previous exercises in this module have used the configure-sso utility script that's included with all projects created with the Yeoman Generator for Microsoft Office. For this exercise, you'll learn how to manually register a Microsoft Entra application and configure your developer environment to use the manually created app.
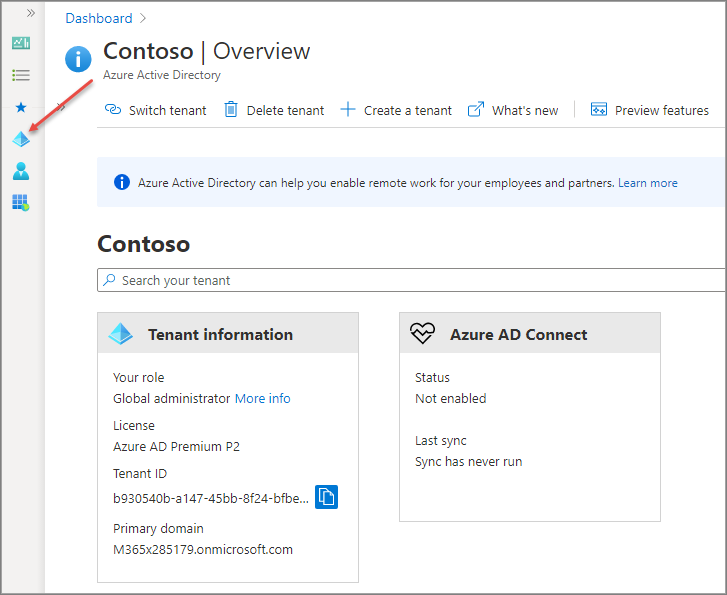
Open a browser and navigate to the Microsoft Entra admin center (https://aad.portal.azure.com). Sign in using a Work or School Account that has global administrator rights to the tenancy.
Select Microsoft Entra ID in the leftmost navigation.
App registration
Select Manage > App registrations in the leftmost navigation.
On the App registrations page, select New registration and set the following values on the Register an application screen. When finished, select the Register button.
- Name: MyOutlookSsoAddin2
- Supported account types: Accounts in any organizational directory (Any Microsoft Entra directory - Multitenant)
- Redirect URI (option): leave default blank value
App authentication
The next step is to configure the app's registration details.
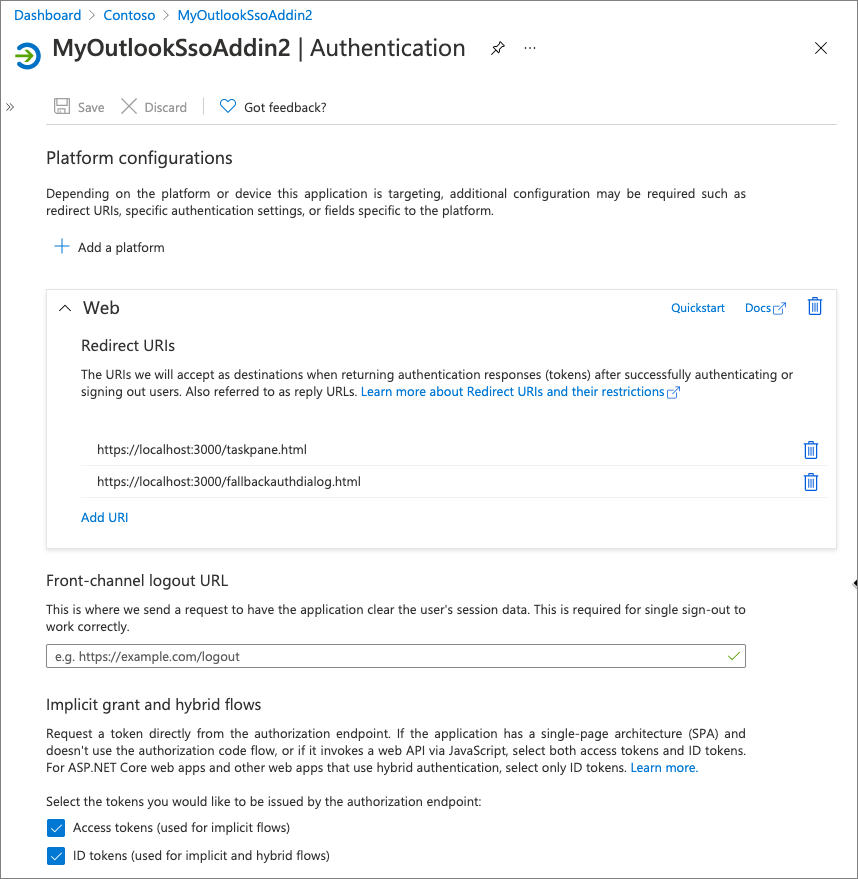
Next, in the leftmost navigation, select Manage > Authentication.
On the Authentication screen, select Add a platform. Then select the Web platform from the list of options:
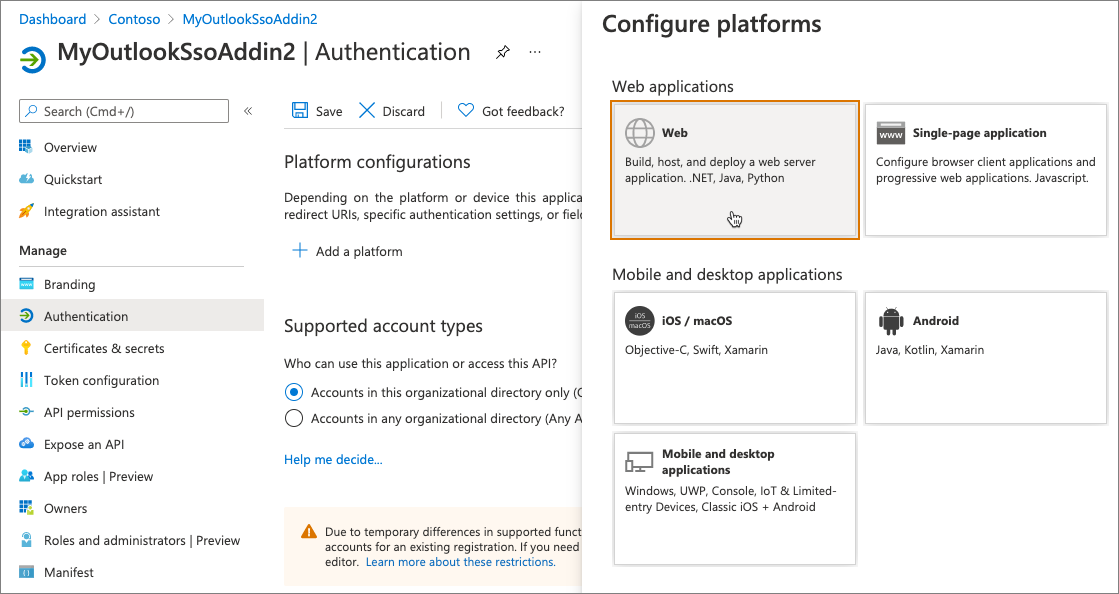
For the Redirect URIs, enter https://localhost:3000/taskpane.html.
For the Implicit grant and hybrid flows, select both of the following options and then select Configure:
- Access tokens (used for implicit flows)
- ID tokens (used for implicit and hybrid flows)
After the screen reloads, select Add URI in the Web platform, and enter https://localhost:3000/fallbackauthdialog.html.
Select Save at the top of the screen to save your changes.
App certificates and secrets
Now you need to create a client secret for the application
Select Certificates & secrets from the leftmost navigation panel.
Select the New client secret button:
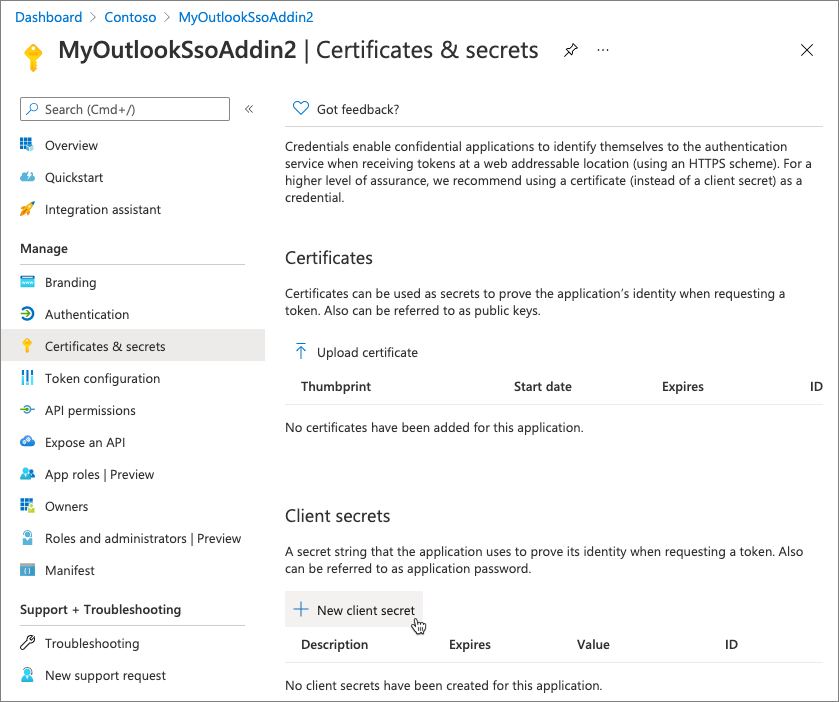
When prompted, give the secret a description and select one of the expiration duration options provided and select Add. What you enter and select doesn't matter for the exercise.

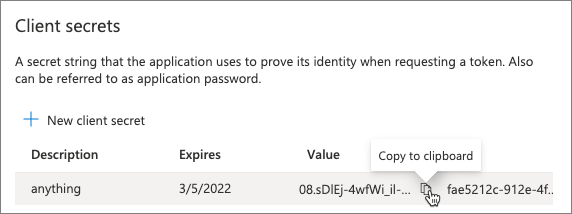
The Certificate & Secrets page will display the new secret.
Important
It's important you copy this value as it's only shown this one time; if you leave the page and come back, it will only show as a masked value.
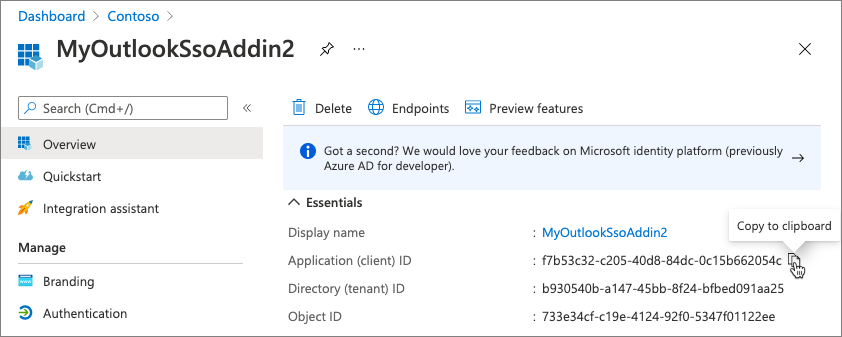
After copying the client secret, let's copy the client ID as well. In the leftmost navigation, select Manage > Overview.
API permissions
Next, you need to grant the application permissions to Microsoft Graph.
In the leftmost navigation, select Manage > API permissions.
It's a good practice to only request permissions that your app needs. So, let's remove the initial User.Read permission by selecting it, then select Remove permission, followed by Yes, remove to confirm.
Next, let's add the minimal permissions required for users to sign in using SSO.
Add a new permission by selecting Add permission.
On the Select an API screen, select Microsoft Graph, then select Delegated permissions. Select the following permissions from the following sections, or use the search box to find these permissions:
- OpenID permissions
- openid
- profile
- Calendars
- Calendars.Read
Once you've selected these permissions, select the Add permissions button.
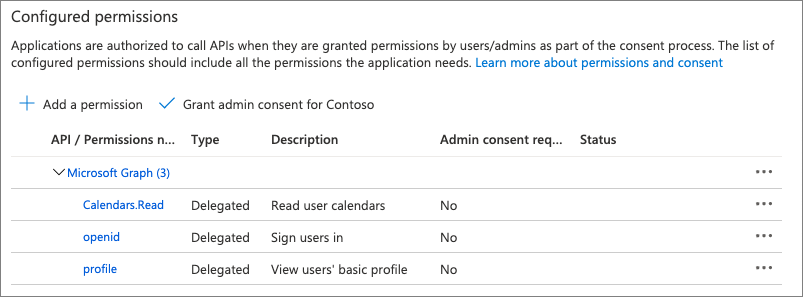
Next, select the Grant admin consent for Contoso followed by accepting the confirmation prompt by selecting Yes.
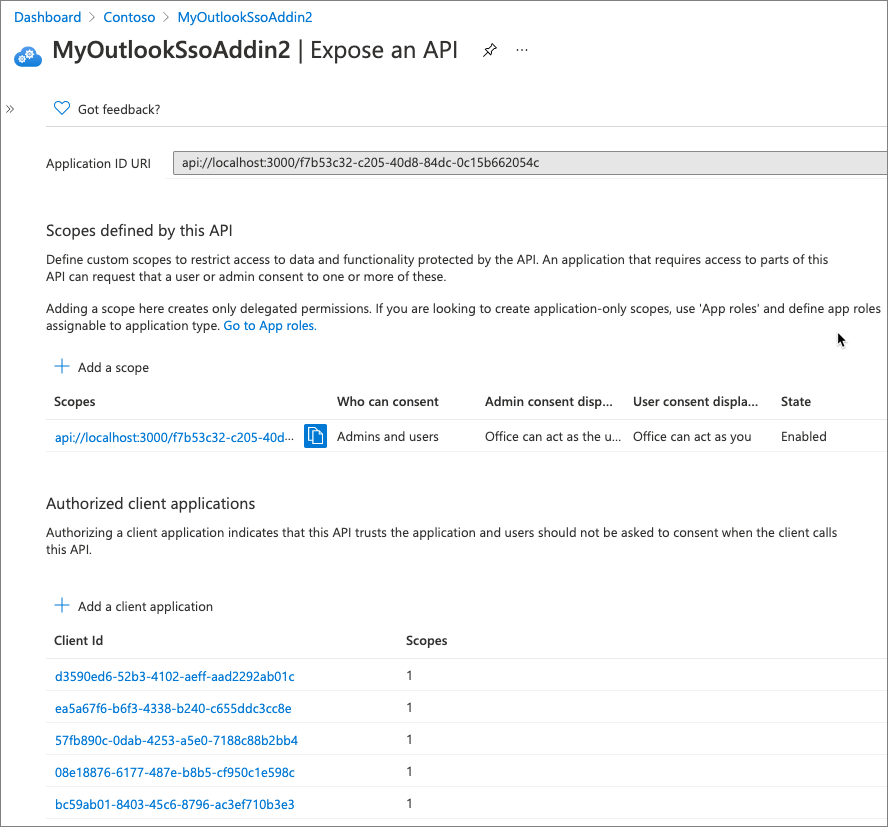
Expose an API: Application ID URI
Finally, select Manage > Expose an API in the leftmost navigation. There are multiple things to do on this page:
First, select Set next to the Application ID URI. This is the unique ID of our application. Add localhost:3000/ just before the protocol and the ID of the application so it looks similar to the following and select Save:
api://localhost:3000/f7b53c32-c205-40d8-84dc-0c15b662054c
Note
The GUID is the unique ID for each app. Your ID won't match the one shown in this exercise.
Expose an API: Scopes defined by the API
The next section contains the scopes defined by the API. These can be custom scopes that enable you to restrict access to data and functionality protected by the API.
Select Add a scope and use the following values to complete the form:
- Scope name: access_as_user
- Who can consent? Admins and users
- Admin consent display name: Office can act as the user
- Admin consent description: Enable Office to call the add-in's web APIs with the same rights as the current user.
- User consent display name: Office can act as you
- User consent description: Enable Office to call the add-in's web APIs with the same rights that you have.
- State: Enabled
Expose an API: Authorized client applications
The last section indicates the API will automatically trust specific applications and not prompt the user for consent when the application calls this API.
This effectively authorizes the Office desktop and web applications to call your add-in's API.
Select the Add a client application to add the following applications. Applications are added as GUIDs. For each one, make sure you select the only Authorized scopes listed to grant the application access to the scope previously defined:
d3590ed6-52b3-4102-aeff-aad2292ab01c(Microsoft Office)ea5a67f6-b6f3-4338-b240-c655ddc3cc8e(Microsoft Office)57fb890c-0dab-4253-a5e0-7188c88b2bb4(Office on the web)08e18876-6177-487e-b8b5-cf950c1e598c(Office on the web)bc59ab01-8403-45c6-8796-ac3ef710b3e3(Outlook on the web)93d53678-613d-4013-afc1-62e9e444a0a5(Office on the web)
If you select one of these apps, each of them has the scope defined previously as an authorized scope.
Update project and developer workstation
With the Microsoft Entra application created, the last step is to update your project and workstation to use the new app.
Within your project, locate and open the .ENV file.
Update the CLIENT_ID to use the client ID you copied from the app registration process.
Locate and open the ./manifest.xml file. At the end of the file, find the <WebApplicationInfo> element. Within this element, update the <ID> and <Resource> elements to use the new client ID.
Locate and open the ./src/helpers/fallbackauthdialog.js file. Find the line that starts with const msalConfig. This is the MSAL.js configuration object. Update the object's clientId property to be the new client ID.
Next, you need to save the client secret for the application in the credential store on your developer workstation. The commend you'll run is dependent on your platform.
Windows
Execute the following PowerShell, after updating the first three values:
$ssoAppName: the name of your project, such as MyOutlookSsoAddin$user: your Windows sign-in user name, such as MyDomain\MyUserName$secret: the client secret you copied when registering the Microsoft Entra app
$ssoAppName = "MyOutlookSsoAddin"
$user = "MyDomain\MyUserName"
$secret = "....."
[void][Windows.Security.Credentials.PasswordVault, Windows.Security.Credentials, ContentType = WindowsRuntime]
$creds = New-Object Windows.Security.Credentials.PasswordCredential
$creds.Resource = $ssoAppName
$creds.UserName = $user
$creds.Password = $secret
$vault = New-Object Windows.Security.Credentials.PasswordVault
$vault.Add($creds)
macOS
Execute the following in the console, after updating the first three values:
SSOAPPNAME: the name of your project, such as MyOutlookSsoAddinUSER: your macOS sign in user name, such as myusernameSECRET: the client secret you copied when registering the Microsoft Entra app
SSOAPPNAME="MyOutlookSsoAddin"
USER="myusername"
SECRET="...."
sudo security add-generic-password -a $USER -s $SSOAPPNAME -w $SECRET -U
Build and retest the application
Run the following command in a command prompt to transpile and start the debugging process:
npm start
Retest the add-in in the Outlook web client
Open a browser and navigate to the Outlook (https://outlook.office.com). Sign in using a Work or School Account.
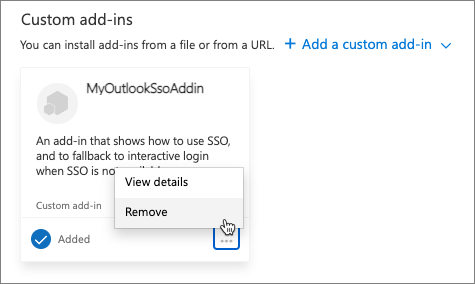
Repeat the process of testing the add-in that you did at the beginning of this exercise. However, before activating the add-in, you need to remove it because the currently installed add-in is still using the old manifest.xml file with the old Microsoft Entra application registration.
To remove the add-in, follow the same steps to install a new add-in, except before uploading your custom manifest.xml file, remove the previously installed add-in:
After you've installed the updated add-in manifest.xml file, complete the testing process to test the new logic of your add-in.