Configure automation in Microsoft Sentinel
What are automation rules and playbooks?
Automation rules help you triage incidents in Microsoft Sentinel. You can use them to automatically assign incidents to the right personnel, close noisy incidents or known false positives, change their severity, and add tags. They are also the mechanism by which you can run playbooks in response to incidents or alerts.
Playbooks are collections of procedures that can be run from Microsoft Sentinel in response to an entire incident, to an individual alert, or to a specific entity. A playbook can help automate and orchestrate your response, and can be set to run automatically when specific alerts are generated or when incidents are created or updated, by being attached to an automation rule. It can also be run manually on-demand on specific incidents, alerts, or entities.
Playbooks in Microsoft Sentinel are based on workflows built in Azure Logic Apps, which means that you get all the power, customizability, and built-in templates of Logic Apps. Each playbook is created for the specific subscription to which it belongs, but the Playbooks display shows you all the playbooks available across any selected subscription.
For example, if you want to stop potentially compromised users from moving around your network and stealing information, you can create an automated, multifaceted response to incidents generated by rules that detect compromised users. You start by creating a playbook that takes the following actions:
When the playbook is called by an automation rule passing it an incident, the playbook opens a ticket in ServiceNow or any other IT ticketing system.
It sends a message to your security operations channel in Microsoft Teams or Slack to make sure your security analysts are aware of the incident.
It also sends all the information in the incident in an email message to your senior network admin and security admin. The email message will include Block and Ignore user option buttons.
The playbook waits until a response is received from the admins, then continues with its next steps.
If the admins choose Block, it sends a command to Microsoft Entra ID to disable the user, and one to the firewall to block the IP address.
If the admins choose Ignore, the playbook closes the incident in Microsoft Sentinel, and the ticket in ServiceNow.
In order to trigger the playbook, you'll then create an automation rule that runs when these incidents are generated. That rule will take these steps:
The rule changes the incident status to Active.
It assigns the incident to the analyst tasked with managing this type of incident.
It adds the "compromised user" tag.
Finally, it calls the playbook you just created. (Special permissions are required for this step.)
Playbooks can be run automatically in response to incidents, by creating automation rules that call the playbooks as actions, as in the example above. They can also be run automatically in response to alerts, by telling the analytics rule to automatically run one or more playbooks when the alert is generated.
You can also choose to run a playbook manually on-demand, as a response to a selected alert.
Get a more complete and detailed introduction to automating threat response using automation rules and playbooks in Microsoft Sentinel.
Create a playbook
Follow these steps to create a new playbook in Microsoft Sentinel:
- For Microsoft Sentinel in the Azure portal, select the Configuration > Automation page. For Microsoft Sentinel in the Defender portal, select Microsoft Sentinel > Configuration > Automation.
- From the top menu, select Create.
- The drop-down menu that appears under Create gives you four choices for creating playbooks:
- If you're creating a Standard playbook (the new kind - see Logic app types), select Blank playbook and then follow the steps in the Logic Apps Standard tab below.
- If you're creating a Consumption playbook (the original, classic kind) then depending on which trigger you want to use, select either Playbook with incident trigger, Playbook with alert trigger, or Playbook with entity trigger. Then, continue following the steps in the Logic Apps Consumption tab below.
- If you're creating a Standard playbook (the new kind - see Logic app types), select Blank playbook and then follow the steps in the Logic Apps Standard tab below.
For more about which trigger to use, see Use triggers and actions in Microsoft Sentinel playbooks. For more about which trigger to use, see Use triggers and actions in Microsoft Sentinel playbooks.
In the Basics tab:
Select the Subscription, Resource group, and Region of your choosing from their respective drop-down lists. The chosen region is where your Logic App information will be stored.
Enter a name for your playbook under Playbook name.
If you want to monitor this playbook's activity for diagnostic purposes, mark the Enable diagnostics logs in Log Analytics check box, and choose your Log Analytics workspace from the drop-down list.
If your playbooks need access to protected resources that are inside or connected to an Azure virtual network, you might need to use an integration service environment (ISE). If so, mark the Associate with integration service environment check box, and select the desired ISE from the drop-down list.
Select Next: Connections >.
In the Connections tab:
Ideally you should leave this section as is, configuring Logic Apps to connect to Microsoft Sentinel with managed identity. Learn about this and other authentication alternatives.
Select Next: Review and create >.
In the Review and create tab:
Review the configuration choices you have made, and select Create and continue to designer.
Your playbook will take a few minutes to be created and deployed, after which you will see the message "Your deployment is complete" and you will be taken to your new playbook's Logic App Designer. The trigger you chose at the beginning will have automatically been added as the first step, and you can continue designing the workflow from there.
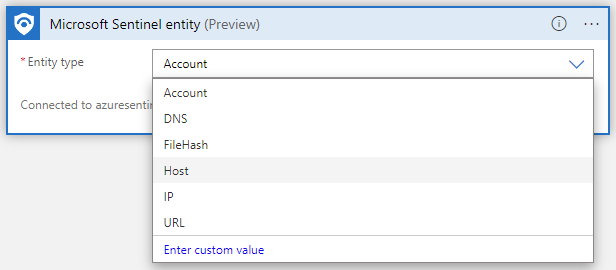
If you chose the Microsoft Sentinel entity (Preview) trigger, select the type of entity you want this playbook to receive as an input.
Add actions
Now you can define what happens when you call the playbook. You can add actions, logical conditions, loops, or switch case conditions, all by selecting New step. This selection opens a new frame in the designer, where you can choose a system or an application to interact with or a condition to set. Enter the name of the system or application in the search bar at the top of the frame, and then choose from the available results.
In every one of these steps, clicking on any field displays a panel with two menus: Dynamic content and Expression. From the Dynamic content menu, you can add references to the attributes of the alert or incident that was passed to the playbook, including the values and attributes of all the mapped entities and custom details contained in the alert or incident. From the Expression menu, you can choose from a large library of functions to add additional logic to your steps.
This screenshot shows the actions and conditions you would add in creating the playbook described in the example at the beginning of this document. Learn more about adding actions to your playbooks.

See Use triggers and actions in Microsoft Sentinel playbooks for details about actions you can add to playbooks for different purposes.
In particular, note this important information about playbooks based on the entity trigger in a non-incident context.
Automate threat responses
You've created your playbook and defined the trigger, set the conditions, and prescribed the actions that it will take and the outputs it will produce. Now you need to determine the criteria under which it will run and set up the automation mechanism that will run it when those criteria are met.
Respond to incidents and alerts
To use a playbook to respond automatically to an entire incident or to an individual alert, create an automation rule that will run when the incident is created or updated, or when the alert is generated. This automation rule will include a step that calls the playbook you want to use.
To create an automation rule:
- From the Automation page in the Microsoft Sentinel navigation menu, select Create from the top menu and then Automation rule.
- The Create new automation rule panel opens. Enter a name for your rule. Your options differ depending on whether your workspace is onboarded to the unified security operations platform. For example:
- Trigger: Select the appropriate trigger according to the circumstance for which you're creating the automation rule—When incident is created, When incident is updated, or When alert is created.
- Conditions:
- If your workspace is not yet onboarded to the unified security operations platform, incidents can have two possible sources:
- Incidents can be created inside Microsoft Sentinel
- Incidents can be imported from—and synchronized with—Microsoft Defender XDR.
- Incidents can be created inside Microsoft Sentinel
- If you selected one of the incident triggers and you want the automation rule to take effect only on incidents sourced in Microsoft Sentinel, or alternatively in Microsoft Defender XDR, specify the source in the If Incident provider equals condition.
- This condition will be displayed only if an incident trigger is selected and your workspace isn't onboarded to the unified security operations platform.
- For all trigger types, if you want the automation rule to take effect only on certain analytics rules, specify which ones by modifying the If Analytics rule name contains condition.
- Add any other conditions you want to determine whether this automation rule will run. Select + Add and choose conditions or condition groups from the drop-down list. The list of conditions is populated by alert detail and entity identifier fields.
- If your workspace is not yet onboarded to the unified security operations platform, incidents can have two possible sources:
- Actions:
- Since you're using this automation rule to run a playbook, choose the Run playbook action from the drop-down list. You'll then be prompted to choose from a second drop-down list that shows the available playbooks. An automation rule can run only those playbooks that start with the same trigger (incident or alert) as the trigger defined in the rule, so only those playbooks will appear in the list.
Important
Microsoft Sentinel must be granted explicit permissions in order to run playbooks, whether manually or from automation rules. If a playbook appears "grayed out" in the drop-down list, it means Sentinel does not have permission to that playbook's resource group. Click the Manage playbook permissions link to assign permissions.
In the Manage permissions panel that opens up, mark the check boxes of the resource groups containing the playbooks you want to run, and click Apply.
- You must have owner permissions on any resource group to which you want to grant Microsoft Sentinel permissions, and you must have the Logic App Contributor role on any resource group containing playbooks you want to run.
- In a multitenant deployment, if the playbook you want to run is in a different tenant, you must grant Microsoft Sentinel permission to run the playbook in the playbook's tenant.
- From the Microsoft Sentinel navigation menu in the playbooks' tenant, select Settings.
- In the Settings blade, select the Settings tab, then the Playbook permissions expander.
- Click the Configure permissions button to open the Manage permissions panel mentioned above, and continue as described there.
In an MSSP scenario, you want to run a playbook in a customer tenant from an automation rule created while signed into the service provider tenant, you must grant Microsoft Sentinel permission to run the playbook in both tenants. In the customer tenant, follow the instructions for the multitenant deployment in the preceding bullet point. In the service provider tenant, you must add the Azure Security Insights app in your Azure Lighthouse onboarding template:
From the Azure portal, go to Microsoft Entra ID.
Click on Enterprise Applications.
Select Application Type and filter on Microsoft Applications.
In the search box type Azure Security Insights.
Copy the Object ID field. You will need to add this additional authorization to your existing Azure Lighthouse delegation.
The Microsoft Sentinel Automation Contributor role has a fixed GUID which is f4c81013-99ee-4d62-a7ee-b3f1f648599a.
Add any other actions you want for this rule. You can change the order of execution of actions by selecting the up or down arrows to the right of any action.
Set an expiration date for your automation rule if you want it to have one.
Enter a number under Order to determine where in the sequence of automation rules this rule will run.
Select Apply. You're done!
Respond to alerts—legacy method
Another way to run playbooks automatically in response to alerts is to call them from an analytics rule. When the rule generates an alert, the playbook runs.
This method will be deprecated as of March 2026.
Beginning June 2023, you can no longer add playbooks to analytics rules in this way. However, you can still see the existing playbooks called from analytics rules, and these playbooks will still run until March 2026. You are strongly encouraged to create automation rules to call these playbooks instead before then.
Run a playbook on demand
You can also manually run a playbook on demand, whether in response to alerts, incidents (in Preview), or entities (also in Preview). This can be useful in situations where you want more human input into and control over orchestration and response processes.
Run a playbook manually on an alert
Note
This procedure is not supported in the unified security operations platform.
In the Azure portal, select one of the following tabs as needed for your environment:
In the Incidents page, select an incident. In the Azure portal, select View full details at the bottom of the incident details pane to open the incident details page.
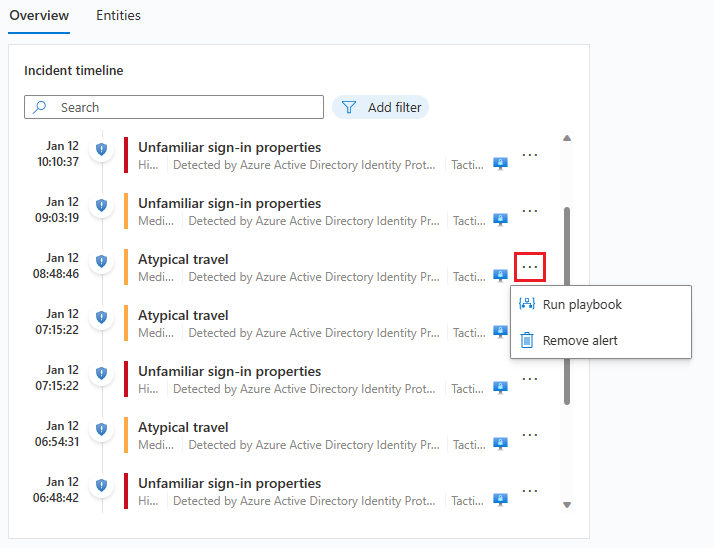
In the incident details page, in the Incident timeline widget, choose the alert you want to run the playbook on. Select the three dots at the end of the alert's line and choose Run playbook from the pop-up menu.
The Alert playbooks pane will open. You'll see a list of all playbooks configured with the Microsoft Sentinel Alert Logic Apps trigger that you have access to.
Select Run on the line of a specific playbook to run it immediately.
You can see the run history for playbooks on an alert by selecting the Runs tab on the Alert playbooks pane. It might take a few seconds for any just-completed run to appear in the list. Selecting a specific run will open the full run log in Logic Apps.