Note
Access to this page requires authorization. You can try signing in or changing directories.
Access to this page requires authorization. You can try changing directories.
Applies to: .NET 8 and higher
This article introduces how to create and configure ASP.NET Core applications in Linux.
Prerequisites
To follow the exercises in this part, you must have a .NET SDK installed. To install the SDK, refer to the installation instructions in Part 1, as necessary.
Goal of this part
Learn how to create an ASP.NET Core web application by using the .NET command-line interface (CLI) in Linux, and how to publish the application to the /var directory. As you learn these concepts, you'll practice some basic tasks such as working with files and folders, and running commands as a privileged user. You'll also learn how to edit files by using the vi text editor in Linux.
.NET CLI
According to this .NET CLI documentation, the .NET CLI is a cross-platform toolchain for developing, building, running, and publishing .NET applications. The .NET CLI is installed together with the .NET SDK.
These trainings use the dotnet command frequently. This command is powerful and has two main functions:
- It provides commands for working on .NET projects. For example,
dotnet buildbuilds a project. Each command defines its own options and arguments. All commands support the--helpoption for printing brief explanations about how to use the command. - It runs .NET applications.
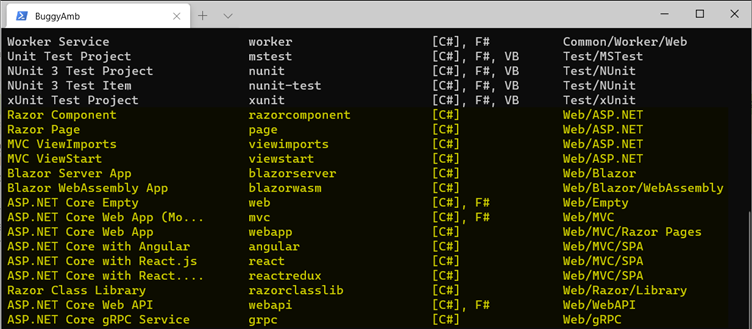
You'll use the dotnet new command to create your first ASP.NET Core project in Linux. This command gets the type of the project as an argument. The project types are explained in this document. You can also display a list of types by running dotnet new without a parameter. Web-related project types are highlighted in yellow in the following screenshot.
Create an ASP.NET Core web application using SDK
You'll use the .NET CLI to create your first web application by using the following command:
dotnet new <template_type> -n <project_name> -o <output_directory>
These rules apply when you use dotnet new:
- The command creates the project files in the output directory. If you omit the
-o <output_directory>segment, then the project will be created in the current directory. You can always use the-oswitch. - If the folder doesn't exist, the command creates it.
- If you omit the
-n <project_name>segment, then the project name will be the same as the directory name.
You're welcome to find creative names for the directory and project itself. However, keep in mind that Linux is case-sensitive. For this exercise, use the more conservative AspNetCoreDemo as the project name, and create it in the firstwebapp directory.
To create the project, run the following command:
dotnet new webapp -n AspNetCoreDemo -o firstwebapp
Examine the output to see the directory and project names. The following screenshot also lists the content of the output directory. You should be familiar with the directory structure if you have created an ASP.NET Core web application on Windows before.

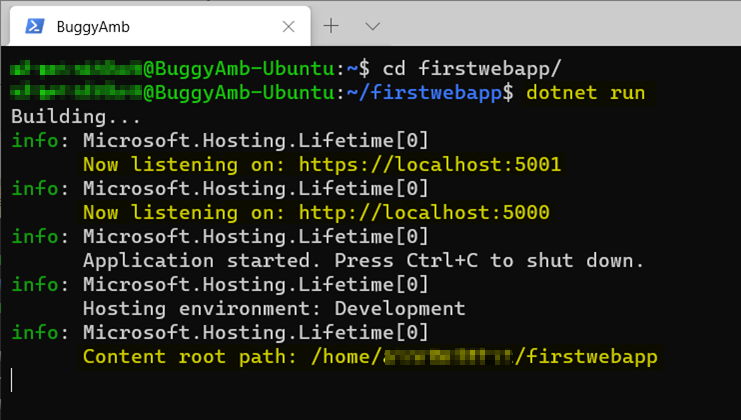
You have created your first application. The next task will be to run it. Change the directory to the project folder, and run dotnet run.
Note
The following items in this screenshot:
- Your web application listens on port 5001 for HTTPS requests and listens on port 5000 for HTTP requests.
- The content root is under the home directory.
We recommend that you don't have the application run under your home directory. You'll publish it to another directory later, but you should test it before you publish it. You can press Ctrl+C to stop the application. But for now, keep it running, and open a new terminal session by using your preferred method to connect to your Linux virtual machine. For this example, you'll use PowerShell again.
Test the web site from another terminal
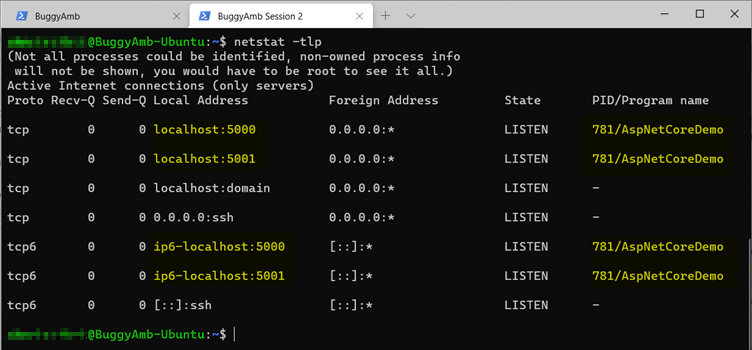
In your new terminal session, verify that your application is listening on ports 5000 and 5001. Linux has the same netstat command that Windows has. Run netstat together with the -tlp switch. You can get familiar with the netstat switches in this article, or you can look at the help file by running man netstat or info netstat.
Here's the output of the netstat -tlp command from the second terminal session. It shows that the AspNetCoreDemo process is running by using PID 781, and is listening on ports 5000 and 5001 for both IPv4 and IPv6.
You can use curl and wget to test your website. Both commands make an HTTP call to the target side, but they behave differently:
Curlis simply a command line browser tool. It makes an HTTP request to the given target, and it shows only the plain output of the HTTP response. For example, it shows the HTML source markup for a web application.Wgetis an HTTP downloader. It makes an HTTP request, and it downloads the given resource. For example, wgethttp://server/file.zipdownloads file.zip fromhttp://serverand save it to the current directory.
The wget command also shows us some more details, such as redirection and any error messages you might receive. Therefore, you can use it as a primitive version of an HTTP trace tool whenever you need that.
For more information about the difference between curl and wget, go to StackExchange webpage.
In this training series, you previously used wget to download the .deb package manager file from Microsoft servers before you installed .NET.
If you run curl http://localhost, nothing occurs. This most likely means that there's no HTTP response. You can then run wget http://localhost to check whether more information is displayed when you try to access the site.
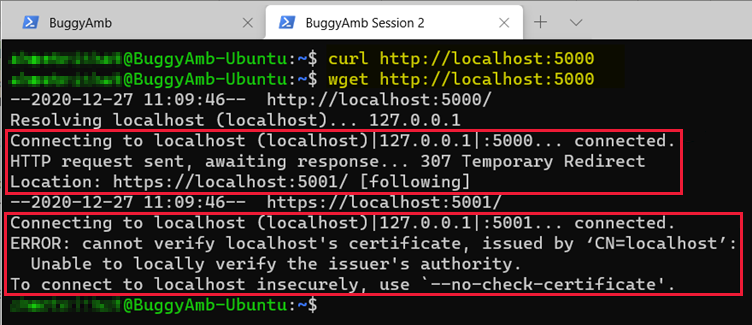
This is what occurs now:
- You make an HTTP request to
http://localhost:5000, and you connect successfully. This means that the application is accepting the connections on port 5000. - You receive an HTTP 307 Temporary Redirect response from the application that points to a secure HTTPS location:
https://localhost:5001. - Wget is smart enough to follow this redirect and make a new request to
https://localhost:5001. - You connect successfully again. However,
wgetdoesn't trust the SSL certificate. Therefore, the connection fails.
The wget command recommends that you work around this issue by using the --no-check-certificate switch to connect insecurely. However, this approach involves SSL certificate settings that are out-of-scope for this training. Instead, you can configure your ASP.NET Core application so that it won't redirect the HTTP requests to HTTPS. If you're familiar with ASP.NET Core application development (or just configuration), edit the Startup.cs file to remove the redirection configuration.
Edit files by using vi
You can use the vi text editor for Linux distros to edit all kinds of plain text files. You'll use it in this training to reconfigure your application.
You must close your application before you can edit it. First close the open terminal session. Then, press Ctrl+C to shut down the application.
To edit Startup.cs file, run the following command:
vi ~/firstwebapp/Startup.cs
Note
This command starts the vi editor, and then loads the file. The ~ (tilde) shortcut refers to your home directory where you created your project. That is, the command points to /home/<YourName>/firstwebapp/Startup.cs.
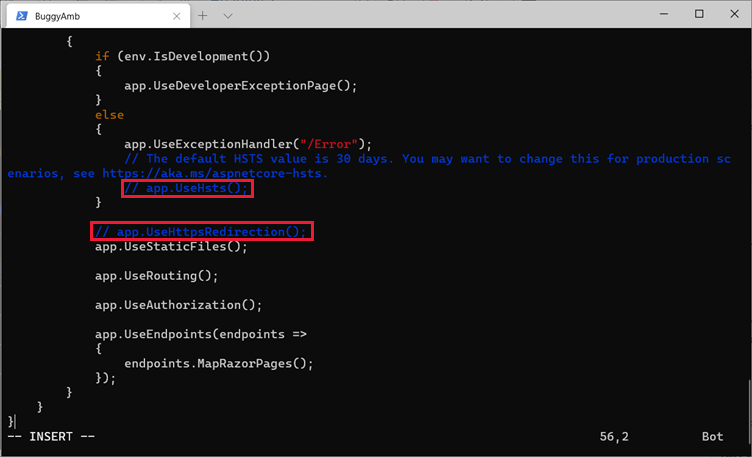
Press the I (Insert) key to enable edit mode. You should now see -- INSERT -- at the bottom of the command line. Use the arrow keys to navigate within the file. Comment both the app.UseHsTs(); and app.UseHttpsRedirection(); lines by adding // at the start of them, as shown in the following screenshot.
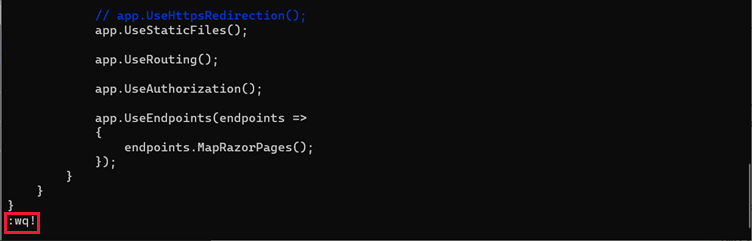
Press esc to exit editing mode, enter :wq!, and then press Enter. Notice that the colon character (:) means that you're entering a command, w means write, q means quit, and ! forces writing.
After you press Enter, the changes should be saved. You can verify the changes by running cat ~/firstwebapp/Startup.cs. This command displays the contents of the Startup.cs file.
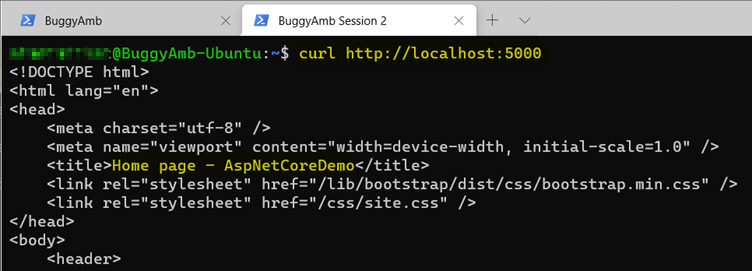
Restart your application. To do this, change the current directory to the ~/firstwebapp directory, and run dotnet run again. Then, open another terminal session to your server, and run the curl http://localhost:5000 command again. This time, the command should return the HTML contents of the home page.
You have now successfully run your first ASP.NET Core Web App on Linux.
Deploy the application to the /var directory
The primary goal of this exercise is to host your web application behind a reverse proxy so that connecting clients can access the application from another computer by using only the hostname without the port number. This is what you'd expect to occur in real world scenarios. You'll work with Nginx later to complete this task. But before you do that, publish your application to the /var directory. This is because we recommend that you don't run the application in a user's home directory.
Remember that the /var directory is used to store content and log files by various applications such as Apache and Nginx. You'll follow that practice here by publishing the newly created web application to /var.
Change to the project folder, and then run dotnet publish to create a publishing folder. Copy that folder to the /var directory.
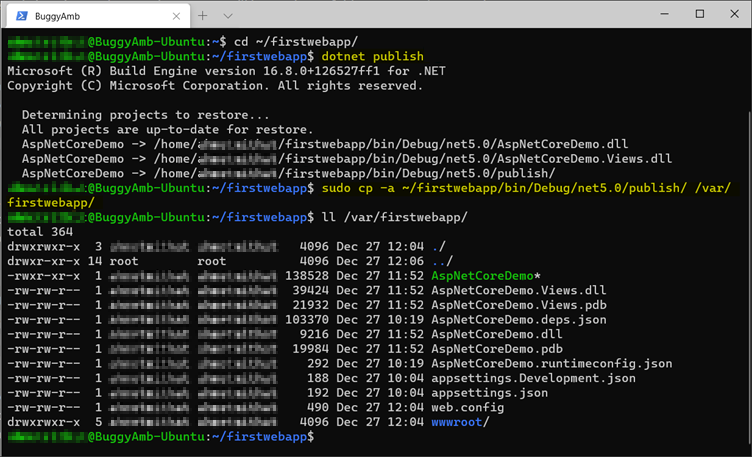
The screenshot shows that the dotnet publish command created publishing files in the ~/firstwebapp/bin/Debug/net5.0/publish/ folder. Then, the following command was used to copy all files to /var/firstwebapp/ folder:
sudo cp -a ~/firstwebapp/bin/Debug/net5.0/publish/ /var/firstwebapp/
Note
Note the usage of sudo before the copy command. You use this because standard users don't have write permission to /var directory. Therefore, you must run the command as a superuser.
To run your application from a published folder, run the following command:
dotnet /var/firstwebapp/AspNetCoreDemo.dll
If you want, you can run these tests by using the same curl and wget commands. This is because the application will still listen on port 5000 for HTTP requests.
Lifetime of the process and next steps
If the application requires constant uptime, running .NET applications within an interactive user session isn't a good practice for the following reasons:
- If users were to terminate their sessions, for example by closing PuTTY or the PowerShell SSH client, or exit the session, the application would shut down.
- If the process is terminated for some reason (for example, the process crashes because of an unhandled exception), it won't start automatically and must be restarted manually.
- If the server is restarted, the application won't start automatically.
Next steps
Part 2.2 - Install Nginx and configuring it as a reverse proxy server
Make sure that the web application starts automatically. Install and configure Nginx as a reverse proxy to route HTTP requests that are made to port 80 to the dotnet application instead (so that clients can connect without having to provide the port number).
Third-party information disclaimer
The third-party products that this article discusses are manufactured by companies that are independent of Microsoft. Microsoft makes no warranty, implied or otherwise, about the performance or reliability of these products.