Note
Access to this page requires authorization. You can try signing in or changing directories.
Access to this page requires authorization. You can try changing directories.
In this quickstart, you download an Unreal Engine (UE) game sample and configure Visual Studio Tools for Unreal Engine. Visual Studio Tools for Unreal Engine is a free extension that helps you develop games with Unreal Engine. It provides features that improve the Unreal Engine development experience in Visual Studio.
Prerequisites
The following must be installed:
- Visual Studio version 17.10 or later.
- Unreal Engine version 5 or later because the example used in this article requires Unreal Engine 5 or later.
- Visual Studio Tools for Unreal Engine. See Install Visual Studio Tools for Unreal Engine for installation instructions.
Lyra is a sample game project for learning about Unreal Engine. For download instructions, see the Downloading the Lyra Starter Game section at Lyra Sample Game. If you acquired the Lyra project via the source code installation of Unreal Engine, that version doesn't contain the assets required to build and run the game. Use the download instructions to get everything you need.
If you have Visual Studio 2022 version 17.11 or earlier, you must generate the Visual Studio solution file in Unreal Engine before you can open the project in Visual Studio. This is the scenario that this article covers.
Note
Visual Studio 2022 version 17.12 and later provides direct support for Unreal Engine projects. You can open the Lyra project directly in Visual Studio without generating a solution file in Unreal Engine. This is the recommended way to work with Unreal Engine projects in Visual Studio. To follow this path, follow the instructions in Open Unreal Engine projects in Visual Studio to build and run the Lyra sample. Then return to this article to learn more about the Visual Studio build output window, Unreal Engine toolbar, and Command-line argument dropdown features.
Configure Lyra to use Visual Studio Tools for Unreal Engine
If you have Visual Studio 2022 17.11 or earlier, you must enable the Visual Studio Tools for Unreal Engine plugin in the Lyra project to use the features of Visual Studio Tools for Unreal Engine. After you download the Lyra game sample, update LyraStarterGame.uproject to use the Visual Studio Tools plugin. You can do this from the Unreal Editor or by manually editing the LyraStarterGame.uproject file.
Method 1: Enable the Visual Studio Integration Tools plugin in the Unreal Editor
- In the Unreal Editor, load the Lyra project.
- From the Visual Studio main menu choose Edit > Plugins.
- Find the Visual Studio Integration Tools plugin and check the box next to it.
Method 2: edit the project file
Open the
LyraStarterGame.uprojectfile in a text editor. It's in the directory where you installed the game sample.Add the following to the end of the
Pluginssection:,{ "Name": "VisualStudioTools", "Enabled": true }
Build the Lyra project in Visual Studio
Before you build the Lyra project in Visual Studio:
- Open the Lyra project in Unreal Engine.
- From the Unreal Engine editor main menu, choose Tools > Generate Visual Studio Project. This creates the solution file for Visual Studio.
- From the Unreal Engine editor main menu, choose Tools > Open Visual Studio to open the game in Visual Studio. If you have multiple versions of Visual Studio on your machine, ensure that the right version opened: from the Visual Studio main menu, choose Help > About Microsoft Visual Studio. You must use Visual Studio 2022 version 17.7 or higher. If the right version didn't open, manually open
LyraStarterGame.slnin the correct version of Visual Studio.
In Visual Studio
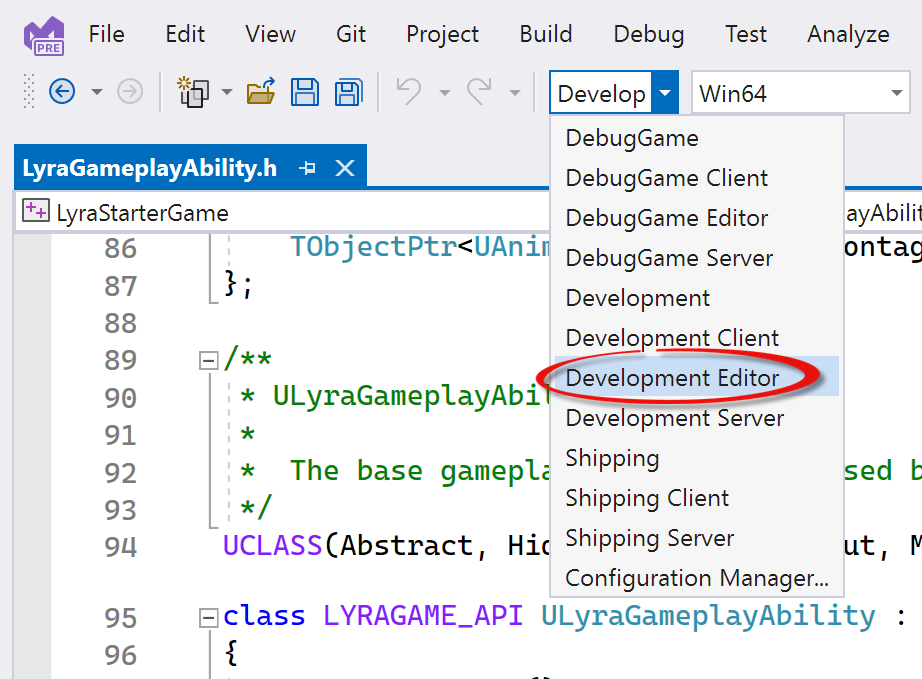
- Change the Solutions Configurations dropdown to Development Editor. This enables the Blueprints Visual Studio Tools for Unreal Engine:
- Set the startup project to be the LyraStarterGame project. In the Solution Explorer, right-click on the solution and choose Properties.
- In the Solution Property Pages dialog, Under Common Properties, choose Configure Startup Projects.
- Ensure that Single startup project is selected and choose LyraStarterGame in the dropdown.
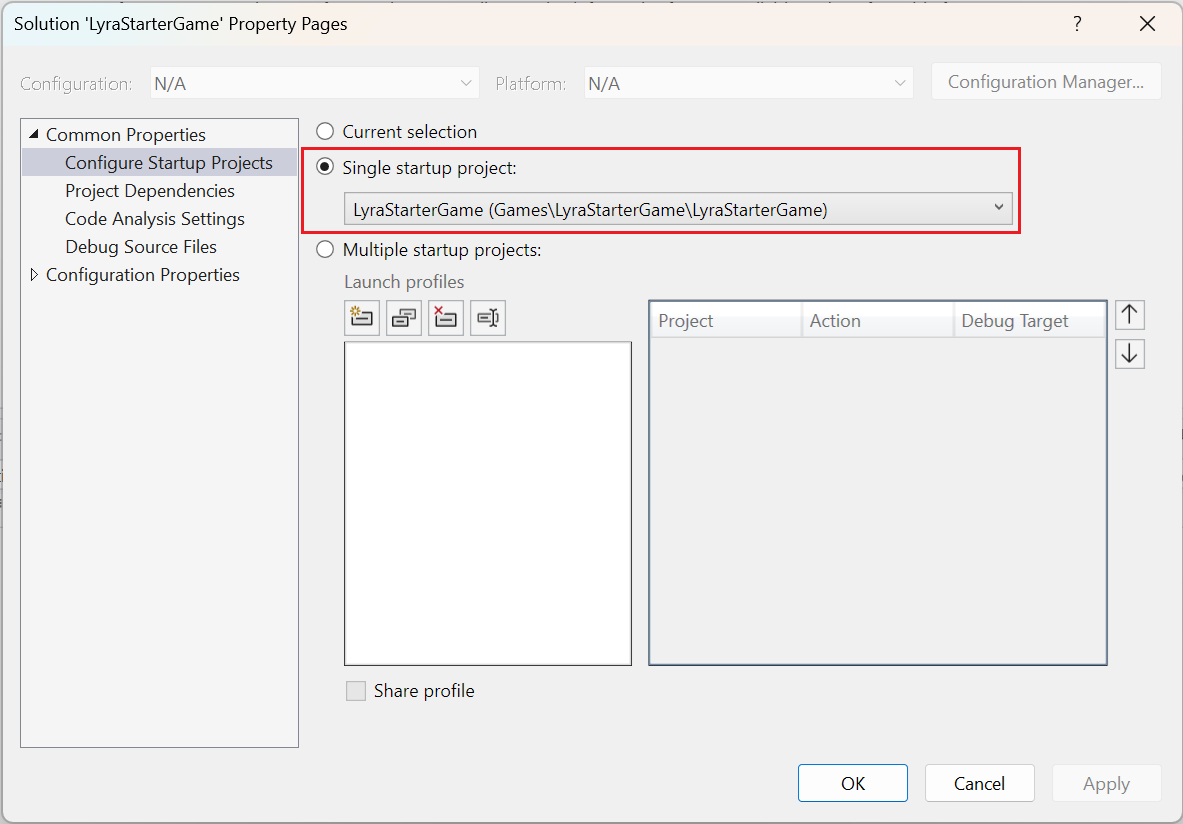
Under Common Properties, Configure Startup projects is selected. The single startup project radio button is selected. The startup project in the dropdown is LyraStarterGame.
- Choose OK to close the dialog.
- From the Visual Studio main menu, choose Build > Build Solution to build the game.
Visual Studio build output window
The build output window in Visual Studio shows the progress of the build and any errors or warnings that occur. You can open the build output window from the Visual Studio main menu via View > Output.
Starting in Visual Studio 2022 17.12, you can double-click on an absolute path to a file in the output window to open that file in Visual Studio. The source code must be part of the Visual Studio solution and the path in the output window must be an absolute path. This works when building Unreal Engine projects in Visual Studio or other types of projects.
The following screenshot shows the output window for a build of the LyraStarterGame sample. The user double-clicked on a warning from LyraCharacter.generated.h. Because the absolute path to that file is provided, the file opens in the editor.

Unreal Engine toolbar
Visual Studio provides a toolbar that improves the Unreal Engine development integration experience in Visual Studio. The toolbar provides quick access to common UE tasks.
Activate the Unreal Engine toolbar in Visual Studio from the main menu via View > Toolbars > Unreal Engine. The toolbar looks like:

The toolbar buttons, left to right:
- The play icon is a quick attach button that attaches to processes listed in the dropdown to the right. The dropdown lists Unreal Engine related processes, which makes it easier to attach to the Unreal Engine Editor more easily. You can also use this to attach to any processes.
- Buttons to start and stop the Unreal Engine integration server. The integration server improves the performance of Unreal Engine integration with Visual Studio. It runs as a background process and automatically updates test information as you work on your project. You can turn it off to reclaim machine resources, and start it when you want the integration improvements. The server is started automatically when you open a UE project in Visual Studio.
- A button to rescan Unreal Engine Blueprint assets. This updates the Visual Studio solution with the latest Blueprint assets from the Unreal Engine project.
- A button that opens the Unreal Engine log window.
- A button to open the Unreal Engine Integration Configuration window where you can refresh and see the overall configuration status and Visual Studio Integration Tool status, check for Blueprint support, see whether get Unreal Engine naming convention checker status, and so on.
Command-line argument dropdown
You might frequently launch your game with different combinations of command-line arguments during the editing and debugging part of your inner loop. This is now easier with the command-line arguments dropdown:

The command-line arguments dropdown is shown following the Solutions Platforms dropdown on the Standard toolbar. There is an entry for C:\UE\LyraStarterGame\LyraStarterGame.uproject -fullscreen, and C:\UE\LyraStarterGame\LyraStarterGame.uproject -JsonDebugOutput.
To add command-line arguments, type them in the dropdown and press Enter. The arguments are saved in the order that you enter them and appear in the dropdown for future use.
There's a limit of five command lines that you can add before the oldest one is removed to make room for a new one. When you first load Unreal Engine, default arguments appear in the dropdown.
The first argument when debugging an Unreal Engine project that runs in the Unreal Engine editor must be the path to the project. For example: C:\UE\LyraStarterGame\LyraStarterGame.uproject.
For more information about using the command-line arguments dropdown, see Pass command-line arguments.
Next steps
Add Unreal Engine classes, modules, and plugins in Visual Studio
View Unreal Engine Blueprints in Visual Studio
View Unreal Engine logging in Visual Studio
View Unreal Engine macros in Visual Studio