Note
Access to this page requires authorization. You can try signing in or changing directories.
Access to this page requires authorization. You can try changing directories.
In this quickstart, you follow guided steps to quickly create a Flask application by using a built-in Python project template. Visual Studio makes it easy to develop Python projects with boilerplate code and functionality in templates for several Python frameworks, including Flask, Django, and Bottle. The Python project described in this article is similar to the project you create manually through the Quickstart: Create a web app with Flask article.
Prerequisites
Visual Studio installed with support for Python workloads.
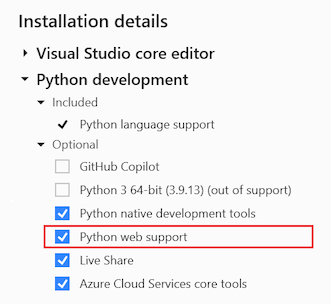
In the Visual Studio Installer, select the Python development workload and the Python web support option for access to web project templates. For more information, see Install Python support in Visual Studio.

Visual Studio for Mac isn't supported. Visual Studio Code on Windows, Mac, and Linux works well with Python through available extensions.
Create the project
Follow this procedure to create a Visual Studio solution and a new Flask web project:
In Visual Studio, select File > New > Project and search for "Flask." Select the Blank Flask Web Project template and select Next.

Visual Studio displays the project configuration dialog. Enter a Name for the project and select Create. You can leave the other fields set to the defaults.

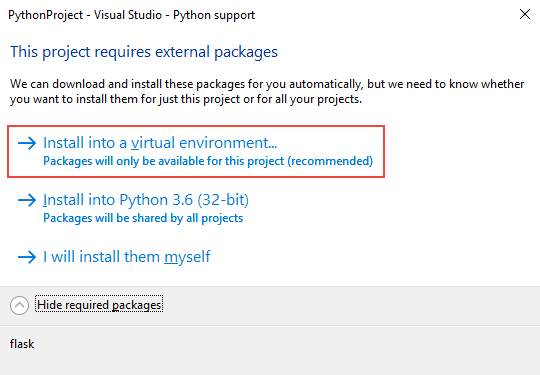
After a moment, Visual Studio displays a prompt about how to handle package dependencies. The prompt is different based on whether you already have package dependencies installed.
The dialog This project requires external packages. indicates that the selected template includes a requirements.txt file that specifies dependencies on the Flask package. Visual Studio can install the packages automatically, which gives you the option to install the packages into a virtual environment. Using a virtual environment is recommended over installing into a global environment.
If you receive this dialog, select the Install into a virtual environment option:
Alternatively, you might see the Python package specification file "requirements.txt" was detected in project <Project name>". prompt at the top of the Visual Studio window. This prompt indicates that the package dependencies are already available in your configuration. Visual Studio can create a virtual environment for you from the existing configuration.
If you see this prompt, select the Create virtual environment option:

Visual Studio displays the Add environment dialog. Accept the default values and select Create, then consent to any elevation requests.


Tip
When you begin a project, it's highly recommended to create a virtual environment right away, as most Visual Studio templates invite you to do. Virtual environments maintain your project's exact requirements over time as you add and remove libraries. You can then easily generate a requirements.txt file, which you use to reinstall those dependencies on other development computers (as when using source control) and when deploying the project to a production server. For more information on virtual environments and their benefits, see Use virtual environments and Manage required packages with requirements.txt.
Examine the boilerplate code
In this section, you examine the boilerplate code in the Flask project file (.py) that Visual Studio creates for the selected template.
Open Solution Explorer to view your solution and Flask project files. The initial project contains only two files, app.py and requirements.txt:

The requirements.txt file specifies the Flask package dependencies. The presence of this file is what invites you to create a virtual environment when first creating the project.
The single app.py file contains boilerplate code for a blank Flask web project. The template provides code similar to the descriptions in the Quickstart - Create a web app with Flask article, with a few added sections.
Open the app.py file in the editor and examine the top section.
The code begins with an
importstatement for the Flask package. This statement creates an instance of theFlaskclass, which is assigned to the variableapp:from flask import Flask app = Flask(__name__)Next, the code assigns the
wsgi_appvariable, which is useful when you deploy the Flask app to a web host:# Make the WSGI interface available at the top level so wfastcgi can get it. wsgi_app = app.wsgi_appThe middle section assigns a function to a URL route, which means the function provides the resource identified by the URL. In this case, the route defines a view:
@app.route('/')
def hello():
    """Renders a sample page."""
    return "Hello World!"
You define routes by using Flask's
@app.routedecorator with an argument that's the relative URL from the site root. As you can see in the code, the function returns only a text string, which is enough for a browser to render.The bottom section contains optional code to start the Flask development server. You can set the host and port through environment variables rather than hard-coding them. Such code allows you to easily control the configuration on both development and production machines without changing the code:
if __name__ == '__main__':
    import os
    HOST = os.environ.get('SERVER_HOST', 'localhost')
    try:
        PORT = int(os.environ.get('SERVER_PORT', '5555'))
    except ValueError:
        PORT = 5555
    app.run(HOST, PORT)
Select Debug > Start without Debugging to run the Flask app and open a browser to the default host and port value,
localhost:5555.

Explore Python templates in Visual Studio
When you install the Python workload, Visual Studio provides various project templates for the Flask, Bottle, and Django web frameworks and Azure cloud services. There are also templates for different machine learning scenarios and a template to create a project from an existing folder structure that contains a Python application. You can access the templates by using the File > New > Project menu option. Select the Python language node and its child nodes to see the available templates.
Visual Studio also provides several file or item templates to quickly create a Python class, a Python package, a Python unit test, web.config files, and more. When you have a Python project open, you access item templates by using the Project > Add New Item menu option. For more information, see the item templates reference.
Using templates can save you significant time when starting a project or creating a file. They're also a great way to learn about different app types and code structures. It's helpful to take a few minutes to create projects and items from the various templates to familiarize yourself with what they offer.
Use Cookiecutter templates
Visual Studio provides direct integration with Cookiecutter to help you discover templates, input template options, and create projects and files. For more information, see the Quickstart: Create a project from a Cookiecutter template article.