Note
Access to this page requires authorization. You can try signing in or changing directories.
Access to this page requires authorization. You can try changing directories.
In this quickstart, you follow guided steps to clone a GitHub repository of Python code and create a project. Visual Studio makes it easy to work with Python projects by using Git commands to access content under source control. You can also clone Python code repositories from the command line and then work with the projects in Visual Studio.
Prerequisites
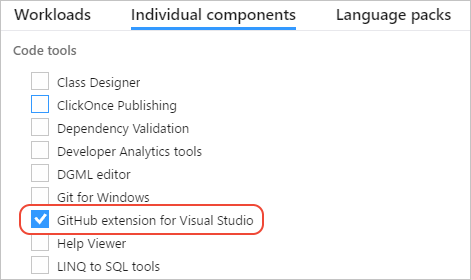
- Visual Studio 2022 installed with support for Python workloads. Visual Studio 2022 provides seamless integration with GitHub with support for Git commands. For more information, see Install Python support in Visual Studio.
Visual Studio installed with support for Python workloads, along with the GitHub extension for Visual Studio. This extension enables you to work with GitHub repositories and Git commands. The GitHub extension is available in the Visual Studio Installer on the Individual components tab in the Code tools section:

Visual Studio for Mac isn't supported. For more information, see What's happening to Visual Studio for Mac? Visual Studio Code on Windows, Mac, and Linux works well with Python through available extensions.
Clone existing repository files
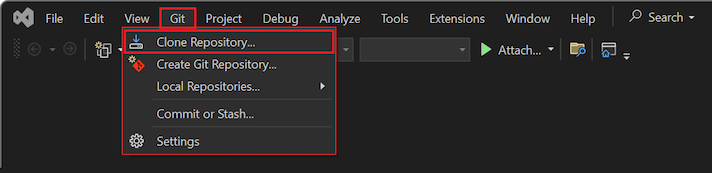
Use the following steps to clone an existing repository by using the Visual Studio Git source control commands:
In Visual Studio, select Git > Clone:
In the Clone a repository dialog, specify the GitHub repository to clone:
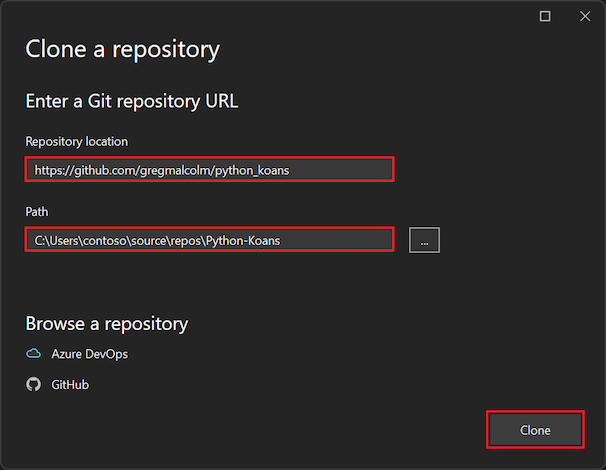
For the Repository location, enter the URL of the repository to clone. For this exercise, enter
https://github.com/gregmalcolm/python_koans.For the Path, enter the folder on your system where you want Visual Studio to store the cloned files.
The folder you specify should be the exact folder that you want Visual Studio to use. Unlike the
git clonecommand, when you create a clone in Team Explorer, Visual Studio doesn't automatically create a new subfolder with the name of the repository.When you're ready, select Clone.
After cloning completes, Visual Studio opens the Git Changes pane for the repository. You can also see the folder with the cloned repository files in Solution Explorer.
Select Git > Local Repositories and confirm the cloned repository is now in the list:


Use the following steps to clone an existing repository by using Visual Studio Team Explorer:
In Visual Studio, select View > Team Explorer to open the Team Explorer window. On the Connect page, you can access GitHub or Azure DevOps repositories or clone a repository.
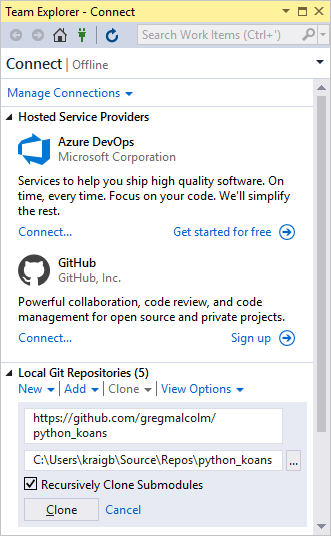
If Team Explorer doesn't open on the Connect page, select the plug icon on the Visual Studio toolbar to open the page.
In the Team Explorer - Connect page, expand the Local Git Repositories section, and select the Clone option.
For the Repository location, enter the URL of the repository to clone. For this exercise, enter
https://github.com/gregmalcolm/python_koans.For the Path, enter the folder on your system where you want Visual Studio to store the cloned files.
The folder you specify should be the exact folder that you want Visual Studio to use. Unlike the
git clonecommand, when you create a clone in Team Explorer, Visual Studio doesn't automatically create a new subfolder with the name of the repository.Select the Recursively Clone Submodules option.
At the bottom of the page, select Clone.

After cloning completes, the repository name appears in the Local Git Repositories list.
Important
In this quickstart, you create a direct clone of the python_koans repository on GitHub. Such a repository is protected by its author from direct changes, so attempting to commit changes to the repository fails. In practice, developers instead fork such a repository to their own GitHub account, make changes there, and then create pull requests to submit those changes to the original repository. When you have your own fork, use its URL instead of the original repository URL used earlier.
Create project from cloned files
After you clone the repository, you can create a new project from the cloned files.
Follow these steps to create a project from existing files.
Important
The following process doesn't move or copy any original source files. If you want to work with a copy of your files, first duplicate the folder and then create the project.
Launch Visual Studio and select File > New > Project.
In the Create a new project dialog, search for python, and select the From Existing Python code template, and select Next.
In the Configure your new project dialog, enter a project Name and Location, choose the solution to contain the project, and select Create.
In the Create New Project from Existing Python Code wizard, set the Folder path to your existing code, set a Filter for file types, and specify any Search paths that your project requires, then select Next. If you don't know the search paths, leave the field blank.

On the next page, select the Startup file for your project. Visual Studio selects the default global Python interpreter and version. You can change the environment by using the dropdown menu. When you're ready, select Next.
Note
The dialog shows only files in the root folder. If the file you want is in a subfolder, leave the startup file blank. You can set the startup file in Solution Explorer, as described in a later step.

Select the location to store the project file (a .pyproj file on disk). If applicable, you can also include autodetection of virtual environments and customize the project for different web frameworks. If you're unsure of these options, leave the fields set to the defaults.
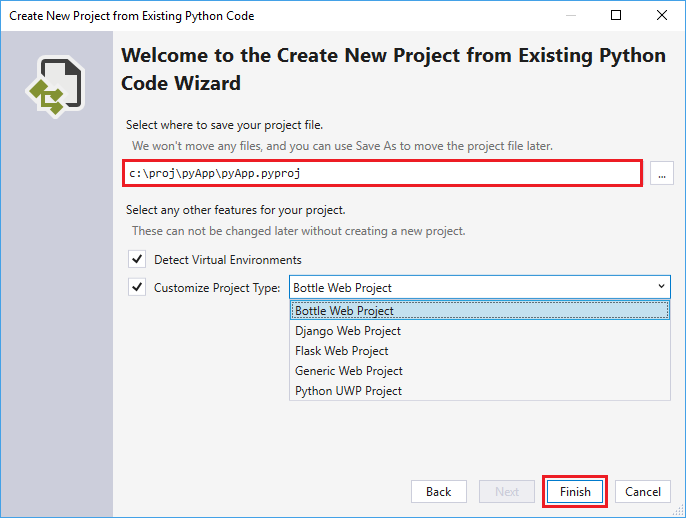
Select Finish.
Visual Studio creates the project and opens it in Solution Explorer. If you want to move the .pyproj file to a different location, select the file in Solution Explorer, and then select File > Save As on the toolbar. This action updates file references in the project, but it doesn't move any code files.
To set a different startup file, locate the file in Solution Explorer, right-click the file, and select Set as Startup File.


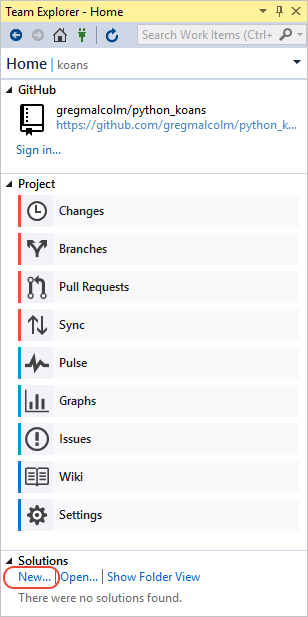
In the Local Git Repositories list, double-click the repository name. The repository dashboard opens in the Team Explorer - Home page with GitHub, Project, and Solutions options.
Expand the Solutions section and select New to create a new project.
In the Create a new project dialog, set the Language filter to Python (or search for python), select the From Existing Python Code template, and select Next.
In the Configure your new project dialog, enter a project Name, set the Location to the same folder as the repository, and select OK. The Create New Project from Existing Python Code wizard opens.
In the wizard, select Finish.

Configure project properties
To run the project, you need to identify the working directory for the project, and let Visual Studio know which file to use as the Startup File.
Follow these steps to configure your project properties:
In Solution Explorer, expand the project node, right-click the contemplate_koans.py file, and select Set as Startup File. This action lets Visual Studio know which file to use to run the project.
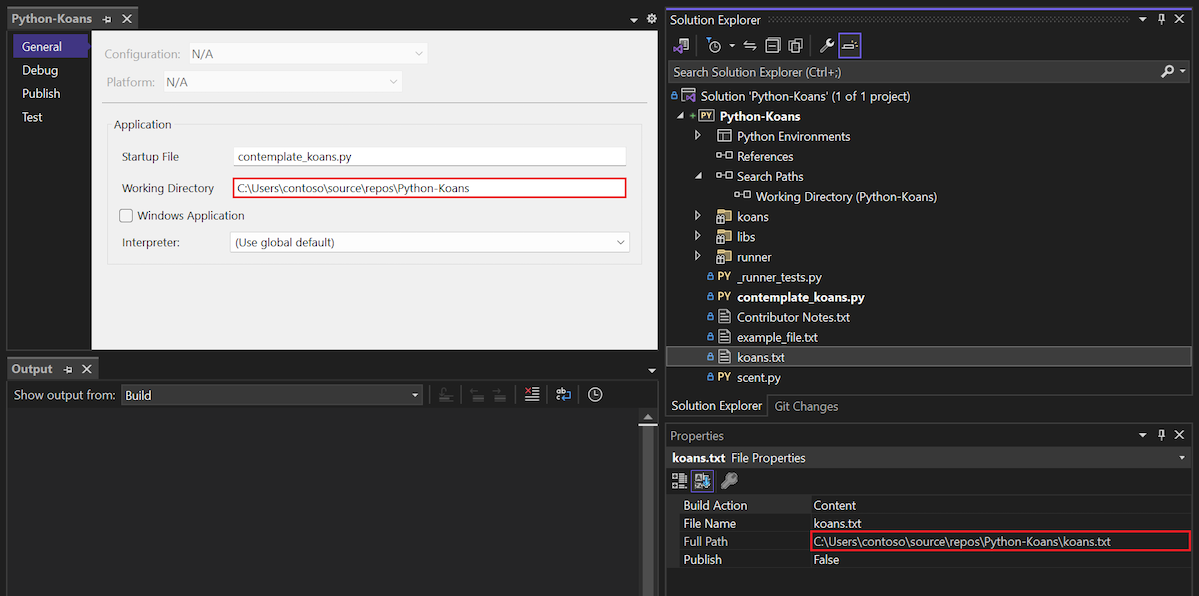
On the main Visual Studio toolbar, select Project > Properties to open the properties for the project.
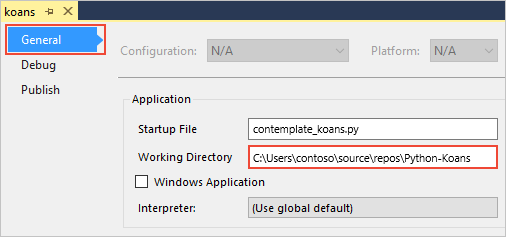
On the General tab, observe the value of the Working Directory for the project.
By default, Visual Studio sets the Working Directory to the project root (
.). Notice that the Startup File has no specific folder location.
The cloned program code looks for a file named koans.txt in the working directory. The code expects the directory to be the folder location where you instructed Visual Studio to store the cloned repository files. If you leave the Working Directory set to the project root (
.), the program generates runtime errors.Set the value of the Working Directory to the folder location of the cloned repository, such as
C:\Users\contoso\source\repos\Python-Koans.Tip
A quick way to confirm the folder location for the cloned files is to check the properties for the cloned file in Solution Explorer. Right-click the koans.txt file and select Properties to open the details pane under Solution Explorer. In the details pane, notice that the folder location for the file is listed in the Full path property. You can paste this value into the Working Directory field in the project Properties page.
Save your changes and close the project Properties pane.


Run Python program
Now you're ready to try running the application for the new project:
Select Debug > Start without Debugging (or use the keyboard shortcut Ctrl+F5) to run the program.
If you see a FileNotFoundError runtime error for the koans.txt file, confirm the Working Directory is set correctly, as described in the previous section.
When the program runs successfully, it displays an assertion error on line 17 of the project file /koans/about_asserts.py:

The assertion error is intentional. The program is designed to teach Python by having you correct all the intentional errors. You can find more information about the program at Ruby Koans, which inspired Python Koans.
Exit the program.
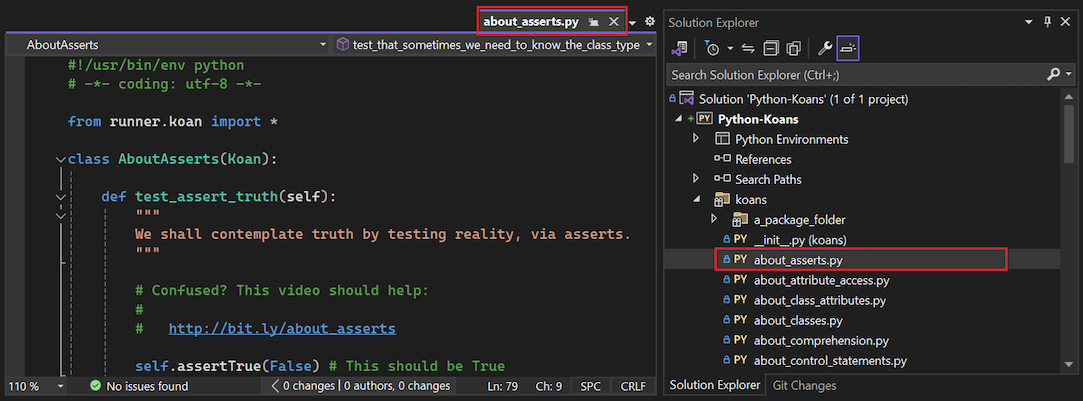
In Solution Explorer, double-click the /koans/about_asserts.py file to open the file in the editor:
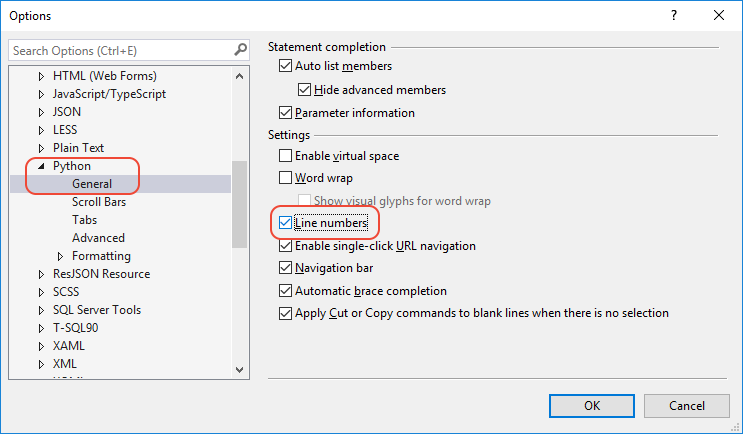
By default, line numbers don't appear in the editor. To see the line numbers, select Tools > Options, expand the All Settings > Language > Python > General section, and select the Line numbers option:

By default, line numbers don't appear in the editor. To see the line numbers, select Tools > Options, expand the Text Editor > Python > General section, and select the Line numbers option:
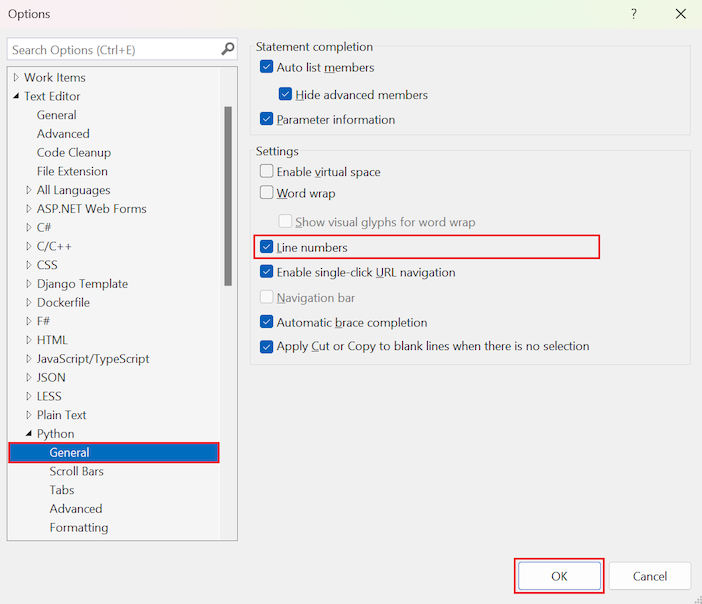
By default, line numbers don't appear in the editor. To see the line numbers, select Tools > Options, and select Show all settings at the bottom of the dialog. Expand the Text Editor > Python > General section and select the Line numbers option:
Correct the error in the /koans/about_asserts.py file by changing the
Falseargument on line 17 toTrue. Here's what the updated code should look like:self.assertTrue(True) # This value should be TrueRun the program again.
If Visual Studio warns about errors, respond with Yes to continue running the code. This time, the program passes through the first check and stops on the next koan. You can continue to correct further errors and run the program to see the adjustments.


