Buy-side setup with the augmented line item
Setting up the buy side using the API can seem complicated, but using the correct order of operations to set up the advertiser, insertion orders, line items, and targeting will increase your chances of success. This version of the guide assumes you're working with the augmented line item and seamless insertion orders.
Use the Buy-Side Setup Guide for the standard line item configuration.
API prerequisites
Before you work with the API you should read API Getting Started, where you'll find information on environments, usage constraints, API semantics (running commands, filtering, sorting, etc.), and best practices.
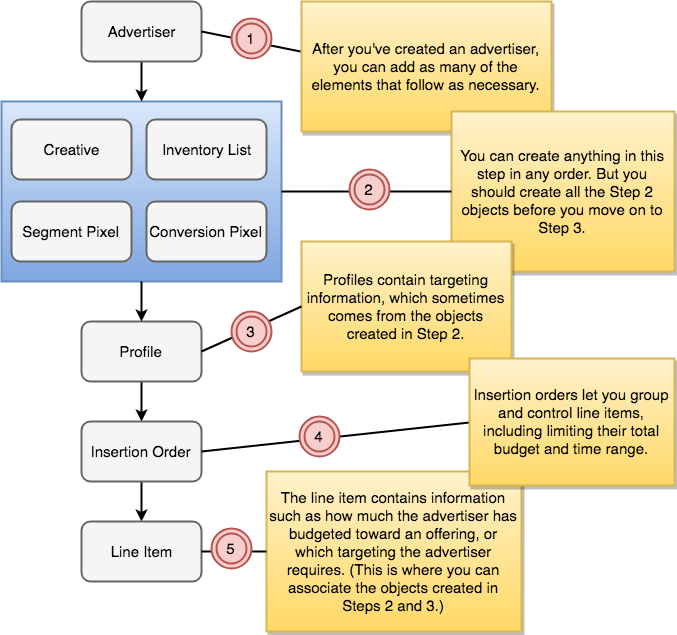
Order of operations
Following the Order of Operations during API setup reduces the required number of API calls, and can prevent mistakes that can result in poor campaign results and unnecessary spending. For example, creating a line item without a profile is possible, but it can result in overspending because the profile ensures you only advertise to targeted audiences. Proceeding in order ensures you account for all the necessary settings when setting up your buy-side objects. The following diagram shows the order and explains it in terms of the object hierarchy.
Best practices for buy-side ALI setup
In addition to following the Order of Operations, include a budget and flight dates on your insertion orders and line items; always attach a profile to your spending objects; and set the state field on your spending objects to inactive until you're ready to go live.
Be careful when allocating a budget and specifying dates on your spending objects
Setting the start date for a budget interval (these dates are called "flight dates" in the UI) after the current date means spending can't start immediately. If an object higher in the order already has these fields set, lower objects will inherit them unless explicitly changed. Budget intervals of lower objects must be within budget interval for higher objects. (For example, if your insertion order has a budget interval starting April 2, 2018, and ending April 30, 2018, you can't create a line item under that insertion order with a budget interval of April 20, 2018 - May 5, 2018.)
Attach a profile to your line item
You could have serious targeting and spending issues if you don't attach a profile. Without a profile, you're almost certainly bidding on impressions that don't provide value to the advertiser. Targeting ensures you don't run out of budget before serving impressions in the times, places, and demographics where the ad will have the most impact.
Tip
A profile can only be attached to a single object. If you use multiple line items, you need to create a profile for each one.
Make sure objects stay inactive until you want to spend money
To avoid accidentally spending before your setup is complete and validated, set the state field on all spending objects to inactive. Reset it to active whenever you're ready to go ahead with spending on the specified start dates.
Buy-side API setup overview steps
To successfully set up your advertising campaigns with minimal rework and decrease the risk of overspending, create the advertiser first, then all the non-spending objects, and finally the insertion order and line item.
Create the advertiser object using the advertiser service, and make a note of the advertiser ID. (You'll use it to create all the other objects.)
Create all the non-spending objects (except a profile) you will need to structure your bidding. These can include:
- One or more creatives (the ad(s) to be served)
- A conversion pixel to identify views and clicks where a desired customer action occurred
- A segment pixel to identify the demographic segment a customer belongs to
- A domain list to specify which domains to allowlist or blocklist
Create a profile that will focus your spending to target only the segments, demographics, times, and so on where you expect your advertising to be effective. Make a note of the profile ID.
Create a seamless insertion order, and make a note of the insertion order ID as well as the ID of the
budget_intervalsarray.Create an augmented line item. To create the JSON for the line item, you'll use the IDs from all of the previous four steps.
Note
Make sure you keep track of the ID returned as you create each object. If you forget to keep track of your ID, you can always make a GET call to the appropriate service to look it up. Keep in mind, however, that you do have rate limits, so you'll want to be sure you're being efficient in your API calls.
Creating the advertiser
Use a POST to the advertiser service to set up an advertiser.
In this example we've left most of the advertiser fields out, so they will be set to their default values. However, we've explicitly included the use_insertion_orders field and set it to "true", because the augmented line item requires using insertion orders. If this value isn't set to "true", you won't be able to create an insertion order successfully. See the Advertiser Service documentation for more information.
Create a JSON file containing the name of the advertiser and its status as shown in the example.
{
    "advertiser": {
        "name": "Advertiser 1",
        "state": "active",
        "use_insertion_orders": "true"
        "default_currency": "USD"
    }
}
Note
We've set the advertiser state to "
active". You might prefer to initially set the state of all objects to"inactive"to ensure you don't begin spending before your advertiser is ready. Thedefault_currencysetting establishes the currency for billing.Send a POST request to the advertiser service, specifying the name of the JSON file.
curl -b cookies -X POST -d @advertiser.json 'https://api.appnexus.com/advertiser'You've created an advertiser named Advertiser 1. (Advertiser names are required to be unique, so remember to change this value when you create test advertisers.)
Creating non-spending objects (Part 1)
Use POST commands to the pixel, segment, and domain-list services to generate pixels for conversion events and segments, and to define domains whose inventory you'll include or exclude from bidding. Non-spending objects, unlike the line item and insertion order, don't define spending and therefore can be created in any order without any worries about creating dependencies or bidding accidentally. We cover the profile separately because of its complexity.
Note
Make sure you keep track of the ID returned as you create each object. If you forget to keep track of your ID, you can always make a GET to the appropriate service to look it up. Keep in mind, however, that you do have rate limits, so you'll want to be sure you're being efficient in your API calls.
Post the creative(s) for the ad(s) you want to serve, using the creative service. You'll need the Advertiser ID to do this.
Create the JSON file. (We named ours creative.json). The contents of the creative.json file depend on the type of creative. There are numerous options; too many to go over here. See Creative Service to find out more about the types of creatives and how to build a JSON file to create them.
Use the following command to post the creative.
curl -b cookies -X POST -d @creative.json 'https://api.appnexus.com/creative?advertiser_id=10'
Use the pixel service to generate a conversion pixel and associate it with the advertiser. You'll need the Advertiser ID to do this. See Pixel Service for more information.
Create the JSON file (we named ours conversionpixel.json) as shown in the example:
{
    "pixel": {
        "name": "Conversion Pixel 1",
        "state": "active",
        "trigger_type": "click",
        "post_click_value": 8
    }
}
Use the following command to generate the pixel.
curl -b cookies -X POST -d @conversionpixel.json 'https://api.appnexus.com/pixel?advertiser_id=10'
Use the segment service to generate an ID to create segment pixels, which are placed on inventory pages to enable segment targeting. Segment targeting gives you the ability to target users based on the segments they belong to. Users are generally added to segments based on an action, such as clicking on a creative. You'll need the Advertiser ID to create a segment pixel. For more information, see Segment Service.
Create the JSON file (we named ours segmentpixel.json) as shown in the example.
{
    "segment": {
        "state": "active",
        "short_name": "Segment Pixel 1"
    }
}
Use the following command to generate the pixel.
curl -b cookies -X POST -d @segmentpixel.json 'https://api.appnexus.com/segment?advertiser_id=10'
Use the inventory-list and inventory-list-items services to create an inventory list. Inventory lists allow you to create allowlists or blocklists, which determine which domains or apps your line items can spend on. Allowlists contain domains and apps that you want to include in your campaign targeting, and blocklists contain domains and apps that you want to exclude. For more information, see the Inventory List Service and Inventory List Item Service documentation. You'll create an empty inventory list first, then update it to add items.
Note
If you want to put domains and apps in both an allowlist and a blocklist, you will need two different inventory lists.
Create the JSON file (we named ours inventory-list.json) as shown in the example. Domains you upload must generally conform to the URI spec to be accepted by our API. In practical terms, you probably don't need to worry about this requirement unless you're trying to upload Internationalized Domain Names. In this case, you should ensure that domain names including non-ASCII characters are encoded using Punycode before upload.
{
    "inventory-list": {
        "name": "Inventory Blocklist 1",
        "description": "Domains to exclude",
        "inventory_list_type": "blocklist"
    }
}
Use the following command to create your inventory list.
curl -b cookies -X POST -d @inventory-list.json 'https://api.appnexus.com/inventory-list'Create another JSON file (we named ours inventory-list-items.json) as shown in the example:
{
    "inventory-list-items": [
        {
            "url": "competitor-url.com",
            "include_children": true
        }
    ]
}
Add the inventory list item using the following command:
curl -b cookies -X POST -d @inventory-list-items.json 'https://api.appnexus.com/inventory-list/7009/item'
Creating non-spending objects (Part 2: Profile)
Use a POST command to the profile service to define times, places, allowed and blocked domains, and other criteria that will help you narrow the scope of your bidding, ensuring Xandr targets the inventory that will get you the best results. You should create the profile after you've defined the other non-spending objects, because objects like segments and inventory lists are often used to create the profile. If you don't define these objects first, you'll need to add them to the profile later. More importantly, if you launch your line items without targeting, you risk wasting budget on impressions that don't contribute to your campaign results. For more information, see Profile Service.
Note
To successfully create an augmented line item, you need to specify a geographic target in the profile. For more information, see Profile Service.
Create a JSON file containing the definitions you want to act on, as well as the action (include or exclude) that you want to take for each definition. We named ours profile.json.
{
  "profile": {
    "segment_group_targets": [
      {
      "segments": [{
        "id": 13886564,
        "action": "include",
        "name": "Segment Pixel 1"
      }]
    }],
    "inventory_url_list_targets": [{
      "id": "7033"
    }],
    "country_action": "include",
    "country_targets": [{
      "id": 233,
      "name": "United States",
      "code": "US"
    }]
  }
}
In this example, we've used the segment pixel (Segment Pixel 1) that we created in Step 2. This profile targets users included in that segment. It also ensures this profile will use the blocklist specified in the Inventory List you created, and that spending will target United States inventory only.
Send a
POSTrequest to the profile service as shown in the following example.curl -b cookies -X POST -d @profile.json 'https://api.appnexus.com/profile?advertiser_id=10'
Creating the insertion order
Use a POST command to the insertion-order service to define total budget, pacing, and other higher-level rules that you want to apply to every one of your line items.
The insertion order is a spending object: it determines how much money can be spent, the period of time over which it can be spent, and the terms on which the advertiser will pay for ad impressions. The settings you specify in the insertion order are inherited by all the line items you create for this insertion order (in other words, for all the campaigns that will run based on it), so you should specify only settings you don't want to differentiate at the line item level. For more information, see Insertion Order Service. Make sure you are following the instructions for a seamless insertion order.
Create a JSON file specifying the minimum settings you want to enforce for all line items in the insertion order. We named ours insertion-order.json. The following example shows that the budget will be controlled in terms of revenue rather than impressions; that the insertion order covers the first two weeks of January in 2019; that the lifetime budget is set at $20,000; and that this budget should be spread across the entire life of the insertion order. Line items will have to honor these constraints.
{
 "insertion-order": {
 "name": "Insertion Order 1",
 "budget_type": "revenue",
 "budget_intervals": [
 {
 "start_date": "2019-01-01 00:00:00",
 "end_date": "2019-01-15 23:59:59",
 "enable_pacing": "true",
 "lifetime_budget": "20000",
 "lifetime_pacing": "true"}]
 }
}
Note
You'll notice that the dates, total budget, and pacing are placed inside the
budget_intervalsarray. This placement is required for a seamless insertion order, which is in turn required if you want to use the augmented line item. If you set budgeting criteria such as thestart_dateandend_dateat the top level of the insertion order code rather than insidebudget_intervals, your insertion order will be incompatible with your line item, and you will have to re-create the insertion order with a new name. See Insertion Order Service for more detailed information.Send a
POSTrequest to the insertion-order service, specifying the name of the JSON file as shown in the example.curl -b cookies -X POST -d @insertion-order.json 'https://api.appnexus.com/insertion-order'
Creating the line item
Use a POST command to the line-item service to set up line item that defines your targeting, optimization and bidding strategies as well as any budgeting criteria not already defined in the parent insertion order.
As the most complex spending object, the line item ties together your insertion order, your profile, and any other non-spending objects you created to complete the picture for one or more slices of your campaign spending. You can create multiple line items under a single insertion order. Note that you can't override settings that have been created above the line item level. For example, you can't create budget intervals outside the intervals defined in the parent insertion order. You'll also be attaching the profile we created in step 3 to this line item by assigning the profile ID to the profile_id field.
Note
When you specify the budget intervals, you must include the parent_interval_id from the parent insertion order. Otherwise, you may not be able to post your line item.
For more information, see Augmented Line Item Service documentation.
Create a JSON file specifying the settings you want to include in the line item as shown in the example. We named ours line-item.json.
Note that the
line_item_typeis set tostandard_v2, indicating that this is an augmented line item.{ "line-item":{ "name":"Line Item Example 1", "state":"inactive", "ad_types":[ "banner" ], "advertiser":{ "id":2724036, "name":"Advertiser_example_1" }, "insertion_orders":[ { "id":866534 } ], "budget_intervals":[ { "start_date":"2019-01-01 00:00:00", "end_date":"2019-01-08 23:59:59", "lifetime_pacing":false, "enable_pacing":false, "parent_interval_id":3159443 } ], "manage_creative":true, "creatives":[ { "id":108159983 } ], "pixels":[ { "id":1014869 } ], "goal_type":"cpa", "goal_value":null, "goal_pixels":[ { "id":1014869, "post_click_goal_target":5, "post_click_goal_threshold":5 } ], "line_item_type":"standard_v2", "profile_id":105327068, "revenue_type":"cpm", "revenue_value":2.00, "supply_strategies":[ { "rtb":true, "managed":false, "deal":false } ], "valuation":{ "goal_target":3.0, "goal_threshold":null } } }Send a
POSTrequest to the insertion-order service, specifying the name of the JSON file.curl -b cookies -X POST -d @line-item.json 'https://api.appnexus.com/line-item?advertiser_id=10'