Note
Access to this page requires authorization. You can try signing in or changing directories.
Access to this page requires authorization. You can try changing directories.
Important
This guide only applies to the legacy line item. If you are using the augmented line item (ALI), see Optimization Guide - ALI.
We built the Campaign Monitor to help campaign managers and ad operations teams view delivery and performance of line items and campaigns at-a-glance. The Campaign Monitor allows you to quickly view which line items and campaigns are on track for performance and delivery and which may need a little more attention to get back on track. The Campaign Monitor also allows you to dig into line item and campaign setup quickly and easily. You can go directly from the Campaign Monitor to the line item or campaign in question to view and edit targeting details and campaign settings.
At-a-glance
To open Campaign Monitor, select Advertiser > Campaign Monitor. Note that this option is not available for all customers.
You can view metrics for the lifetime of a line item or for yesterday. Metrics are based on the local time for your network. Data is current to within approximately one hour.
To view the available metrics, click the Columns button to drop down a list of metrics you can choose to display in the Campaign Monitor grid.

The following metrics are selected by default:
Impressions: Impressions served in the allotted time period.
Clicks: Clicks in the allotted time period.
Conversions: Conversions attributed in the allotted time period.
Revenue: How much money the network made for the line item or campaign.
Media Cost: How much money the network spent on inventory.
Revenue Type: How the advertiser is paying the network.
CTR: If you have a budget and are bidding on a CPC basis, we can calculate if you are on pace or not.
Days Into Flight: How many days the line item or campaign has been live and how many days are left.
Estimated End Date: The estimated end date for the line item or campaign based on past performance.
You can also choose to view these additional metrics:
eCPM: How much money the network spent per thousand impressions.
eCPC: How much money the network spent per click.
eCPA: How much money the network spent per conversion.
Lifetime Budget: The lifetime budget in dollars.
Lifetime Budget Impressions: The lifetime budget in impressions.
Lifetime Budget Remaining: How many dollars of the lifetime budget are remaining.
Lifetime Budget Remaining Impressions: How many impressions of the lifetime budget are remaining.
Daily Budget: The daily budget in dollars.
Daily Budget Impressions: The daily budget in impressions.
Network Profit Margin: The profit expressed as a percentage of revenue.
Priority: The priority that determines when an impression will serve compared to other impressions.
Profit: How much money the network made after cost.
Post-View Conversions: Post-view conversions attributed in the allotted time period.
Post-Click Conversions: Post-click conversions attributed in the allotted time period.
Start Date: The actual start date for the line item or campaign.
End Date: The actual end date for the line item or campaign.
Revenue eCPM: How much money the network made per thousand impressions.
Imps Expected: How many impressions should have served to date if impression budget were paced evenly over the lifetime of the line item or campaign.
Media Cost Expected: How much money the network should have spent to date if budget were paced evenly over the lifetime of the line item or campaign.
Revenue Expected: How much money the network should have made to date if budget were paced evenly over the lifetime of the line item or campaign.
You can select to Show stats for either the Lifetime of the line item or campaign or from Yesterday. Yesterday is based on local time for your member.
Exporting campaign monitor
You can export Campaign Monitor results to a CSV file if you want to do more in-depth analysis or you have your own tools (such as tools you've built into Microsoft Excel). Click the Export dropdown, give your file a name (or leave the default), and click Export.
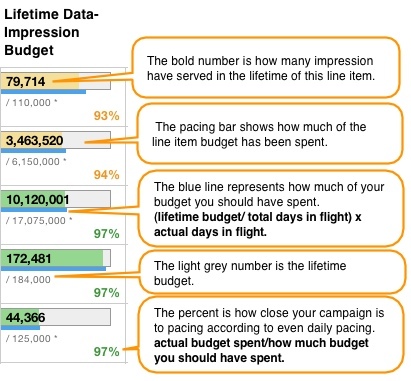
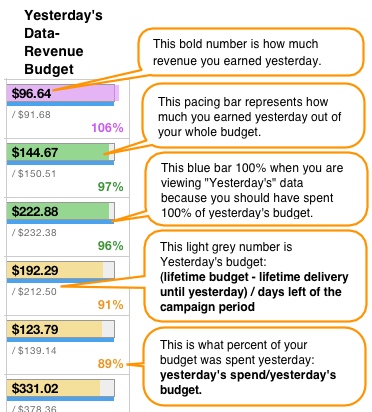
Pacing bars
The Campaign Monitor gives you a visual of line item and campaign delivery by using pacing bars. Pacing bars are displayed any place you've set a budget. The pacing bar is used to gauge how far along you are in your budget compared to where you should be. It also tells you what % you are pacing to.
The color of the pacing bar is also based on how close you are to pacing so you can quickly view a line item or campaign's health. If your pacing bar is grey it's because we don't have flight dates for the line item or the campaign and therefore, cannot determine how far along the line item or campaign should be. If you'd like to see the line item or campaign pacing compared to expected pacing, please read Getting the Most out of Campaign Monitor, below.
| Lifetime Pacing Bar | Yesterday Pacing Bar |
|---|---|
|
|
Personalizing your pacing bars
You can change the colors and ranges on your pacing bars. Click the pacing bar arrow to open the Customize pacing target colors and ranges dropdown. Moving the range sliders and select the colors you want, then click Save Settings.
Filtering
Click the +Filter button to select which line items to display in the grid. You can filter on Advertiser, Insertion Order, Name/ID, Sales Rep, and Trafficker. The filter allows you to easily find line items that are relevant to you. Filters will not be applied until you select the type of filter (such as Advertiser) and the individual advertisers, insertion orders, etc. that you want to filter on.
You can also filter which line items display in the grid by their "last served date."
Alerts
Alerts allow you to quickly see which line items are not serving. By default, the Campaign Monitor pulls in any line item or campaign that has served in the last 14 days, since we do not want to make assumptions about whether or not a campaign or line item is supposed to be serving or not. The monitor pulls in line items and campaigns that have not been serving for some time, so we needed to differentiate between campaigns that are eligible to serve but are not serving (Alert !), and campaigns that are not eligible to serve and are not serving (Paused). Hover over an alert icon the see the Status of that alert.
Pauses:
- A campaign or line item is inactive.
- One or more parent objects is inactive.
- The start date is in the future or end date is in the past.
- Lifetime or daily impression budget is met.
Alerts:
- Lifetime or daily budget is set to "0."
- No creatives associated with this campaign or if no creative is eligible.
Viewing campaigns
You can view metrics for all campaigns associated with a line item by clicking on the Campaigns+ button in the Line Items column. This will list the campaigns associated with that line item, along with the campaign pacing and performance information.
Details pane
By clicking the Details button for any line item or campaign, the Campaign Monitor allows you to dig deeper into line item and campaign performance with graphs and setup details. You can also click through directly to the line item or campaign from the details pane, which allows you to review settings that may be hindering delivery or performance.
Graphs
In the details pane, you can view expected metrics compared to actual metrics based on a cumulative lifetime view and an individual day view. Click on the button in the Metrics section that corresponds to the metric you want to see in graph view.
| Cummulative Lifetime Metrics | Last 14 individual Day Metrics |
|---|---|
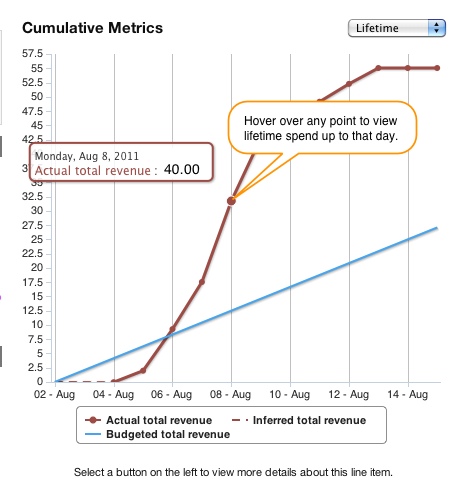
|
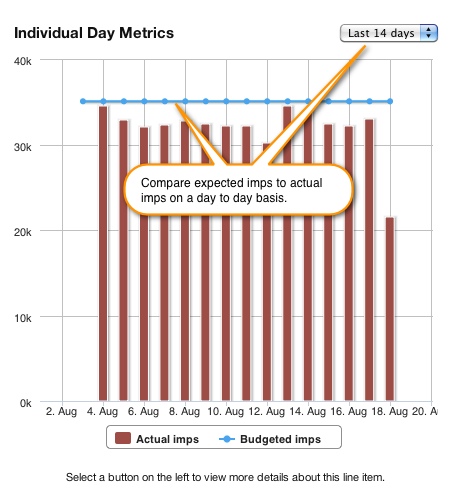
|
Line item or campaign settings
The details pane displays the most prominent line item or campaign settings. You can also easily click through directly to the line item or campaign in question by clicking the Edit settings for this line item (or campaign) option at the bottom of the details pane.
You can also click through directly to any creatives that may be causing alerts. Click the Status button to see alert details.
Getting the Most out of Campaign Monitor
There are a few tweaks you can make during line item and campaign set up to improve how helpful the Campaign Monitor is to you.
Display of pacing bars
Pacing bars can only be displayed if we can decipher how long the line item or campaign will run and how much budget you have for that time (whether an impression budget, a revenue budget, or a media cost budget). Putting in definitive flight dates at the line item level or on all campaigns will allow you to view a pacing bar. Also, setting lifetime budgets, as opposed to choosing "unlimited," will also allow us to display more information in the pacing bar. Setting these budgets at the line item level is best, but if that doesn't fit the model of your business, setting a budget on all campaigns associated with a line item allows us to add up the campaign budgets to create a line item level.
Days into flight
You must set flight dates on the line item level or on all campaigns to be able to view days into flight information. Flight dates are also necessary to view pacing bars.