Note
Access to this page requires authorization. You can try signing in or changing directories.
Access to this page requires authorization. You can try changing directories.
Tables are used to model and manage business data. When you develop an app, you can use standard tables, custom tables, or both. Power Apps provides an easy way to view, create, and edit tables for Microsoft Dataverse.
Prerequisites
To create and edit tables in Dataverse, you need the following:
- A Power Platform environment with Dataverse.
- Appropriate permission that includes both of the following privileges:
- The system customizer security role in the environment. Note that, apart from self-created table records, the system customizer role doesn’t have the privileges to access table records that aren’t shared with them. More information: Environments with a Dataverse database.
- A system or custom security role that has Create, Read, and Write privileges to the Entity table. These privileges allow the user to create and edit tables in Dataverse. Note that a Power Platform admin must grant the user data access to edit the rows of these tables.
View tables
Sign into Power Apps, and then select Tables on the left navigation pane. If the item isn’t in the side panel pane, select …More and then select the item you want.
Filter the tables that are displayed using the following tabs:
| View | Description |
|---|---|
| Recommended | Displays only the standard tables. Standard tables are tables included with Power Apps or Dynamics 365 apps. |
| Custom | Displays only custom tables. Custom tables are created by you and other app makers. |
| All | Displays all the tables. |
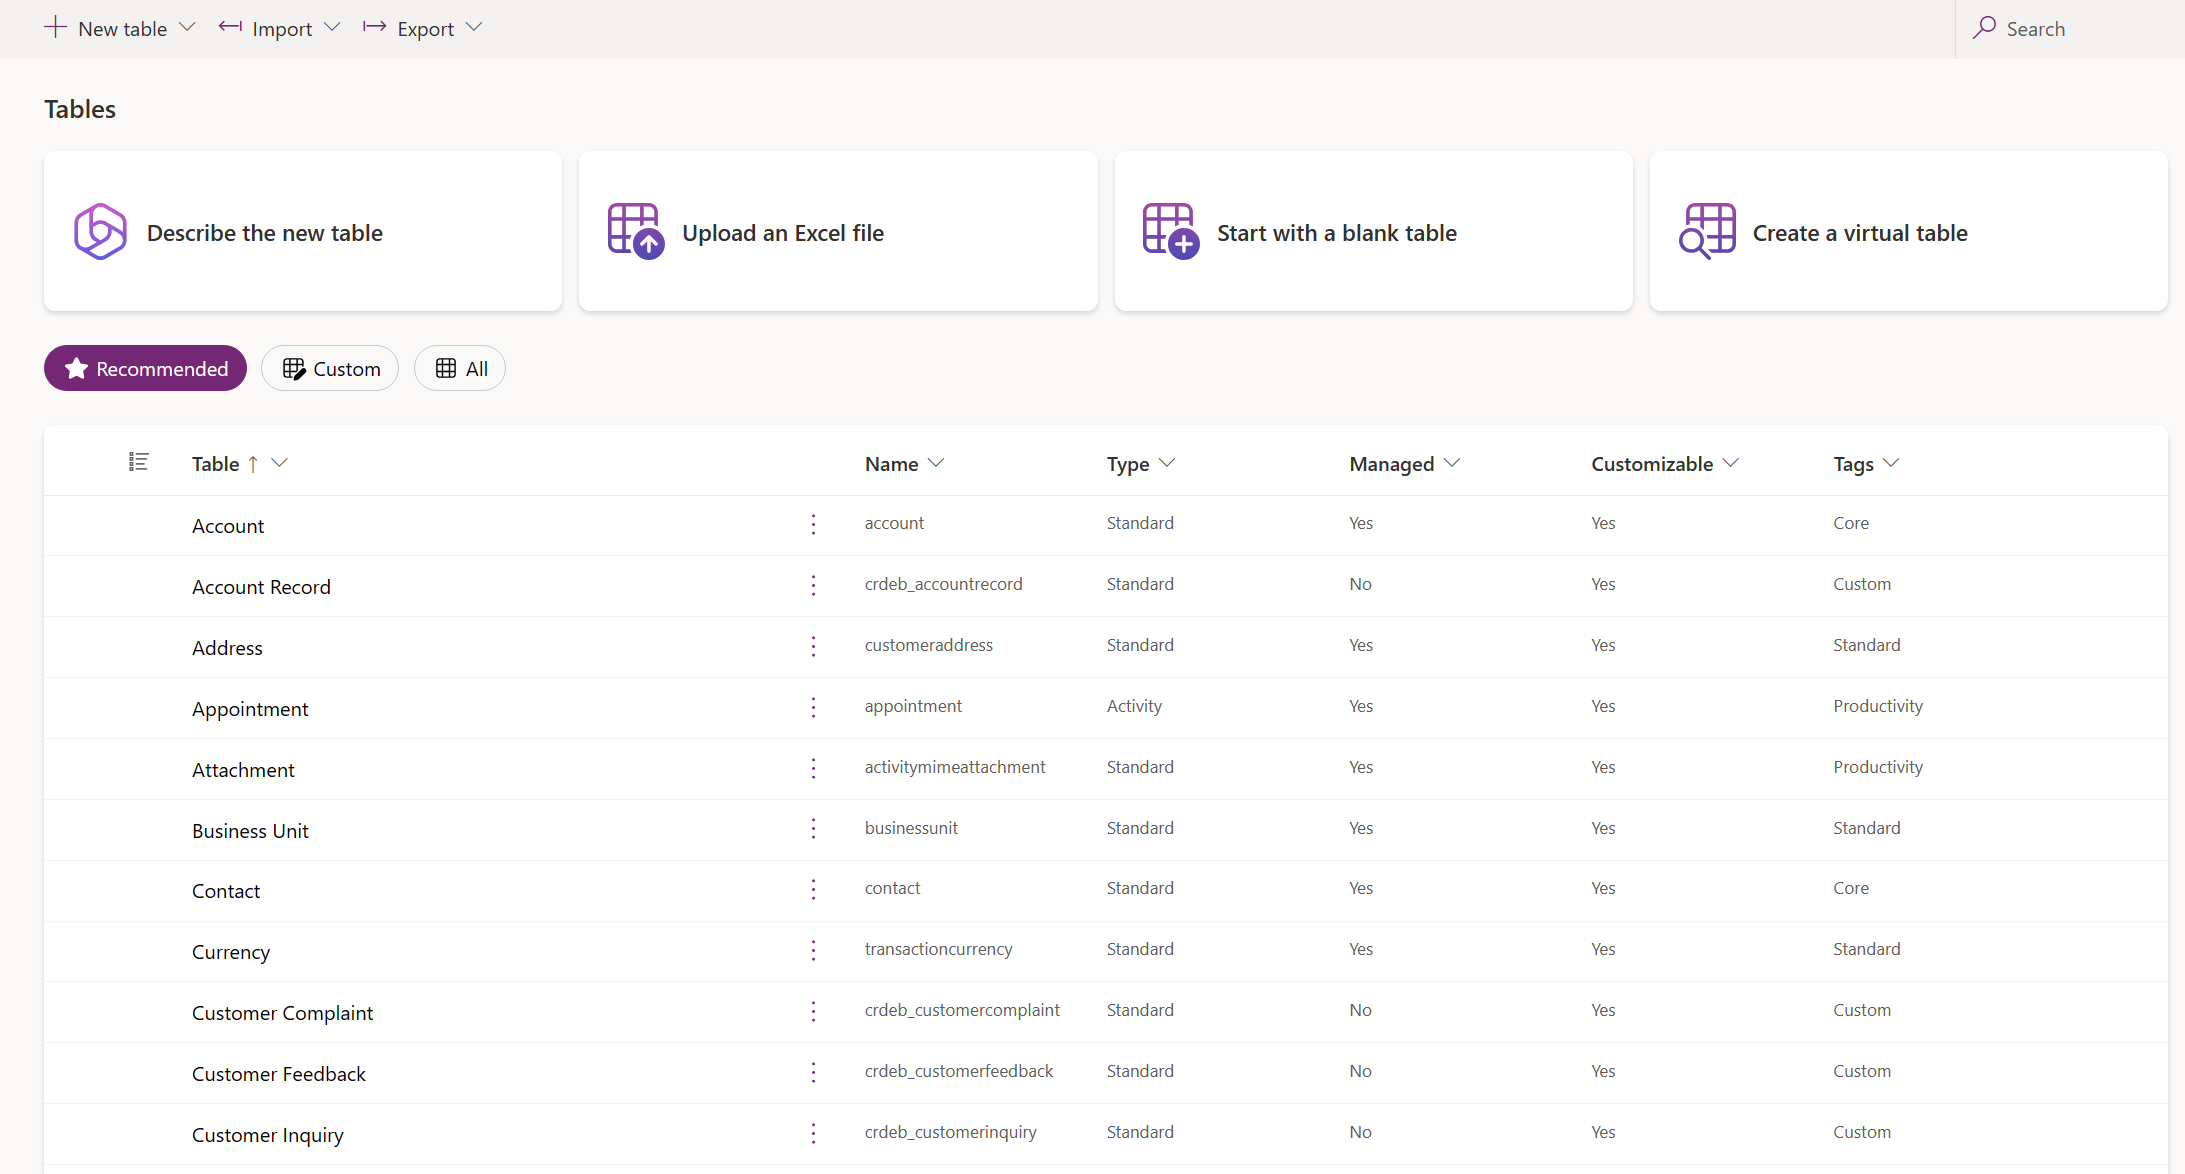
You can also select a column heading from the table view, and then select Filter by to display tables by a certain property, such as Type, Managed, or Tags.
Create a table
There are several ways to create a new table:
Create new tables
Use the data workspace experience where you create tables, configure table relationships, and can view a diagram of your data.

Command bar:
- Back. Takes you back where you were in Power Apps.
- New table. Create a new table using any of the methods described in this article.
- Existing table. Add one more more existing tables and visualize them in the designer.
- Hide data or View data. Closes or displays the table row editor.
- Create relationships. Creates a table relationship between two tables. Select a table on the canvas and CTRL + click another table, then select Create relationships. More information: Types of table relationships (NOTE: many-to-many relationships aren't supported)
- Remove. Deletes the table and all associated table rows when a new table is selected. Remove doesn't delete the table and associated rows when an existing table is selected.
Data workspace canvas. On the data workspace canvas, you can drag tables around the data workspace to relocate them and select ... to invoke the table actions menu, and view a diagram of your data.
Data workspace actions:
- +. Zoom in to increase the size of the table objects on the canvas.
- -. Zoom out to decrease the size of the table objects on the canvas.
- Fit view. Resize to fit within the available space in the browser tab.
- Show map or Hide map. When Show map is selected, displays a compact representation of the tables on the canvas.
Table actions menu:
- Hide data or View data. Closes or displays the table row editor.
- Row ownership. Select the ownership type as either user or team, or organization.
- Properties. Edit the table display name, plural name, description, and schema name.
- Remove. Remove the table and all associated rows. If the tables is a new table, all data is deleted. For existing tables, that table is only removed from the table designer and no data is removed.
Table row editor. In this area, create new, edit, or delete rows, create new columns, change the table ownership type, and edit table properties.
Show more or less column. You can select and clear the columns to be displayed in the table card. Also displays or hides the relationship for lookup columns that connect to another table currently in the designer.
Add new relationship handle. Drag the handle and create a new relationship by pointing it towards another table. Some relationship types are currently not supported. More information: Limitations using the data workspace
Tip
Can't find the tables you created on the canvas? Select Fit view on the data workspace actions menu.
Create a table with the visual table designer by using any of the following methods:
Start with Copilot
Describe your data in natural language and Copilot generates tables along with relationships for you.
Note
To use this feature, note the following requirements:
- Copilot must be enabled for the environment. By default, Copilot is enabled. More information: Manage feature settings
- This feature is available in 20 languages including Danish, Dutch, English (United States), French, German, Italian, Japanese, Portuguese (Brazil), Spanish, Chinese (Simplified), Czech, Finnish, Greek, Korean, Norwegian (Bokmål), Polish, Russian, Swedish, Thai, and Turkish. Depending on where your environment is hosted, you might need to enable data movement across regions. For more information go to Copilots and generative AI features that are available when you enable data movement across regions.
- From the Choose an option to create tables page, select Start with Copilot.
- Describe the tables you'd like to create with the assistance of Copilot. You can also specify the number of tables to create, size of table, and whether to include relationship by configuring the Table options menu.
- Keep iterating with Copilot in the Copilot panel until you're satisfied with your data. More information: Review the table
- When you're finished, select Save and exit.
Limitations using the data workspace
The following data types aren't currently supported when you create a column in the data workspace:
- Rich text
- Customer
- Autonumber
- Formula
Some relationship configurations are currently not supported.
| Starting table | Targeting table | Relationship type | Status |
|---|---|---|---|
| New | New | One-to-many | Supported |
| New | New | Many-to-one | Supported |
| New | New | Many-to-many | Not supported |
| Existing | New | One-to-many | Supported |
| Existing | New | Many-to-one | Not supported |
| Existing | New | Many-to-many | Not supported |
| Existing | Existing | One-to-many | Not supported |
| Existing | Existing | Many-to-one | Not supported |
| Existing | Existing | Many-to-many | Not supported |
Set advanced properties
From the Tables area, on the command bar select New table > Set advanced properties. This opens the New table properties panel. You start with a blank table and enter the table properties, such as name, and description. Expand Advanced options to set more properties, such as track changes and audit changes.
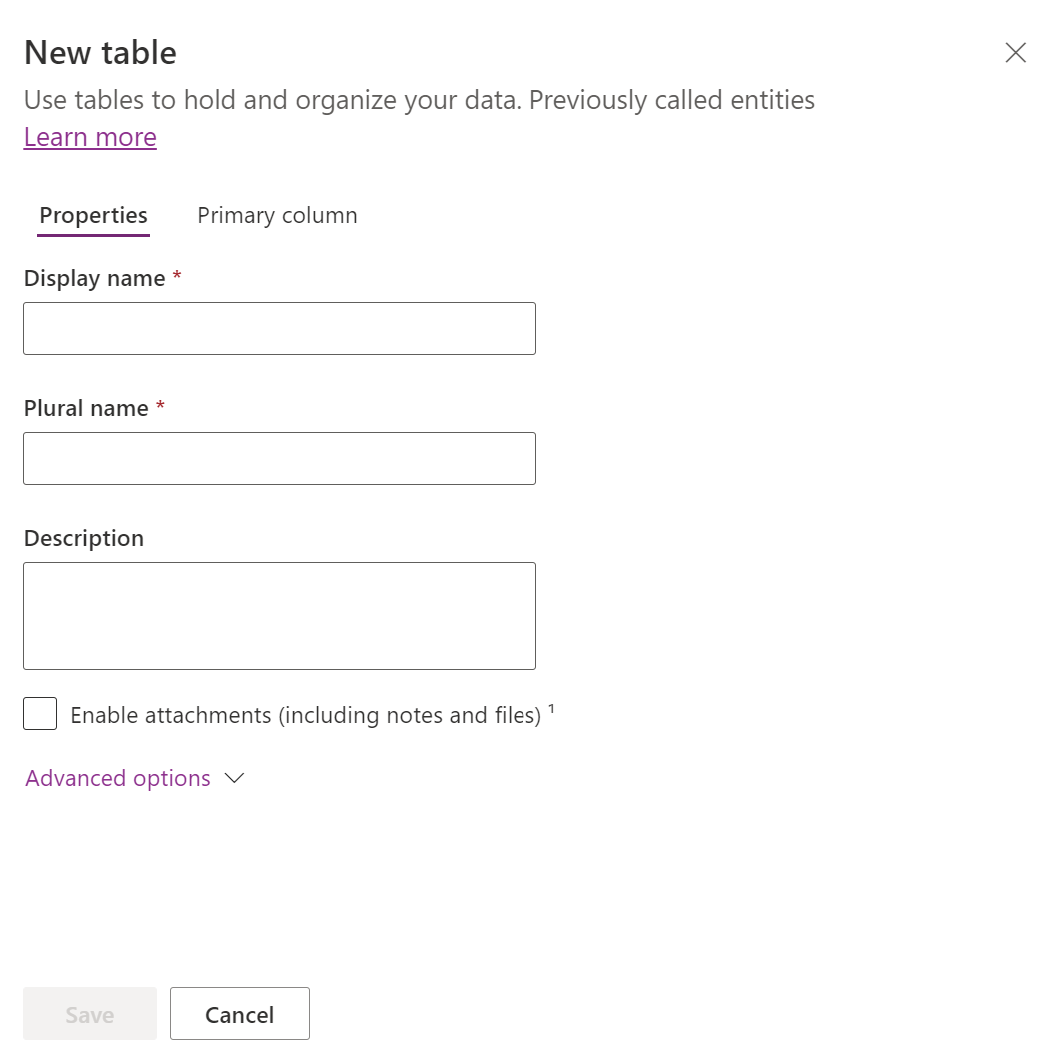
Table properties
Enter data for the following properties.
| Property | Description |
|---|---|
| Display name | This is the singular name for the table that is shown in the app. This can be changed later. |
| Plural display name | This is the plural name for the table that is shown in the app. This can be changed later. |
| Description | Provide a meaningful description of the purpose of the table. |
Select Enable Attachments to append notes and files to records for this table.
Select the Primary column tab if you want to change the Display name or Description of the primary column. The primary column is used by lookup fields when establishing relationships with other tables.
Important
After you save the table, the Primary column display name and description can't be changed.
Advanced options
Select Advanced options to display additional properties that are optional for a table.
| Property | Description |
|---|---|
| Schema name | By default, the schema name is automatically created for you based on the display name, but you can change it. The schema name can't contain spaces and includes the customization prefix for the Dataverse solution publisher. You can't change this after the table is saved. |
| Type | Select the type of table. Use standard for most tables. Activity tables are a special table that can only be owned by a user or team, but can't be owned by an organization. Virtual tables require the table be populated with data from an external source. Elastic tables should be considered when your business scenario entails very large data volumes with high throughput, storage, and low latency requirements. |
| Record ownership | Switch the table type to Activity table to create tables that can manage tasks. The type of Ownership defines who can perform operations on a record. |
| Choose a table image | You can choose whether to display an image for the table. This image is displayed in Power Apps in some design areas. Notice that the image doesn't appear in apps using the table. To display images in apps, use the image column. More information: Image columns |
| Color | Set a color to be used for the table in model-driven apps. |
| Apply duplicate detection rules | If duplicate detection is enabled for your organization, enabling this allows you to create duplicate detection rules for this table. |
| Track changes | Enables data synchronization in a performant way by detecting what data has changed since the data was initially extracted or last synchronized. This option must be enabled for certain features such as Azure Synapse Link for Dataverse. |
| Provide custom help | When selected, set a Help URL to control what page users see when they select the help button in the application. Use this to provide guidance specific to your company processes for the table. |
| Audit changes to its data | When auditing is enabled for your environment, this allows for changes to table records to be captured over time. When you enable auditing for a table, by default, many table columns, such as data types of owner, number, text, and choice are enabled for auditing. However, some columns aren’t enabled by default such as those with data types of lookup, but those columns can be enabled. Select or clear the Enable auditing property for the columns that you want to enable auditing on. |
| Leverage quick create form if available | After you've created and published a Quick Create Form for this table, people have the option to create a new record using the Create button in the navigation pane. More information: Create and design model-driven app forms When this is enabled for a custom activity table, the custom activity is visible in the group of activity entities when people use the Create button in the navigation pane. However, because activities don't support quick create forms, the main form is used when the custom table icon is selected. |
| Enable long term retention | Dataverse supports custom retention policies to securely retain unlimited data long term in a cost-efficient way. More information: Long term data retention overview |
| Creating a new activity | Associate activities to records for this table. |
| Doing a mail merge | App users can use this table with mail merge. |
| Setting up OneNote integration | When you turn on OneNote integration, you have the benefits of using OneNote to take or review customer notes from within your records. Requires SharePoint document management to be set up. More information: Set up OneNote integration |
| Setting up SharePoint document management | After other tasks have been performed to enable document management for your organization, enabling this feature allows for this table to participate in integration with SharePoint. More information: Manage your documents using SharePoint |
| Can have connections | Use the connections feature to show how records for this table have connections to records of other tables that also have connections enabled. |
| Can have a contact email | Send emails using an email address stored in one of the fields for this table. If a Single Line of Text column with format set to email doesn't already exist for this table, a new one is created when you enable sending email. |
| Have an access team | Create team templates for this table. |
| Can be linked to feedback | Let app users write feedback for any table record, or rate table records within a defined rating range. More information: Configure a table for feedback/ratings |
| Appear in search results | Enable so that table records can be included in search results when using an app. |
| Can be taken offline | Makes data in this table available while the Power Apps application isn't connected to a network. |
| Can be added to a queue | Use the table with queues. Queues improve routing and sharing of work by making records for this table available in a central place that everyone can access. |
Select Save to continue. This action closes the New table panel and displays the table hub.
Create with external data
Use an Excel file/CSV file or SharePoint list to populate a table with your data, which uses copilot to assist with the table generation.
Note
- Generally available copilot features are enabled by default and can't be turned off. To disable them, a tenant admin must contact support.
- When you use create with external data, such as data from Excel or SharePoint, Power Apps initially displays only the first 20 rows of your dataset as a preview. The full dataset is ingested and made available after you save the table.
From the Tables area, on the command bar select New table > Create with external data, and then select either File (Excel, .CSV) or SharePoint list.
- Select from device or drag and drop your Excel file onto the Upload an Excel file page.
- The data from the Excel file is displayed as a Dataverse table. Select a column header > Edit column to make changes, such as the column name or data type.
- When you're finished, select Create.
For more information about how AI is used with this feature, go to FAQ for Excel to table and app.
SharePoint columns not used in Dataverse table generation
The following columns aren’t included when generating a Dataverse table from a SharePoint list because the respective data types aren’t supported with Dataverse:
- Image
- Task outcome
- External data
- Managed metadata
- Attachment (single)
- Multiple attachments / images
- SharePoint list system columns
- Symbol at column level (currency, prefix, postfix) in numbers
- Unique values
Create a virtual table
A virtual table is a custom table in Microsoft Dataverse that has columns containing data from an external data source, such as Azure SQL Database or SharePoint.
- From the Tables area, on the command bar select New table > Create a virtual table.
- Follow the New table from external data wizard to create the virtual table. More information: Create the virtual table
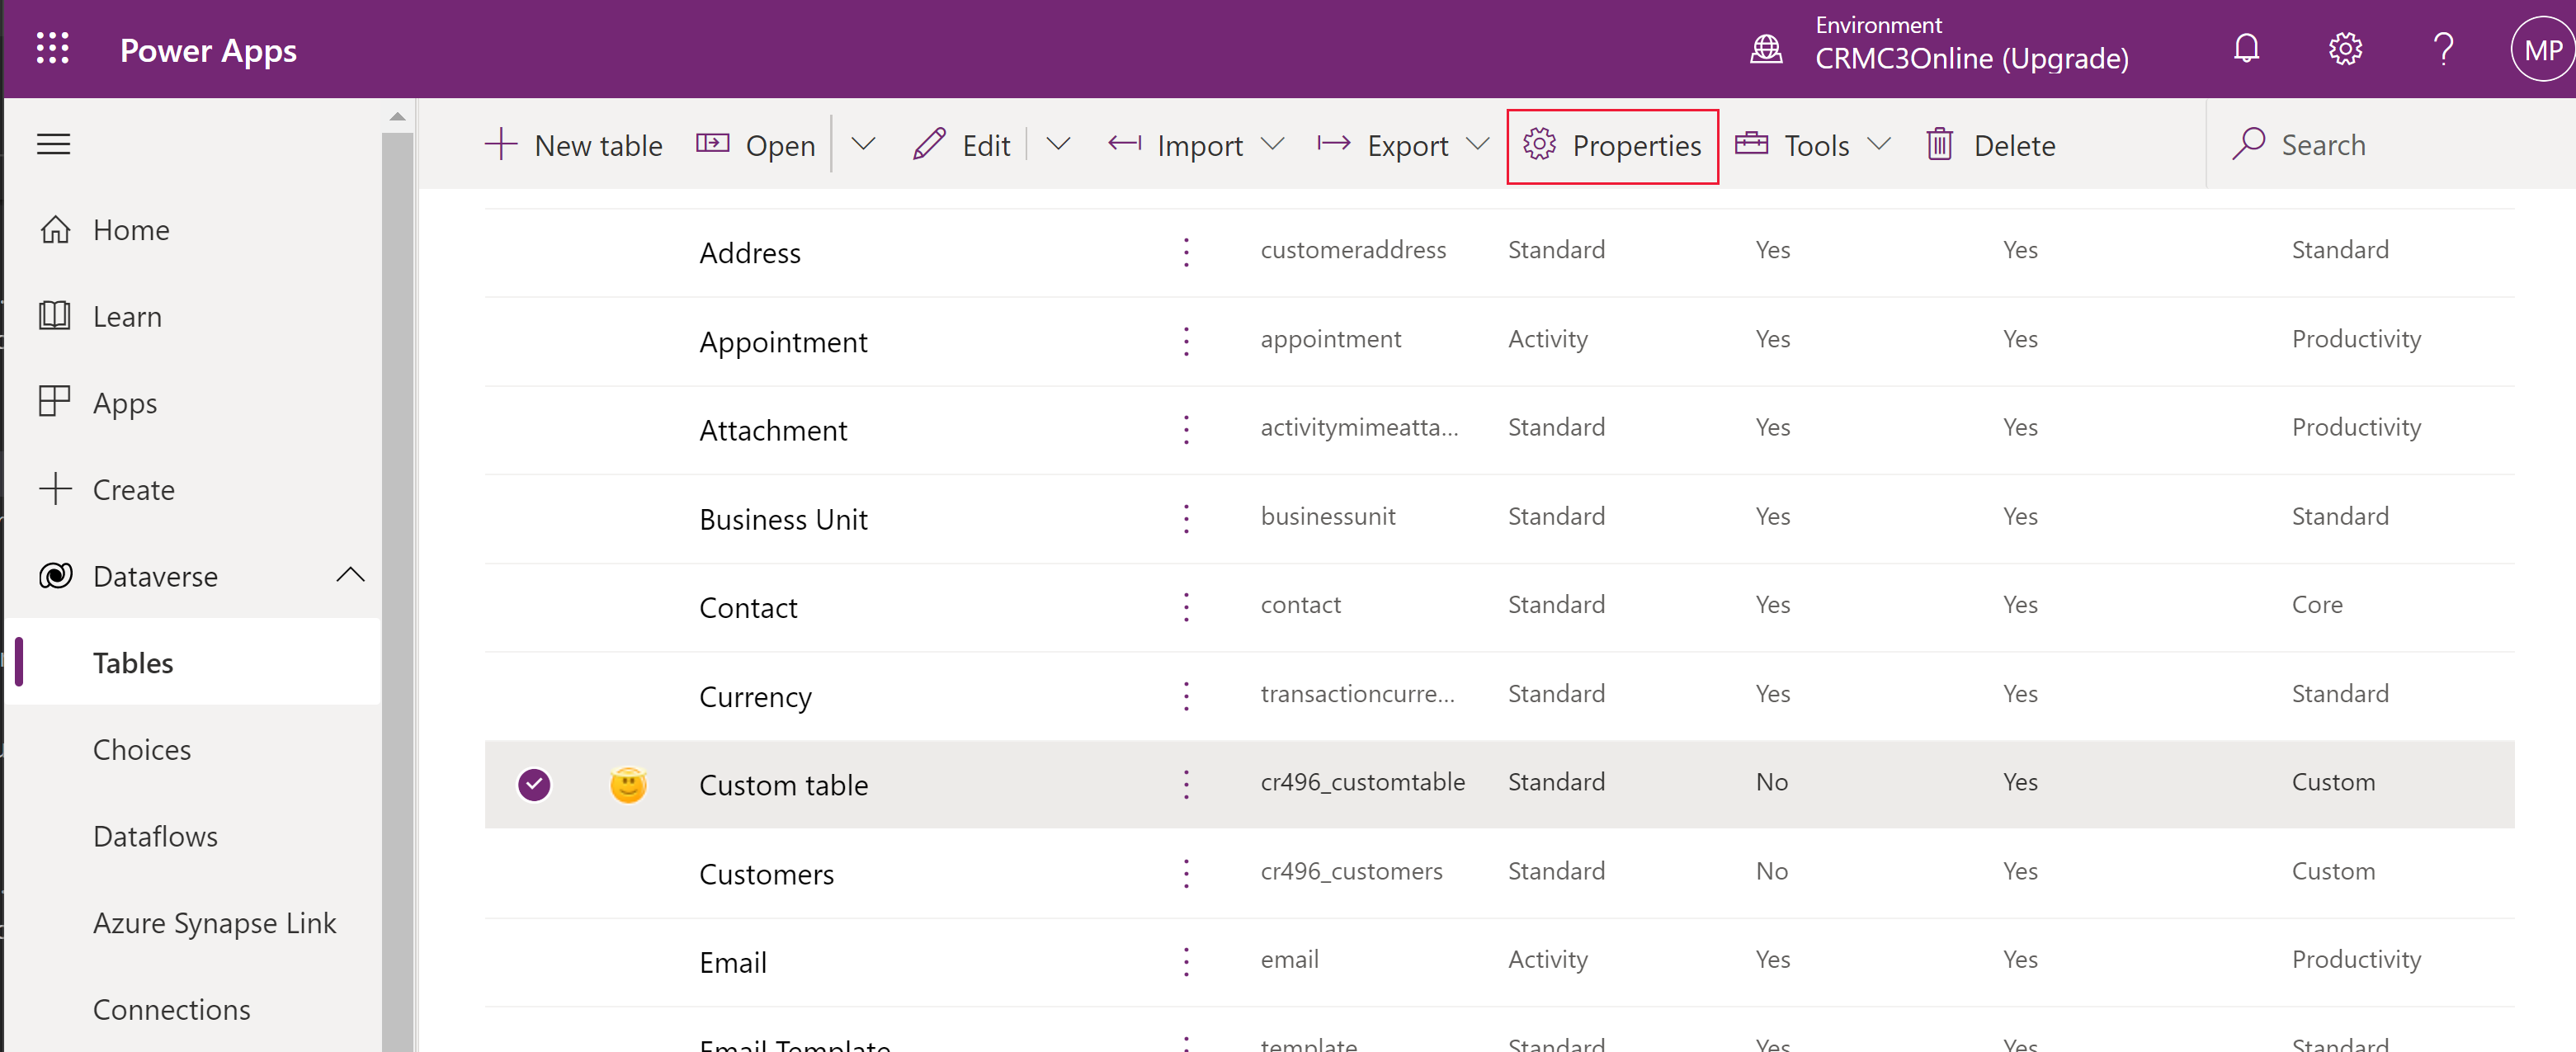
Edit a table
While viewing tables, select the table you want to edit, and then select Properties from the command bar if you want to edit the table properties.
Edit table components using the table hub
To edit form components, open the table to display the table hub. The table hub displays the table components described in the following sections.

Table properties
Displays a few common properties for the table. Select Properties on the command bar to edit the table properties.
Schema
From the Schema area, select from the following table components to open the area where you can view and open existing components or create a new one.
- Columns. More information: Create and edit columns
- Relationships. See Create and edit relationships between tables
- Keys. More information: Define alternate keys to reference rows
Data experiences
From the Data experiences area select from the following table components to open the area where you can view and open existing components or create a new one.
- Forms. More information: Create and design forms
- Views. More information: Create or edit a view
- Charts. More information: Create a system chart
- Dashboards. More information: Create or edit dashboards
Customizations
From the Customizations area, select from the following table components to open the area where you can view and open existing components or create a new one.
- Business rules. More information: Create business rules and recommendations to apply logic in a form
- Commands. More information: Customize the command bar using command designer
Table columns and data
View and create table record data for the table. Select the number of columns, such as +17 more, to select columns to display in the columns and data view.
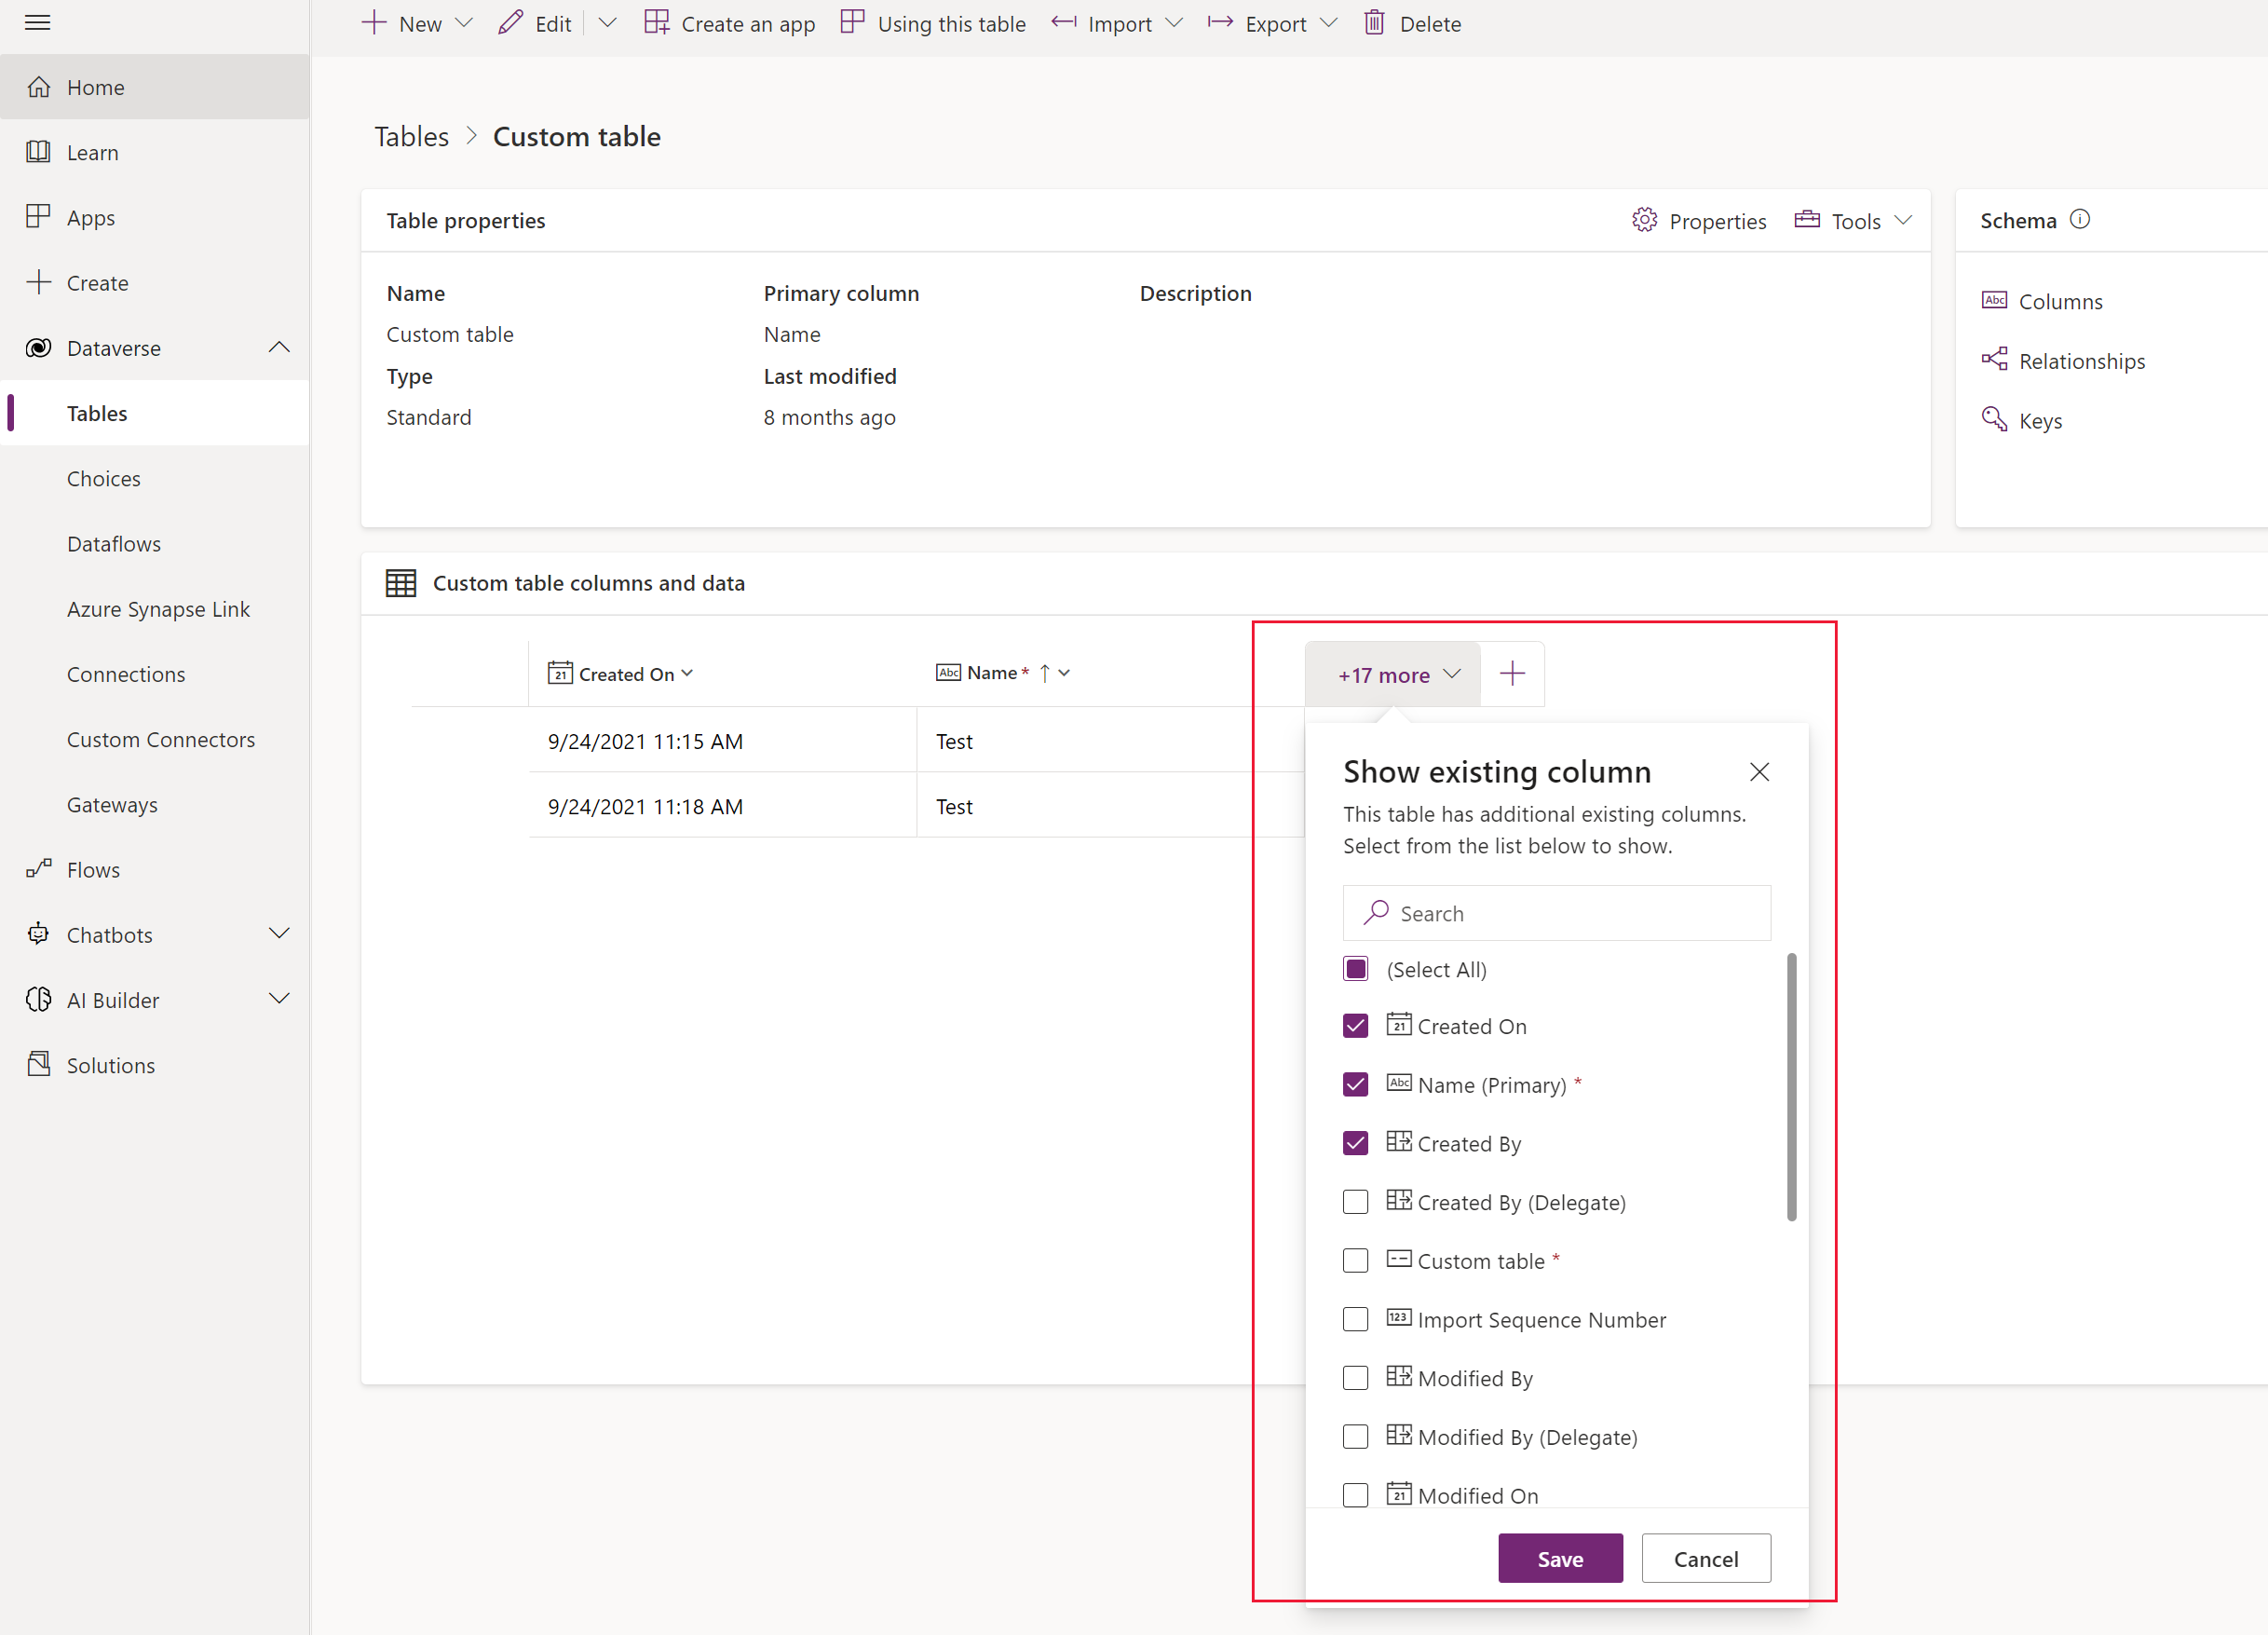
Table designer
From the table hub, select Edit to open the table designer. The table designer lets you make extensive changes to a table including editing or adding new records and columns, editing table properties, or creating a model-driven app based on the table.
Update forms and views
From the table hub, select Update forms and views to add selected columns to forms and views in this table without having to edit them in the form and view designers. More information: Update forms and views using table designer
Delete a table
As someone with the system administrator security role, you can delete custom tables that aren't part of a managed solution.
Warning
When you delete a custom table, the database tables that store data for that table are deleted and all data they contain is lost. Any associated records that have a parental relationship to the custom table are also deleted. For more information about parental relationships, see Create and edit relationships between tables.
The only way to recover data from a table that was deleted is to restore the database from a point before the table was deleted. More information: Backup and restore instances
While viewing tables, select the table, and then select Delete from the menu.
If the table has dependencies that prevent it from being deleted you see an error message. To identify and remove any dependencies, you need to use the solution explorer. More information Identify table dependencies