Note
Access to this page requires authorization. You can try signing in or changing directories.
Access to this page requires authorization. You can try changing directories.
In this tutorial, you go through the whole process of loading data into your workspace, and using deployment pipelines together with Git integration to collaborate with others in the development, testing, and publication of your data and reports.
Note
Some Git integration items are in preview. For more information, see the list of supported items.
Prerequisites
To integrate Git with your Microsoft Fabric workspace, you need to set up the following prerequisites for both Fabric and Git.
Fabric prerequisites
To access the Git integration feature, you need a Fabric capacity. A Fabric capacity is required to use all supported Fabric items. If you don't have one yet, sign up for a free trial. Customers that already have a Power BI Premium capacity, can use that capacity, but keep in mind that certain Power BI SKUs only support Power BI items.
In addition, the following tenant switches must be enabled from the Admin portal:
- Users can create Fabric items - require in case of Fabric artifacts use
- Users can synchronize workspace items with their Git repositories
- Create workspaces (only if you want to branch out to a new workspace.)
- Users can synchronize workspace items with GitHub repositories: For GitHub users only
These switches can be enabled by the tenant admin, capacity admin, or workspace admin, depending on your organization's settings.
Git prerequisites
Git integration is currently supported for Azure DevOps and GitHub. To use Git integration with your Fabric workspace, you need the following in either Azure DevOps or GitHub:
- An Active Azure DevOps account registered to same Fabric user (supported even if Azure DevOps organization reside in a different tenant than Fabric tenant). Create a free account.
- Access to an existing repository.
- Download the FoodSales.pbix file into a Git repo that you can edit. We use this sample file in this tutorial. Alternatively, you can use your own semantic model and report, if you prefer.
If you already have admin rights to a workspace with data, you can skip to step 3.
Step 1: Create a Premium workspace
To create a new workspace and assign it a license:
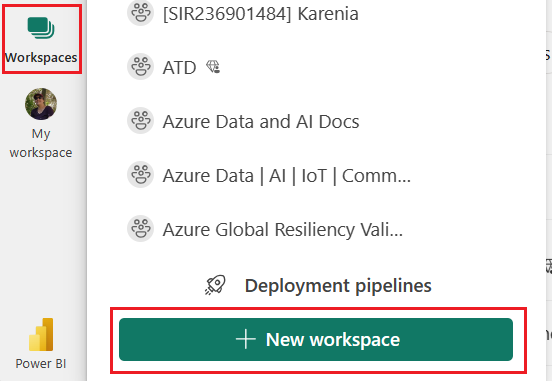
From the left navigation bar of the Power BI experience, select Workspaces > + New workspace.
Name the workspace FoodSalesWS.
(Optional) Add a description.
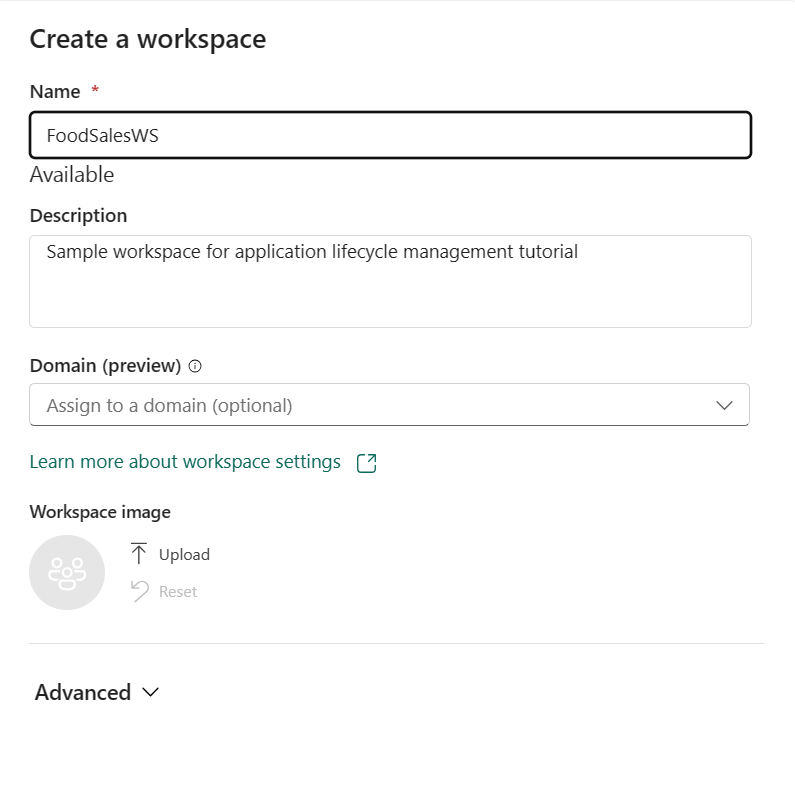
Expand the Advanced section to reveal Workspace type.
Select either Fabric Trial or Power BI Premium.
Select Apply.
For more on creating a workspace, see Create a workspace.
Step 2: Load content into the workspace
You can upload content from OneDrive, SharePoint, or a local file. In this tutorial, we load a .pbix file.
From the top menu bar, select Upload > Browse.
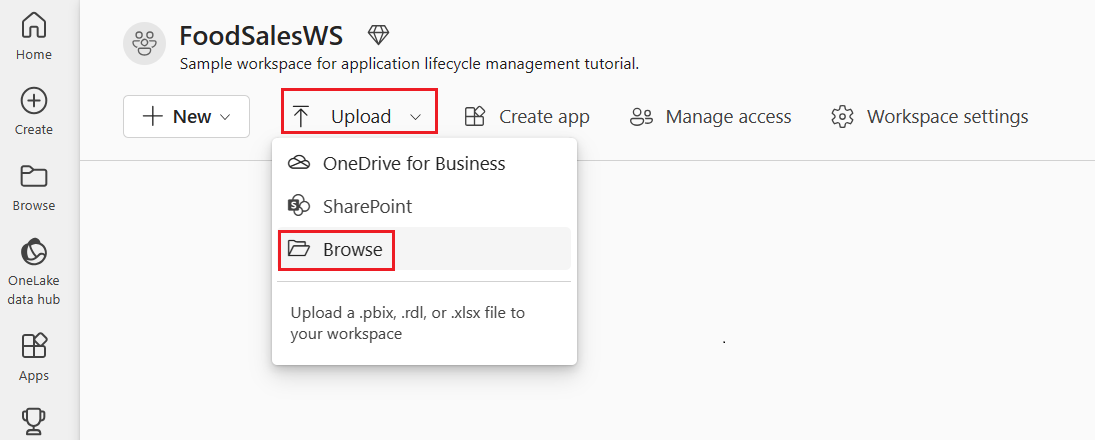
Browse to the location of the FoodSales.pbix file you downloaded earlier, or load your own sample semantic model and report.
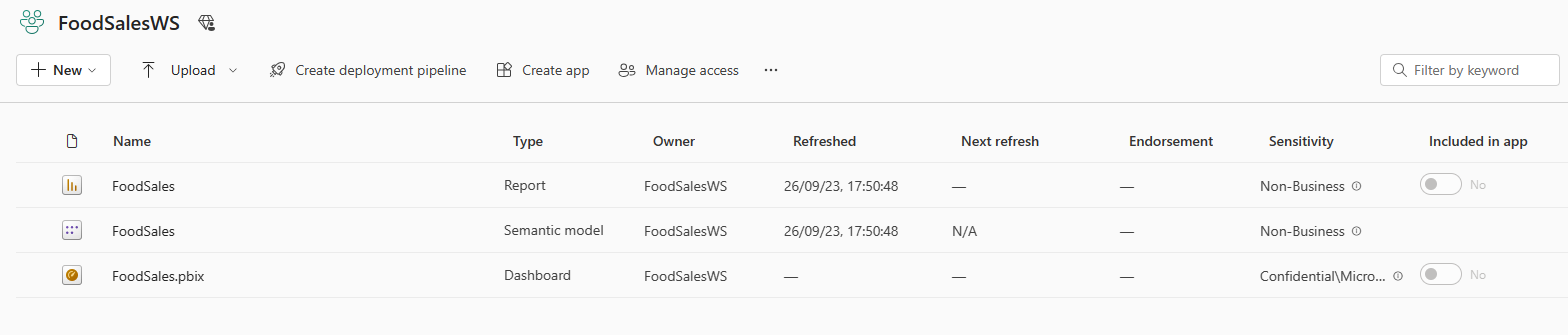
You now have a workspace with content in it for you and your team to work on.
Edit credentials - first time only
Before you create a deployment pipeline, you need to set the credentials. This step only needs to be done once for each semantic model. After your credentials are set for this semantic model, you won't have to set them again.
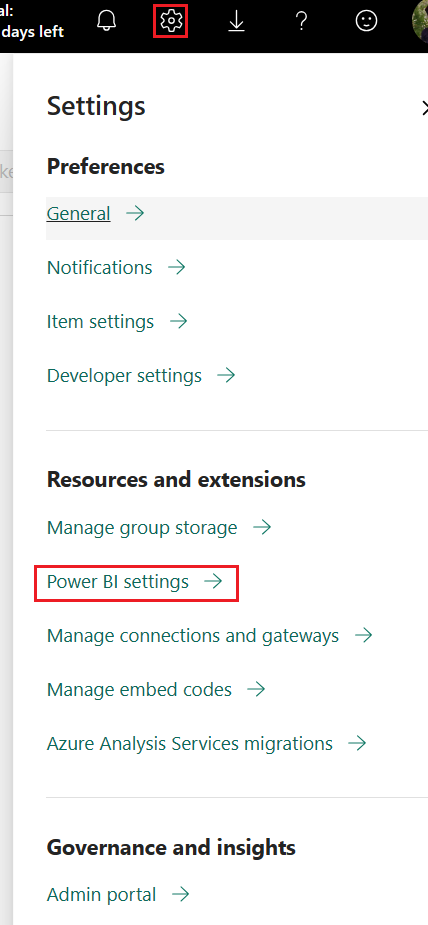
Go to Settings > Power BI settings.
Select Semantic models > Data source credentials > Edit credentials.
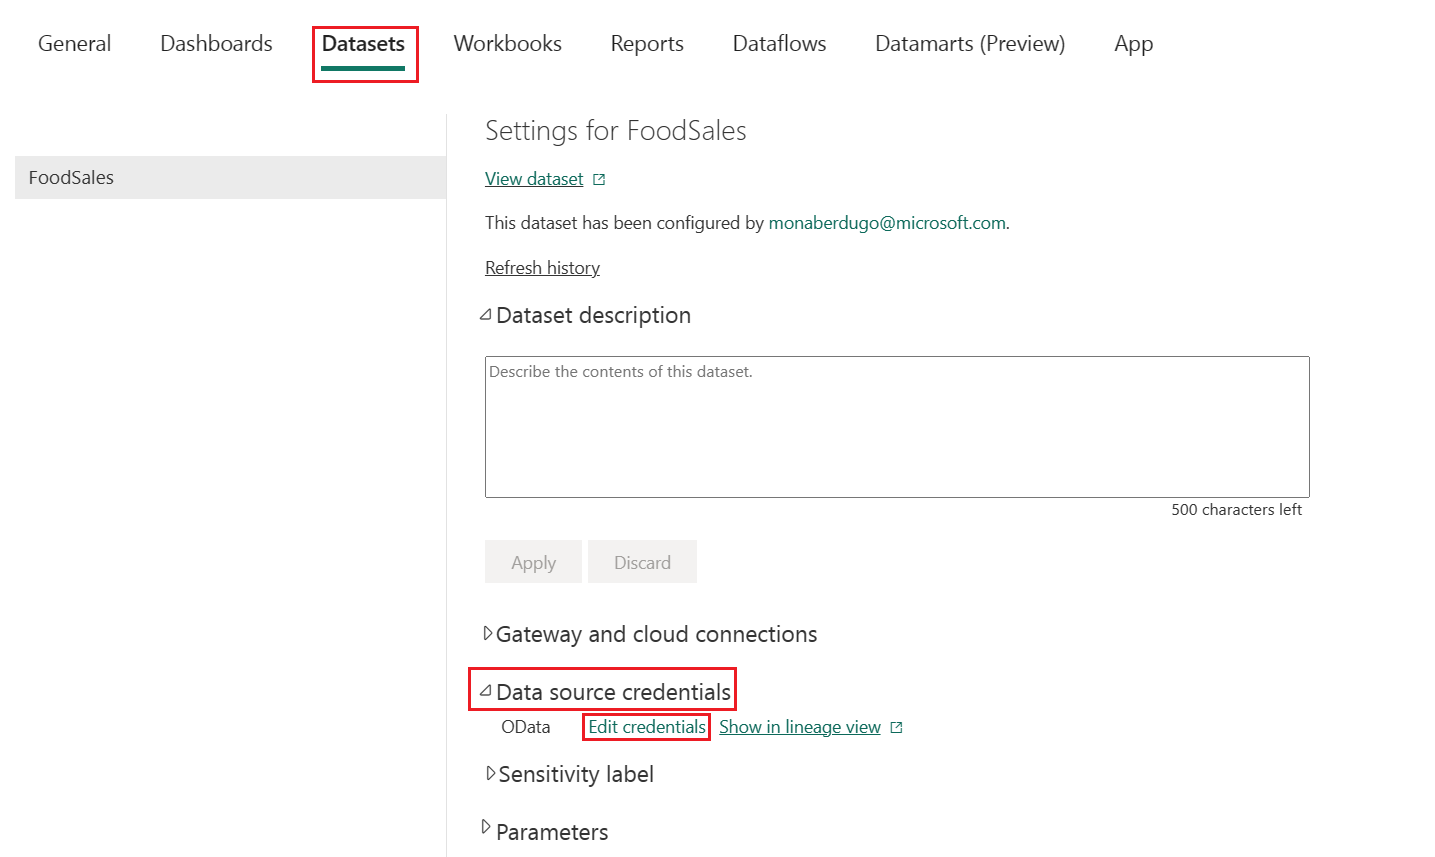
Set the Authentication method to Anonymous, the Privacy level to Public, and uncheck the Skip test connection box.
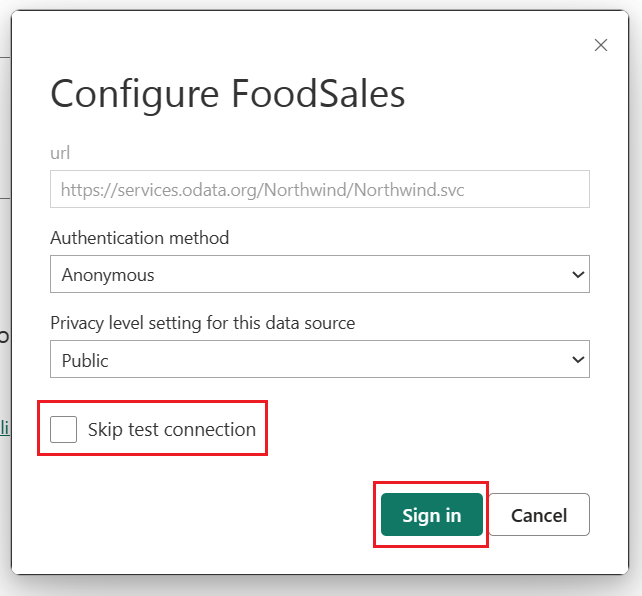
Select Sign in. The connection is tested and credentials set.
You can now create a deployment pipeline.
Step 3: Connect the team's development workspace to git
The entire team shares this workspace and each member of the team can edit it. By connecting this workspace to git, you can keep track of all the changes and revert back to previous versions if necessary. When all the changes are merged into this shared branch, deploy this workspace to production using the deployment pipeline.
Read more about version control with Git in Introduction to Git integration.
Let's connect this workspace to the main branch of your Git repo so all team members can edit it and create pull requests. Follow these steps if you're using an Azure DevOps repo. If you're using a GitHub repo, follow the directions in Connect a workspace to a GitHub repo.
Go to Workspace settings in the top right corner.
Select Git integration.
Select Azure DevOps. You’re automatically signed into the Azure Repos account registered to the Microsoft Entra user signed into the workspace.

From the dropdown menu, specify the following details about the branch you want to connect to:
Select main (or master) branch
Type the name of folder in the repo where the .pbix file located. This folder will be synced with the workspace.
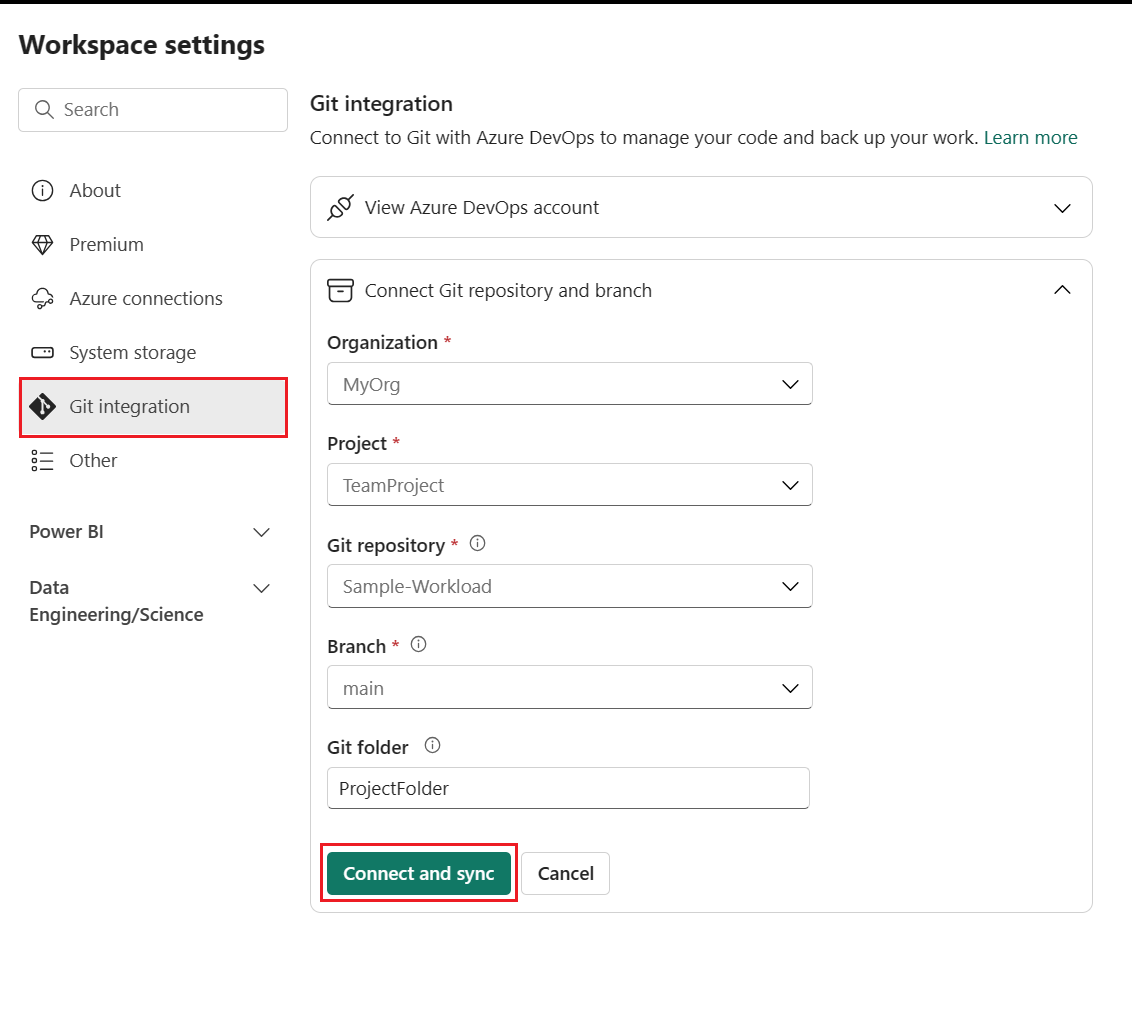
Select Connect and sync.
After you connect, the Workspace displays information about source control that allows you to view the connected branch, the status of each item in the branch and the time of the last sync. The Source control icon shows 0 because the items in the workspace Git repo are identical.
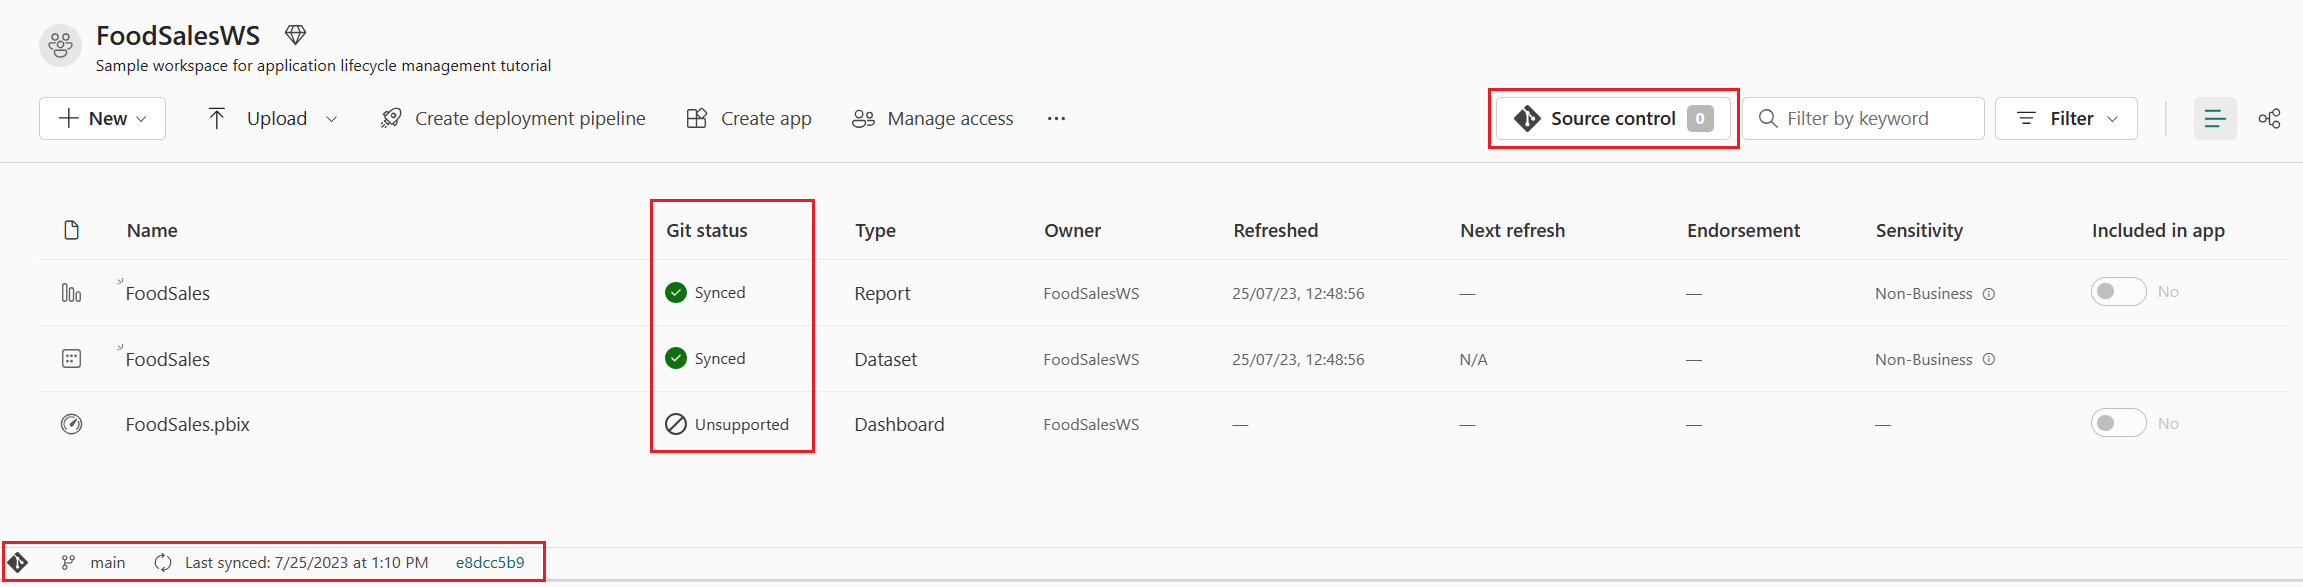
Now the workspace is synced with the main branch of your Git repo making it easy to keep track of changes.
For more information about connecting to git, see Connect a workspace to an Azure repo.
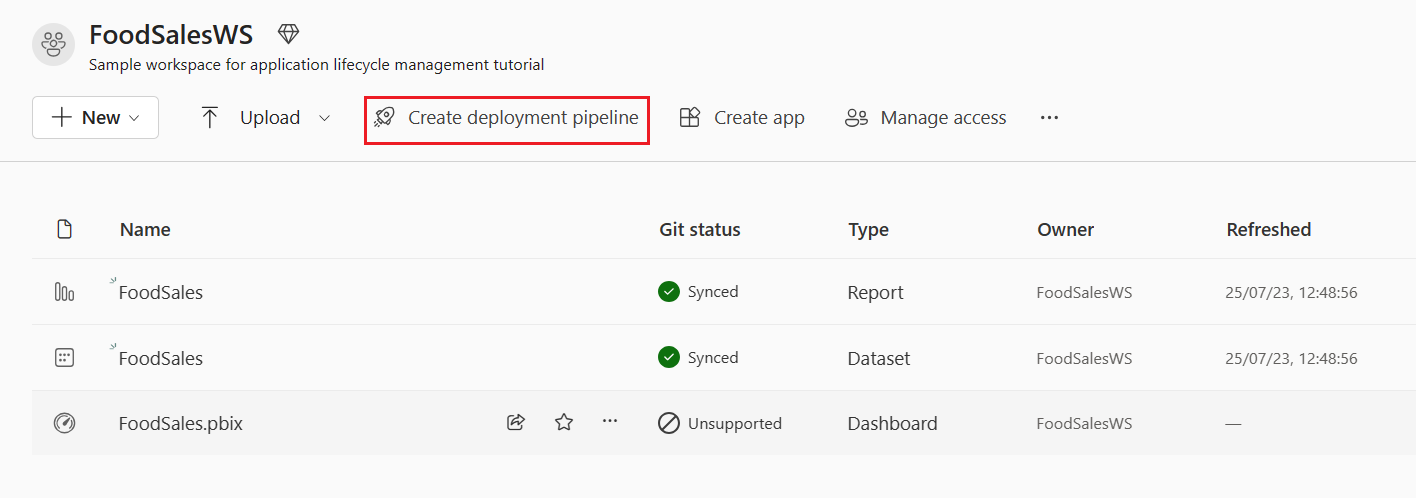
Step 4: Create a deployment pipeline
In order to share this workspace with others and use it for various stages of testing and development, we need to create a deployment pipeline. You can read about how deployment pipelines work in Introduction to deployment pipelines. To create a deployment pipeline and assign the workspace to the development stage, do the following steps:
From the workspace home page, select Create deployment pipeline.
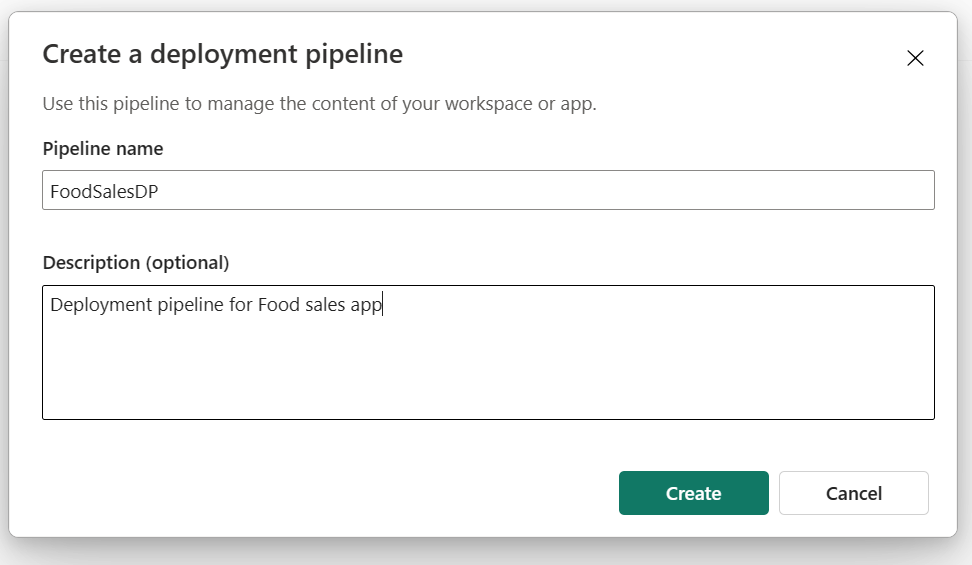
Name your pipeline FoodSalesDP, give it a description (optional) and select Next.
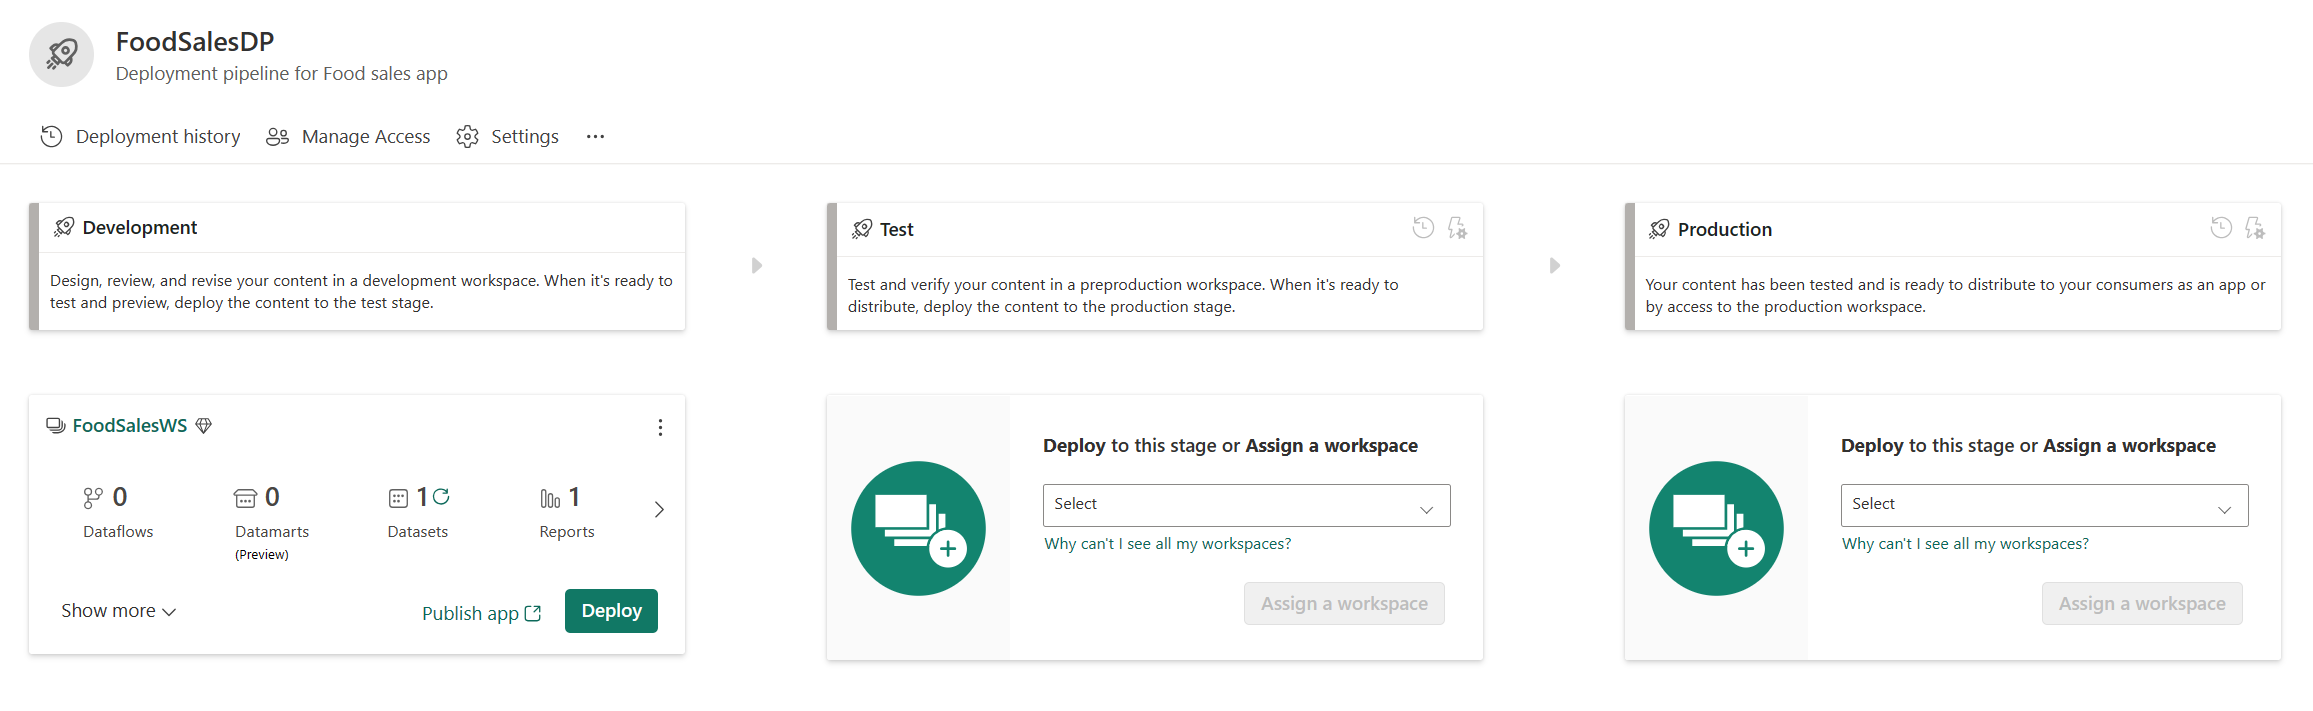
Accept the default three stages to your pipeline, and select Create.

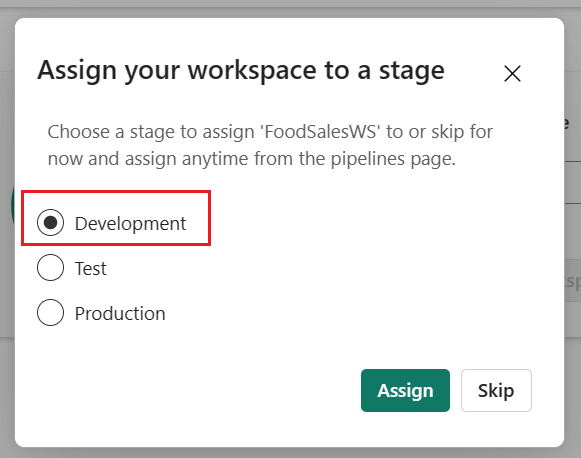
Assign the FoodSalesWS workspace to the Development stage.
The development stage of the deployment pipeline shows one semantic model, one report, and one dashboard. The other stages are empty.
You can read more about creating deployment pipelines in Deployment pipelines overview.
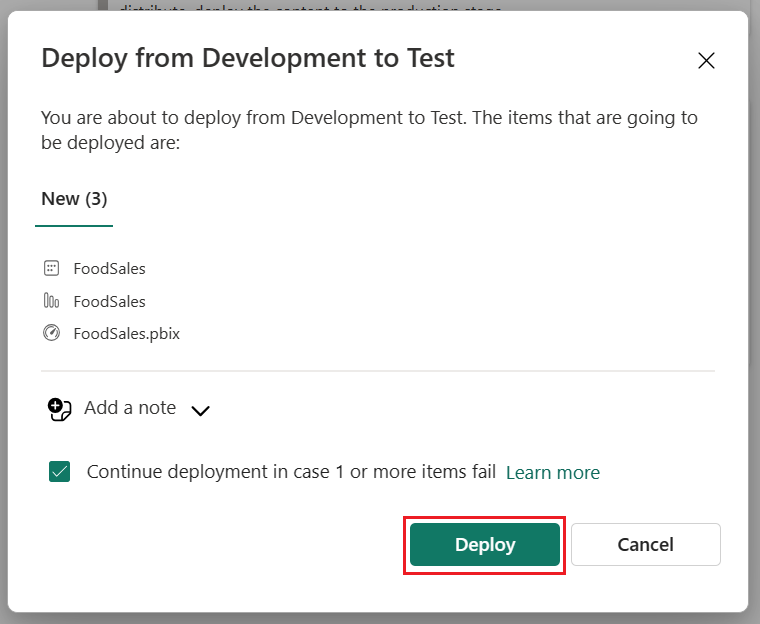
Step 5: Deploy content to other stages
Now, deploy the content to the other stages of the pipeline.
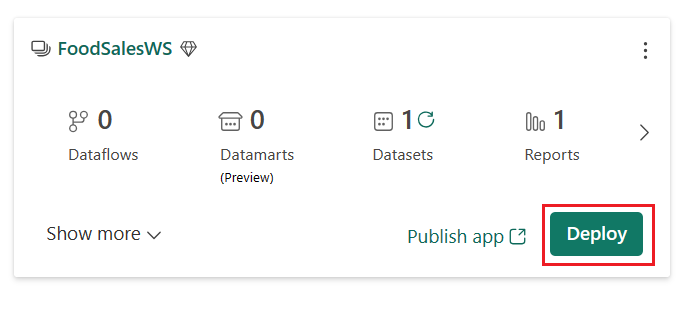
From the development stage of the deployment content view, select Deploy.
Confirm that you want to deploy the content to the test stage.
The green check icon indicates that the contents of the two stages are identical, since you deployed the entire content of the pipeline.
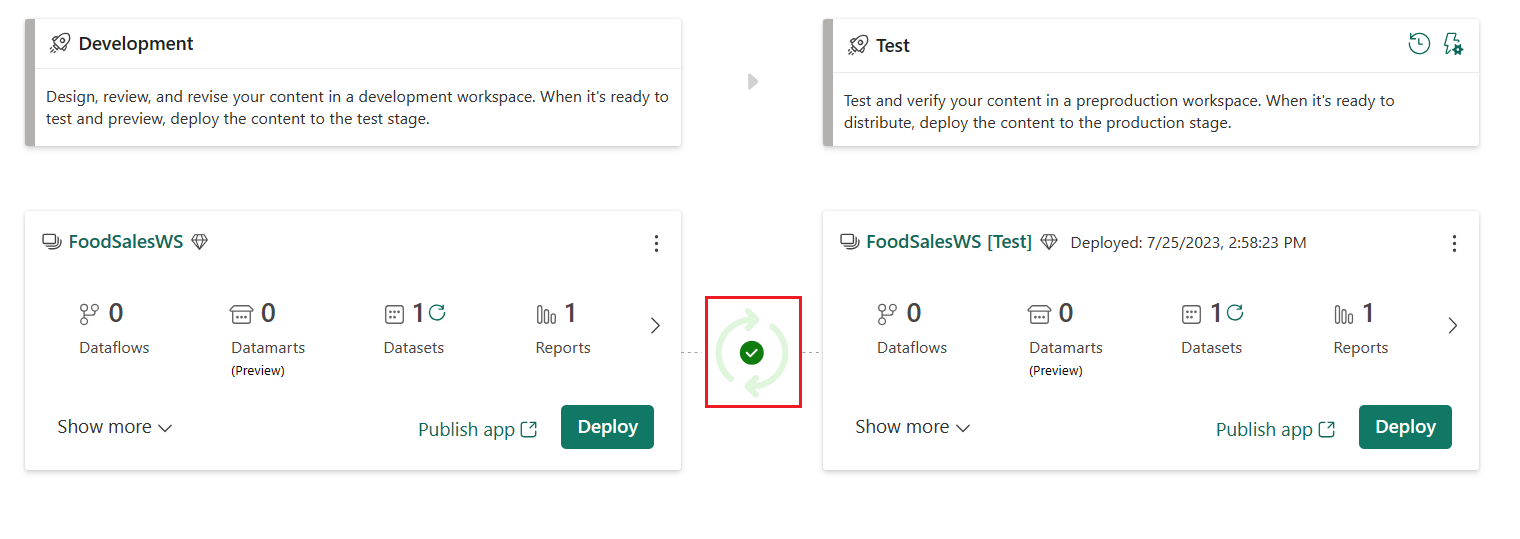
Deploy the content from the test stage to the production stage.
To refresh the semantic model in any stage, select the refresh button next to the semantic models icon in the summary card of each stage.

The entire team shares this deployment pipeline. Each team member can edit the semantic model and report in the development stage. When the team is ready to test the changes, they deploy the content to the test stage. When the team is ready to release the changes to production, they deploy the content to the production stage.
For more information on deploying content, see Deploy content.
Step 6: Create an isolated workspace
In order to avoid editing the shared workspace and interfering with other team members' changes, each team member should create their own isolated workspace to work in until they're ready to share their changes with the team.
From the branch tab of the Source control menu, select the down arrow next to the current branch name, and select Branch out to new workspace.

Specify the following details about the branch and workspace. The new branch is automatically created based on the branch connected to the current workspace.
- Branch name (for this tutorial, name it MyFoodEdits)
- Workspace name (for this tutorial, name it My_FoodSales)

Select Branch out.
Select Connect and sync.
Fabric creates the new workspace and syncs it to the new branch. You're automatically taken to the new workspace, but the sync might take a few minutes.
The new workspace now contains the content of the Git repo folder. Notice it doesn't contain the .pbix file. Since .pbix files are unsupported, this file wasn't copied to the Git repo when we synced.
Use this workspace to make changes to the semantic model and report until you're ready to share them with your team.
Step 7: Edit the workspace
Once the branched out workspace is synced, you can make changes to the workspace by creating, deleting, or editing an item. In this tutorial, we change the format of a semantic model column. You can edit the workspace in Power BI Desktop or data model. In this tutorial, we edit the workspace from the data model.
From the semantic model workspace, select the semantic model ellipsis (three dots) > Open data model.
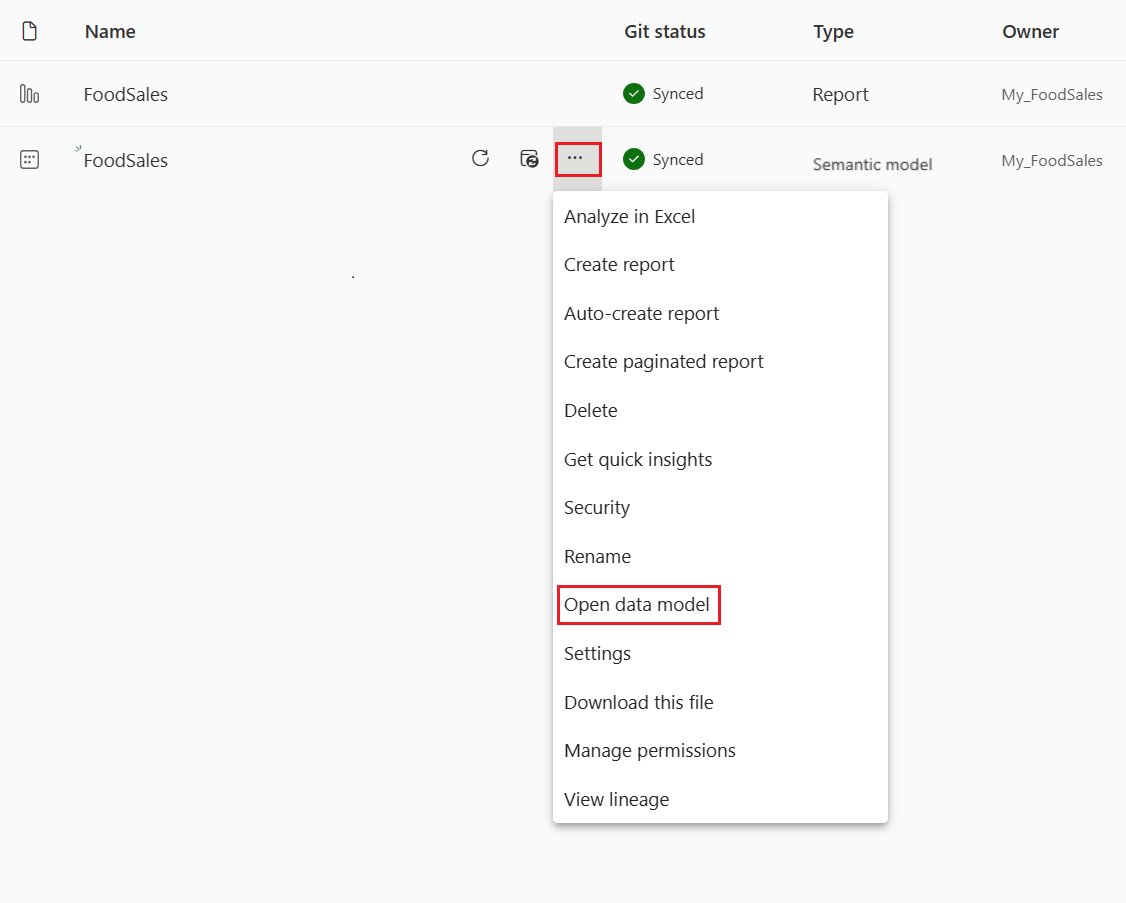
Note
If Open data model is disabled, go to Workspace settings > Power BI > General and enable Data model settings.

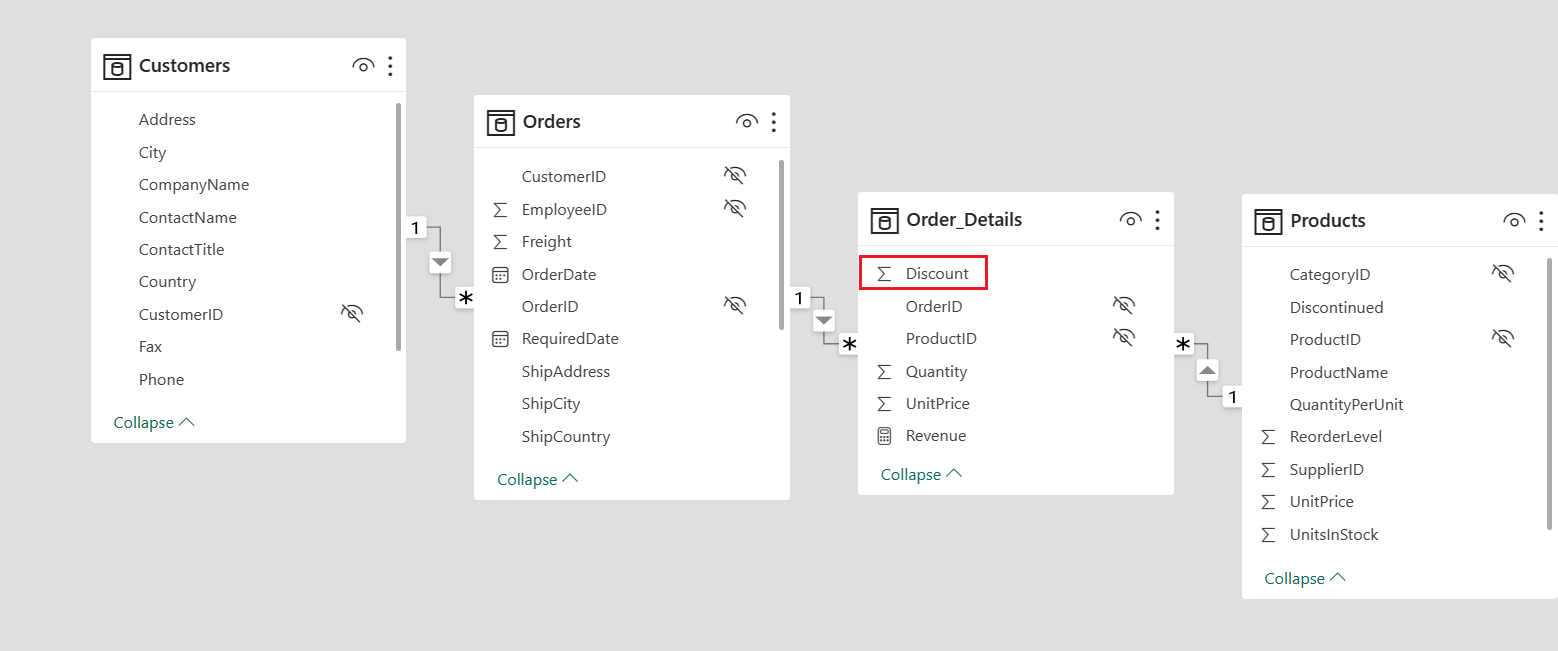
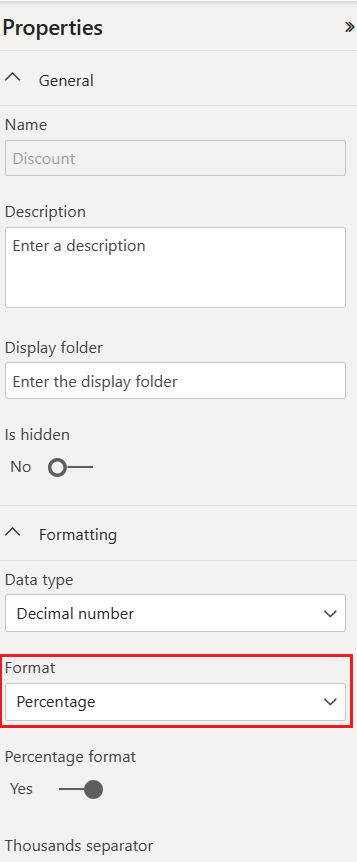
From the Order_details table, select Discount.
From the Properties pane, change the Format from General to Percentage.
Step 8: Commit changes
To commit this change from the workspace into the Git branch, go back to the workspace home page.
The source control icon now shows 1 because one item in the workspace was changed but not committed to the Git repo. The FoodSales semantic model shows a status of Uncommitted.
![]()
Select the source control icon to view the changed items in the Git repo. The semantic model shows a status of Modified.
Select the item to commit and add an optional message.
Select Commit.

The Git status of the semantic model changes to Synced and the workspace and Git repo are in sync.
Step 9: Create PR and merge
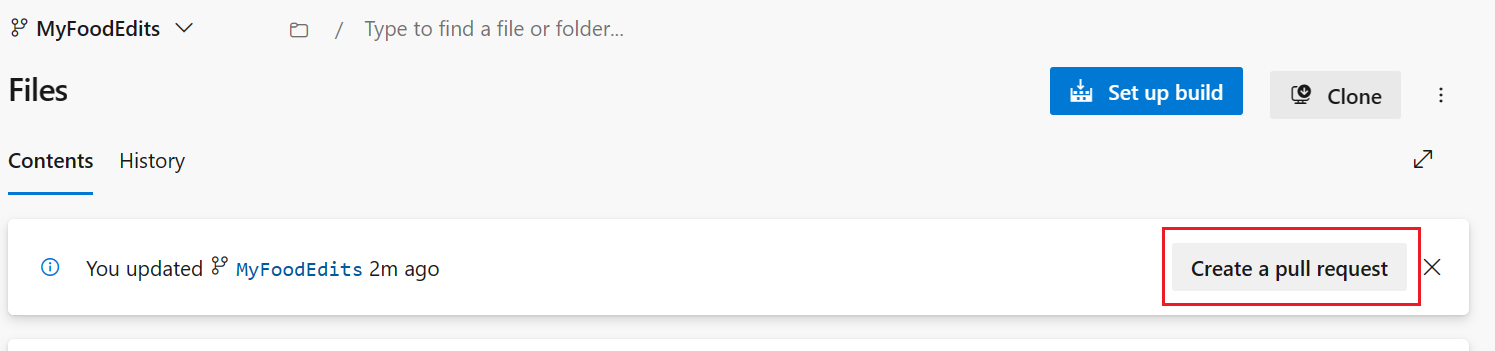
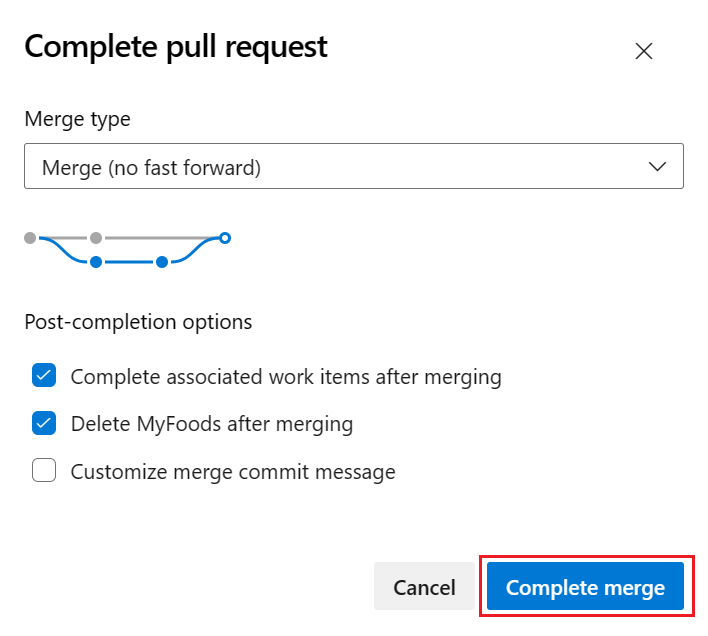
In the Git repo, create a pull request to merge the MyFoodEdits branch with the main branch.
This step can be done manually or automated:
Select Create a pull request.
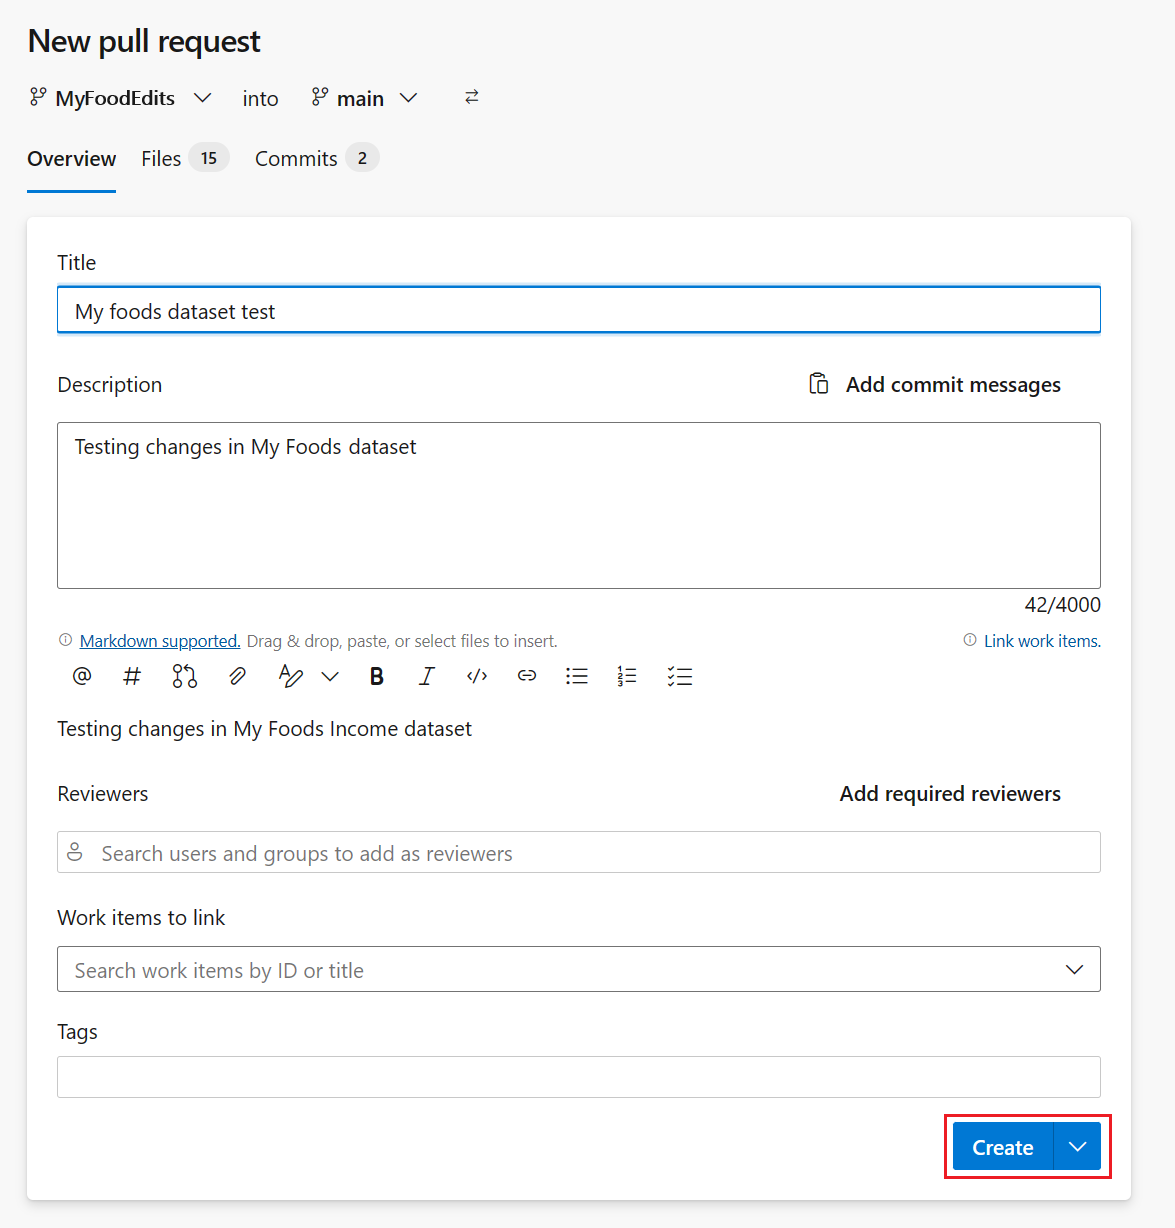
Provide a title, description, and any other information you want for the pull request. Then select Create.
-
Once the changes have been merged to the main branch, you can safely delete the workspace, if you want. It's not deleted automatically.
Step 10: Update shared workspace
Go back to the shared workspace connected to the dev stage of the deployment pipeline (the one we created in Step 1) and refresh the page.
The source control icon now shows 1 because one item in the Git repo was changed and is different from the items in the FoodSales workspace. The FoodSales semantic model shows a status of Update required.
![]()
You can update the workspace manually or automated:
Select the source control icon to view the changed items in the Git repo. The semantic model shows a status of Modified.
Select Update all.
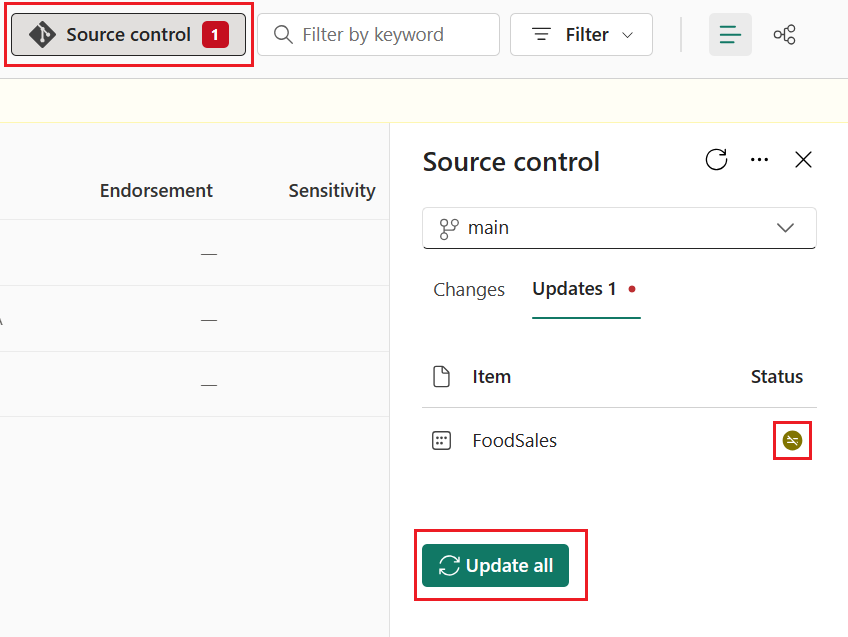
The Git status of the semantic model changes to Synced and the workspace is synced with the main Git branch.
Step 11: Compare stages in deployment pipeline
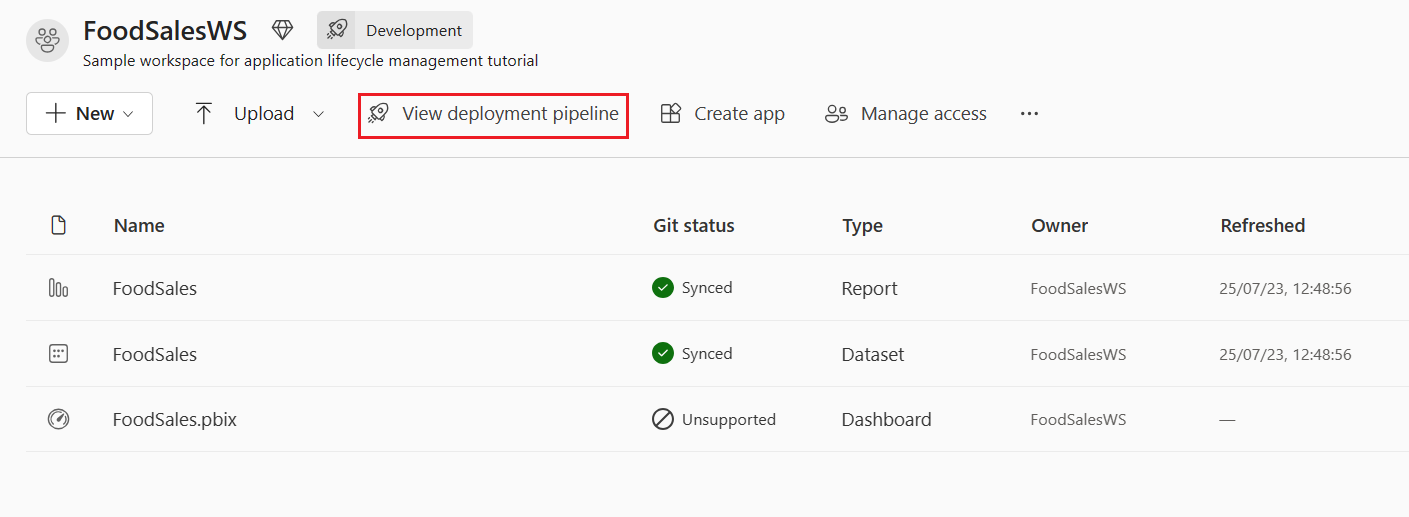
Select View deployment pipeline to compare the content in the development stage with the content in the test stage.
Notice the orange
Xicon between the stages indicating that changes were made to the content in one of the stages since the last deployment.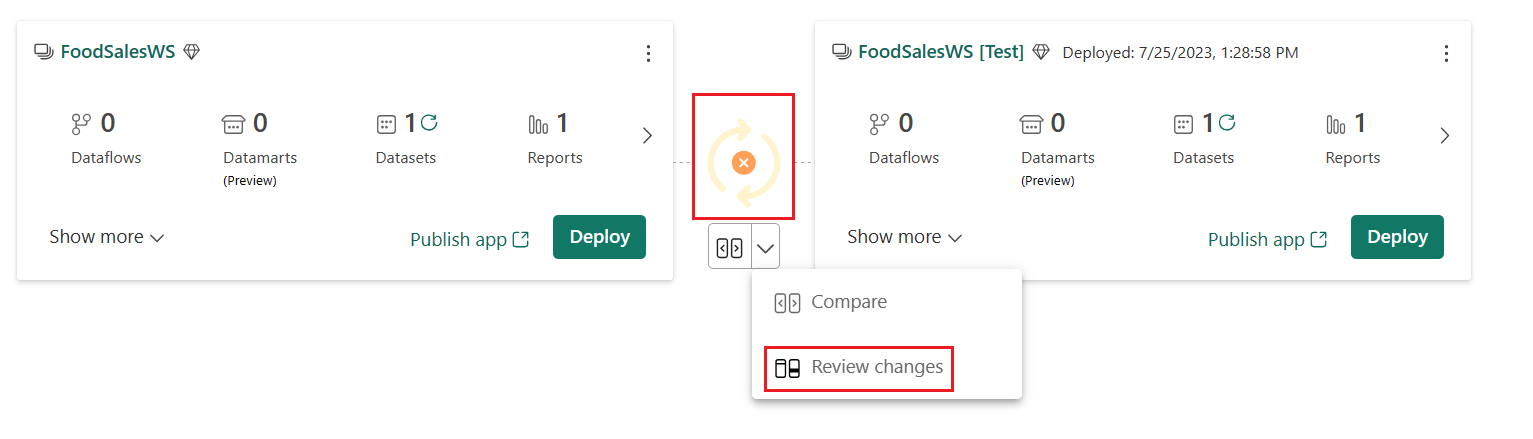
Select the down arrow > Review Changes to view the changes. The Change Review screen shows the difference between the semantic models in the two stages.
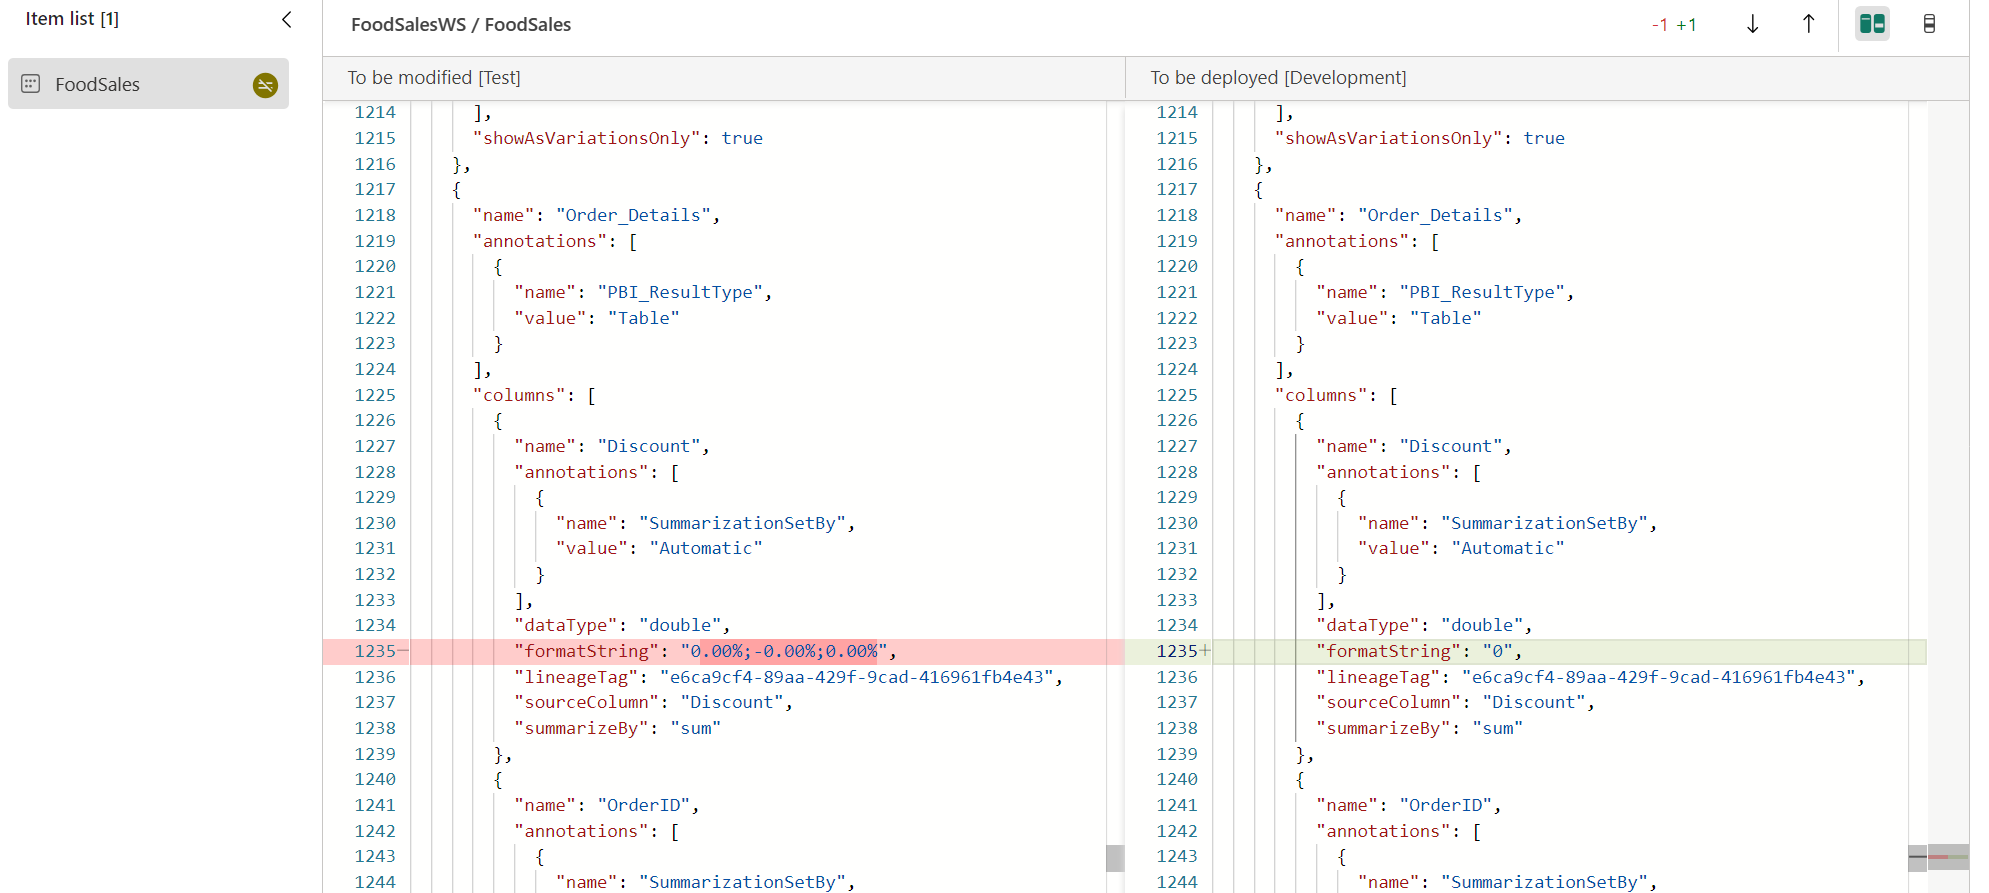
Review the changes and close the window.
For more information about comparing stages in a deployment pipeline, see Compare stages in a deployment pipeline.
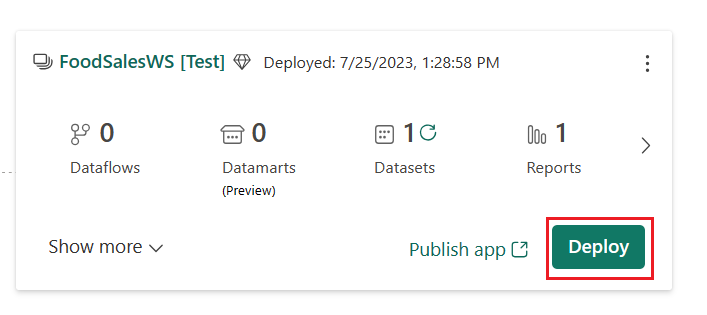
Step 12: Deploy to test stage
When you’re satisfied with the changes, deploy the changes to the test and/or production stages using the same process you used in Step 5.
Summary
In this tutorial, you learned how to use deployment pipelines along with Git integration to manage the lifecycle of an app, report, or other content in a workspace.
In particular, you learned how to:
- Set up your workspaces and add content for managing their lifecycle in Fabric.
- Apply Git best practices to work alone and collaborate with teammates on changes.
- Combine Git and deployment pipelines for an efficient end to end release process.