Muistiinpano
Tämän sivun käyttö edellyttää valtuutusta. Voit yrittää kirjautua sisään tai vaihtaa hakemistoa.
Tämän sivun käyttö edellyttää valtuutusta. Voit yrittää vaihtaa hakemistoa.
The Federal Information Processing Standard (FIPS) 140-2 is a US government standard that defines minimum security requirements for cryptographic modules in information technology products and systems. Azure Kubernetes Service (AKS) allows you to create Linux and Windows node pools with FIPS 140-2 enabled. Deployments running on FIPS-enabled node pools can use those cryptographic modules to provide increased security and help meet security controls as part of FedRAMP compliance. For more information on FIPS 140-2, see Federal Information Processing Standard (FIPS) 140.
Important
Starting on March 17, 2027, Azure Kubernetes Service (AKS) no longer supports or provides security updates for Ubuntu 20.04. Any existing node images will be deleted, and you'll be unable to scale any node pools running Ubuntu 20.04. Migrate to a supported Ubuntu version by upgrading your node pools to Kubernetes version 1.35+. For more information on this retirement, see the Retirement GitHub issue and the Azure Updates retirement announcement. To stay informed on announcements and updates, follow the AKS release notes.
Important
Starting on November 30, 2025, Azure Kubernetes Service (AKS) no longer supports or provides security updates for Azure Linux 2.0. The Azure Linux 2.0 node image is frozen at the 202512.06.0 release. Beginning on March 31, 2026, node images will be removed, and you'll be unable to scale your node pools. Migrate to a supported Azure Linux version by upgrading your node pools to a supported Kubernetes version or migrating to osSku AzureLinux3. For more information, see the Retirement GitHub issue and the Azure Updates retirement announcement. To stay informed on announcements and updates, follow the AKS release notes.
Prerequisites
An active Azure subscription. If you don't have an Azure subscription, create a free account before you begin.
Set your subscription context using the
az account setcommand. For example:az account set --subscription "00000000-0000-0000-0000-000000000000"kubectl installed. You can install it locally using the
az aks install-clicommand.
- Terraform installed locally. For installation instructions, see Install Terraform.
Version compatibility
- Azure CLI version 2.32.0 or later installed and configured. To find the version, run
az --version. For more information about installing or upgrading the Azure CLI, see Install Azure CLI.
- ARM template examples in this article use API version
2023-03-01forMicrosoft.ContainerService/managedClustersandMicrosoft.ContainerService/managedClusters/agentPools.
- Bicep examples in this article use API version
2023-03-01forMicrosoft.ContainerService/managedClustersandMicrosoft.ContainerService/managedClusters/agentPools.
- Terraform examples in this article use the AzureRM provider 3.x.
- For Terraform FIPS settings, use
enable_fips_imageonazurerm_kubernetes_cluster.default_node_poolandfips_enabledonazurerm_kubernetes_cluster_node_pool.
Limitations
FIPS-enabled node pools have the following limitations:
- FIPS-enabled node pools require Kubernetes version 1.19 and greater.
- To update the underlying packages or modules used for FIPS, you must use Node image upgrade.
- Container images on the FIPS nodes aren't assessed for FIPS compliance.
- Mounting of a CIFS share fails because FIPS disables some authentication modules. To work around this issue, see Errors when mounting a file share on a FIPS-enabled node pool.
- FIPS-enabled node pools with Arm64 VMs are only supported with Azure Linux 3.0+.
- The AKS monitoring add-on supports FIPS-enabled node pools with Ubuntu, Azure Linux, and Windows starting with Agent version 3.1.17 (Linux) and Win-3.1.17 (Windows).
Important
The FIPS-enabled Linux image is a different image than the default Linux image used for Linux-based node pools.
FIPS-enabled node images can have different version numbers, such as kernel version, than images that aren't FIPS-enabled. The update cycle for FIPS-enabled node pools and node images can differ from node pools and images that aren't FIPS-enabled.
Supported OS versions
You can create FIPS-enabled node pools on all supported OS types (Linux and Windows). However, not all OS versions support FIPS-enabled node pools. After a new OS version is released, there's typically a waiting period before it's FIPS compliant.
The following table includes the supported OS versions for FIPS-enabled node pools:
| OS type | OS SKU | FIPS compliance | Default |
|---|---|---|---|
| Linux | Ubuntu | Supported | Disabled by default |
| Linux | Azure Linux | Supported | Disabled by default |
| Windows | Windows Server 2022 | Supported | Enabled by default |
| Windows | Windows Server 2025 | Supported | Enabled by default and can't be disabled |
When requesting FIPS-enabled Ubuntu, if the default Ubuntu version doesn't support FIPS, AKS defaults to the most recent FIPS-supported version of Ubuntu. For example, Ubuntu 22.04 is default for Linux node pools. Since 22.04 doesn't currently support FIPS, AKS defaults to Ubuntu 20.04 for Linux FIPS-enabled node pools.
Note
Previously, you could use the GetOSOptions API to determine whether a given OS supported FIPS. The GetOSOptions API is now deprecated and is no longer included in new AKS API versions starting with 2024-05-01.
Create the Terraform configuration file
Terraform configuration files define the infrastructure that Terraform creates and manages.
Create a file named
main.tfand add the following code to define the Terraform version and specify the Azure provider:terraform { required_version = ">= 1.0" required_providers { azurerm = { source = "hashicorp/azurerm" version = "~> 3.0" } } } provider "azurerm" { features {} }Add the following code to
main.tfto create an Azure resource group. Feel free to change the name and location of the resource group as needed.resource "azurerm_resource_group" "example" { name = "example-fips-rg" location = "East US" }
Create an AKS cluster with a FIPS-enabled default node pool
You can enable FIPS on the default node pool when creating a new AKS cluster.
When creating more node pools on a cluster that already has a FIPS-enabled default node pool, you must also enable FIPS on the new node pools using the --enable-fips-image parameter.
Create an AKS cluster with FIPS enabled on the default node pool using the
az aks createcommand with the--enable-fips-imageparameter.az aks create \ --resource-group myResourceGroup \ --name myAKSCluster \ --node-count 3 \ --enable-fips-imageVerify your node pool is FIPS-enabled using the
az aks showcommand and query for the enableFIPS value in agentPoolProfiles.az aks show \ --resource-group myResourceGroup \ --name myAKSCluster \ --query="agentPoolProfiles[].{Name:name enableFips:enableFips}" \ -o tableThe following example output shows the default node pool is FIPS-enabled:
Name       enableFips
---------  ------------
nodepool1  True
Enabling FIPS during AKS cluster creation currently isn't supported in the Azure portal. To create a cluster with a FIPS-enabled default node pool, use the Azure CLI, ARM template, Bicep, or Terraform instructions in this article.
When creating more node pools on a cluster that already has a FIPS-enabled default node pool, you must also enable FIPS on the new node pools by setting enableFips to true.
Create an AKS cluster with FIPS enabled on the default node pool using an ARM template by setting the
enableFipsproperty totruein the agent pool profile. For example:{ "type": "Microsoft.ContainerService/managedClusters", "location": "[parameters('location')]", "name": "[parameters('clusterName')]", "properties": { "kubernetesVersion": "1.27", "enableRBAC": true, "dnsPrefix": "[parameters('dnsPrefix')]", "agentPoolProfiles": [ { "name": "nodepool1", "count": 3, "vmSize": "Standard_D2s_v3", "osType": "Linux", "osSKU": "Ubuntu", "type": "VirtualMachineScaleSets", "mode": "System", "enableFips": true } ] }, "identity": { "type": "SystemAssigned" } }Deploy the ARM template using the Azure portal, Azure CLI, or Azure PowerShell. For more information on deploying ARM templates, see Deploy resources with ARM templates.
Verify your node pool is FIPS-enabled using the
az aks showcommand and query for the enableFIPS value in agentPoolProfiles.az aks show \ --resource-group myResourceGroup \ --name myAKSCluster \ --query="agentPoolProfiles[].{Name:name enableFips:enableFips}" \ -o tableThe following example output shows the default node pool is FIPS-enabled:
Name       enableFips
---------  ------------
nodepool1  True
When creating more node pools on a cluster that already has a FIPS-enabled default node pool, you must also enable FIPS on the new node pools by setting enableFIPS to true.
Create an AKS cluster with FIPS enabled on the default node pool using Bicep by setting
enableFIPStotruein the agent pool profile. For example:param location string param clusterName string param dnsPrefix string resource aks 'Microsoft.ContainerService/managedClusters@2023-03-01' = { name: clusterName location: location identity: { type: 'SystemAssigned' } properties: { kubernetesVersion: '1.27' enableRBAC: true dnsPrefix: dnsPrefix agentPoolProfiles: [ { name: 'nodepool1' count: 3 vmSize: 'Standard_D2s_v3' osType: 'Linux' osSKU: 'Ubuntu' type: 'VirtualMachineScaleSets' mode: 'System' enableFIPS: true } ] } }Deploy the Bicep file using the Azure CLI, Azure PowerShell, or the Azure portal. For more information on deploying Bicep files, see Create Bicep files using Visual Studio Code.
Verify your node pool is FIPS-enabled using the
az aks showcommand and query for the enableFIPS value in agentPoolProfiles.az aks show \ --resource-group myResourceGroup \ --name myAKSCluster \ --query="agentPoolProfiles[].{Name:name enableFips:enableFips}" \ -o tableThe following example output shows the default node pool is FIPS-enabled:
Name       enableFips
---------  ------------
nodepool1  True
When creating more node pools on a cluster that already has a FIPS-enabled default node pool, you must also enable FIPS on the new node pools by setting fips_enabled to true on azurerm_kubernetes_cluster_node_pool.
Add the following code to
main.tfto create an AKS cluster with FIPS enabled on the default node pool:resource "azurerm_kubernetes_cluster" "example" { name = "example-aks-cluster" location = azurerm_resource_group.example.location resource_group_name = azurerm_resource_group.example.name dns_prefix = "example-aks" default_node_pool { name = "nodepool1" node_count = 3 vm_size = "Standard_D2s_v3" os_sku = "Ubuntu" enable_fips_image = true } identity { type = "SystemAssigned" } }Initialize Terraform in the directory containing your
main.tffile using theterraform initcommand.terraform initCreate a Terraform execution plan using the
terraform plancommand.terraform planApply the configuration using the
terraform applycommand to deploy the cluster with a FIPS-enabled default node pool.terraform applyConnect to the AKS cluster using the [
az aks get-credentials][az-aks-get-credentials] command.az aks get-credentials \ --resource-group myResourceGroup \ --name myAKSClusterVerify your node pool is FIPS-enabled using the
az aks showcommand and query for the enableFIPS value in agentPoolProfiles.az aks show \ --resource-group myResourceGroup \ --name myAKSCluster \ --query="agentPoolProfiles[].{Name:name enableFips:enableFips}" \ -o tableThe following example output shows the default node pool is FIPS-enabled:
Name       enableFips
---------  ------------
nodepool1  True
For more information on the azurerm_kubernetes_cluster resource, see the Terraform Azure provider documentation.
Add a FIPS-enabled Linux node pool to an existing AKS cluster
Add a FIPS-enabled Linux node pool to an existing cluster using the
az aks nodepool addcommand with the--enable-fips-imageparameter.az aks nodepool add \ --resource-group myResourceGroup \ --cluster-name myAKSCluster \ --name fipsnp \ --enable-fips-imageVerify your node pool configuration using the
az aks showcommand and query for the enableFIPS value in agentPoolProfiles.az aks show \ --resource-group myResourceGroup \ --name myAKSCluster \ --query="agentPoolProfiles[].{Name:name enableFips:enableFips}" \ -o tableThe following example output shows the fipsnp node pool is FIPS-enabled:
Name       enableFips
---------  ------------
fipsnp     True
nodepool1  False
List the nodes using the
kubectl get nodescommand.kubectl get nodesThe following example output shows a list of the nodes in the cluster. The nodes starting with
aks-fipsnpare part of the FIPS-enabled node pool.NAME STATUS ROLES AGE VERSION aks-fipsnp-12345678-vmss000000 Ready agent 6m4s v1.19.9 aks-fipsnp-12345678-vmss000001 Ready agent 5m21s v1.19.9 aks-fipsnp-12345678-vmss000002 Ready agent 6m8s v1.19.9 aks-nodepool1-12345678-vmss000000 Ready agent 34m v1.19.9Run a deployment with an interactive session on one of the nodes in the FIPS-enabled node pool using the
kubectl debugcommand.kubectl debug node/aks-fipsnp-12345678-vmss000000 -it --image=mcr.microsoft.com/dotnet/runtime-deps:6.0From the interactive session output, verify the FIPS cryptographic libraries are enabled. Your output should look similar to the following example output:
root@aks-fipsnp-12345678-vmss000000:/# cat /proc/sys/crypto/fips_enabled
1
FIPS-enabled node pools also have a kubernetes.azure.com/fips_enabled=true label, which deployments can use to target those node pools.
Enabling FIPS when adding a Linux node pool currently isn't supported in the Azure portal. To add a FIPS-enabled Linux node pool, use the Azure CLI, ARM template, Bicep, or Terraform instructions in this article.
Create a FIPS-enabled Linux node pool using an ARM template by deploying an agent pool resource with the
enableFipsproperty set totrue. For example:{ "type": "Microsoft.ContainerService/managedClusters/agentPools", "apiVersion": "2023-03-01", "name": "[concat(parameters('clusterName'), '/fipsnp')]", "properties": { "count": 3, "vmSize": "Standard_D2s_v3", "osType": "Linux", "osSKU": "Ubuntu", "mode": "User", "enableFips": true } }Deploy the ARM template using the Azure portal, Azure CLI, or Azure PowerShell. For more information on deploying ARM templates, see Deploy resources with ARM templates.
Verify your node pool configuration using the
az aks showcommand and query for the enableFIPS value in agentPoolProfiles.az aks show \ --resource-group myResourceGroup \ --name myAKSCluster \ --query="agentPoolProfiles[].{Name:name enableFips:enableFips}" \ -o tableThe following example output shows the fipsnp node pool is FIPS-enabled:
Name       enableFips
---------  ------------
fipsnp     True
nodepool1  False
List the nodes using the
kubectl get nodescommand.kubectl get nodesThe following example output shows a list of the nodes in the cluster. The nodes starting with
aks-fipsnpare part of the FIPS-enabled node pool.NAME STATUS ROLES AGE VERSION aks-fipsnp-12345678-vmss000000 Ready agent 6m4s v1.19.9 aks-fipsnp-12345678-vmss000001 Ready agent 5m21s v1.19.9 aks-fipsnp-12345678-vmss000002 Ready agent 6m8s v1.19.9 aks-nodepool1-12345678-vmss000000 Ready agent 34m v1.19.9Run a deployment with an interactive session on one of the nodes in the FIPS-enabled node pool using the
kubectl debugcommand.kubectl debug node/aks-fipsnp-12345678-vmss000000 -it --image=mcr.microsoft.com/dotnet/runtime-deps:6.0From the interactive session output, verify the FIPS cryptographic libraries are enabled. Your output should look similar to the following example output:
root@aks-fipsnp-12345678-vmss000000:/# cat /proc/sys/crypto/fips_enabled
1
FIPS-enabled node pools also have a kubernetes.azure.com/fips_enabled=true label, which deployments can use to target those node pools.
Create a FIPS-enabled Linux node pool using Bicep by deploying an agent pool resource with
enableFIPSset totrue. For example:param clusterName string param nodePoolName string = 'fipsnp' resource nodePool 'Microsoft.ContainerService/managedClusters/agentPools@2023-03-01' = { name: '${clusterName}/${nodePoolName}' properties: { count: 3 vmSize: 'Standard_D2s_v3' osType: 'Linux' osSKU: 'Ubuntu' mode: 'User' enableFIPS: true } }Deploy the Bicep file using the Azure CLI, Azure PowerShell, or the Azure portal. For more information on deploying Bicep files, see Create Bicep files using Visual Studio Code.
Verify your node pool configuration using the
az aks showcommand and query for the enableFIPS value in agentPoolProfiles.az aks show \ --resource-group myResourceGroup \ --name myAKSCluster \ --query="agentPoolProfiles[].{Name:name enableFips:enableFips}" \ -o tableThe following example output shows the fipsnp node pool is FIPS-enabled:
Name       enableFips
---------  ------------
fipsnp     True
nodepool1  False
List the nodes using the
kubectl get nodescommand.kubectl get nodesThe following example output shows a list of the nodes in the cluster. The nodes starting with
aks-fipsnpare part of the FIPS-enabled node pool.NAME STATUS ROLES AGE VERSION aks-fipsnp-12345678-vmss000000 Ready agent 6m4s v1.19.9 aks-fipsnp-12345678-vmss000001 Ready agent 5m21s v1.19.9 aks-fipsnp-12345678-vmss000002 Ready agent 6m8s v1.19.9 aks-nodepool1-12345678-vmss000000 Ready agent 34m v1.19.9Run a deployment with an interactive session on one of the nodes in the FIPS-enabled node pool using the
kubectl debugcommand.kubectl debug node/aks-fipsnp-12345678-vmss000000 -it --image=mcr.microsoft.com/dotnet/runtime-deps:6.0From the interactive session output, verify the FIPS cryptographic libraries are enabled. Your output should look similar to the following example output:
root@aks-fipsnp-12345678-vmss000000:/# cat /proc/sys/crypto/fips_enabled
1
FIPS-enabled node pools also have a kubernetes.azure.com/fips_enabled=true label, which deployments can use to target those node pools.
Add the following code to
main.tfto add a FIPS-enabled Linux node pool in your AKS cluster:resource "azurerm_kubernetes_cluster_node_pool" "fips_linux" { name = "fipsnp" kubernetes_cluster_id = azurerm_kubernetes_cluster.example.id vm_size = "Standard_D2s_v3" os_type = "Linux" os_sku = "Ubuntu" node_count = 3 fips_enabled = true node_taints = [] }Apply the updated Terraform configuration using the
terraform planandterraform applycommands.terraform plan terraform applyConnect to the AKS cluster using the [
az aks get-credentials][az-aks-get-credentials] command.az aks get-credentials \ --resource-group myResourceGroup \ --name myAKSClusterVerify your node pool configuration using the
az aks showcommand and query for the enableFIPS value in agentPoolProfiles.az aks show \ --resource-group myResourceGroup \ --name myAKSCluster \ --query="agentPoolProfiles[].{Name:name enableFips:enableFips}" \ -o tableThe following example output shows the fipsnp node pool is FIPS-enabled:
Name       enableFips
---------  ------------
fipsnp     True
nodepool1  False
List the nodes using the
kubectl get nodescommand.kubectl get nodesThe following example output shows a list of the nodes in the cluster. The nodes starting with
aks-fipsnpare part of the FIPS-enabled node pool.NAME STATUS ROLES AGE VERSION aks-fipsnp-12345678-vmss000000 Ready agent 6m4s v1.19.9 aks-fipsnp-12345678-vmss000001 Ready agent 5m21s v1.19.9 aks-fipsnp-12345678-vmss000002 Ready agent 6m8s v1.19.9 aks-nodepool1-12345678-vmss000000 Ready agent 34m v1.19.9Run a deployment with an interactive session on one of the nodes in the FIPS-enabled node pool using the
kubectl debugcommand.kubectl debug node/aks-fipsnp-12345678-vmss000000 -it --image=mcr.microsoft.com/dotnet/runtime-deps:6.0From the interactive session output, verify the FIPS cryptographic libraries are enabled. Your output should look similar to the following example output:
root@aks-fipsnp-12345678-vmss000000:/# cat /proc/sys/crypto/fips_enabled
1
FIPS-enabled node pools also have a kubernetes.azure.com/fips_enabled=true label, which deployments can use to target those node pools.
For more information on the azurerm_kubernetes_cluster_node_pool resource, see the Terraform Azure provider documentation.
Add a FIPS-enabled Windows node pool
In this section, we add a Windows node pool to an existing AKS cluster. Windows Server 2022 and later node pools enable FIPS by default even if enableFips doesn't show True. Windows Server 2025 and later node pools don't support disabling FIPS.
Create a Windows node pool using the
az aks nodepool addcommand. Unlike Linux-based node pools, Windows node pools share the same image set.az aks nodepool add \ --resource-group myResourceGroup \ --cluster-name myAKSCluster \ --name fipsnp \ --enable-fips-image \ --os-type WindowsVerify your node pool configuration using the
az aks showcommand and query for the enableFIPS value in agentPoolProfiles.az aks show \ --resource-group myResourceGroup \ --name myAKSCluster \ --query="agentPoolProfiles[].{Name:name enableFips:enableFips}" \ -o tableVerify Windows node pools have access to FIPS cryptographic libraries by creating an RDP connection to a Windows node in a node pool and checking the registry. From the Run application, enter
regedit.Look for
HKEY_LOCAL_MACHINE\SYSTEM\CurrentControlSet\Control\Lsa\FIPSAlgorithmPolicyin the registry.If
Enabledis set to 1, then FIPS is enabled.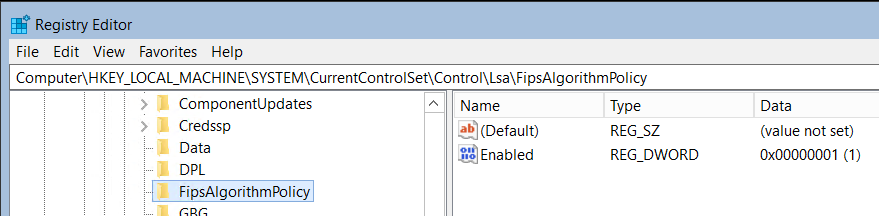
FIPS-enabled node pools also have a kubernetes.azure.com/fips_enabled=true label, which deployments can use to target those node pools.
There isn't an Azure portal experience to enable or disable FIPS settings for Windows node pools. Any Windows node pools created using Azure portal has FIPS enabled. Windows Server 2022 and later node pools enable FIPS by default, and Windows Server 2025 and later node pools don't support disabling FIPS.
Create a Windows node pool using an ARM template by deploying an agent pool resource with
osTypeset toWindows. For example:{ "type": "Microsoft.ContainerService/managedClusters/agentPools", "apiVersion": "2023-03-01", "name": "[concat(parameters('clusterName'), '/fipsnp')]", "properties": { "count": 3, "vmSize": "Standard_D2s_v3", "osType": "Windows", "osSKU": "Windows2022", "mode": "User" } }Deploy the ARM template using the Azure portal, Azure CLI, or Azure PowerShell. For more information on deploying ARM templates, see Deploy resources with ARM templates.
Verify your node pool configuration using the
az aks showcommand and query for the enableFIPS value in agentPoolProfiles.az aks show \ --resource-group myResourceGroup \ --name myAKSCluster \ --query="agentPoolProfiles[].{Name:name enableFips:enableFips}" \ -o tableVerify Windows node pools have access to FIPS cryptographic libraries by creating an RDP connection to a Windows node in a node pool and checking the registry. From the Run application, enter
regedit.Look for
HKEY_LOCAL_MACHINE\SYSTEM\CurrentControlSet\Control\Lsa\FIPSAlgorithmPolicyin the registry.If
Enabledis set to 1, then FIPS is enabled.
FIPS-enabled node pools also have a kubernetes.azure.com/fips_enabled=true label, which deployments can use to target those node pools.
Create a Windows node pool using Bicep by deploying an agent pool resource with
osTypeset toWindows. For example:param clusterName string param nodePoolName string = 'fipsnp' resource nodePool 'Microsoft.ContainerService/managedClusters/agentPools@2023-03-01' = { name: '${clusterName}/${nodePoolName}' properties: { count: 3 vmSize: 'Standard_D2s_v3' osType: 'Windows' osSKU: 'Windows2022' mode: 'User' enableFIPS: true } }Deploy the Bicep file using the Azure CLI, Azure PowerShell, or the Azure portal. For more information on deploying Bicep files, see Create Bicep files using Visual Studio Code.
Verify your node pool configuration using the
az aks showcommand and query for the enableFIPS value in agentPoolProfiles.az aks show \ --resource-group myResourceGroup \ --name myAKSCluster \ --query="agentPoolProfiles[].{Name:name enableFips:enableFips}" \ -o tableVerify Windows node pools have access to FIPS cryptographic libraries by creating an RDP connection to a Windows node in a node pool and checking the registry. From the Run application, enter
regedit.Look for
HKEY_LOCAL_MACHINE\SYSTEM\CurrentControlSet\Control\Lsa\FIPSAlgorithmPolicyin the registry.If
Enabledis set to 1, then FIPS is enabled.
FIPS-enabled node pools also have a kubernetes.azure.com/fips_enabled=true label, which deployments can use to target those node pools.
Add the following code to
main.tfto create a Windows node pool in your AKS cluster:resource "azurerm_kubernetes_cluster_node_pool" "fips_windows" { name = "fipsnp" kubernetes_cluster_id = azurerm_kubernetes_cluster.example.id vm_size = "Standard_D2s_v3" os_type = "Windows" os_sku = "Windows2022" node_count = 3 fips_enabled = true node_taints = [] }Apply the updated Terraform configuration using the
terraform planandterraform applycommands.terraform plan terraform applyConnect to the AKS cluster using the [
az aks get-credentials][az-aks-get-credentials] command.az aks get-credentials \ --resource-group myResourceGroup \ --name myAKSClusterVerify your node pool configuration using the
az aks showcommand and query for the enableFIPS value in agentPoolProfiles.az aks show \ --resource-group myResourceGroup \ --name myAKSCluster \ --query="agentPoolProfiles[].{Name:name enableFips:enableFips}" \ -o tableVerify Windows node pools have access to FIPS cryptographic libraries by creating an RDP connection to a Windows node in a node pool and checking the registry. From the Run application, enter
regedit.Look for
HKEY_LOCAL_MACHINE\SYSTEM\CurrentControlSet\Control\Lsa\FIPSAlgorithmPolicyin the registry.If
Enabledis set to 1, then FIPS is enabled.
FIPS-enabled node pools also have a kubernetes.azure.com/fips_enabled=true label, which deployments can use to target those node pools.
Update an existing node pool to enable or disable FIPS
Existing Linux node pools can be updated to enable or disable FIPS. If you're planning to migrate your node pools from non-FIPS to FIPS, first validate that your application is working properly in a test environment before migrating it to a production environment. Validating your application in a test environment should prevent issues caused by the FIPS kernel blocking some weak cipher or encryption algorithm, such as an MD4 algorithm that isn't FIPS compliant.
Note
When updating an existing Linux node pool to enable or disable FIPS, the node pool update moves between the fips and nonfips image. This node pool update triggers a reimage to complete the update. This can cause the node pool update to take a few minutes to complete.
Prerequisites for updating an existing node pool
Azure CLI version 2.64.0 or later. To find the version, run az --version. If you need to install or upgrade, see Install Azure CLI.
Enable FIPS on an existing node pool
You can update existing Linux node pools to enable FIPS. When you update an existing node pool, the node image changes from the current image to the recommended FIPS image of the same OS SKU.
Update a node pool using the
az aks nodepool updatecommand with the--enable-fips-imageparameter.az aks nodepool update \ --resource-group myResourceGroup \ --cluster-name myAKSCluster \ --name np \ --enable-fips-imageThis command triggers a reimage of the node pool immediately to deploy the FIPS-compliant OS. This reimage occurs during the node pool update. No extra steps are required.
Verify your node pool is FIPS-enabled using the
az aks showcommand and query for the enableFIPS value in agentPoolProfiles.az aks show \ --resource-group myResourceGroup \ --name myAKSCluster \ --query="agentPoolProfiles[].{Name:name enableFips:enableFips}" \ -o tableThe following example output shows that the np node pool is FIPS-enabled:
Name       enableFips
---------  ------------
np         True
nodepool1  False
Enabling FIPS on an existing node pool currently isn't supported in the Azure portal. To enable FIPS on an existing node pool, use the Azure CLI, ARM template, Bicep, or Terraform instructions in this article.
Enable FIPS on an existing node pool using an ARM template by updating the agent pool profile to set the
enableFipsproperty totrue. For example:{ "type": "Microsoft.ContainerService/managedClusters/agentPools", "name": "[concat(parameters('clusterName'), '/np')]", "apiVersion": "2023-03-01", "properties": { "enableFips": true } }Deploy the updated template using the Azure portal, Azure CLI, or Azure PowerShell. For more information on deploying ARM templates, see Deploy resources with ARM templates.
Verify your node pool is FIPS-enabled using the
az aks showcommand and query for the enableFIPS value in agentPoolProfiles.az aks show \ --resource-group myResourceGroup \ --name myAKSCluster \ --query="agentPoolProfiles[].{Name:name enableFips:enableFips}" \ -o tableThe following example output shows that the np node pool is FIPS-enabled:
Name       enableFips
---------  ------------
np         True
nodepool1  False
Enable FIPS on an existing node pool using Bicep by updating the agent pool resource to set
enableFIPStotrue. For example:param clusterName string param nodePoolName string = 'np' resource nodePool 'Microsoft.ContainerService/managedClusters/agentPools@2023-03-01' = { name: '${clusterName}/${nodePoolName}' properties: { enableFIPS: true } }Deploy the updated Bicep file using the Azure CLI, Azure PowerShell, or the Azure portal. For more information on deploying Bicep files, see Create Bicep files using Visual Studio Code.
Verify that your node pool is FIPS-enabled using the
az aks showcommand and query for the enableFIPS value in agentPoolProfiles.az aks show \ --resource-group myResourceGroup \ --name myAKSCluster \ --query="agentPoolProfiles[].{Name:name enableFips:enableFips}" \ -o tableThe following example output shows that the np node pool is FIPS-enabled:
Name       enableFips
---------  ------------
np         True
nodepool1  False
Update the
azurerm_kubernetes_cluster_node_poolresource inmain.tfby settingfips_enabledtotrue:resource "azurerm_kubernetes_cluster_node_pool" "example" { name = "np" kubernetes_cluster_id = azurerm_kubernetes_cluster.example.id vm_size = "Standard_D2s_v3" os_type = "Linux" os_sku = "Ubuntu" node_count = 3 fips_enabled = true }Apply the updated Terraform configuration using the
terraform planandterraform applycommands. Terraform detects the change tofips_enabledand triggers the necessary reimage operation.terraform plan terraform applyConnect to the AKS cluster using the [
az aks get-credentials][az-aks-get-credentials] command.az aks get-credentials \ --resource-group myResourceGroup \ --name myAKSClusterVerify your node pool is FIPS-enabled using the
az aks showcommand and query for the enableFIPS value in agentPoolProfiles.az aks show \ --resource-group myResourceGroup \ --name myAKSCluster \ --query="agentPoolProfiles[].{Name:name enableFips:enableFips}" \ -o tableThe following example output shows that the np node pool is FIPS-enabled:
Name       enableFips
---------  ------------
np         True
nodepool1  False
Disable FIPS on an existing node pool
You can update existing Linux node pools to disable FIPS. When updating an existing node pool, the node image changes from the current FIPS image to the recommended non-FIPS image of the same OS SKU. The node image change occurs after a reimage.
Update a Linux node pool using the
az aks nodepool updatecommand with the--disable-fips-imageparameter.az aks nodepool update \ --resource-group myResourceGroup \ --cluster-name myAKSCluster \ --name np \ --disable-fips-imageThis command triggers a reimage of the node pool immediately to deploy the FIPS-compliant OS. This reimage occurs during the node pool update. No extra steps are required.
Verify your node pool isn't FIPS-enabled using the
az aks showcommand and query for the enableFIPS value in agentPoolProfiles.az aks show \ --resource-group myResourceGroup \ --name myAKSCluster \ --query="agentPoolProfiles[].{Name:name enableFips:enableFips}" \ -o tableThe following example output shows that the np node pool isn't FIPS-enabled:
Name       enableFips
---------  ------------
np         False
nodepool1  False
Disabling FIPS on an existing node pool currently isn't supported in the Azure portal. To disable FIPS on an existing node pool, use the Azure CLI, ARM template, Bicep, or Terraform instructions in this article.
Disable FIPS on an existing node pool using an ARM template by updating the agent pool profile to set the
enableFipsproperty tofalse. For example:{ "type": "Microsoft.ContainerService/managedClusters/agentPools", "name": "[concat(parameters('clusterName'), '/np')]", "apiVersion": "2023-03-01", "properties": { "enableFips": false } }Deploy the updated template using the Azure portal, Azure CLI, or Azure PowerShell. For more information on deploying ARM templates, see Deploy resources with ARM templates.
Verify your node pool isn't FIPS-enabled using the
az aks showcommand and query for the enableFIPS value in agentPoolProfiles.az aks show \ --resource-group myResourceGroup \ --name myAKSCluster \ --query="agentPoolProfiles[].{Name:name enableFips:enableFips}" \ -o tableThe following example output shows that the np node pool isn't FIPS-enabled:
Name       enableFips
---------  ------------
np         False
nodepool1  False
Disable FIPS on an existing node pool using Bicep by updating the agent pool resource to set
enableFIPStofalse. For example:param clusterName string param nodePoolName string = 'np' resource nodePool 'Microsoft.ContainerService/managedClusters/agentPools@2023-03-01' = { name: '${clusterName}/${nodePoolName}' properties: { enableFIPS: false } }Deploy the updated Bicep file using the Azure CLI, Azure PowerShell, or the Azure portal. For more information on deploying Bicep files, see Create Bicep files using Visual Studio Code.
Verify your node pool isn't FIPS-enabled using the
az aks showcommand and query for the enableFIPS value in agentPoolProfiles.az aks show \ --resource-group myResourceGroup \ --name myAKSCluster \ --query="agentPoolProfiles[].{Name:name enableFips:enableFips}" \ -o tableThe following example output shows that the np node pool isn't FIPS-enabled:
Name       enableFips
---------  ------------
np         False
nodepool1  False
Update the
azurerm_kubernetes_cluster_node_poolresource inmain.tfby settingfips_enabledtofalse:resource "azurerm_kubernetes_cluster_node_pool" "example" { name = "np" kubernetes_cluster_id = azurerm_kubernetes_cluster.example.id vm_size = "Standard_D2s_v3" os_type = "Linux" os_sku = "Ubuntu" node_count = 3 fips_enabled = false }Apply the updated Terraform configuration using the
terraform planandterraform applycommands. Terraform detects the change tofips_enabledand triggers the necessary reimage operation.terraform plan terraform applyVerify your node pool isn't FIPS-enabled using the
az aks showcommand and query for the enableFIPS value in agentPoolProfiles.az aks show \ --resource-group myResourceGroup \ --name myAKSCluster \ --query="agentPoolProfiles[].{Name:name enableFips:enableFips}" \ -o tableThe following example output shows that the np node pool isn't FIPS-enabled:
Name       enableFips
---------  ------------
np         False
nodepool1  False
Message of the day
You can replace the Message of the Day (MOTD) on Linux nodes using the --message-of-the-day flag when creating a cluster or adding a node pool.
Create a cluster and replace the message of the day using the az aks create command with the --message-of-the-day flag set to the path of the new MOTD file.
az aks create --cluster-name myAKSCluster --resource-group myResourceGroup --message-of-the-day ./newMOTD.txt
Add a node pool and replace the message of the day using the az aks nodepool add command with the --message-of-the-day flag set to the path of the new MOTD file.
az aks nodepool add --name mynodepool1 --cluster-name myAKSCluster --resource-group myResourceGroup --message-of-the-day ./newMOTD.txt
Related content
To learn more about AKS security, see Best practices for cluster security and upgrades in Azure Kubernetes Service (AKS).