Create a private endpoint for Azure Data Explorer
Use an Azure private endpoint to connect to your cluster in your Azure virtual network (VNet).
Private endpoints use private IP addresses from your virtual network to connect you privately to your cluster. With this setup, network traffic between a client on your private network and the cluster travels over the virtual network and a private link on the Microsoft backbone network. This article shows you how to create a private endpoint for your cluster.
Prerequisites
- An Azure subscription. Create a free Azure account.
- Sign in to the Azure portal.
- An Azure Data Explorer cluster that isn't injected in a virtual network.
- A virtual network.
Create a private endpoint
There are several ways to create a private endpoint for a cluster.
- During the deployment of your cluster in the portal
- By creating a private endpoint resource directly
- On an existing cluster
Create a private endpoint during the deployment of your cluster in the portal
Use the following information to create a private endpoint whilst creating your cluster.
In the Create an Azure Data Explorer cluster page, select the Network tab.
Under Connectivity method, select Private Endpoints.
Under Private Endpoint, select Add.

Configure the private endpoint.
Complete the steps to create the cluster.
Create a private endpoint on an existing cluster
Use the following information to create a private endpoint on an existing cluster.
In the Azure portal, navigate to your cluster and then select Networking.
Select Private endpoint connections, and then select + Private endpoint.

Configure the private endpoint.
Configure your private endpoint
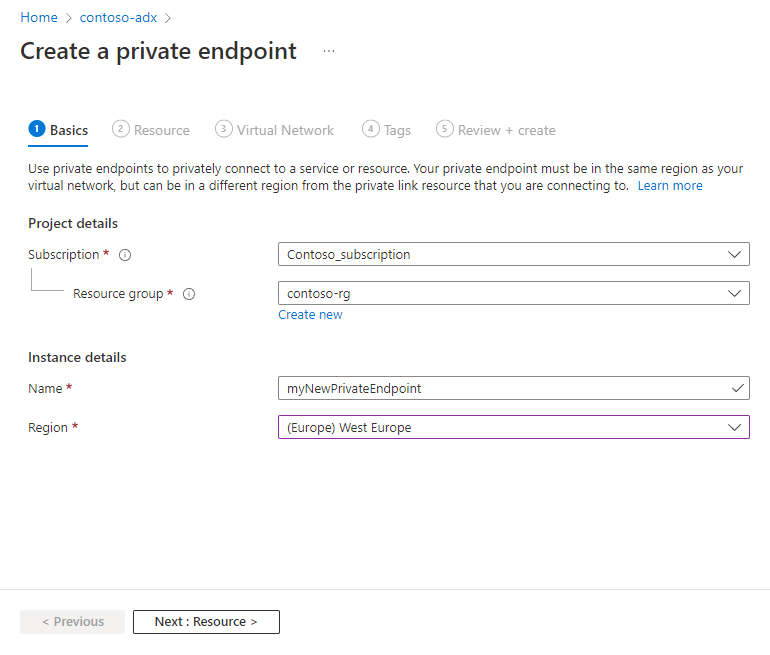
On the Basics tab, fill out the basic cluster details with the following information, and then select on Next.

Setting Suggested value Field description Subscription Your subscription Select the Azure subscription to use for your private endpoint Resource group Your resource group Use an existing resource group or create a new resource group Name myNewPrivateEndpoint Choose a name that identifies your Private Endpoint in the resource group Region (Europe) West Europe Select the region that best meets your needs On the Resources tab, select Connect to an Azure resource in my directory, fill out the resource details with the following information, and then select Next.

Setting Suggested value Field description Subscription Your subscription Select the Azure subscription that you want to use for your cluster Resource type Your resource group Select "Microsoft.Kusto/clusters Resource contoso-adx Choose the cluster that should be used as the destination for the new Azure Private Endpoint Target sub-resource cluster There's no other option Alternatively, you can select Connect to an Azure resource by resource ID or alias. This enables you to create a private endpoint to a cluster in another tenant or if you don't have at least Reader access on the resource.
Setting Suggested value Field description ResourceId or alias /subscriptions/... The resource ID or alias that someone has shared with you. The easiest way to get the resource ID is to navigate to the cluster in the Azure portal and copy the Resource ID from the Properties sections Target sub-resource cluster There's no other option Request message Please approve The resource owner sees this message while managing private endpoint connection On the Virtual Network tab, under Networking, specify the Virtual Network and Subnet where you want to deploy the private endpoint.
Under Private IP configuration, select Dynamically allocate IP address.
Note
The Statically allocate IP address option is not supported.
Under Private DNS integration, turn on the Integrate with the private DNS zone. It's needed to resolve the engine and data management endpoints including the storage accounts required for ingestion and export features.
Note
We recommend that you use the Private DNS integration option. If you have a situation where you can't use the option, follow the instructions under Use a custom DNS server.
Select Next.

On the Tags tab, configure any tags you require, and then select Next.
Review the configuration details and then select Create to create the private endpoint resource.

Verify the private endpoint creation
Once the creation of the private endpoint is complete, you'll be able to access it in the Azure portal.

To see all the private endpoints created for your cluster:
In the Azure portal, navigate to your cluster and then select Networking
Select Private endpoint. In the table, you can see all private endpoints created for your cluster.

In the Connection state column, verify that the private endpoint is approved.
Use a custom DNS server
In some situations, you may not be able to integrate with the private DNS zone of the virtual network. For example, you may be using your own DNS server or you create DNS records using the host files on your virtual machines. This section describes how to get to the DNS zones.
Install choco
Install ARMClient
choco install armclientLog in with ARMClient
armclient loginRun the following REST API call to get the private DNS zones for your cluster:
#replace the <...> placeholders with the correct values
armclient GET /subscriptions/<subscriptionIdADX>/resourceGroups/<resourceGroupNameADX>/providers/Microsoft.Kusto/clusters/<clusterName>/privateLinkResources?api-version=2022-02-01
Check the response. The required DNS zones are in the "requiredZoneNames" array in the response of the result.
{
  "value": [
    {
      "id": "/subscriptions/<subscriptionIdADX>/resourceGroups/<resourceGroupNameADX>/providers/Microsoft.Kusto/Clusters/<clusterName>/PrivateLinkResources/cluster",
      "name": "<clusterName>/cluster",
      "type": "Microsoft.Kusto/Clusters/PrivateLinkResources",
      "location": "<the region of your cluster>",
      "properties": {
        "groupId": "cluster",
        "requiredMembers": [
          "Engine",
          "DataManagement",
          "blob-storageAccount1",
          "queue-storageAccount1",
          "table-storageAccount1",
          "blob-storageAccount2",
          "queue-storageAccount2",
          "table-storageAccount2"
        ],
        "requiredZoneNames": [
          "privatelink.<the region of your cluster>.kusto.windows.net",
          "privatelink.blob.core.windows.net",
          "privatelink.queue.core.windows.net",
          "privatelink.table.core.windows.net"
        ],
        "provisioningState": "Succeeded"
      }
    }
  ]
}
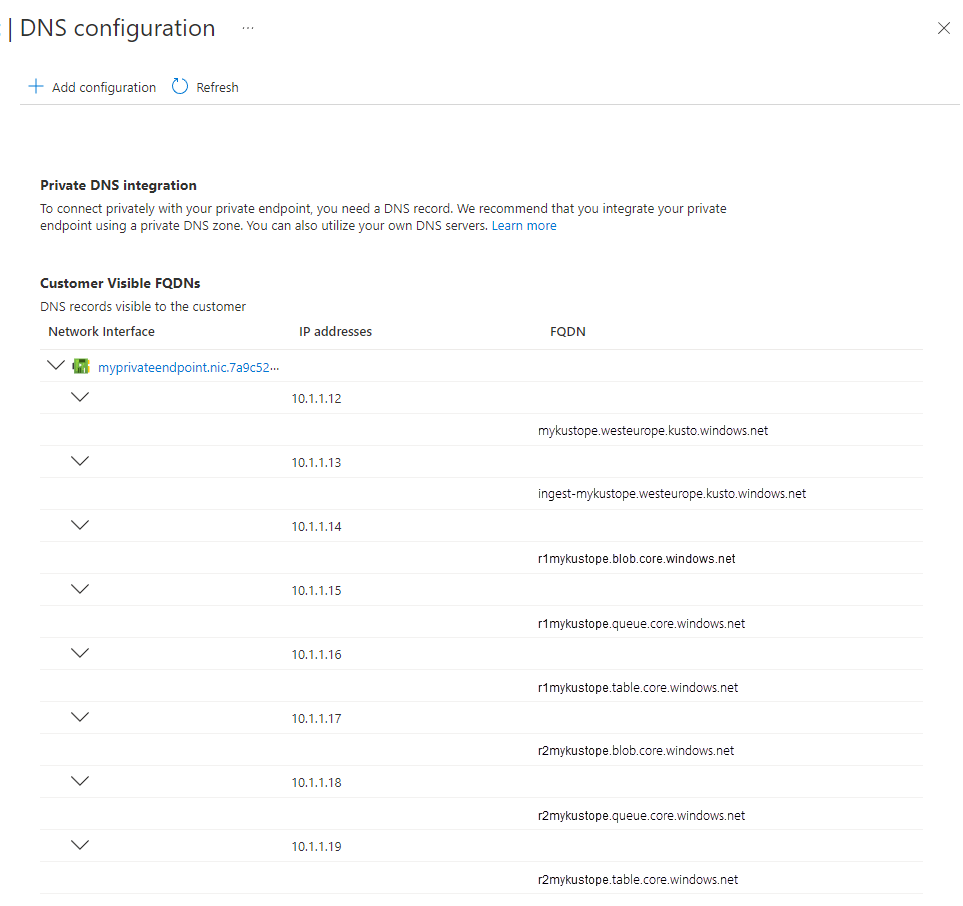
in the Azure portal, navigate to your private endpoint, and select DNS configuration. On this page, you can get the required information for the IP address mapping to the DNS name.
Warning
This information allows you to propagate your custom DNS server with the necessary records. We highly recommend that you integrate with the private DNS Zones of the virtual network and don't configure your own custom DNS server. The nature of private endpoints for Azure Data Explorer clusters is different than for other Azure PaaS services. In some situations, such as high ingestion loads, in order to increase throughput it might be necessary for the service to scale out the number of storage accounts that are accessible via the private endpoint. If you choose to propagate your own custom DNS server, it is your responsibility to take care of updating the DNS records in such situations, and later removing records i the number of storage accounts is scaled back in.
