Muistiinpano
Tämän sivun käyttö edellyttää valtuutusta. Voit yrittää kirjautua sisään tai vaihtaa hakemistoa.
Tämän sivun käyttö edellyttää valtuutusta. Voit yrittää vaihtaa hakemistoa.
Important
This feature is in Beta. No workspace setting is required to enable it. Install the Agent Bricks CLI to get started.
The Agent Bricks CLI (databricks-agentbricks) is a Azure Databricks command-line tool for developers who build and deploy custom agents in code.
The Agent Bricks CLI is a code-first path for building custom agents from the terminal. The Agent Bricks CLI scaffolds a project using a built-in framework based on Databricks best practices. It can then run the project locally for testing and deploy it to the Azure Databricks agent runtime. The CLI enables you to go from an empty directory to a deployed agent without wiring up runtime, tools, memory, and managed resources by hand. For other ways to build custom agents, including the app-based workflow, see Run agents on Databricks Apps using the legacy agent server.
Prerequisites
The Databricks CLI, installed and available on your path.
Python 3.10 or above, with
pip.Install the Agent Bricks CLI:
pip install databricks-agentbricks
The Agent Bricks CLI lifecycle
The Agent Bricks CLI scaffolds a local directory of deployable agent code from a framework template, with the runtime, tests, and an optional chat UI already wired up. You write the application logic (model, tools, and prompts), and the CLI handles running it locally and deploying it to Azure Databricks infrastructure.
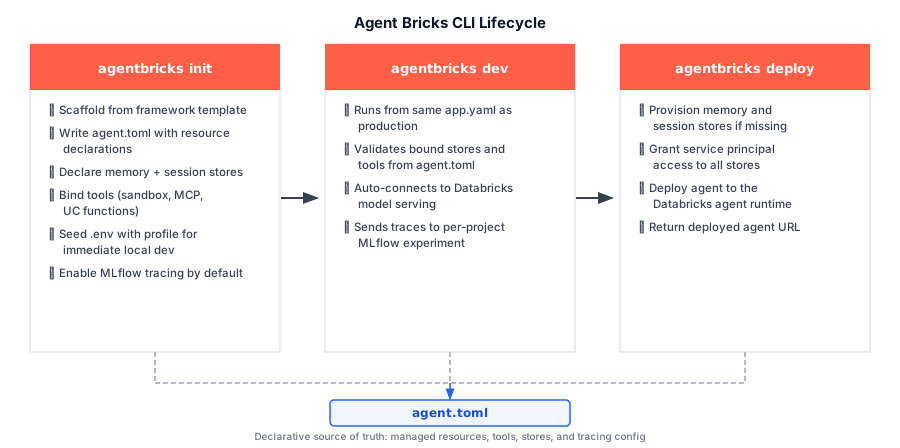
agent.toml is the declarative source of truth for all Azure Databricks-managed resources your agent depends on: tool bindings (data sandbox, managed Model Context Protocol (MCP) services, Unity Catalog functions), and memory, session, and tracing resources. agentbricks deploy reads it to provision and wire everything up, so the file, not hand-written setup code, is what deploys.
The three commands that take an agent from a blank directory to production:
agentbricks initscaffolds the project from a bundled template, optionally seeding a.envfile with a Databricks profile so the project runs right away.agentbricks devruns the agent locally against Azure Databricks model serving so you can test it before deploying.agentbricks deployprovisions the resources declared inagent.tomland rolls the agent out to the Azure Databricks agent runtime.
Note
You can also add tools and bind memory and session stores at any time, not only at init. Use agentbricks tools add, agentbricks memory bind, and agentbricks sessions bind to update your agent configuration between any of these steps.
Agent Bricks CLI capabilities
| Capability | Description |
|---|---|
| Model access | The Agent Bricks CLI automatically provisions model access so your agent can call a Azure Databricks-served model without managing credentials or endpoints. See Databricks Foundation Model APIs. |
| Managed memory | Long-term memories that an agent can write and search, partitioned by actor and backed by managed stores. Use memory to persist facts and preferences across sessions. See Managed agent memory. |
| Managed sessions | Conversation transcripts held in managed session stores and partitioned by actor, with support for forking sessions into independent copies. See Managed agent sessions. |
| Tools | Azure Databricks-managed capabilities declared in agent.toml: a downscoped Unity Catalog sandbox, a Azure Databricks-managed MCP service, or a Unity Catalog function. Custom Python tools are written directly in the project code. See MCPs and agent tools. |
| Tracing | MLflow tracing that is on by default, routing each run's traces to a per-project MLflow experiment for debugging and monitoring. See Tracing overview. |
| Deployment | Deploys an agent to the Azure Databricks agent runtime, grants the agent's service principal access to bound stores, and manages the deployment lifecycle. |
Create a new agent
Step 1: Authenticate with OAuth and save a profile
The Agent Bricks CLI uses Databricks CLI authentication. Authenticate to your workspace with OAuth (user-to-machine) and save the credentials as a named profile.
To start the OAuth flow, run the following, replacing the host with your workspace URL. The command opens a browser to complete sign-in, then writes the profile to ~/.databrickscfg:
databricks auth login --host https://<your-workspace-url> --profile <profile>
To set that profile as the CLI's default so later commands can omit --profile, run the following:
agentbricks login --profile <profile>
agentbricks login validates the profile's credentials. If they are missing or rejected, the CLI reruns databricks auth login and retries.
Step 2: Scaffold the agent project
Scaffold a new agent project, and pass --framework to choose the template. This example uses the LangGraph template, which includes a browser chat app:
agentbricks init --framework langgraph my-agent
cd my-agent
The CLI ships one bundled template per framework and --framework selects which one to scaffold from: langgraph for LangGraph or openai for the OpenAI Agents SDK. The CLI writes the project's managed resources and tool bindings to agent.toml and template provenance to .agentbricks/project.toml. To scaffold the API-only backend without the chat app, add --disable-chat-app.
Step 3: Attach managed session and memory stores
Bind managed stores so your agent can persist conversation history and long-term memory. Each command records the store name in agent.toml and creates the store if it does not exist.
To bind a session store and a memory store, run the following:
agentbricks sessions bind my-agent-sessions
agentbricks memory bind my-agent-memory
Step 4: View tracing
Tracing is on by default. agentbricks init binds a default /Shared/agentbricks_traces/<project> MLflow experiment, and agentbricks dev and agentbricks deploy send each run's traces to it.
To list traces after your agent has produced some, run the following:
agentbricks tracing list
To bind a specific MLflow experiment, run agentbricks tracing bind --experiment-id <experiment-id>. To turn tracing off, run agentbricks tracing unbind.
Step 5: Run the agent locally
Run the agent on your machine to test it before you deploy.
agentbricks dev
This starts a local server on port 8000 using the same command and environment as the Azure Databricks agent runtime. The Agent Bricks CLI connects the agent to Azure Databricks model serving so it can call the model locally. The template sets a default model as the MODEL value in agent/agent.py. To use a different model, edit that value. Send requests to http://localhost:8000 to interact with the agent.
Step 6: Deploy the agent
Deploy the agent to the Azure Databricks agent runtime. The CLI provisions the bound stores, grants the agent's service principal access to them, and rolls out the deployment. The deployed agent is named agent-bricks-<name>.
agentbricks deploy my-agent
When the deployment finishes, the CLI returns the deployment's URL. Open that URL to interact with your live agent, which is automatically connected to Azure Databricks model serving. To manage the deployment afterward, use the agentbricks deployments commands, such as agentbricks deployments logs and agentbricks deployments stop.
Bring an existing agent
If you already built an agent with LangGraph or the OpenAI Agents SDK, use the --existing flag to move it to the Agent Bricks CLI and DurableAgentServer. The CLI doesn't rewrite your code. Instead, it prepares migration instructions that a coding agent, such as Claude Code or Codex, follows to convert the project.
Step 1: Prepare the migration
From the agent's project directory, prepare the migration. Pass the framework that the agent uses: langgraph for LangGraph or openai for the OpenAI Agents SDK.
agentbricks init --framework langgraph --existing .
The CLI writes an agent-bricks-migrate/ directory that contains the migration instructions, a prompt for your coding agent, and a reference project generated from the CLI's templates. It also adds skills in .claude/skills/ and .agent/skills/ that point coding agents to the instructions. The command doesn't change your application code, dependencies, or .env file, and doesn't create any resources in your workspace.
Step 2: Convert the project with your coding agent
Paste the prompt from agent-bricks-migrate/ into your coding agent. The coding agent converts the project to use agent.toml and a DurableAgentServer entrypoint, and verifies the conversion.
Step 3: Check the conversion
Run agentbricks doctor in the project directory:
agentbricks doctor .
agentbricks doctor inspects the project's files without running its code or contacting Azure Databricks. It succeeds when the project has a valid agent.toml, starts DurableAgentServer with an invoke handler, and calls the adapter for its framework. A failed report means that the conversion isn't finished.
Step 4: Clean up, run, and deploy
Delete agent-bricks-migrate/ and the two skills that point to it, and keep them out of your commits. Then run the agent with agentbricks dev and deploy it with agentbricks deploy.
Considerations
--existingsupports LangGraph and the OpenAI Agents SDK withDurableAgentServer. It doesn't support--server custom.- Switching the agent to a managed session store doesn't move its existing conversation history. The migration instructions ask you to decide how to handle earlier conversations.
- The
--disable-chat-app,--memory-store, and--session-storeoptions shape the reference project. They don't create resources.
agent.toml reference
agent.toml is the declarative source of truth for the Azure Databricks-managed resources that your agent uses. agentbricks init creates it, agentbricks tools add, agentbricks memory bind, agentbricks sessions bind, and agentbricks tracing bind update it, and agentbricks deploy reads it to provision resources and grant access. You can also edit it directly.
| Section or field | Description |
|---|---|
schema_version |
The version of the agent.toml format. Generated projects use 1. |
[agent] framework |
The framework template: langgraph or openai. |
[agent] server |
The agent server: agentbricks for DurableAgentServer, or custom for your own server. |
[memory_store] name |
The managed memory store that the agent uses. |
[session_store] name |
The managed session store that the agent uses. |
[tracing] experiment_name |
The MLflow experiment for traces. Remove the section to turn tracing off. |
[[tools]] |
A tool binding. Each tool has an id, an auth value of user or app, and a source that identifies the tool, plus an optional policy. |
[auth.user] |
Request-user authorization for tools that you write in code: required and additional_api_scopes. See Request-user authorization. |
The following example is the file that agentbricks init generates for a LangGraph agent named my-agent:
schema_version = 1

[agent]
framework = "langgraph"
server = "agentbricks"

[memory_store]
name = "my-agent-memory"

[session_store]
name = "my-agent-session"

[tracing]
experiment_name = "/Shared/agentbricks_traces/my-agent"
The following example shows tool bindings that agentbricks tools add writes: a built-in MCP service, a Genie Agent, and a sandbox scoped to one table:
[[tools]]
id = "web_search"
auth = "user"
source = { kind = "mcp", service = "system.ai.web_search" }

[[tools]]
id = "genie_agent"
auth = "user"
source = { kind = "genie_agent", space_id = "<space-id>" }

[[tools]]
id = "sandbox"
auth = "user"
source = { kind = "sandbox", service = "system.ai.sandbox" }
policy = { downscope = [{ resource = "table:samples.nyctaxi.trips", permission = "read_only" }] }
Tools that call a Unity Catalog function use source = { kind = "uc_function", function = "<catalog>.<schema>.<function>" } and support only auth = "app".
Command reference
For the full, up-to-date command reference including all commands and flags, see the Agent Bricks CLI README on GitHub.
Additional resources
- Agent tools and MCP services: MCPs and agent tools.
- Managed agent memory concepts and API: Managed agent memory.
- Managed agent sessions concepts and API: Managed agent sessions.
- MLflow Tracing for agents: Tracing overview.