Define a work item query
Azure DevOps Services | Azure DevOps Server 2022 - Azure DevOps Server 2019
Visual Studio 2019 | Visual Studio 2022
Work item queries in Azure Boards generate lists of work items based on the filter criteria provided by you. You can save and share these managed queries with others.
You can create queries from the web portal or from a supported client, such as Visual Studio Team Explorer. To support bulk updates or additions, import or export queries using Excel or .csv files.
Note
The browser images used in this article are from the New Boards Hubs feature, which is enabled by default. If this feature isn't enabled, you might be using the previous boards experience. To display the images for the previous experience, select the Azure DevOps Server 2022 version of this article.
Check out our recommended best practices, later in this article.
Prerequisites
- Access levels:
- Have Stakeholder access to view and run shared queries. All project members have Stakeholder access by default. For more information, see Change the permissions for a shared query or folder.
- Have Basic access or higher to add and save a shared query.
- Permissions: Have your Contribute permission set to Allow for the folder that you want to add a query to. By default, the Contributors group doesn't have this permission.
Note
Users with Stakeholder access for a public project have full access to query features just like users with Basic access. For more information, see Stakeholder access quick reference.
- Access levels: By default, all project members and users with Stakeholder access can view and run all shared queries. You can change the permissions set for a shared query folder or shared query. For more information, see Set query permissions.
- Permissions: To add and save a query under Shared queries, you must be granted Basic access or higher. Also, you must have your Contribute permission set to Allow for the folder you want to add the query to. By default, the Contributors group doesn't have this permission.
Choose a query filter
From the Query Editor, select the filter to jump to an article with sample queries. Along with the query filters, you can interactively apply filters to query results.
Note
Managed queries don't support proximity searches, however semantic searches do. Semantic searches also support both * and ? as wildcard characters and you can use more than one wildcard character to match more than one character. For more information, see Functional work item search.
Filter features
Macros
You can interactively filter a query using the ![]() Filter function.
Filter function.
Open Queries
From your web browser, (1) check that you selected the right project, (2) choose Boards > Queries, and then (3) choose All.
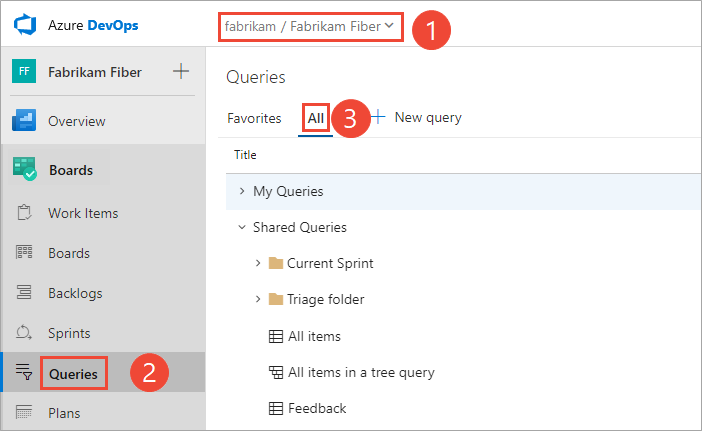
The Queries page opens to the Favorites tab that lists the queries you set as favorites. You can choose the All tab to view all queries you defined and shared queries for the project.
Tip
Queries you or your team have chosen as favorites show up on the Favorites page. Favorite queries along with other objects also appear on your Project page. For more information, see Set personal or team favorites.
From your project, choose Boards > Queries, and then choose All.

The Queries page opens to the Favorites tab that lists the queries you set as favorites. You can choose the All tab to view all queries you defined and shared queries for the project.
Tip
Queries you or your team have chosen as favorites show up on the Favorites page. Favorite queries along with other objects also appear on your Project page. For more information, see Set personal or team favorites.
Define a flat-list query
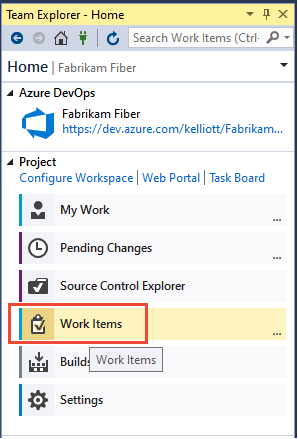
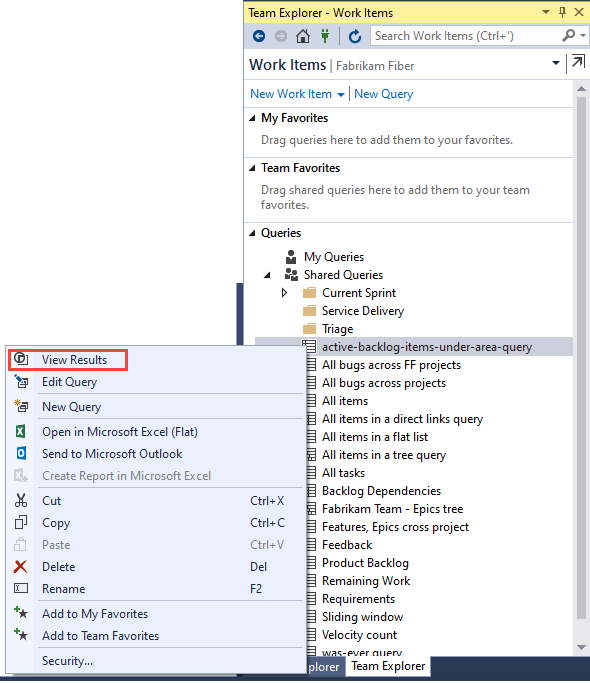
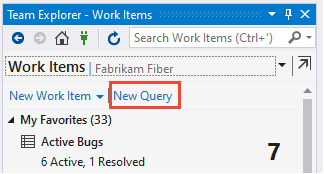
Start a new query from the Queries tab in the web portal or the Work Items tab in Team Explorer.
- Select New > New query.
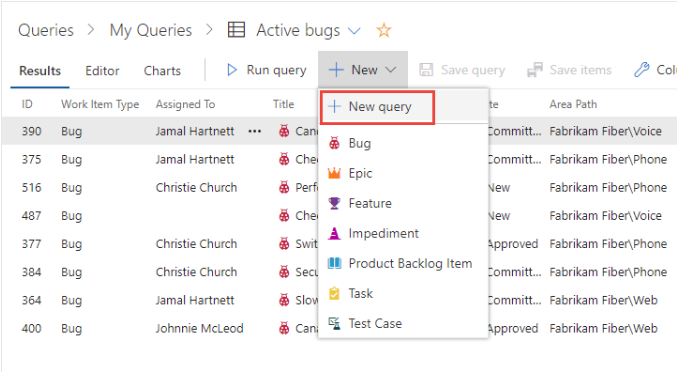
The Query Editor displays with the following default settings: Flat list of work items, Work Item Type=[Any], and State=[Any].
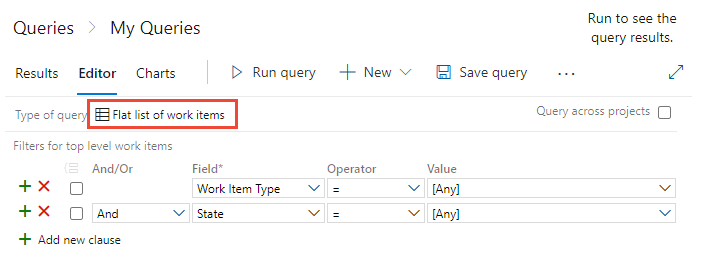
- Modify the Values and add or remove clauses, or change the Type of query to Work items and direct links or to a Tree of work items.
- Select New > New query.

The Query Editor displays with the following default settings: Flat list of work items, Work Item Type=[Any], and State=[Any].

- Modify the Values and add or remove clauses, or change the Type of query to Work items and direct links or to a Tree of work items.
Query across or within projects
New queries scope to the current project by default. But, you can create queries to find work items defined within the organization or project collection. All queries that you save, however, get saved under a specific project.
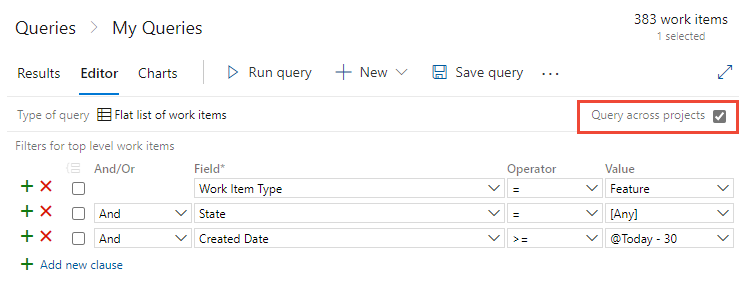
To list work items defined in two or more projects, checkmark Query across projects. For example, the following query finds all features created in all projects within the last 30 days.

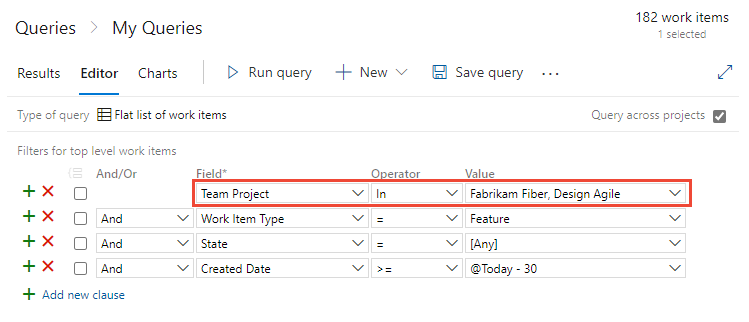
With the Query across projects checked, you can add the Team Project field to filter to a select number of projects.

Note
- Separate multiple project names with the list separator that corresponds to the regional settings defined for your client computer, for example, a comma
,. - When you use the 'State' field in a query across multiple projects, the displayed values are limited to those defined in the default project. This means that if you're querying across projects, you might not see all possible state values from each project, but only those from the project that is set as the default. For example, if you have three projects—Project A, Project B, and Project C—and only Project A has a state called 'In Review,' while Projects B and C have different states, querying across these projects only shows the states defined in Project A.
- The Team Project field is available only after you check Query across projects.
- When Query across projects is checked, all fields from all work item types defined in all projects in the collection appear in the Field drop-down menu.
- When Query across projects is unchecked, only those fields from those work item types, as defined in the current project, appear in the Field drop-down menu.
Define a clause
To create a query, define one or more clauses. Each clause defines a filter criteria for a single field.
Sample query clause
| And/Or | Field | Operator | Value |
|---|---|---|---|
| And | Assigned To | = | @Me |
For a list of available operators based on the field data type, see Query index quick reference.
All clauses get added as an And statement. Select Or to change the grouping. Group clauses to ensure that the clause statements are run in the sequence required.
Select Add new clause to add another clause at the end of the query, and then select the Field, Operator, and Value for that clause.


For example, search for all work items assigned to you by specifying the Assigned To field, the equals (=) operator, and the @Me macro, which represents your user identity.
Tip
To view the WIQL syntax for a query, and how parenthesis are used to group clauses, install the Marketplace Wiql Editor. This extension supports viewing the WIQL syntax and exporting it to a WIQL file for use in REST API calls. For more information, see Syntax for the Work Item Query Language (WIQL).
Checklist for defining a query clause
In the first empty row, under the Field column heading, choose the down arrow to display the list of available fields, and choose an item in the list. For more information, see Query Fields and Values.
In the same row, under the Operator column heading, select the down arrow to display the list of available operators, and then choose an item in the list. For more information, see Operators.
In the same row, under the Value column heading, either enter a value, or select the down arrow, and then choose an item in the list. For more information about how to use a macro or variable to specify the current project, user, date, or other selection, see Variables.
To add a clause, choose Add new clause.
You can add a clause to the end of the query, or perform the following tasks with the corresponding icons:
 Insert new filter line
 Remove this filter line
 Group selected clauses
 Ungroup clauses
Use a work item tree to view hierarchies
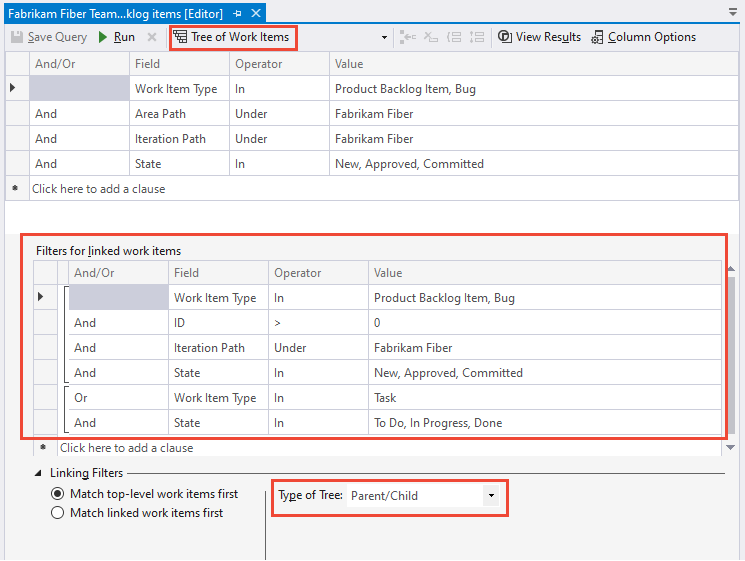
Use the  Tree of Work Items query to view a multi-tiered, nested list of work items. For example, you can view all backlog items and their linked tasks. To focus on different parts of the tree, choose
  Expand all or
  Collapse all.
Note
You can't construct a query that shows a hierarchical view of Test Plans, Test Suites, and Test Cases. These items aren't linked together using parent-child link types. However, you can create a direct links query that lists test-related work items. Also, you can, view the hierarchy through the Test Plans page.
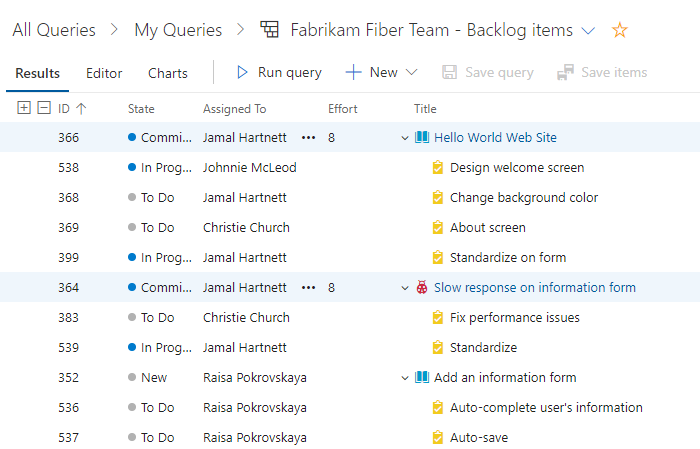
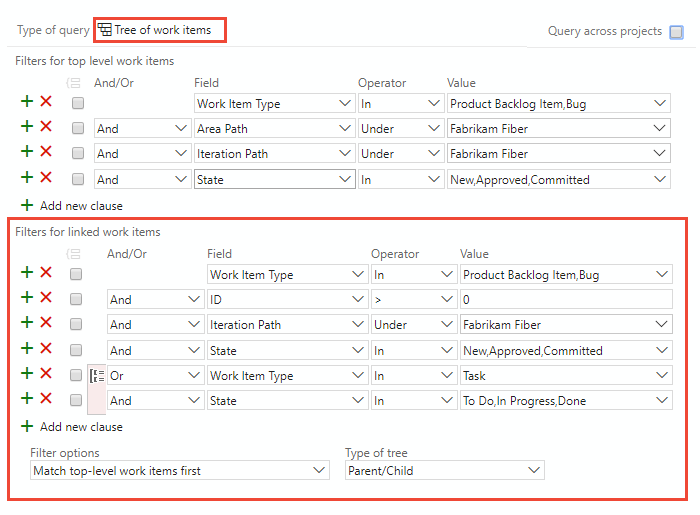
Define the filter criteria for both parent and child work items. To find linked children, select Match top-level work items first. To find linked parents, select Match linked work items first.
Use direct links to view dependencies
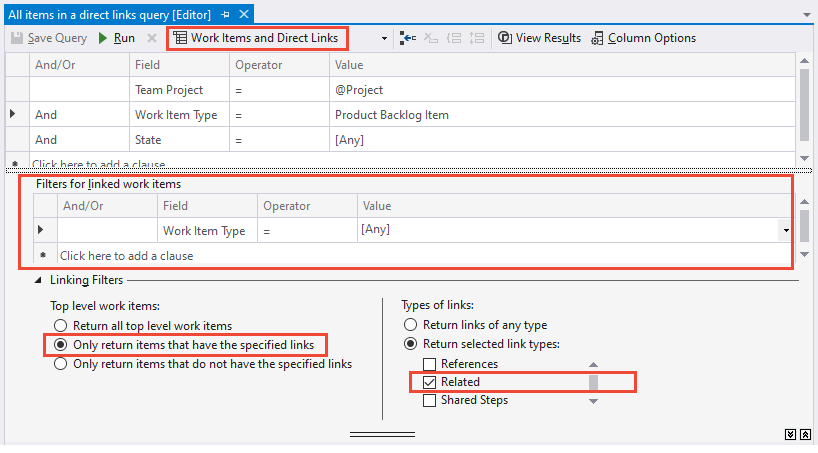
Use the  Work items and Direct links query to track work items that depend on other tracked work, such as tasks, bugs, issues, or features. For example, you can view backlog items that depend on other items being implemented or a bug being fixed.
Use the direct links query to track dependencies across teams. The query also helps you manage commitments your team makes. Choose the filter criteria for the top and linked work items. And, select the types of links to filter the dependencies.

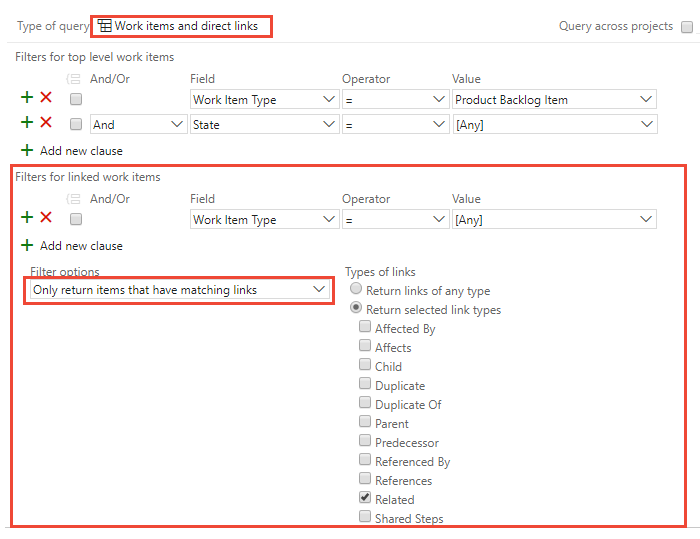
Filter your first-tier list of work items by choosing one of these options:
- Only return items that have matching links: First-tier work items return, but only if they have links to work items specified by the linked work items filter criteria.
- Return all top level items: All first-tier work items return despite the linked work items filter criteria. Second-tier work items that are linked to the first tier return if they match the linked work items filter criteria.
- Only return items that do not have matching links: First-tier work items are returned, but only if they don't have links to work items specified by the linked work items filter criteria.
For more information about each link type, see Link type reference.
Use and/or logical expression
Specify And or Or to create logical expressions of your query clauses. Use And to find work items that meet the criteria in both the current clause and the previous clause. Use Or to find work items that meet the criterion in either the current clause or the previous clause.
Add one new clause for each work item field to refine your search criteria. Add clauses to return only the set of work items you want. If you don't receive the results you expect from your query, refine it. You can add, remove, group, or ungroup query clauses to improve your query results.
Group query clauses to operate as a single unit separate from the rest of the query. Grouping clauses is similar to putting parentheses around an expression in a mathematical equation or logic statement. When you group clauses, the And or Or for the first clause in the group applies to the whole group.
Group clauses
Grouped clauses operate as a single unit separate from the rest of the query. Grouping clauses is similar to putting parentheses around a mathematical equation or logic expression. The And or Or operator for the first clause in the group applies to the whole group.
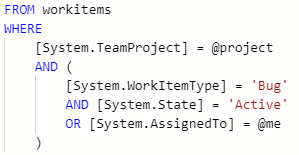
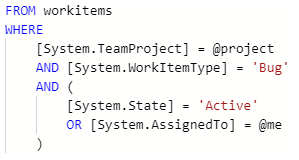
As the following examples show, the grouped clauses are translated to the corresponding logical expression.
| Query | Grouped clauses | Logical expression |
|---|---|---|
| 1 |  |
 |
| 2 |  |
 |
| 3 |  |
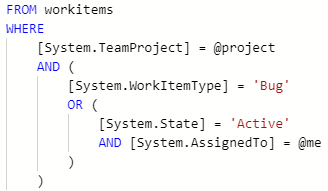 |
These queries return work items that are type Bug and meet the following logical expressions:
- Query 1:
AND State=Active OR Assigned to @Me - Query 2:
AND (State=Active OR Assigned to @Me) - Query 3:
OR (State=Active AND Assigned to @Me)
To group one or more clauses, select them and then select the ![]() group clauses icon.
group clauses icon.

You can also group several grouped clauses. Check the boxes of each clause. Then, choose the ![]() group clauses icon.
group clauses icon.
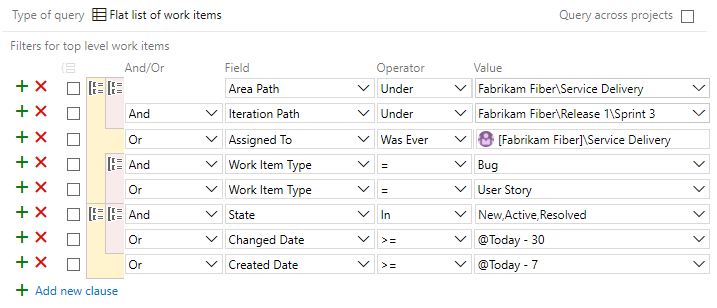
If your query results don't return expected results, do the following steps:
- Make sure that each clause is defined as you intended.
- Verify
And/Orassignments to each clause. If your results contain more work items than expected, often anOrclause is present instead of anAndclause. - Determine if you need to group or change the grouping of the query clauses and the
And/Orassignments of each grouped clause. - Add more query clauses to refine your query filter criteria.
- Review the options available to specify fields, operators, and values.
- See best practices, later in this article.
Ungroup a clause
To ungroup a clause, select the ![]() ungroup clauses icon for the grouped clause.
ungroup clauses icon for the grouped clause.
Set default column width in query results
To set the default column width in query results, do the following steps:
- Open the query you want to modify.
- Manually adjust the column widths to your desired size by dragging the edges of the column headers.
- Select Save or Save As if you want to save it as a new query.
- Close and reopen the query to ensure that the column widths are retained.
Azure DevOps doesn't currently support setting a default column width that persists across all sessions. The column widths are saved per query, so you need to adjust and save them for each query individually.
View query results in a dashboard
The following two widgets display query results. You can open work items directly from these widgets.
- Work assigned to me: Lists all proposed or active work items assigned to the signed-in user. Lists the ID, State, and Title fields.
- Query results widget: Displays the results of a flat, tree, or direct-links query. You can configure the fields displayed through the widget, resize the column fields, and expand and collapse tree and direct-links query.
For more information, see Add widgets to a dashboard.
View query results widget with Parent titles
You can view the results of a query with the Parent title displayed. To do so, perform these steps:
- Create the query that filters the work items of interest. The query can be a flat-list, tree, or direct-links query.
- Add the Parent field as a column.
- Save the query as a Shared query or Team favorite.
- Add the Query results widget to your dashboard and configure the query. Make sure the Parent field is set to display.
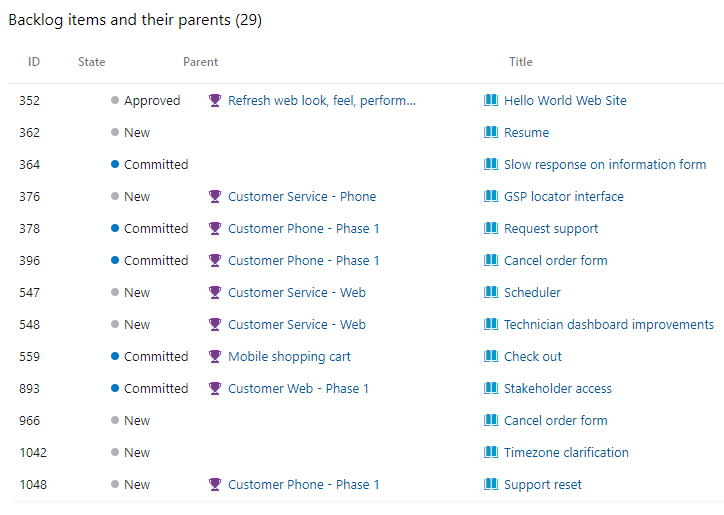
The following image illustrates a query results widget that displays the Parent field.
Define a query as a hyperlink
A query hyperlink uses the Work Item Query Language (WIQL), which resembles Transact-SQL. For more information, see Syntax for the Work Item Query Language (WIQL).
Note
Most browsers enforce a limit of between 2000 and 2083 characters for a URL string.
Query hyperlink syntax
Encode the WIQL portion of the URL syntax. You can use any URL encoder tool to encode your URL.
https://dev.azure.com/OrganizationName/ProjectName/_workitems?_a=query&wiql={Encoded WorkItemQueryLanguage}
For example, the following hyperlink lists the ID and title of all active bugs defined under the FabrikamFiber/Web area path for the Fabrikam organization.
https://dev.azure.com/fabrikam/FabrikamFiber/_workitems?_a=query&wiql=SELECT%20%5BSystem.ID%5D%2C%20%5BSystem.Title%5D%20FROM%20WorkItems%20WHERE%20%5BSystem.TeamProject%5D%3D'FabrikamFiber'%20AND%20%5BSystem.WorkItemType%5D%3D'Bug'%20AND%20%5BSystem.State%5D%3D'Active'%20AND%20%5BSystem.AreaPath%5D%3D'FabrikamFiber%5CWeb'
The decoded WIQL conforms to:
SELECT [System.ID], [System.Title]
   FROM WorkItems
   WHERE [System.TeamProject]='FabrikamFiber'
   AND [System.WorkItemType]='Bug'
   AND [System.State]='Active'
   AND [System.AreaPath]='FabrikamFiber\Web'
Note
The WIQL length must not exceed 32K characters for Azure Boards queries.
Query hyperlink syntax
https://{ServerName}/{CollectionName}/{ProjectName}/_workitems?_a=query&wiql={Encoded WorkItemQueryLanguage}
For example, the following hyperlink lists the ID, title, and state of all bugs under the FabrikamFiber/Web area path.
http://fabrikam:8080/tfs/DefaultCollection/FabrikamFiber/_workitems?_a=query&wiql=SELECT%20%5BSystem.ID%5D%2C%20%5BSystem.Title%5D%2C%20%5BSystem.State%5D%20FROM%20WorkItems%20WHERE%20%5BSystem.TeamProject%5D%3D'FabrikamFiber'%20AND%20%5BSystem.WorkItemType%5D%3D'Bug'%20AND%20%5BSystem.AreaPath%5D%3D'FabrikamFiber%5CWeb'%20%20
For example, see the following nonencoded entry.
http://fabrikam:8080/tfs/DefaultCollection/FabrikamFiber/_workitems?_a=query&wiql=
SELECT [System.ID], [System.Title], [System.State]
   FROM WorkItems
   WHERE [System.TeamProject]='FabrikamFiber'
   AND [System.WorkItemType]='Bug'
   AND [System.AreaPath]='FabrikamFiber\Web'
Best practices
The following best practices apply to the following queries you can create:
Create focused, selective queries
Define a highly selective query by applying all filters that are necessary for your query. The more selective the query is, the smaller the set of results. The smaller the result set is, the more targeted and selective your query is.
Use tags to categorize work items
Use work item tags to categorize your work items instead of a custom field. Queries that filter on tags usually perform faster over those queries that filter on string matches.
Unlike custom field matches or partial matches, a query with a Tags Contains operation doesn't require a complete scan of all work item tables.
Use Contains words for string matches
To filter on a string match, use the Contains Words instead of the Contains operator. The Contains Words operator runs a full-text search on the specified field, which tends to complete more quickly.
The Contains operator runs a table scan, which is a slower operation than the Contains Words operator. It also consumes more CPU cycles. These CPU cycles can cause you to encounter rate limitations. For more information, see Rate and usage limits.
Specify small groups with the In Group operator
The In Group operator filters work items based on matches within a group of values. The group of values correspond to the values contained within a team, security group, or work tracking category. For example, you can create a query to find all work items that are assigned to any member of a team. Or, find all work items that belong to the requirements category (Microsoft.RequirementCategory).
When you filter on a group that contains a large number of members, your result set tends to be larger and nonselective. Also, if a group corresponds to a large Microsoft Entra group, the query generates a fairly large cost to resolve that group from Microsoft Entra ID.
Avoid use of negated operators
Negated operators—such as <>, Not In, Not Under, Not In Group—tend to generate nonselective queries and large result sets.
Only use negated operators when necessary. Always try to find alternatives first. For example, if Field1 has values A, B, C, D; specify the Field1 In A, B, C clause, instead of the negated Field1 <> D clause.
Avoid string comparisons
Queries that contain string comparisons generate table scans that are inherently inefficient. Instead, we recommend you use tags or a specific custom field as alternatives, particularly when a query performs poorly.
Limit Or operators
Limit the number of Or operators defined in your query. Queries run better when fewer Or operators are used. Too many Or operators can make your query nonselective. If your query runs slowly, reorder the Or operator clause towards the top of the query clauses.
Save your query
Due to internal optimizations, saved queries tend to perform better over unsaved queries. Always save your query when you plan to reuse it. Even for WIQL queries run through a REST API, save the WIQL through the web portal to make your REST API calls, so they're less prone to future performance regressions.
Run your query
Sometimes you need to run your query a few times to reach the right optimization plan. Make sure to save your query and run it up to 10 times over a 30-minute period. This way, the system can examine and seek out the optimization plan that's most appropriate for your query.
