Démarrage rapide : Joindre votre application d’appels à un standard automatique Teams
Dans ce guide de démarrage rapide, vous allez apprendre à démarrer l’appel d’un utilisateur Azure Communication Services vers un standard automatique Teams. Vous allez y parvenir en procédant comme suit :
- Activez la fédération de la ressource Azure Communication Services avec le locataire Teams.
- Sélectionnez ou créez un standard automatique Teams via le centre d’administration Teams.
- Obtenez l’adresse e-mail du standard automatique via le centre d’administration Teams.
- Obtenez l’ID d’objet du standard automatique via l’API Graph.
- Démarrez un appel avec le kit de développement logiciel (SDK) Azure Communication Services Calling.
Si vous souhaitez passer à la fin, vous pouvez télécharger ce guide de démarrage rapide en guise d’exemple sur GitHub.
Activer l’interopérabilité dans votre locataire Teams
Un utilisateur Microsoft Entra avec un rôle Administrateur Teams peut exécuter la cmdlet PowerShell avec le module Microsoft Teams pour activer la ressource Communication Services dans le locataire.
1. Préparer le module Microsoft Teams
Tout d’abord, ouvrez PowerShell et vérifiez l’existence du module Teams avec la commande suivante :
Get-module *teams*
Si vous ne voyez pas le module MicrosoftTeams, installez-le d’abord. Pour installer le module, vous devez exécuter PowerShell en tant qu’administrateur. Exécutez ensuite la commande suivante :
Install-Module -Name MicrosoftTeams
Vous êtes alors informé des modules à installer, que vous pouvez confirmer avec une réponse Y ou A. Si le module est installé mais obsolète, vous pouvez exécuter la commande suivante pour mettre à jour le module :
Update-Module MicrosoftTeams
2. Se connecter au module Microsoft Teams
Une fois le module installé et prêt, vous pouvez vous connecter au module MicrosftTeams avec la commande suivante. Une fenêtre interactive vous invite à vous connecter. Le compte d’utilisateur que vous utilisez doit avoir des autorisations d’administrateur Teams. Sinon, vous pouvez obtenir une réponse access denied aux étapes suivantes.
Connect-MicrosoftTeams
3. Activer la configuration du locataire
L’interopérabilité avec les ressources Communication Services est contrôlée par la configuration du locataire et la stratégie attribuée. Le locataire Teams a une seule configuration de locataire, et les utilisateurs Teams ont une stratégie générale ou une stratégie personnalisée attribuée. Pour plus d’informations, consultez Attribuer des stratégies dans Teams.
Une fois connecté, vous pouvez exécuter l’applet de commande Set-CsTeamsAcsFederationConfiguration pour activer la ressource Communication Services dans votre locataire. Remplacez le texte IMMUTABLE_RESOURCE_ID par un ID de ressource immuable dans votre ressource de communication. Plus de détails sur l’obtention de ces informations sont disponibles ici.
$allowlist = @('IMMUTABLE_RESOURCE_ID')
Set-CsTeamsAcsFederationConfiguration -EnableAcsUsers $True -AllowedAcsResources $allowlist
4. Activer une stratégie de locataire
Chaque utilisateur Teams a une External Access Policy attribuée qui détermine si les utilisateurs Communication Services peuvent appeler cet utilisateur Teams. Utilisez l’applet de commande Set-CsExternalAccessPolicy pour vérifier que la stratégie attribuée à l’utilisateur Teams a défini EnableAcsFederationAccess sur $true
Set-CsExternalAccessPolicy -Identity Global -EnableAcsFederationAccess $true
Créer ou sélectionner un standard automatique Teams
Le standard automatique Teams est un système qui fournit un système de gestion automatisée d’appels pour les appels entrants. Il sert de réceptionniste virtuel, ce qui permet aux appelants d’être automatiquement routés vers la personne ou le service approprié sans avoir besoin d’un opérateur humain. Vous pouvez sélectionner un standard automatique existant ou en créer un via le centre d’administration Teams.
Découvrez comment créer un standard automatique à l’aide du centre d’administration Teams ici.
Rechercher l’ID d’objet du standard automatique
Une fois le standard automatique créé, nous devons trouver l’ID d’objet corrélé pour l’utiliser ultérieurement lors des appels. L’ID d’objet est connecté au compte de ressource qui a été attaché au standard automatique. Ouvrez l’onglet Comptes de ressource dans l’administration Teams et recherchez l’e-mail du compte.
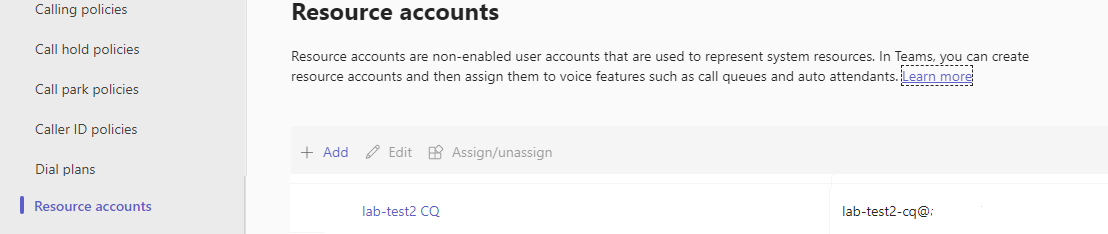 Vous trouverez toutes les informations nécessaires à un compte de ressource dans Microsoft Graph Explorer en utilisant cet e-mail dans la recherche.
https://graph.microsoft.com/v1.0/users/lab-test2-cq-@contoso.com
Dans les résultats, nous pouvons trouver le champ « ID »
    "userPrincipalName": "lab-test2-cq@contoso.com",
    "id": "31a011c2-2672-4dd0-b6f9-9334ef4999db"
Prérequis
- Obtenez un compte Azure avec un abonnement actif. Créez un compte gratuitement.
- Node.js, Active LTS et Maintenance LTS (version 8.11.1 et 10.14.1).
- Créez une ressource Communication Services active. Créez une ressource Communication Services.
Configuration
Création d’une application Node.js
Ouvrez votre fenêtre de terminal ou de commande, créez un répertoire pour votre application, puis accédez-y.
mkdir calling-quickstart && cd calling-quickstart
Installer le package
Utilisez la commande npm install pour installer le SDK Azure Communication Services Calling pour JavaScript.
Important
Ce guide de démarrage rapide utilise la version next du SDK Azure Communication Services Calling.
npm install @azure/communication-common@next --save
npm install @azure/communication-calling@next --save
Configurer le framework d’application
Ce guide de démarrage rapide utilise webpack pour regrouper les ressources de l’application. Exécutez la commande suivante pour installer les packages npm webpack, webpack-cli et webpack-dev-server, puis listez-les comme dépendances de développement dans votre fichier package.json :
npm install copy-webpack-plugin@^11.0.0 webpack@^5.88.2 webpack-cli@^5.1.4 webpack-dev-server@^4.15.1 --save-dev
Créez un fichier index.html dans le répertoire racine de votre projet. Nous utiliserons ce fichier pour configurer une disposition de base qui permettra à l’utilisateur d’effectuer un appel vidéo 1 à 1.
Voici le code :
<!-- index.html -->
<!DOCTYPE html>
<html>
    <head>
        <title>Azure Communication Services - Calling Web SDK</title>
    </head>
    <body>
        <h4>Azure Communication Services - Calling Web SDK</h4>
        <input id="user-access-token"
            type="text"
            placeholder="User access token"
            style="margin-bottom:1em; width: 500px;"/>
        <button id="initialize-teams-call-agent" type="button">Initialize Call Agent</button>
        <br>
        <br>
        <input id="application-object-id"
            type="text"
            placeholder="Enter application objectId identity in format: 'APP_GUID'"
            style="margin-bottom:1em; width: 500px; display: block;"/>
        <button id="start-call-button" type="button" disabled="true">Start Call</button>
        <button id="hangup-call-button" type="button" disabled="true">Hang up Call</button>
        <button id="accept-call-button" type="button" disabled="true">Accept Call</button>
        <button id="start-video-button" type="button" disabled="true">Start Video</button>
        <button id="stop-video-button" type="button" disabled="true">Stop Video</button>
        <br>
        <br>
        <div id="connectedLabel" style="color: #13bb13;" hidden>Call is connected!</div>
        <br>
        <div id="remoteVideoContainer" style="width: 40%;" hidden>Remote participants' video streams:</div>
        <br>
        <div id="localVideoContainer" style="width: 30%;" hidden>Local video stream:</div>
        <!-- points to the bundle generated from client.js -->
        <script src="./main.js"></script>
    </body>
</html>
Modèle d’objet Azure Communication Services Calling Web SDK
Les classes et les interfaces suivantes gèrent certaines des principales fonctionnalités du SDK Appel Azure Communication Services :
| Nom | Description |
|---|---|
CallClient |
Point d’entrée principal du SDK Appel. |
CallAgent |
Sert à démarrer et à gérer les appels. |
DeviceManager |
Utilisé pour gérer les appareils multimédias. |
Call |
Utilisé pour représenter un appel. |
LocalVideoStream |
Utilisé pour créer un flux vidéo local pour un appareil photo sur le système local. |
RemoteParticipant |
Utilisé pour représenter un participant distant dans l’appel. |
RemoteVideoStream |
Utilisé pour représenter un flux vidéo distant d’un participant distant. |
Créez un fichier dans le répertoire racine de votre projet sous le nom client.js qui contiendra la logique d’application pour ce guide de démarrage rapide. Ajoutez le code suivant à client.js :
// Make sure to install the necessary dependencies
const { CallClient, VideoStreamRenderer, LocalVideoStream } = require('@azure/communication-calling');
const { AzureCommunicationTokenCredential } = require('@azure/communication-common');
const { AzureLogger, setLogLevel } = require("@azure/logger");
// Set the log level and output
setLogLevel('verbose');
AzureLogger.log = (...args) => {
    console.log(...args);
};
// Calling web sdk objects
let callAgent;
let deviceManager;
let call;
let incomingCall;
let localVideoStream;
let localVideoStreamRenderer;
// UI widgets
let userAccessToken = document.getElementById('user-access-token');
let applicationObjectId = document.getElementById('application-object-id');
let initializeCallAgentButton = document.getElementById('initialize-teams-call-agent');
let startCallButton = document.getElementById('start-call-button');
let hangUpCallButton = document.getElementById('hangup-call-button');
let acceptCallButton = document.getElementById('accept-call-button');
let startVideoButton = document.getElementById('start-video-button');
let stopVideoButton = document.getElementById('stop-video-button');
let connectedLabel = document.getElementById('connectedLabel');
let remoteVideoContainer = document.getElementById('remoteVideoContainer');
let localVideoContainer = document.getElementById('localVideoContainer');
/**
 * Create an instance of CallClient. Initialize a CallAgent instance with a AzureCommunicationTokenCredential via created CallClient. CallAgent enables us to make outgoing calls and receive incoming calls.
 * You can then use the CallClient.getDeviceManager() API instance to get the DeviceManager.
 */
initializeCallAgentButton.onclick = async () => {
    try {
        const callClient = new CallClient();
        tokenCredential = new AzureCommunicationTokenCredential(userAccessToken.value.trim());
        callAgent = await callClient.createCallAgent(tokenCredential)
        // Set up a camera device to use.
        deviceManager = await callClient.getDeviceManager();
        await deviceManager.askDevicePermission({ video: true });
        await deviceManager.askDevicePermission({ audio: true });
        // Listen for an incoming call to accept.
        callAgent.on('incomingCall', async (args) => {
            try {
                incomingCall = args.incomingCall;
                acceptCallButton.disabled = false;
                startCallButton.disabled = true;
            } catch (error) {
                console.error(error);
            }
        });
        startCallButton.disabled = false;
        initializeCallAgentButton.disabled = true;
    } catch(error) {
        console.error(error);
    }
}
/**
 * Place a 1:1 outgoing video call to an Teams Auto attendant
 * Add an event listener to initiate a call when the `startCallButton` is selected.
 * Enumerate local cameras using the deviceManager `getCameraList` API.
 * In this quickstart, we're using the first camera in the collection. Once the desired camera is selected, a
 * LocalVideoStream instance will be constructed and passed within `videoOptions` as an item within the
 * localVideoStream array to the call method. When the call connects, your application will be sending a video stream to the other participant.
 */
startCallButton.onclick = async () => {
    try {
        const localVideoStream = await createLocalVideoStream();
        const videoOptions = localVideoStream ? { localVideoStreams: [localVideoStream] } : undefined;
        call = callAgent.startCall([{ teamsAppId: applicationObjectId.value.trim(), cloud:"public" }], { videoOptions: videoOptions });
        // Subscribe to the call's properties and events.
        subscribeToCall(call);
    } catch (error) {
        console.error(error);
    }
}
/**
 * Accepting an incoming call with a video
 * Add an event listener to accept a call when the `acceptCallButton` is selected.
 * You can accept incoming calls after subscribing to the `CallAgent.on('incomingCall')` event.
 * You can pass the local video stream to accept the call with the following code.
 */
acceptCallButton.onclick = async () => {
    try {
        const localVideoStream = await createLocalVideoStream();
        const videoOptions = localVideoStream ? { localVideoStreams: [localVideoStream] } : undefined;
        call = await incomingCall.accept({ videoOptions });
        // Subscribe to the call's properties and events.
        subscribeToCall(call);
    } catch (error) {
        console.error(error);
    }
}
// Subscribe to a call obj.
// Listen for property changes and collection udpates.
subscribeToCall = (call) => {
    try {
        // Inspect the initial call.id value.
        console.log(`Call Id: ${call.id}`);
        //Subsribe to call's 'idChanged' event for value changes.
        call.on('idChanged', () => {
            console.log(`Call ID changed: ${call.id}`);
        });
        // Inspect the initial call.state value.
        console.log(`Call state: ${call.state}`);
        // Subscribe to call's 'stateChanged' event for value changes.
        call.on('stateChanged', async () => {
            console.log(`Call state changed: ${call.state}`);
            if(call.state === 'Connected') {
                connectedLabel.hidden = false;
                acceptCallButton.disabled = true;
                startCallButton.disabled = true;
                hangUpCallButton.disabled = false;
                startVideoButton.disabled = false;
                stopVideoButton.disabled = false;
            } else if (call.state === 'Disconnected') {
                connectedLabel.hidden = true;
                startCallButton.disabled = false;
                hangUpCallButton.disabled = true;
                startVideoButton.disabled = true;
                stopVideoButton.disabled = true;
                console.log(`Call ended, call end reason={code=${call.callEndReason.code}, subCode=${call.callEndReason.subCode}}`);
            }
        });

        call.on('isLocalVideoStartedChanged', () => {
            console.log(`isLocalVideoStarted changed: ${call.isLocalVideoStarted}`);
        });
        console.log(`isLocalVideoStarted: ${call.isLocalVideoStarted}`);
        call.localVideoStreams.forEach(async (lvs) => {
            localVideoStream = lvs;
            await displayLocalVideoStream();
        });
        call.on('localVideoStreamsUpdated', e => {
            e.added.forEach(async (lvs) => {
                localVideoStream = lvs;
                await displayLocalVideoStream();
            });
            e.removed.forEach(lvs => {
               removeLocalVideoStream();
            });
        });

        // Inspect the call's current remote participants and subscribe to them.
        call.remoteParticipants.forEach(remoteParticipant => {
            subscribeToRemoteParticipant(remoteParticipant);
        });
        // Subscribe to the call's 'remoteParticipantsUpdated' event to be
        // notified when new participants are added to the call or removed from the call.
        call.on('remoteParticipantsUpdated', e => {
            // Subscribe to new remote participants that are added to the call.
            e.added.forEach(remoteParticipant => {
                subscribeToRemoteParticipant(remoteParticipant)
            });
            // Unsubscribe from participants that are removed from the call
            e.removed.forEach(remoteParticipant => {
                console.log('Remote participant removed from the call.');
            });
        });
    } catch (error) {
        console.error(error);
    }
}
// Subscribe to a remote participant obj.
// Listen for property changes and collection udpates.
subscribeToRemoteParticipant = (remoteParticipant) => {
    try {
        // Inspect the initial remoteParticipant.state value.
        console.log(`Remote participant state: ${remoteParticipant.state}`);
        // Subscribe to remoteParticipant's 'stateChanged' event for value changes.
        remoteParticipant.on('stateChanged', () => {
            console.log(`Remote participant state changed: ${remoteParticipant.state}`);
        });
        // Inspect the remoteParticipants's current videoStreams and subscribe to them.
        remoteParticipant.videoStreams.forEach(remoteVideoStream => {
            subscribeToRemoteVideoStream(remoteVideoStream)
        });
        // Subscribe to the remoteParticipant's 'videoStreamsUpdated' event to be
        // notified when the remoteParticiapant adds new videoStreams and removes video streams.
        remoteParticipant.on('videoStreamsUpdated', e => {
            // Subscribe to newly added remote participant's video streams.
            e.added.forEach(remoteVideoStream => {
                subscribeToRemoteVideoStream(remoteVideoStream)
            });
            // Unsubscribe from newly removed remote participants' video streams.
            e.removed.forEach(remoteVideoStream => {
                console.log('Remote participant video stream was removed.');
            })
        });
    } catch (error) {
        console.error(error);
    }
}
/**
 * Subscribe to a remote participant's remote video stream obj.
 * You have to subscribe to the 'isAvailableChanged' event to render the remoteVideoStream. If the 'isAvailable' property
 * changes to 'true' a remote participant is sending a stream. Whenever the availability of a remote stream changes
 * you can choose to destroy the whole 'Renderer' a specific 'RendererView' or keep them. Displaying RendererView without a video stream will result in a blank video frame.
 */
subscribeToRemoteVideoStream = async (remoteVideoStream) => {
    // Create a video stream renderer for the remote video stream.
    let videoStreamRenderer = new VideoStreamRenderer(remoteVideoStream);
    let view;
    const renderVideo = async () => {
        try {
            // Create a renderer view for the remote video stream.
            view = await videoStreamRenderer.createView();
            // Attach the renderer view to the UI.
            remoteVideoContainer.hidden = false;
            remoteVideoContainer.appendChild(view.target);
        } catch (e) {
            console.warn(`Failed to createView, reason=${e.message}, code=${e.code}`);
        }
    }

    remoteVideoStream.on('isAvailableChanged', async () => {
        // Participant has switched video on.
        if (remoteVideoStream.isAvailable) {
            await renderVideo();
        // Participant has switched video off.
        } else {
            if (view) {
                view.dispose();
                view = undefined;
            }
        }
    });
    // Participant has video on initially.
    if (remoteVideoStream.isAvailable) {
        await renderVideo();
    }
}
// Start your local video stream.
// This will send your local video stream to remote participants so they can view it.
startVideoButton.onclick = async () => {
    try {
        const localVideoStream = await createLocalVideoStream();
        await call.startVideo(localVideoStream);
    } catch (error) {
        console.error(error);
    }
}
// Stop your local video stream.
// This will stop your local video stream from being sent to remote participants.
stopVideoButton.onclick = async () => {
    try {
        await call.stopVideo(localVideoStream);
    } catch (error) {
        console.error(error);
    }
}
/**
 * To render a LocalVideoStream, you need to create a new instance of VideoStreamRenderer, and then
 * create a new VideoStreamRendererView instance using the asynchronous createView() method.
 * You may then attach view.target to any UI element.
 */
// Create a local video stream for your camera device
createLocalVideoStream = async () => {
    const camera = (await deviceManager.getCameras())[0];
    if (camera) {
        return new LocalVideoStream(camera);
    } else {
        console.error(`No camera device found on the system`);
    }
}
// Display your local video stream preview in your UI
displayLocalVideoStream = async () => {
    try {
        localVideoStreamRenderer = new VideoStreamRenderer(localVideoStream);
        const view = await localVideoStreamRenderer.createView();
        localVideoContainer.hidden = false;
        localVideoContainer.appendChild(view.target);
    } catch (error) {
        console.error(error);
    }
}
// Remove your local video stream preview from your UI
removeLocalVideoStream = async() => {
    try {
        localVideoStreamRenderer.dispose();
        localVideoContainer.hidden = true;
    } catch (error) {
        console.error(error);
    }
}
// End the current call
hangUpCallButton.addEventListener("click", async () => {
    // end the current call
    await call.hangUp();
});
Ajouter le code du serveur local webpack
Créez un fichier dans le répertoire racine de votre projet sous le nom webpack.config.js qui contiendra la logique de serveur local pour ce guide de démarrage rapide. Ajoutez le code suivant à webpack.config.js :
const path = require('path');
const CopyPlugin = require("copy-webpack-plugin");

module.exports = {
    mode: 'development',
    entry: './client.js',
    output: {
        filename: 'main.js',
        path: path.resolve(__dirname, 'dist'),
    },
    devServer: {
        static: {
            directory: path.join(__dirname, './')
        },
    },
    plugins: [
        new CopyPlugin({
            patterns: [
                './index.html'
            ]
        }),
    ]
};
Exécuter le code
Utilisez webpack-dev-server pour créer et exécuter votre application. Exécutez la commande suivante pour créer un bundle de l’application hôte sur un serveur web local :
npx webpack serve --config webpack.config.js
Étapes manuelles pour configurer l’appel :
- Ouvrez votre navigateur et accédez à l’adresse http://localhost:8080/..
- Entrez un jeton d’accès utilisateur valide. Consultez la documentation sur les jetons d’accès utilisateur si vous n’avez pas encore de jeton d’accès disponible.
- Cliquez sur les boutons « Initialiser l’agent d’appel ».
- Entrez l’ID d’objet du standard automatique, puis sélectionnez le bouton « Démarrer l’appel ». L’application démarre l’appel sortant vers le standard automatique avec l’ID d’objet donné.
- L’appel est connecté au standard automatique.
- L’utilisateur Communication Services est routé via le standard automatique selon sa configuration.
Nettoyer les ressources
Si vous voulez nettoyer et supprimer un abonnement Communication Services, vous pouvez supprimer la ressource ou le groupe de ressources. La suppression du groupe de ressources efface également les autres ressources qui y sont associées. Apprenez-en davantage sur le nettoyage des ressources.
Étapes suivantes
Pour plus d’informations, consultez les articles suivants :
- Démarrage des Appels UI vers les applications vocales Teams
- Apprenez-en davantage sur les fonctionnalités du SDK Calling
- Apprenez-en davantage sur le fonctionnement des appels