הערה
הגישה לדף זה מחייבת הרשאה. באפשרותך לנסות להיכנס או לשנות מדריכי כתובות.
הגישה לדף זה מחייבת הרשאה. באפשרותך לנסות לשנות מדריכי כתובות.
Note
The Mixed Reality Academy tutorials were designed with HoloLens (1st gen) and Mixed Reality Immersive Headsets in mind. As such, we feel it's important to leave these tutorials in place for developers who are still looking for guidance in developing for those devices. These tutorials are not updated with the latest toolsets or interactions being used for HoloLens 2. They are maintained to continue working on the supported devices. There will be a new series of tutorials that will be posted in the future that demonstrate how to develop for HoloLens 2. This notice is updated with a link to those tutorials when they're posted.
In this course, you learn how to implement an Azure IoT Hub Service on a virtual machine running the Ubuntu 16.4 operating system. An Azure Function App is then used to receive messages from your Ubuntu VM, and store the result within an Azure Table Service. You can then view this data using Power BI on Microsoft HoloLens or immersive (VR) headset.
The content of this course is applicable to IoT Edge devices. Though in this course, the focus is on a virtual machine environment, so that access to a physical Edge device isn't necessary.
By completing this course, you learn to:
- Deploy an IoT Edge module to a Virtual Machine (Ubuntu 16 OS), which represents your IoT device.
- Add an Azure Custom Vision Tensorflow Model to the Edge module, with code that analyzes images stored in the container.
- Set up the module to send the analysis result message back to your IoT Hub Service.
- Use an Azure Function App to store the message within an Azure Table.
- Set up Power BI to collect the stored message and create a report.
- Visualize your IoT message data within Power BI.
The Services you' ll use include:
Azure IoT Hub is a Microsoft Azure Service, which allows developers to connect, monitor, and manage, IoT assets. For more information, visit the Azure IoT Hub Service page.
Azure Container Registry is a Microsoft Azure Service, which allows developers to store container images, for various types of containers. For more information, visit the Azure Container Registry Service page.
Azure Function App is a Microsoft Azure Service, which allows developers to run small pieces of code, 'functions', in Azure. It provides a way to delegate work to the cloud, rather than your local application, which can have many benefits. Azure Functions supports several development languages, including C#, F#, Node.js, Java, and PHP. For more information, visit the Azure Functions page.
Azure Storage: Tables is a Microsoft Azure Service, which allows developers to store structured, non-SQL, data in the cloud, making it easily accessible anywhere. The Service boasts a schema-less design, allowing for the evolution of tables as needed, and thus is flexible. For more information, visit the Azure Tables page
This course teaches you how to setup and use the IoT Hub Service, and then visualize a response provided by a device. It is up to you to apply these concepts to a custom IoT Hub Service setup, which you might be building.
Device support
| Course | HoloLens | Immersive headsets |
|---|---|---|
| MR and Azure 313: IoT Hub Service | ✔️ | ✔️ |
Prerequisites
For the most up-to-date prerequisites for developing with Mixed Reality, including with the Microsoft HoloLens, visit the Install the tools article.
Note
This tutorial is designed for developers who have basic experience with Python. Also the prerequisites and written instructions within this document represent what is tested and verified at the time of writing (July 2018). You're free to use the latest software, as listed within the install the tools article, though it shouldn't be assumed that the information in this course perfectly matches what you find in newer software than that listed as follows.
The following hardware and software is required:
Windows 10 Fall Creators Update (or later), Developer Mode enabled
Warning
You can't run a Virtual Machine using Hyper-V on Windows 10 Home Edition.
Windows 10 SDK (latest version)
A HoloLens, Developer Mode enabled
Visual Studio 2017.15.4 (Only used to access the Azure Cloud Explorer)
Internet Access for Azure, and for IoT Hub Service. For more information, please follow this link to IoT Hub Service page
A machine learning model. If you don't have your own ready to use model, you can use the model provided with this course.
Hyper-V software enabled on your Windows 10 development machine.
A Virtual Machine running Ubuntu (16.4 or 18.4), running on your development machine or alternatively you can use a separate computer running Linux (Ubuntu 16.4 or 18.4). You can find more information on how to create a VM on Windows using Hyper-V in the "Before you Start" chapter.
Before you start
- Set up and test your HoloLens. If you need support setting up your HoloLens, make sure to visit the HoloLens setup article.
- It's a good idea to perform Calibration and Sensor Tuning when beginning developing a new HoloLens app (sometimes it can help to perform those tasks for each user).
For help on Calibration, follow this link to the HoloLens Calibration article.
For help on Sensor Tuning, follow this link to the HoloLens Sensor Tuning article.
Set up your Ubuntu Virtual Machine using Hyper-V. The following resources help you with the process.
- First, follow this link to download the Ubuntu 16.04.4 LTS (Xenial Xerus) ISO. Select the 64-bit PC (AMD64) desktop image.
- Make sure Hyper-V is enabled on your Windows 10 machine. You can follow this link for guidance on installing and enabling Hyper-V on Windows 10.
- Start Hyper-V and create a new Ubuntu VM. You can follow this link for a step by step guide on how to create a VM with Hyper-V. When requested to "Install an operating system from a bootable image file", select the Ubuntu ISO you have download earlier.
Note
Using Hyper-V Quick Create isn't suggested.
Chapter 1 - Retrieve the Custom Vision model
With this course, you have access to a pre-built Custom Vision model that detects keyboards and mice from images. If you use it, proceed to Chapter 2.
However, you can follow these steps if you wish to use your own Custom Vision model:
In your Custom Vision Project go to the Performance tab.
Warning
Your model must use a compact domain, to export the model. You can change your models domain in the settings for your project.

Select the Iteration you want to export and click on Export. A blade appears.

In the blade, click Docker File.

Click Linux in the drop-down menu and then click on Download.

Unzip the content. You use it later in this course.
Chapter 2 - The Container Registry Service
The Container Registry Service is the repository used to host your containers.
The IoT Hub Service that you build and use in this course, refers to Container Registry Service to obtain the containers to deploy in your Edge Device.
First, follow this link to the Azure Portal, and login with your credentials.
Go to Create a resource and look for Container Registry.
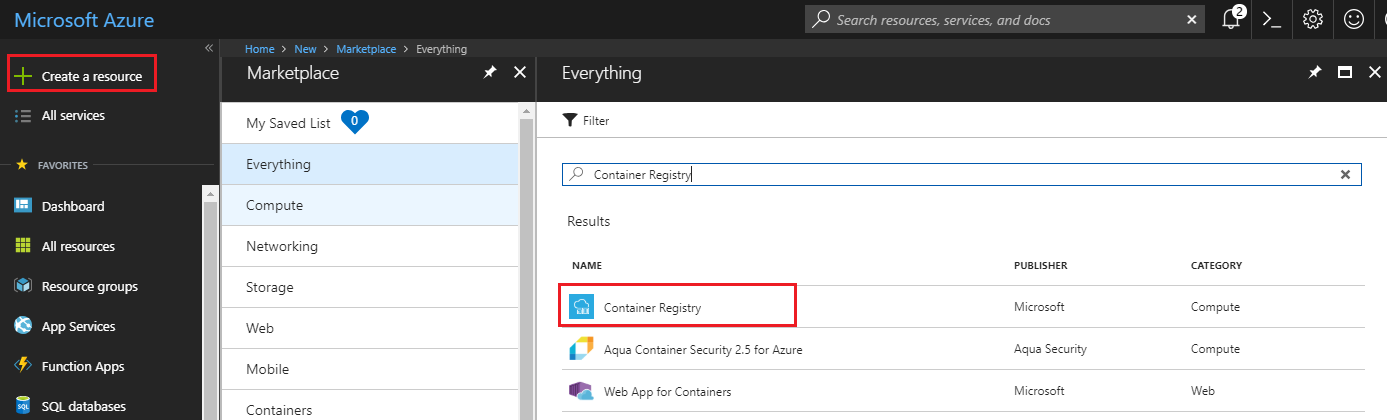
Click on Create.
Set the Service setup parameters:
Insert a name for your project, In this example its called IoTCRegistry.
Choose a Resource Group or create a new one. A resource group provides a way to monitor, control access, provision, and manage, billing for a collection of Azure assets. It's recommended to keep all the Azure Services associated with a single project (for example, such as these courses) under a common resource group).
Set the location of the Service.
Set Admin user to Enable.
Set SKU to Basic.
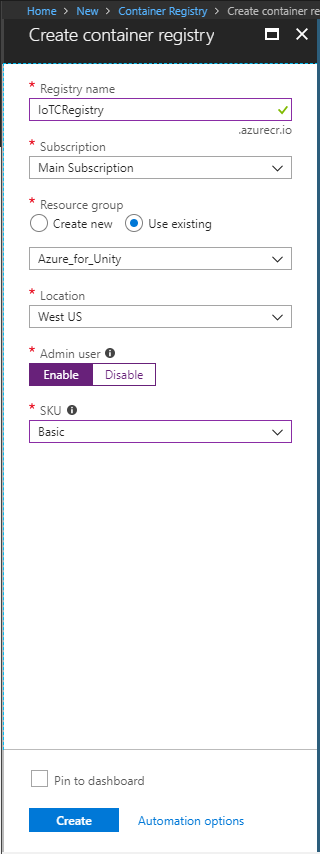
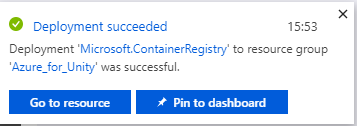
Click Create and wait for the Services to be created.
Once the notification pops up informing you of the successful creation of the Container Registry, click on Go to resource to be redirected to your Service page.
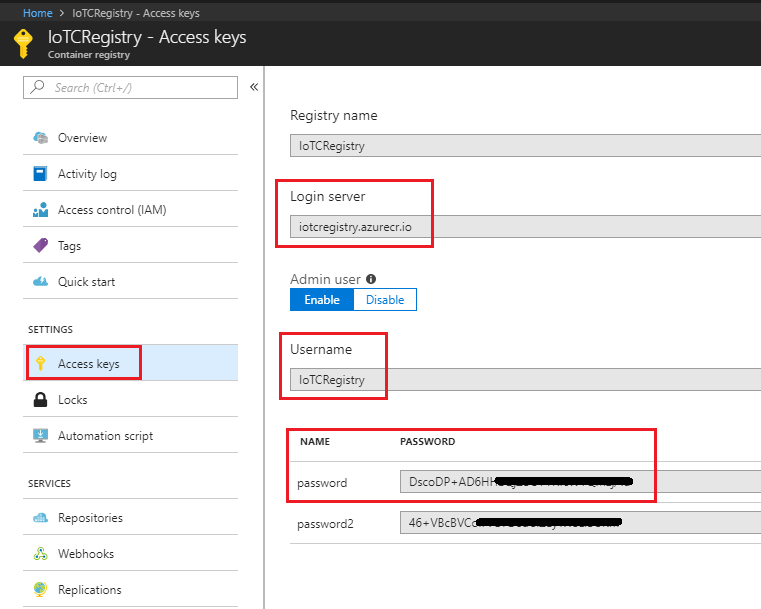
In the Container Registry Service page, click on Access keys.
Take note (you could use your Notepad) of the following parameters:
- Login Server
- Username
- Password
Chapter 3 - The IoT Hub Service
Now you begin the creation and setup of your IoT Hub Service.
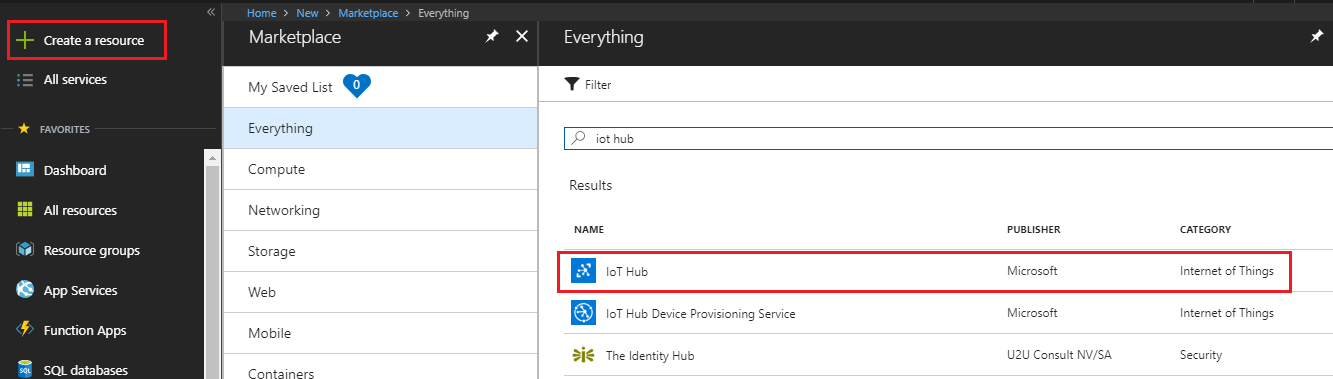
If not already signed in, log into the Azure Portal.
Once logged in, click on Create a resource in the top left corner, and search for IoT Hub, and click Enter.
The new page provides a description of the Storage account Service. At the bottom left of this prompt, click the Create button, to create an instance of this Service.
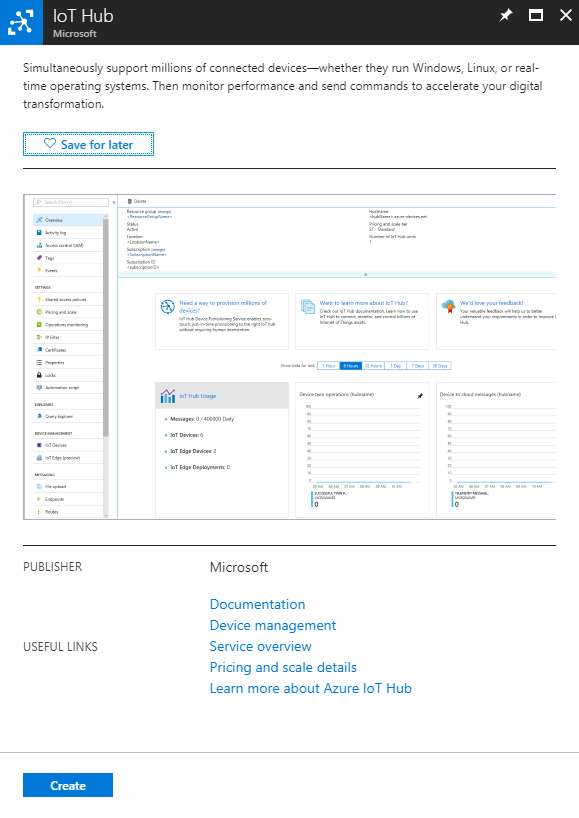
Once you click Create, a panel appears:
Choose a Resource Group or create a new one. A resource group provides a way to monitor, control access, provision and manage billing for a collection of Azure assets. It's recommended to keep all the Azure Services associated with a single project (for example, such as these courses) under a common resource group.
If you wish to read more about Azure Resource Groups, please follow this link on how to manage a Resource Group.
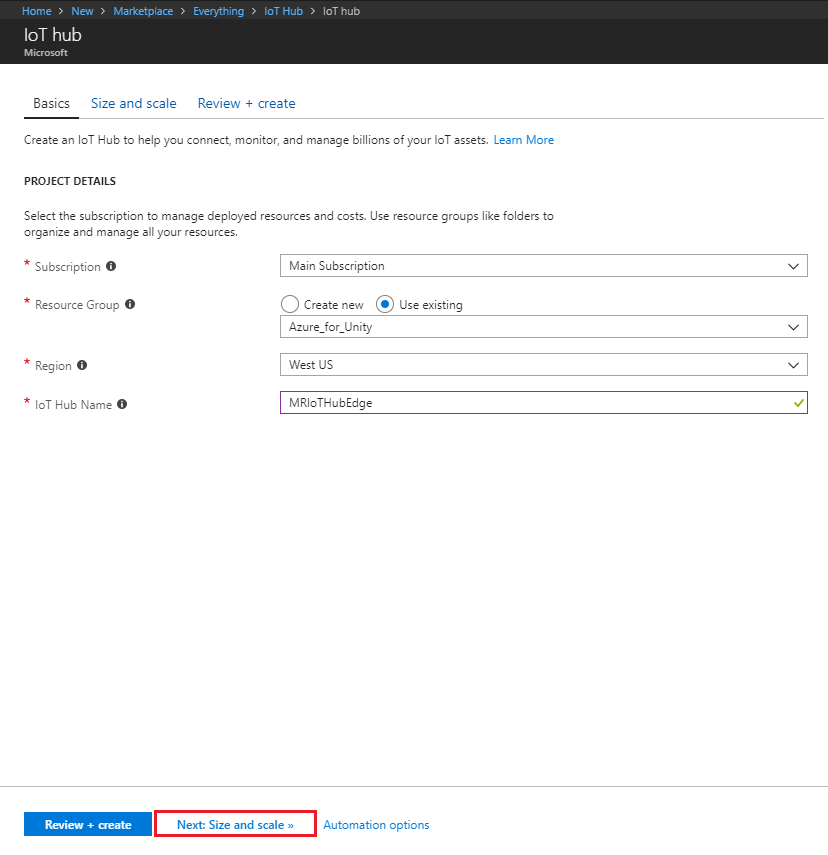
Select an appropriate Location (Use the same location across all the Services you create in this course).
Insert your desired Name for this Service instance.
On the bottom of the page, click on Next: Size and scale.
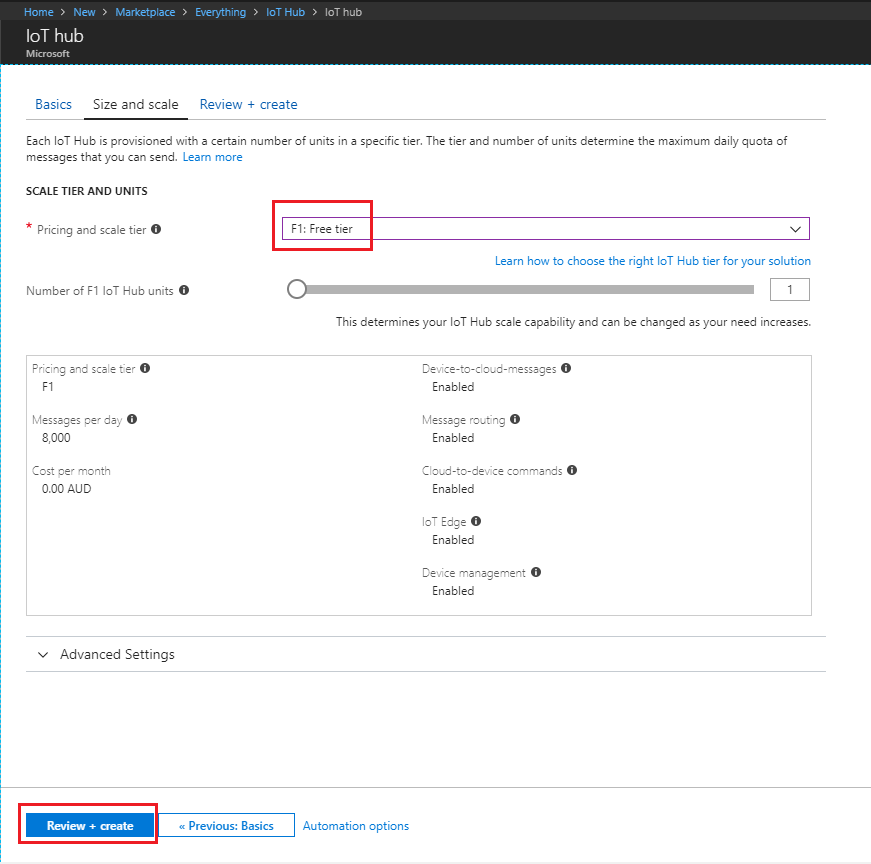
In this page, select your Pricing and scale tier (if it is your first IoT Hub Service instance, a free tier should be available to you).
Click on Review + Create.
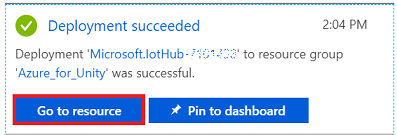
Review your settings and click on Create.

Once the notification pops up informing you of the successful creation of the IoT Hub Service, click on Go to resource to be redirected to your Service page.
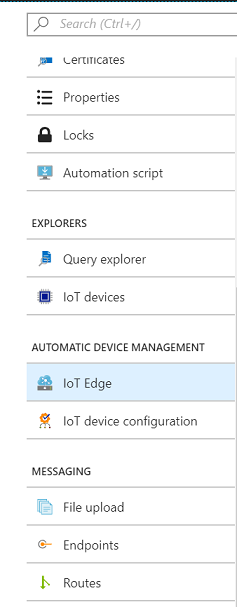
Scroll the side panel on the left until you see Automatic Device Management, the click on IoT Edge.
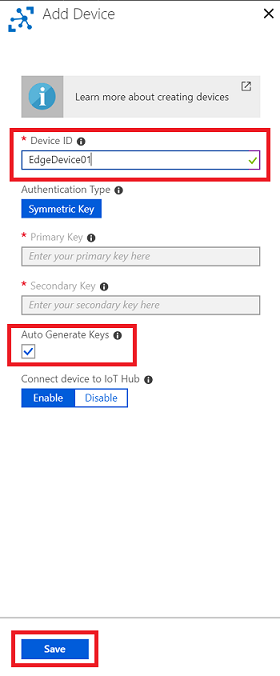
In the window that appears to the right, click on Add IoT Edge Device. A blade appears to the right.
In the blade, provide your new device a Device ID (a name of your choice). Then, click Save. The Primary and Secondary Keys auto generate if you have Auto Generate ticked.
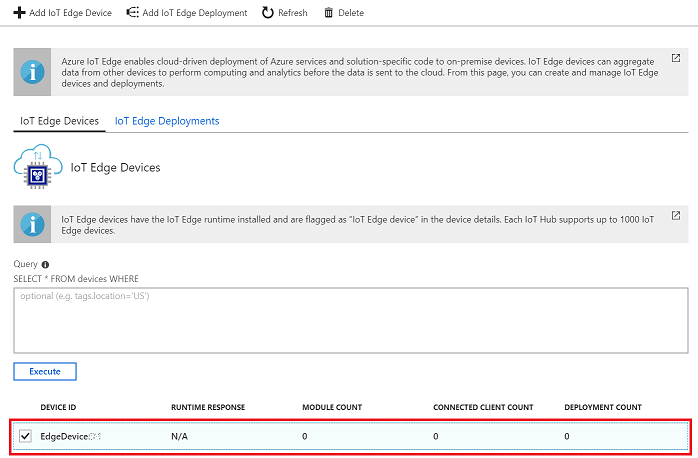
You navigate back to the IoT Edge Devices section, where your new device is listed. Click on your new device (outlined in red in the following image).
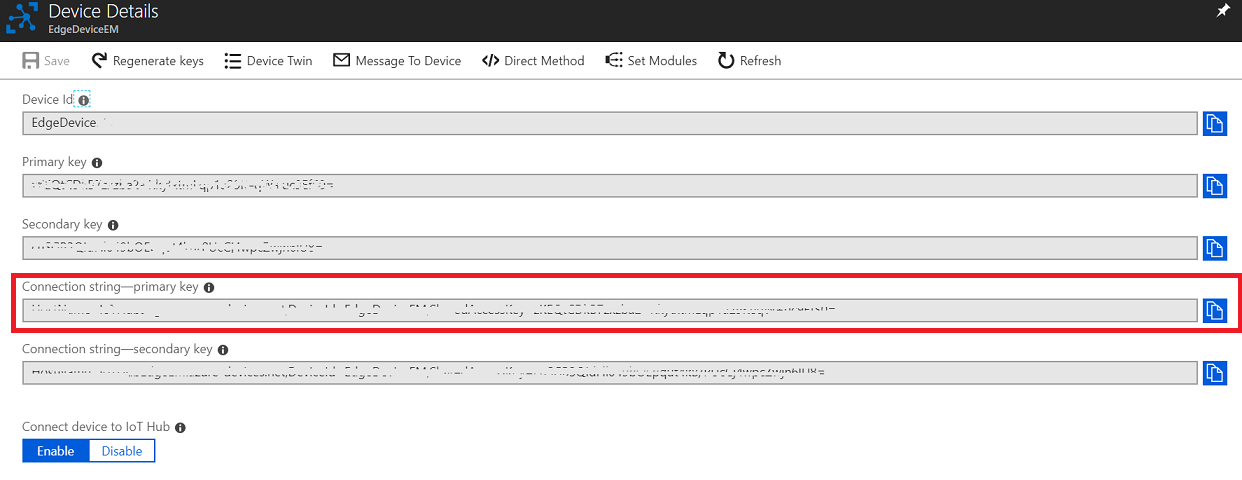
On the Device Details page that appears, take a copy of the Connection String (primary key).
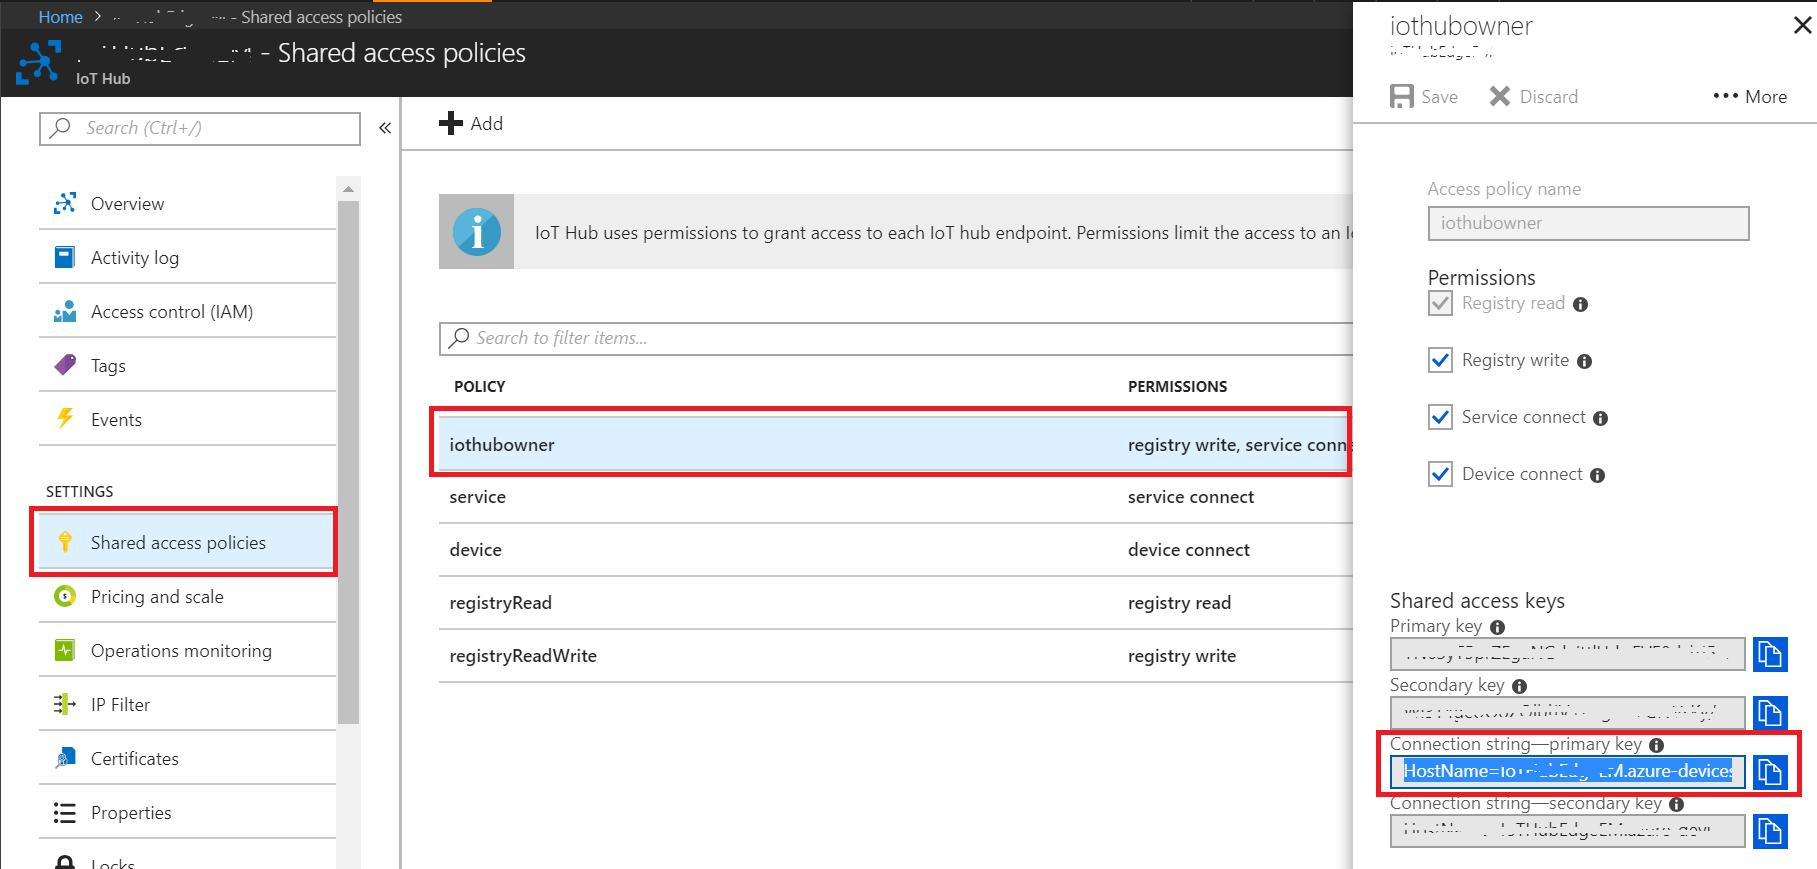
To open it, go back to the panel on the left, and click Shared access policies.
On the page that appears, click iothubowner, and a blade appears to the right of the screen.
Take note (on your Notepad) of the Connection string (primary key), for later use when setting the Connection String to your device.
Chapter 4 - Setting up the development environment
To create and deploy modules for IoT Hub Edge, you require the following components installed on your development machine running Windows 10:
Docker for Windows, it asks you to create an account to be able to download.
Important
Docker requires Windows 10 PRO, Enterprise 14393, or Windows Server 2016 RTM, to run. If you're running other versions of Windows 10, you can try installing Docker using the Docker Toolbox.
-
Visual Studio Code (also known as VS Code).
After installing the software mentioned above, you'll need to restart your machine.
Chapter 5 - Setting up the Ubuntu environment
Now you can move on to setting up your device running Ubuntu OS. Follow the steps to install the necessary software, to deploy your containers on your board:
Important
You should always precede the terminal commands with sudo to run as admin user. i.e:
sudo docker \<option> \<command> \<argument>
Open the Ubuntu Terminal, and use the following command to install pip:
[!HINT] You can open Terminal very easily through using the keyboard shortcut: Ctrl + Alt + T.
sudo apt-get install python-pipThroughout this Chapter, you may be prompted, by Terminal, for permission to use your device storage, and for you to input y/n (yes or no), type 'y', and then press the Enter key, to accept.
Once that command is complete, use the following command to install curl:
sudo apt install curlOnce pip and curl are installed, use the following command to install the IoT Edge runtime, this is necessary to deploy and control the modules on your board:
    curl https://packages.microsoft.com/config/ubuntu/16.04/prod.list > ./microsoft-prod.list

    sudo cp ./microsoft-prod.list /etc/apt/sources.list.d/

    curl https://packages.microsoft.com/keys/microsoft.asc | gpg --dearmor > microsoft.gpg

    sudo cp ./microsoft.gpg /etc/apt/trusted.gpg.d/

    sudo apt-get update

    sudo apt-get install moby-engine

    sudo apt-get install moby-cli

    sudo apt-get update

    sudo apt-get install iotedge
At this point you are prompted to open up the runtime config file, to insert the Device Connection String, that you noted down (in your Notepad), when creating the IoT Hub Service (at step 14, of Chapter 3). Run the following line on the terminal to open that file:
sudo nano /etc/iotedge/config.yamlThe config.yaml file is displayed, ready for you to edit:
Warning
When this file opens, it may be confusing. You are text editing this file, within the Terminal itself.
Use the arrow keys on your keyboard to scroll down (you need to scroll down a little way), to reach the line containing":
"<ADD DEVICE CONNECTION STRING HERE>".
Substitute line, including the brackets, with the Device Connection String you noted earlier.
With your Connection String in place, on your keyboard, press the Ctrl-X keys to save the file. It asks you to confirm by typing Y. Then, press the Enter key, to confirm. You go back to the regular Terminal.
Once these commands have all run successfully, you'll have installed the IoT Edge Runtime. Once initialized, the runtime starts on its own every time the device is powered up, and will sit in the background, waiting for modules to be deployed from the IoT Hub Service.
Run the following command line to initialize the IoT Edge Runtime:
sudo systemctl restart iotedgeImportant
If you make changes to your .yaml file, or the above setup, you need to run the restart line command again, within Terminal.
Check the IoT Edge Runtime status by running the following command line. The runtime should appear with the status active (running) in green text.
sudo systemctl status iotedgePress the Ctrl-C keys, to exit the status page. You can verify that the IoT Edge Runtime is pulling the containers correctly by typing the following command:
sudo docker psA list with two (2) containers should appear. These are the default modules that are automatically created by the IoT Hub Service (edgeAgent and edgeHub). Once you create and deploy your own modules, they appear in this list, underneath the default ones.
Chapter 6 - Install the extensions
Important
The next few Chapters (6-9) are to be performed on your Windows 10 machine.
Open VS Code.
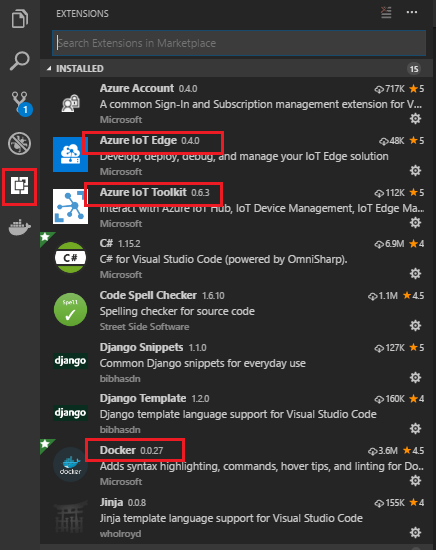
Click on the Extensions (square) button on the left bar of VS Code, to open the Extensions panel.
Search for, and install, the following extensions (as shown in the following image):
- Azure IoT Edge
- Azure IoT Toolkit
- Docker
Once the extensions are installed, close and re-open VS Code.
With VS Code open once more, navigate to View > Integrated terminal.
You now install Cookiecutter. In the terminal, run the following bash command:
pip install --upgrade --user cookiecutter[!HINT] If you have trouble with this command:
- Restart VS Code, and/ or your computer.
- It might be necessary to switch the VS Code Terminal to the one you have been using to install Python, i.e. Powershell (especially in case the Python environment was already installed on your machine). With the Terminal open, you'll find the drop down menu on the right side of the Terminal.
- Make sure the Python installation path is added as Environment Variable on your machine. Cookiecutter should be part of the same location path. Please follow this link for more information on Environment Variables,
Once Cookiecutter is finished installing, you should restart your machine, so that Cookiecutter is recognized as a command, within your System's environment.
Chapter 7 - Create your container solution
At this point, you need to create the container, with the module, to be pushed into the Container Registry. Once you push your container, you use the IoT Hub Edge Service to deploy it to your device, which is running the IoT Edge runtime.
From VS Code, click View > Command palette.
In the palette, search and run Azure IoT Edge: New Iot Edge Solution.
Browse into a location where you want to create your solution. Press the Enter key, to accept the location.
Give a name to your solution. Press the Enter key, to confirm your provided name.
Now you are prompted to choose the template framework for your solution. Click Python Module. Press the Enter key, to confirm this choice.
Give a name to your module. Press the Enter key, to confirm the name of your module. Make sure to take a note (with your Notepad) of the module name, as it's used later.
You notice a pre-built Docker Image Repository address appears on the palette. It looks like:
localhost:5000/-THE NAME OF YOUR MODULE-.
Delete localhost:5000, and in its place insert the Container Registry Login Server address, which you noted when creating the Container Registry Service (in step 8, of Chapter 2). Press the Enter key, to confirm the address.
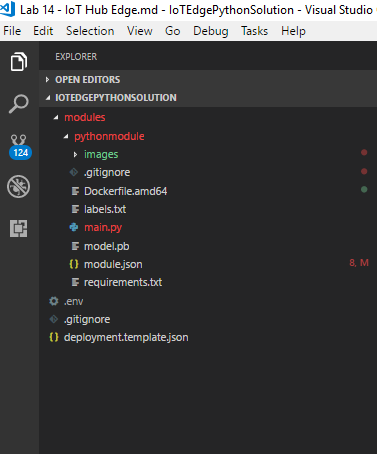
At this point, the solution containing the template for your Python module is created and its structure is displayed in the Explore Tab, of VS Code, on the left side of the screen. If the Explore Tab isn't open, you can open it by clicking the top-most button, in the bar on the left.

The last step for this Chapter, is to click and open the .env file, from within the Explore Tab, and add your Container Registry username and password. This file is ignored by git, but on building the container, sets the credentials to access the Container Registry Service.

Chapter 8 - Editing your container solution
You now complete the container solution, by updating the following files:
- main.py python script.
- requirements.txt.
- deployment.template.json.
- Dockerfile.amd64
You then create the images folder, used by the python script to check for images to match against your Custom Vision model. Lastly, you add the labels.txt file, to help read your model, and the model.pb file, which is your model.
With VS Code open, navigate to your module folder, and look for the script called main.py. Double-click to open it.
Delete the content of the file and insert the following code:
# Copyright (c) Microsoft. All rights reserved.
# Licensed under the MIT license. See LICENSE file in the project root for
# full license information.

import random
import sched, time
import sys
import iothub_client
from iothub_client import IoTHubModuleClient, IoTHubClientError, IoTHubTransportProvider
from iothub_client import IoTHubMessage, IoTHubMessageDispositionResult, IoTHubError
import json
import os
import tensorflow as tf
import os
from PIL import Image
import numpy as np
import cv2

# messageTimeout - the maximum time in milliseconds until a message times out.
# The timeout period starts at IoTHubModuleClient.send_event_async.
# By default, messages do not expire.
MESSAGE_TIMEOUT = 10000

# global counters
RECEIVE_CALLBACKS = 0
SEND_CALLBACKS = 0

TEMPERATURE_THRESHOLD = 25
TWIN_CALLBACKS = 0

# Choose HTTP, AMQP or MQTT as transport protocol.  Currently only MQTT is supported.
PROTOCOL = IoTHubTransportProvider.MQTT


# Callback received when the message that we're forwarding is processed.
def send_confirmation_callback(message, result, user_context):
    global SEND_CALLBACKS
    print ( "Confirmation[%d] received for message with result = %s" % (user_context, result) )
    map_properties = message.properties()
    key_value_pair = map_properties.get_internals()
    print ( "    Properties: %s" % key_value_pair )
    SEND_CALLBACKS += 1
    print ( "    Total calls confirmed: %d" % SEND_CALLBACKS )


def convert_to_opencv(image):
    # RGB -> BGR conversion is performed as well.
    r,g,b = np.array(image).T
    opencv_image = np.array([b,g,r]).transpose()
    return opencv_image

def crop_center(img,cropx,cropy):
    h, w = img.shape[:2]
    startx = w//2-(cropx//2)
    starty = h//2-(cropy//2)
    return img[starty:starty+cropy, startx:startx+cropx]

def resize_down_to_1600_max_dim(image):
    h, w = image.shape[:2]
    if (h < 1600 and w < 1600):
        return image

    new_size = (1600 * w // h, 1600) if (h > w) else (1600, 1600 * h // w)
    return cv2.resize(image, new_size, interpolation = cv2.INTER_LINEAR)

def resize_to_256_square(image):
    h, w = image.shape[:2]
    return cv2.resize(image, (256, 256), interpolation = cv2.INTER_LINEAR)

def update_orientation(image):
    exif_orientation_tag = 0x0112
    if hasattr(image, '_getexif'):
        exif = image._getexif()
        if (exif != None and exif_orientation_tag in exif):
            orientation = exif.get(exif_orientation_tag, 1)
            # orientation is 1 based, shift to zero based and flip/transpose based on 0-based values
            orientation -= 1
            if orientation >= 4:
                image = image.transpose(Image.TRANSPOSE)
            if orientation == 2 or orientation == 3 or orientation == 6 or orientation == 7:
                image = image.transpose(Image.FLIP_TOP_BOTTOM)
            if orientation == 1 or orientation == 2 or orientation == 5 or orientation == 6:
                image = image.transpose(Image.FLIP_LEFT_RIGHT)
    return image


def analyse(hubManager):

    messages_sent = 0;

    while True:
        #def send_message():
        print ("Load the model into the project")
        # These names are part of the model and cannot be changed.
        output_layer = 'loss:0'
        input_node = 'Placeholder:0'

        graph_def = tf.GraphDef()
        labels = []

        labels_filename = "labels.txt"
        filename = "model.pb"

        # Import the TF graph
        with tf.gfile.FastGFile(filename, 'rb') as f:
            graph_def.ParseFromString(f.read())
            tf.import_graph_def(graph_def, name='')

        # Create a list of labels
        with open(labels_filename, 'rt') as lf:
            for l in lf:
                labels.append(l.strip())
        print ("Model loaded into the project")

        results_dic = dict()

        # create the JSON to be sent as a message
        json_message = ''

        # Iterate through images
        print ("List of images to analyse:")
        for file in os.listdir('images'):
            print(file)

            image = Image.open("images/" + file)

            # Update orientation based on EXIF tags, if the file has orientation info.
            image = update_orientation(image)

            # Convert to OpenCV format
            image = convert_to_opencv(image)

            # If the image has either w or h greater than 1600 we resize it down respecting
            # aspect ratio such that the largest dimension is 1600
            image = resize_down_to_1600_max_dim(image)

            # We next get the largest center square
            h, w = image.shape[:2]
            min_dim = min(w,h)
            max_square_image = crop_center(image, min_dim, min_dim)

            # Resize that square down to 256x256
            augmented_image = resize_to_256_square(max_square_image)

            # The compact models have a network size of 227x227, the model requires this size.
            network_input_size = 227

            # Crop the center for the specified network_input_Size
            augmented_image = crop_center(augmented_image, network_input_size, network_input_size)

            try:
                with tf.Session() as sess:
                    prob_tensor = sess.graph.get_tensor_by_name(output_layer)
                    predictions, = sess.run(prob_tensor, {input_node: [augmented_image] })
            except Exception as identifier:
                print ("Identifier error: ", identifier)

            print ("Print the highest probability label")
            highest_probability_index = np.argmax(predictions)
            print('FINAL RESULT! Classified as: ' + labels[highest_probability_index])

            l = labels[highest_probability_index]

            results_dic[file] = l

            # Or you can print out all of the results mapping labels to probabilities.
            label_index = 0
            for p in predictions:
                truncated_probablity = np.float64(round(p,8))
                print (labels[label_index], truncated_probablity)
                label_index += 1

        print("Results dictionary")
        print(results_dic)

        json_message = json.dumps(results_dic)
        print("Json result")
        print(json_message)

        # Initialize a new message
        message = IoTHubMessage(bytearray(json_message, 'utf8'))

        hubManager.send_event_to_output("output1", message, 0)

        messages_sent += 1
        print("Message sent! - Total: " + str(messages_sent))
        print('----------------------------')

        # This is the wait time before repeating the analysis
        # Currently set to 10 seconds
        time.sleep(10)


class HubManager(object):

    def __init__(
            self,
            protocol=IoTHubTransportProvider.MQTT):
        self.client_protocol = protocol
        self.client = IoTHubModuleClient()
        self.client.create_from_environment(protocol)

        # set the time until a message times out
        self.client.set_option("messageTimeout", MESSAGE_TIMEOUT)

    # Forwards the message received onto the next stage in the process.
    def forward_event_to_output(self, outputQueueName, event, send_context):
        self.client.send_event_async(
            outputQueueName, event, send_confirmation_callback, send_context)

    def send_event_to_output(self, outputQueueName, event, send_context):
        self.client.send_event_async(outputQueueName, event, send_confirmation_callback, send_context)

def main(protocol):
    try:
        hub_manager = HubManager(protocol)
        analyse(hub_manager)
        while True:
            time.sleep(1)

    except IoTHubError as iothub_error:
        print ( "Unexpected error %s from IoTHub" % iothub_error )
        return
    except KeyboardInterrupt:
        print ( "IoTHubModuleClient sample stopped" )

if __name__ == '__main__':
    main(PROTOCOL)
Open the file called requirements.txt, and substitute its content with the following:
azure-iothub-device-client==1.4.0.0b3
opencv-python==3.3.1.11
tensorflow==1.8.0
pillow==5.1.0
Open the file called deployment.template.json, and substitute its content following the guideline:
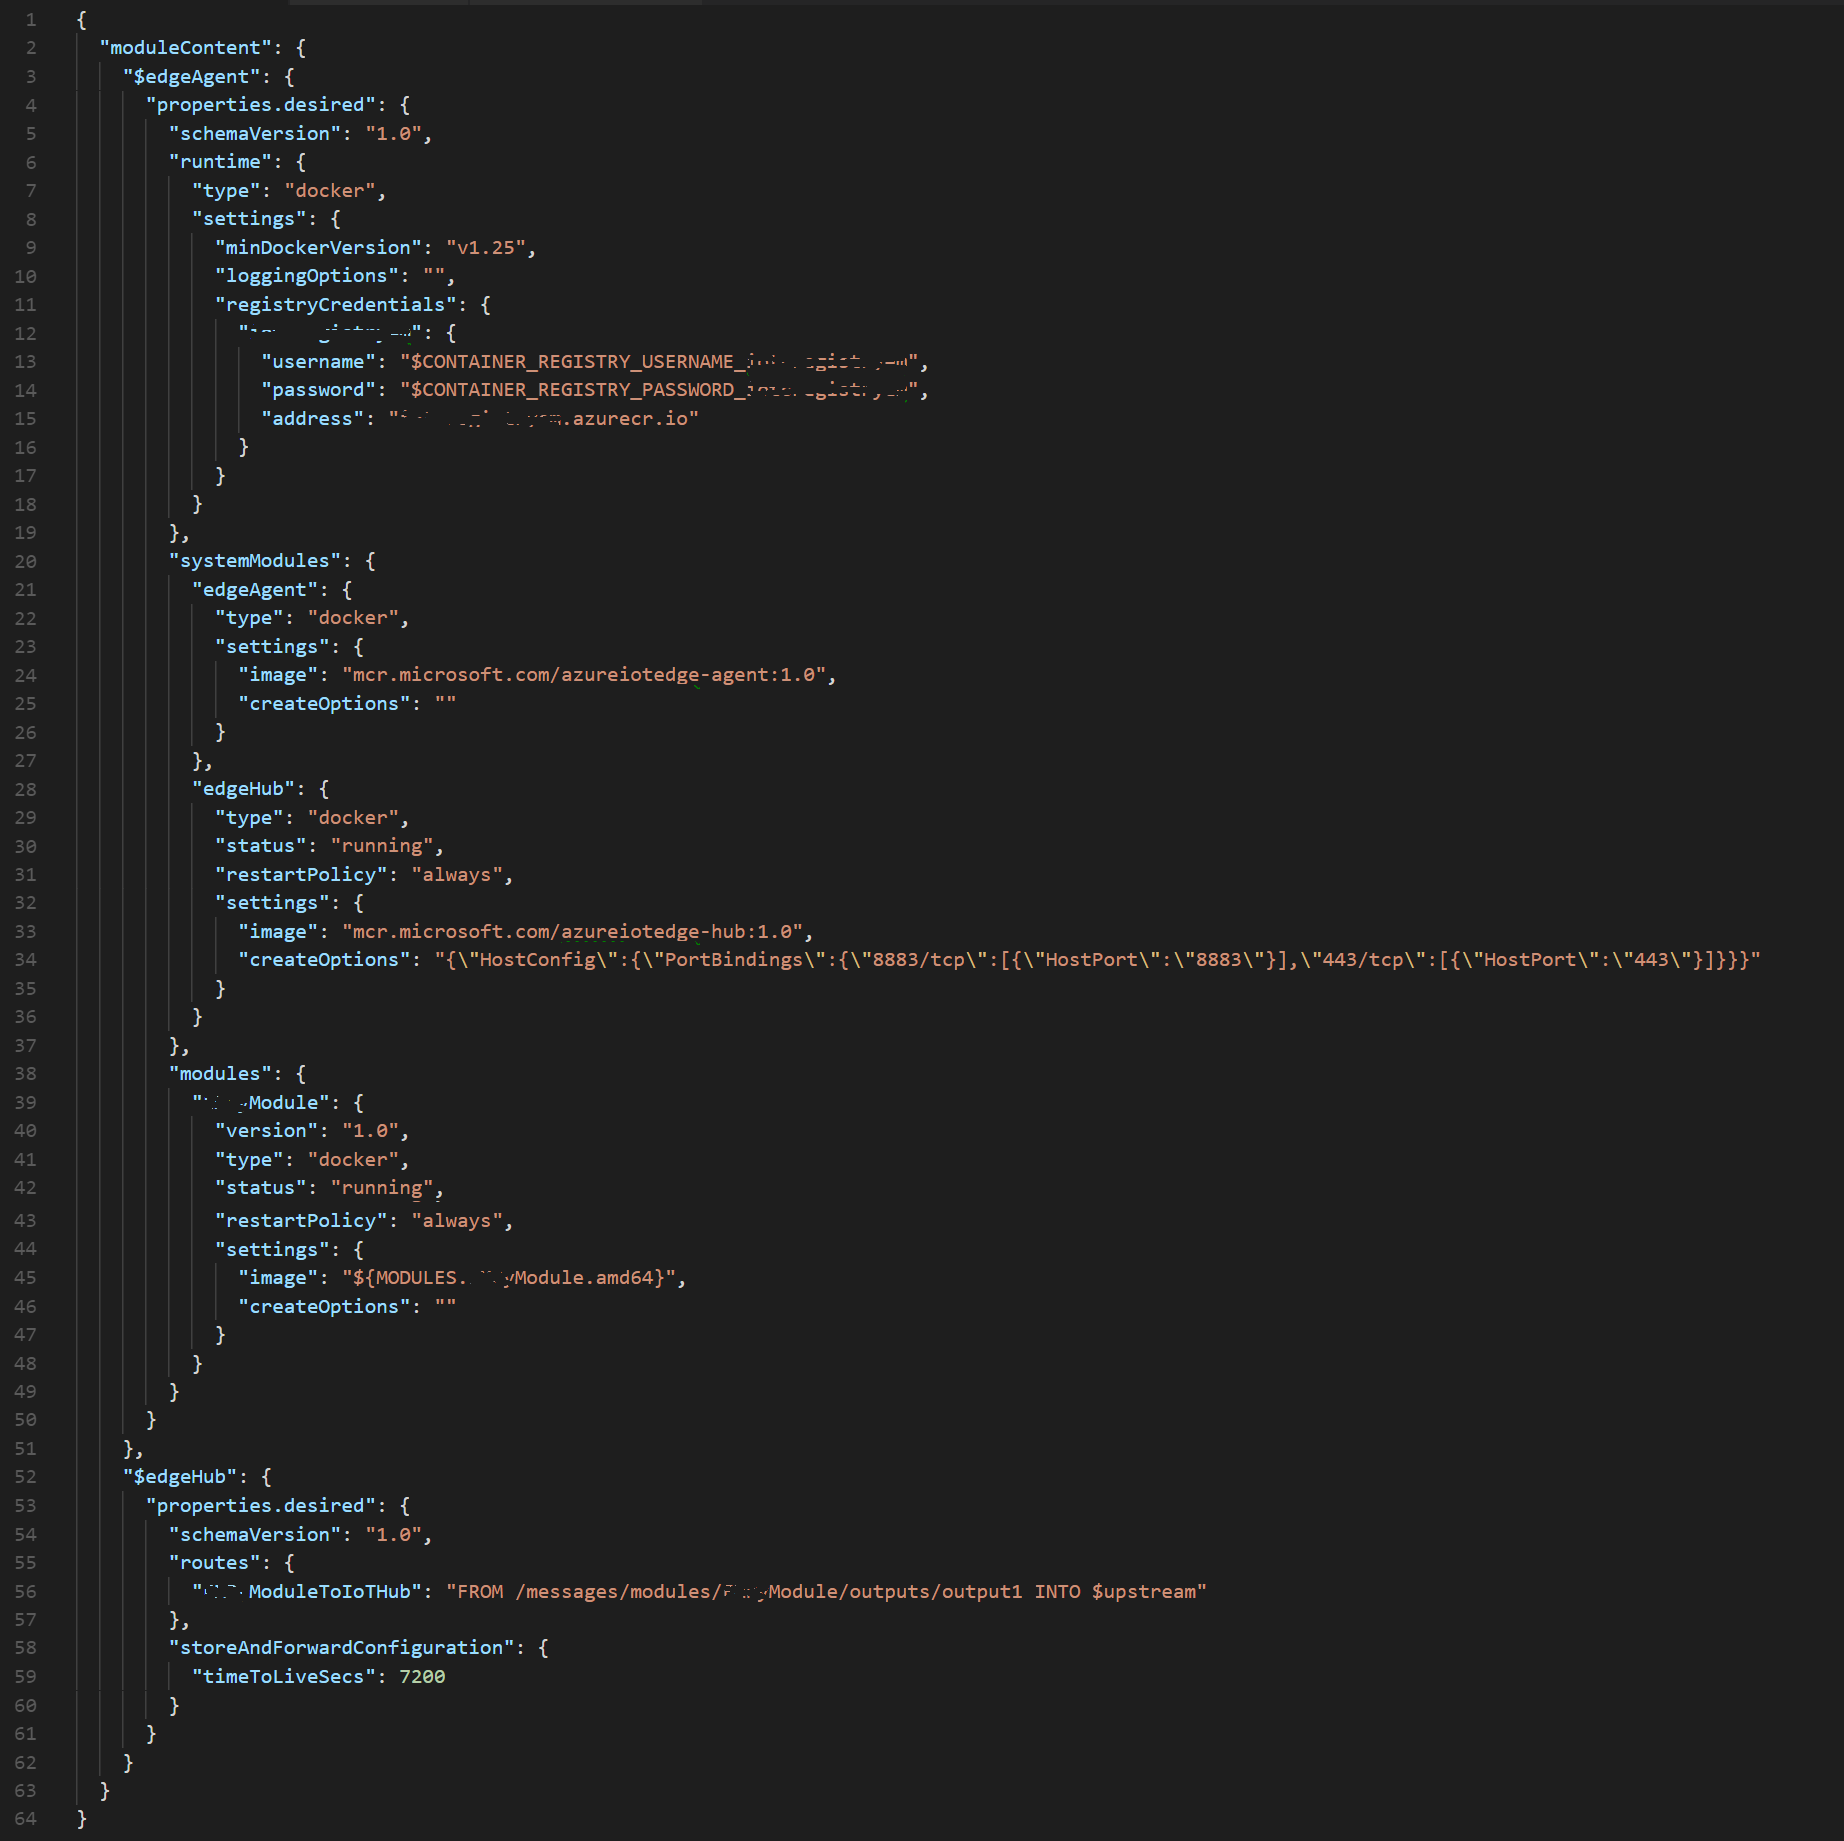
Because you have your own, unique, JSON structure, you need to edit it by hand (rather than copying an example). To make it easy, use the following image as a guide.
Areas that look different to yours, but which you should NOT change are highlighted yellow.
Sections which you need to delete, are a highlighted red.
Be careful to delete the correct brackets, and also remove the commas.

The completed JSON should look like the following image (though, with your unique differences: username/password/module name/module references):
Open the file called Dockerfile.amd64, and substitute its content with the following:
FROM ubuntu:xenial

WORKDIR /app

RUN apt-get update && \
    apt-get install -y --no-install-recommends libcurl4-openssl-dev python-pip libboost-python-dev && \
    rm -rf /var/lib/apt/lists/*
RUN pip install --upgrade pip
RUN pip install setuptools

COPY requirements.txt ./
RUN pip install -r requirements.txt

RUN pip install pillow
RUN pip install numpy

RUN apt-get update && apt-get install -y \
    pkg-config \
    python-dev \
    python-opencv \
    libopencv-dev \
    libav-tools  \
    libjpeg-dev \
    libpng-dev \
    libtiff-dev \
    libjasper-dev \
    python-numpy \
    python-pycurl \
    python-opencv


RUN pip install opencv-python
RUN pip install tensorflow
RUN pip install --upgrade tensorflow

COPY . .

RUN useradd -ms /bin/bash moduleuser
USER moduleuser

CMD [ "python", "-u", "./main.py" ]
Right-click on the folder beneath modules (it has the name you provided previously; in the example further down, it's called pythonmodule), and click on New Folder. Name the folder images.
Inside the folder, add some images containing mouse or keyboard. Those are the images that are analyzed by the Tensorflow model.
Warning
If you're using your own model, you need to change it to reflect your own models data.
You now need to retrieve the labels.txt and model.pb files from the model folder, which you previously downloaded (or created from your own Custom Vision Service), in Chapter 1. Once you have the files, place them within your solution, alongside the other files. The final result should look like the following image:
Chapter 9 - Package the solution as a container
You're now ready to "package" your files as a container and push it to your Azure Container Registry. Within VS Code, open the Integrated Terminal (View > Integrated Terminal or Ctrl+`), and use the following line to login to Docker (substitute the values of the command with the credentials of your Azure Container Registry (ACR)):
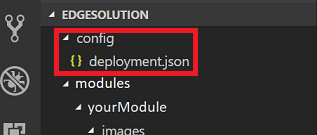
docker login -u <ACR username> -p <ACR password> <ACR login server>Right-click on the file deployment.template.json, and click Build IoT Edge Solution. This build process takes quite some time (depending on your device), so be prepared to wait. After the build process finishes, a deployment.json file is created inside a new folder called config.
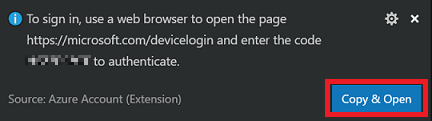
Open the Command Palette again, and search for Azure: Sign In. Follow the prompts using your Azure Account credentials; VS Code provides you with an option to Copy and Open, which copies the device code you'll soon need, and open your default web browser. When asked, paste the device code, to authenticate your machine.
Once signed in, you notice on the bottom side of the Explore panel, a new section called Azure IoT Hub Devices. Click this section to expand it.
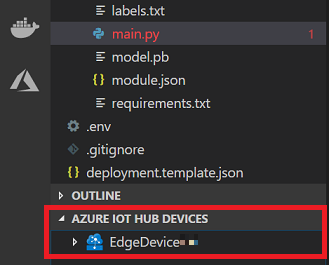
If your device is not here, you need to right-click Azure IoT Hub Devices, and then click Set IoT Hub Connection String. You then see that the Command Palette (at the top of VS Code), prompts you to input your Connection String. This is the Connection String you noted down at the end of Chapter 3. Press the Enter key, once you copied the string in.
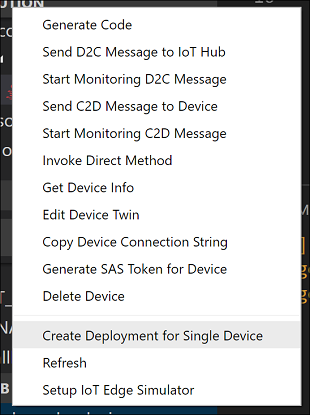
Your device should load, and appear. Right-click on the device name, and then click, Create Deployment for Single Device.
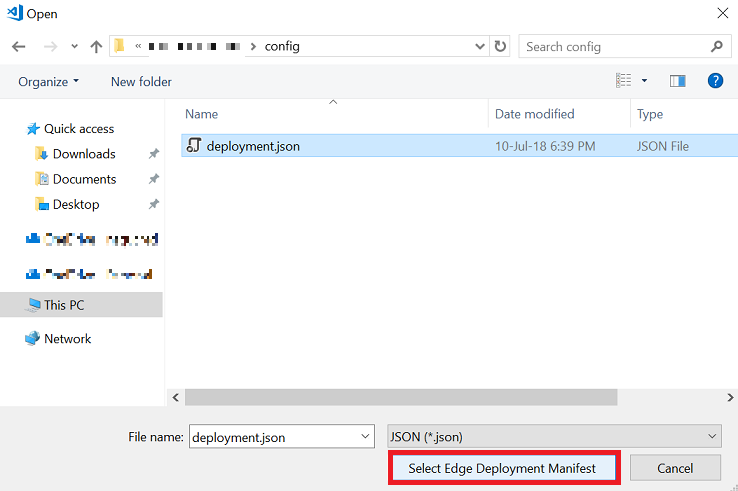
You get a File Explorer prompt, where you can navigate to the config folder, and then select the deployment.json file. With that file selected, click the Select Edge Deployment Manifest button.
At this point, you provided your IoT Hub Service with the manifest for it to deploy your container, as a module, from your Azure Container Registry, effectively deploying it to your device.
To view the messages sent from your device to the IoT Hub, right-click again on your device name in the Azure IoT Hub Devices section, in the Explorer panel, and click on Start Monitoring D2C Message. The messages sent from your device should appear in the VS Terminal. Be patient, as it may take some time. See the next Chapter for debugging, and checking if deployment was successful.
This module now iterates between the images in the images folder and analyze them, with each iteration. This is just a demonstration of how to get the basic machine learning model to work in an IoT Edge device environment.
To expand the functionality of this example, you could proceed in several ways. One way could be including some code in the container, that captures photos from a webcam that is connected to the device, and saves the images in the images folder.
Another way could be copying the images from the IoT device into the container. A practical way to do that is to run the following command in the IoT device Terminal (perhaps a small app could do the job, if you wished to automate the process). You can test this command by running it manually from the folder location where your files are stored:
sudo docker cp <filename> <modulename>:/app/images/<a name of your choice>
Chapter 10 - Debugging the IoT Edge Runtime
The following are a list of command lines, and tips, to help you monitor and debug the messaging activity of the IoT Edge Runtime, from your Ubuntu device.
Check the IoT Edge Runtime status by running the following command line:
sudo systemctl status iotedgeNote
Remember to press Ctrl + C, to finish viewing the status.
List the containers that are currently deployed. If the IoT Hub Service deployed the containers successfully, they are displayed by running the following command line:
sudo iotedge listOr
sudo docker psNote
Running the commands is a good way to check whether your module is deployed successfully, as it appears in the list; you otherwise only see the edgeHub and edgeAgent.
To display the code logs of a container, run the following command line:
journalctl -u iotedge
Useful commands to manage the IoT Edge Runtime:
To delete all containers in the host:
sudo docker rm -f $(sudo docker ps -aq)To stop the IoT Edge Runtime:
sudo systemctl stop iotedge
Chapter 11 - Create Table Service
Navigate back to your Azure Portal, where you create an Azure Tables Service, by creating a Storage resource.
If not already signed in, log into the Azure Portal.
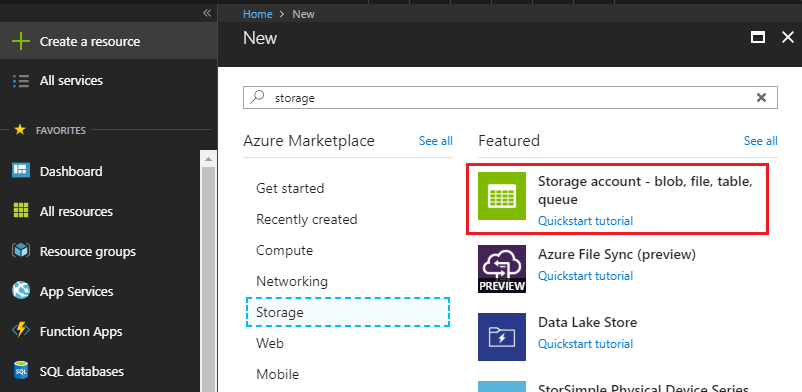
Once logged in, click on Create a resource, in the top left corner, and search for Storage account, and press the Enter key, to start the search.
Once it appears, click Storage account - blob, file, table, queue from the list.
The new page provides a description of the Storage account Service. At the bottom left of this prompt, click the Create button, to create an instance of this Service.
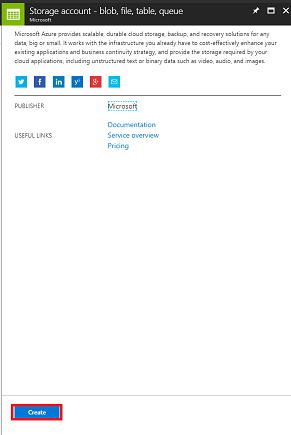
Once you click on Create, a panel appears:
Insert your desired Name for this Service instance (must be all lowercase).
For Deployment model, click Resource manager.
For Account kind, using the dropdown menu, click Storage (general purpose v1).
Click an appropriate Location.
For the Replication dropdown menu, click Read-access-geo-redundant storage (RA-GRS).
For Performance, click Standard.
Within the Secure transfer required section, click Disabled.
From the Subscription dropdown menu, click an appropriate subscription.
Choose a Resource Group or create a new one. A resource group provides a way to monitor, control access, provision, and manage, billing for a collection of Azure assets. It's recommended to keep all the Azure Services associated with a single project (for example, such as these courses) under a common resource group.
If you wish to read more about Azure Resource Groups, please follow this link on how to manage a Resource Group.
Leave Virtual networks as Disabled, if it is an option for you.
Click Create.

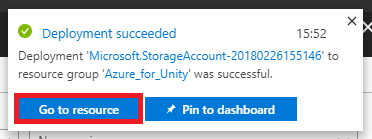
Once you click on Create, you have to wait for the Service to be created, it might take a minute.
A notification appears in the Portal once the Service instance is created. Click on the notifications to explore your new Service instance.

Click the Go to resource button in the notification, and you are taken to your new Storage Service instance overview page.
From the overview page, to the right-hand side, click Tables.
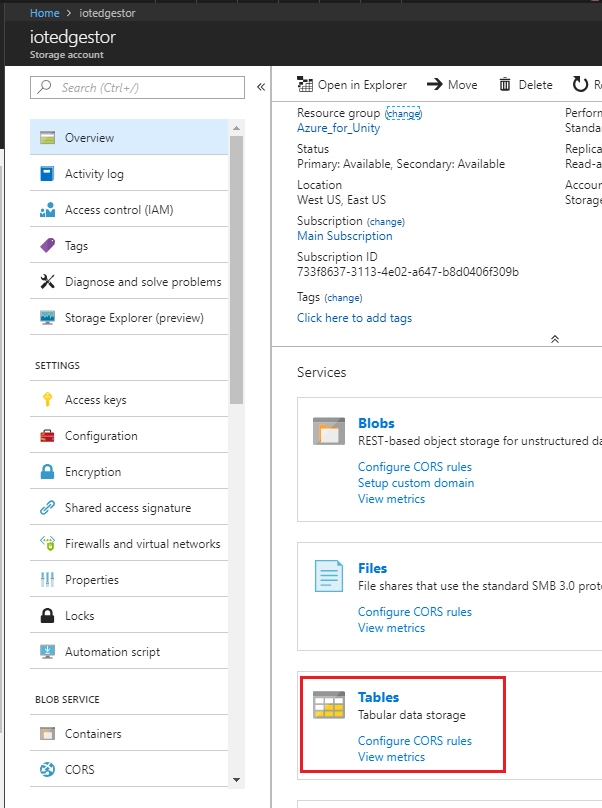
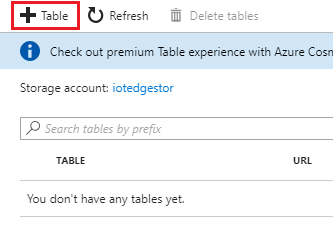
The panel on the right changes to show the Table Service information, wherein you need to add a new table. Click the + Table button to the top-left corner.
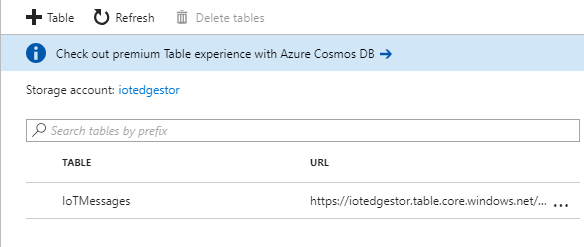
A new page is shown, wherein you need to enter a Table name. This is the name you use to refer to the data in your application in later Chapters (creating Function App, and Power BI). Insert IoTMessages as the name (you can choose your own, just remember it when used later in this document) and click OK.
Once the new table is created, you are able to see it within the Table Service page (at the bottom).
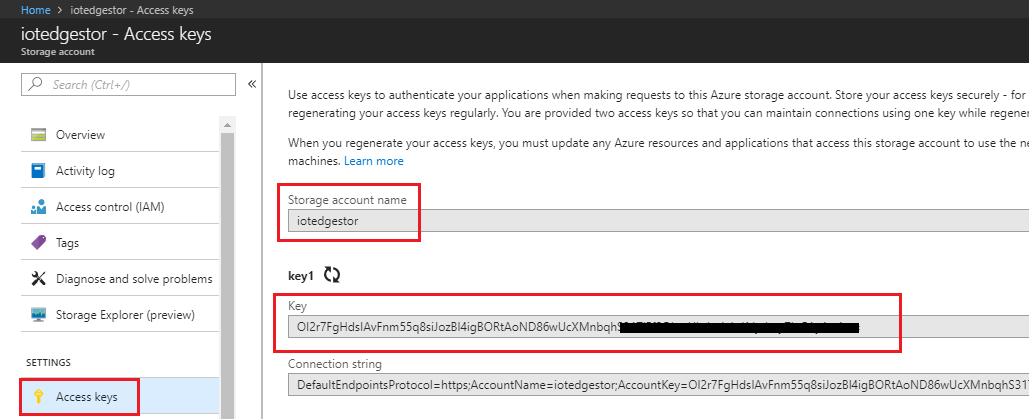
Now click on Access keys and take a copy of the Storage account name and Key (using your Notepad), you use these values later in this course, when creating the Azure Function App.
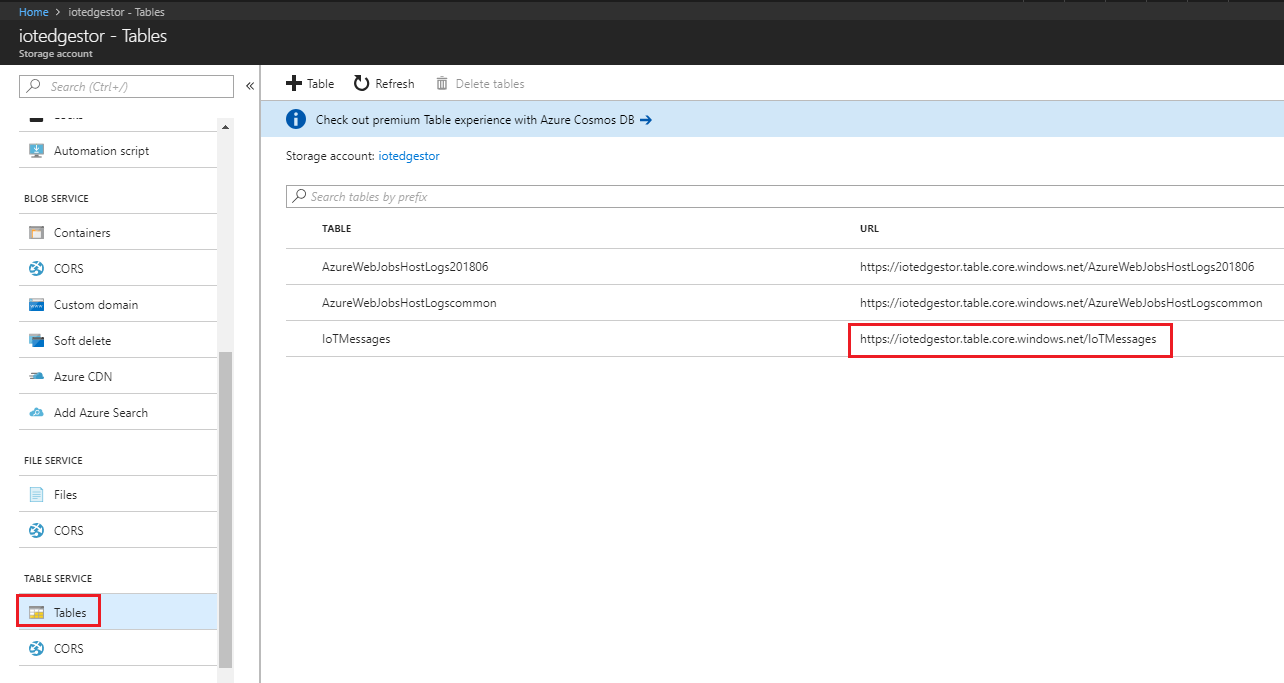
Using the panel on the left again, scroll to the Table Service section, and click Tables (or Browse Tables, in newer Portals) and take a copy of the Table URL (using your Notepad). You use this value later in this course, when linking your table to your Power BI application.
Chapter 12 - Completing the Azure Table
Now that your Table Service storage account is setup, it's time to add data to it, which can be used to store and retrieve information. The editing of your Tables can be done through Visual Studio.
Open Visual Studio (not Visual Studio Code).
From the menu, click View > Cloud Explorer.
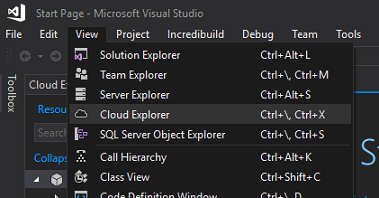
The Cloud Explorer opens as a docked item (be patient, as loading may take time).
Warning
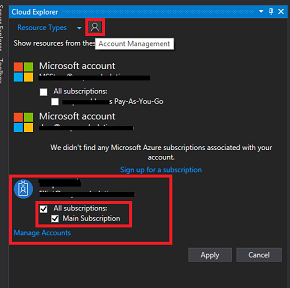
If the subscription you used to create your Storage Accounts is not visible, ensure that you have:
Logged in to the same account as the one you used for the Azure Portal.
Selected your subscription from the Account Management page (you may need to apply a filter from your account settings):
Your Azure cloud Services are shown. Find Storage Accounts and click the arrow to the left of that to expand your accounts.
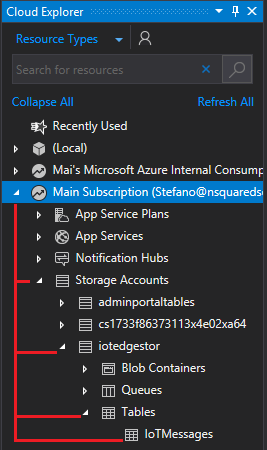
Once expanded, your newly created Storage account should be available. Click the arrow to the left of your storage, and then once that is expanded, find Tables and click the arrow next to it, to reveal the Table you created in the last Chapter. Double-click your Table.
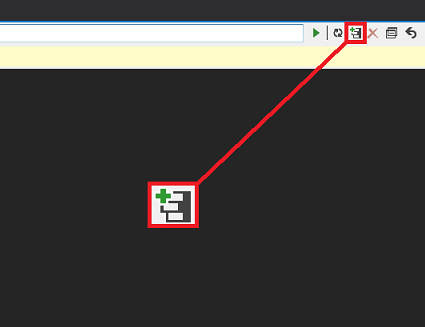
Your table is opened in the center of your Visual Studio window. Click the table icon with the + (plus) on it.
A window appears prompting for you to Add Entity. You create only one entity, though it has three properties. You notice that PartitionKey and RowKey are already provided, as these are used by the table to find your data.
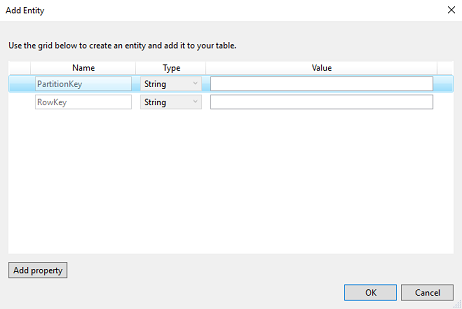
Update the following values:
Name: PartitionKey, Value: PK_IoTMessages
Name: RowKey, Value: RK_1_IoTMessages
Then, click Add property (to the lower left of the Add Entity window) and add the following property:
- MessageContent, as a string, leave the Value empty.
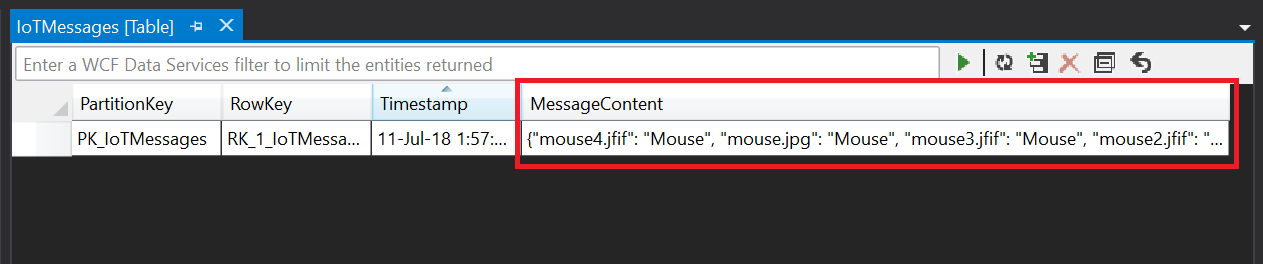
Your table should match the one in the following image:
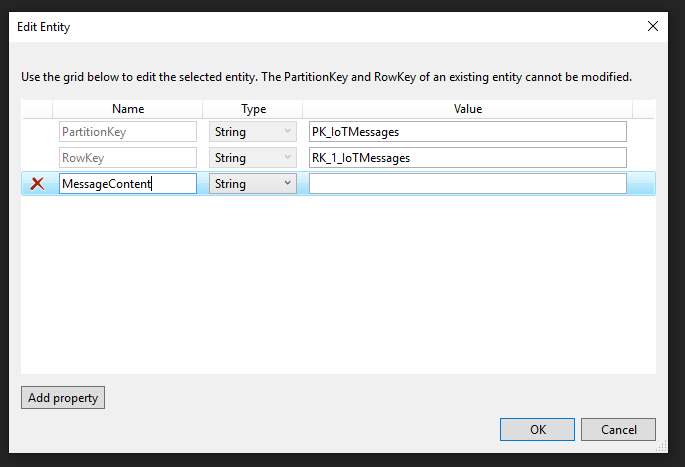
Note
The reason why the entity has the number 1 in the row key, is because you might want to add more messages, should you desire to experiment further with this course.
Click OK when you're finished. Your table is now ready to be used.
Chapter 13 - Create an Azure Function App
It's now time to create an Azure Function App, which is called by the IoT Hub Service to store the IoT Edge device messages in the Table Service, which you created in the previous Chapter.
First, you need to create a file that allows your Azure Function to load the libraries you need.
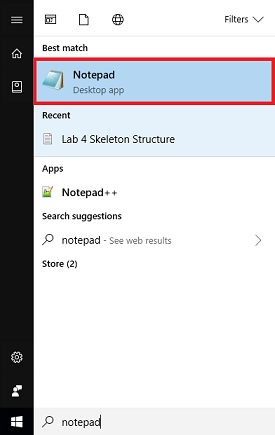
Open Notepad (press the Windows Key, and type notepad).
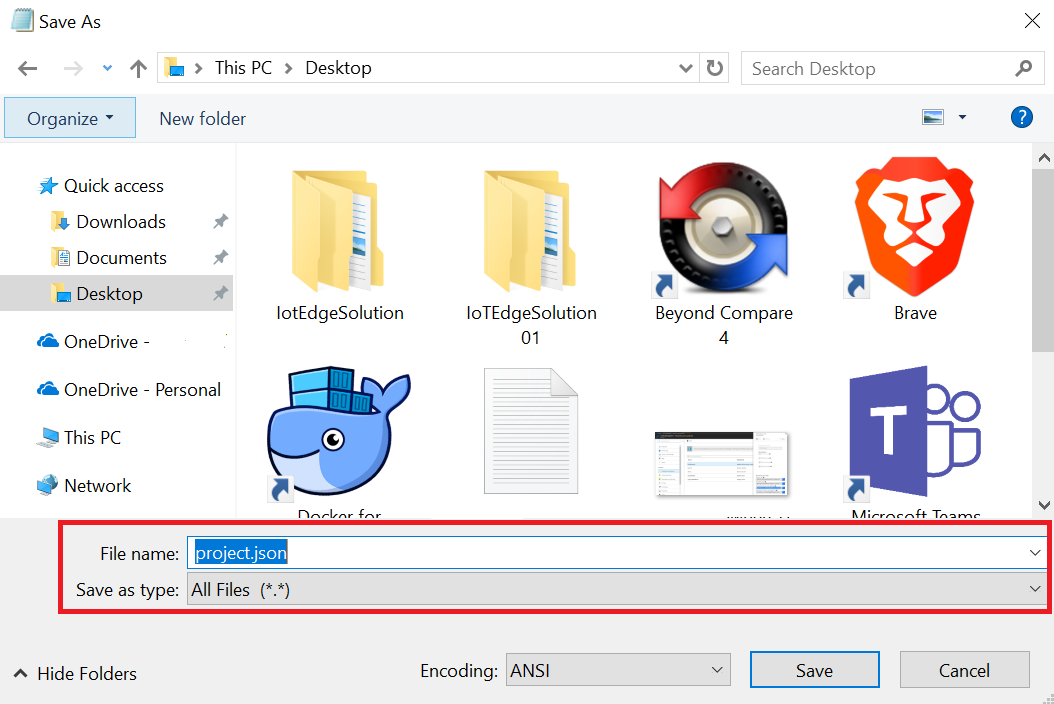
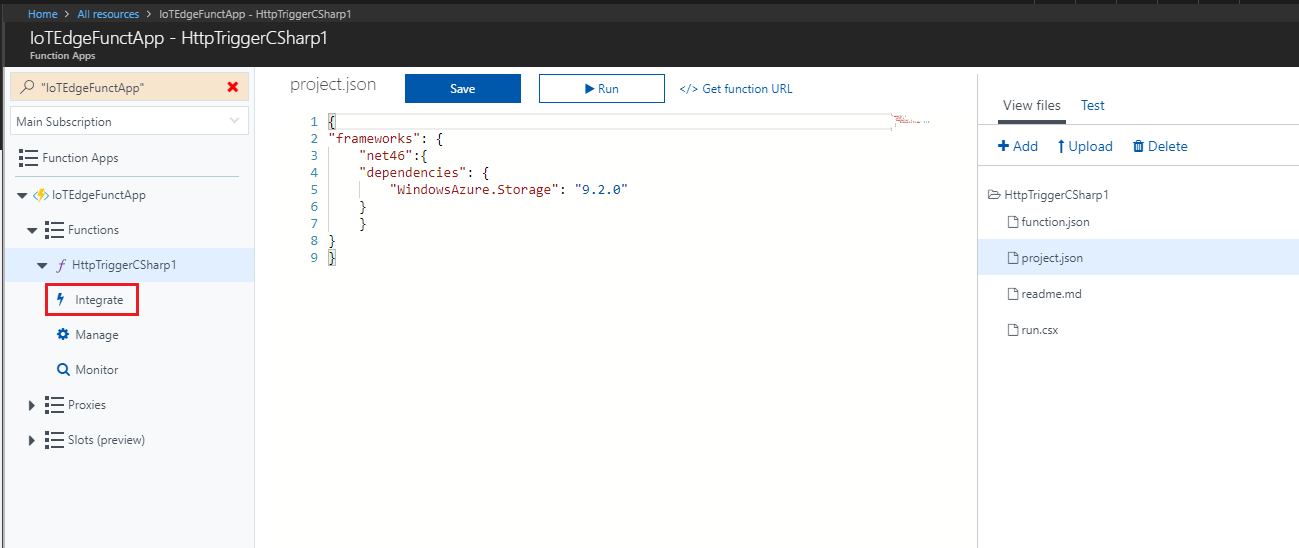
With Notepad open, insert the following JSON structure into it. Once you do that, save it on your desktop as project.json. This file defines the libraries your function uses. If you use NuGet, it looks familiar.
Warning
It's important that the naming is correct; ensure it does NOT have a .txt file extension. See the following JSON structure for reference:
{
"frameworks": {
    "net46":{
    "dependencies": {
        "WindowsAzure.Storage": "9.2.0"
    }
    }
}
}
Log in to the Azure Portal.
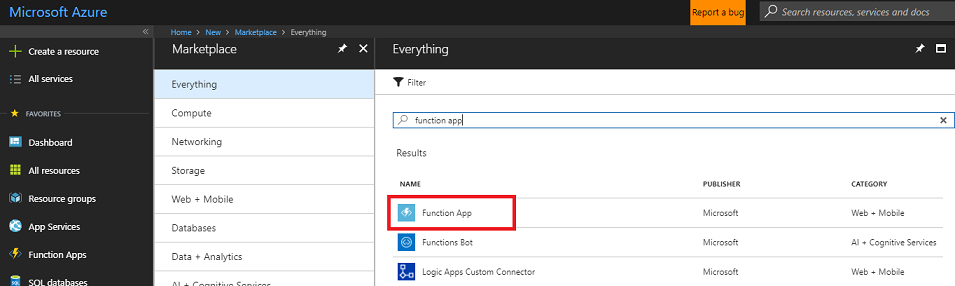
Once you're logged in, click on Create a resource in the top left corner, and search for Function App, and press the Enter key, to search. To open a new panel, click Function App from the results.
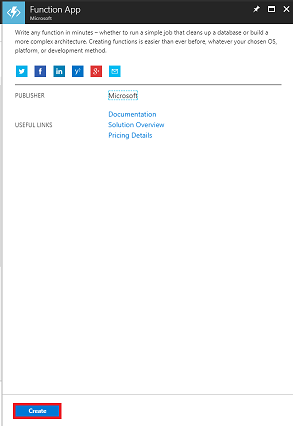
The new panel provides a description of the Function App Service. At the bottom left of this panel, click the Create button, to create an association with this Service.
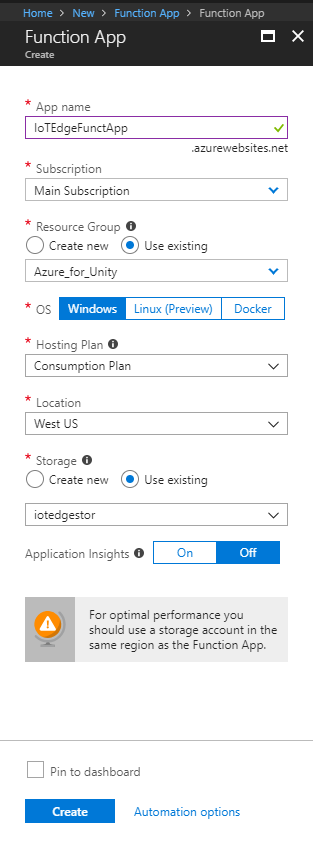
Once you click on Create, fill in the following:
For App name, insert your desired name for this Service instance.
Select a Subscription.
Select the pricing tier appropriate for you, if this is the first time creating a Function App Service, a free tier should be available to you.
Choose a Resource Group or create a new one. A resource group provides a way to monitor, control access, provision, and manage, billing for a collection of Azure assets. It's recommended to keep all the Azure Services associated with a single project (for example, such as these courses) under a common resource group.
If you wish to read more about Azure Resource Groups, please follow this link on how to manage a Resource Group.
For OS, click Windows, as that is the intended platform.
Select a Hosting Plan (this tutorial is using a Consumption Plan).
Select a Location (choose the same location as the storage you built in the previous step).
For the Storage section, you must select the Storage Service you created in the previous step.
You don't need Application Insights in this app, so feel free to leave it Off.
Click Create.
Once you click on Create, you have to wait for the Service to be created, it might take a minute.
A notification appears in the Portal once the Service instance is created.

Click on the notification, once deployment is successful (is finished).
Click the Go to resource button in the notification to explore your new Service instance.

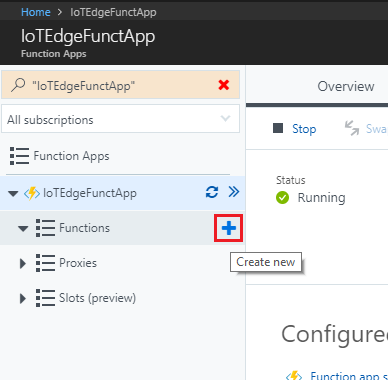
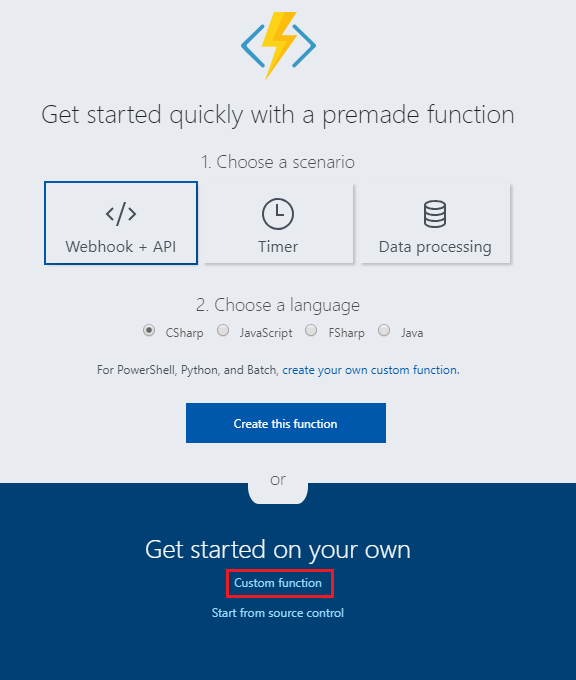
In the left side of the new panel, click the + (plus) icon next to Functions, to create a new function.
Within the central panel, the Function creation window appears. Scroll down further, and click on Custom function.
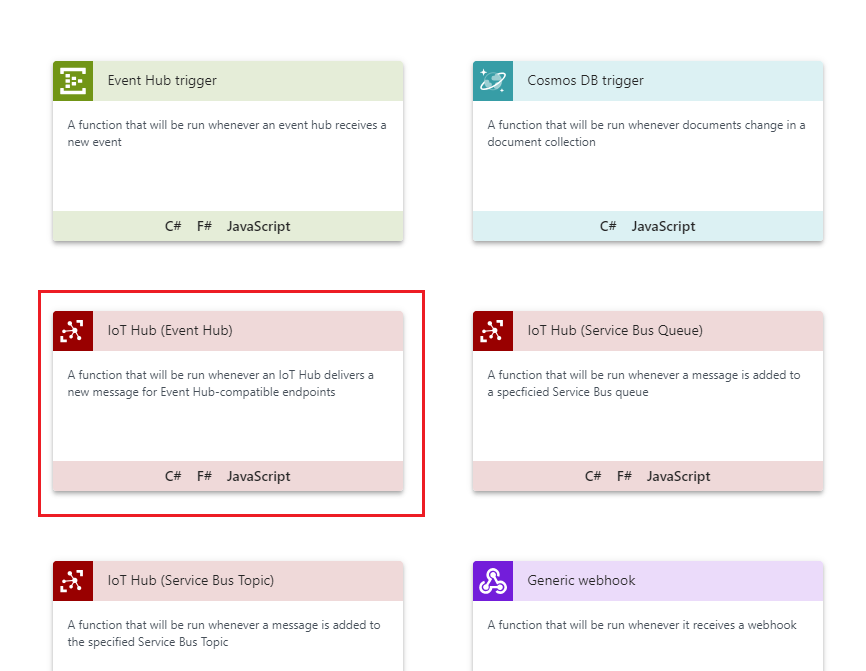
Scroll down the next page, until you find IoT Hub (Event Hub), then click on it.
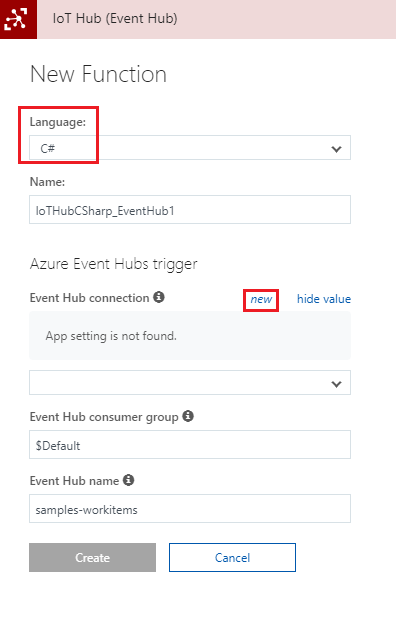
In the IoT Hub (Event Hub) blade, set the Language to C# and then click on new.
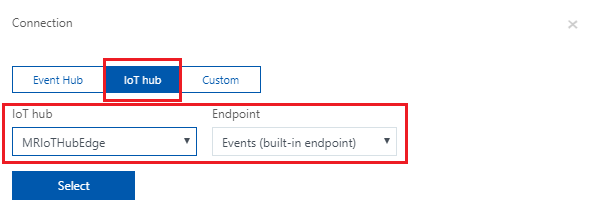
In the window that appears, make sure that IoT Hub is selected and the name of the IoT Hub field corresponds with the name of your IoT Hub Service that you created previously (in step 8, of Chapter 3). Then click the Select button.
Back on the IoT Hub (Event Hub) blade, click on Create.
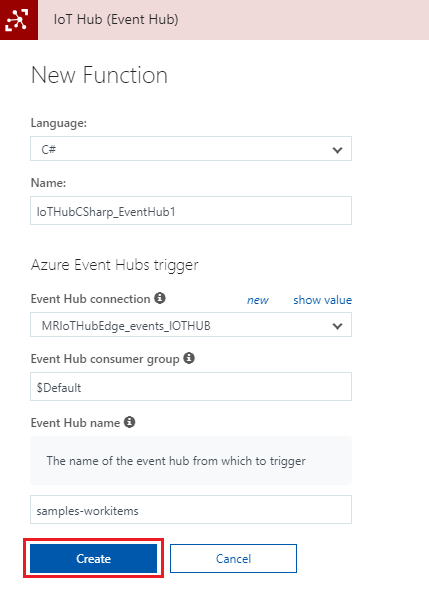
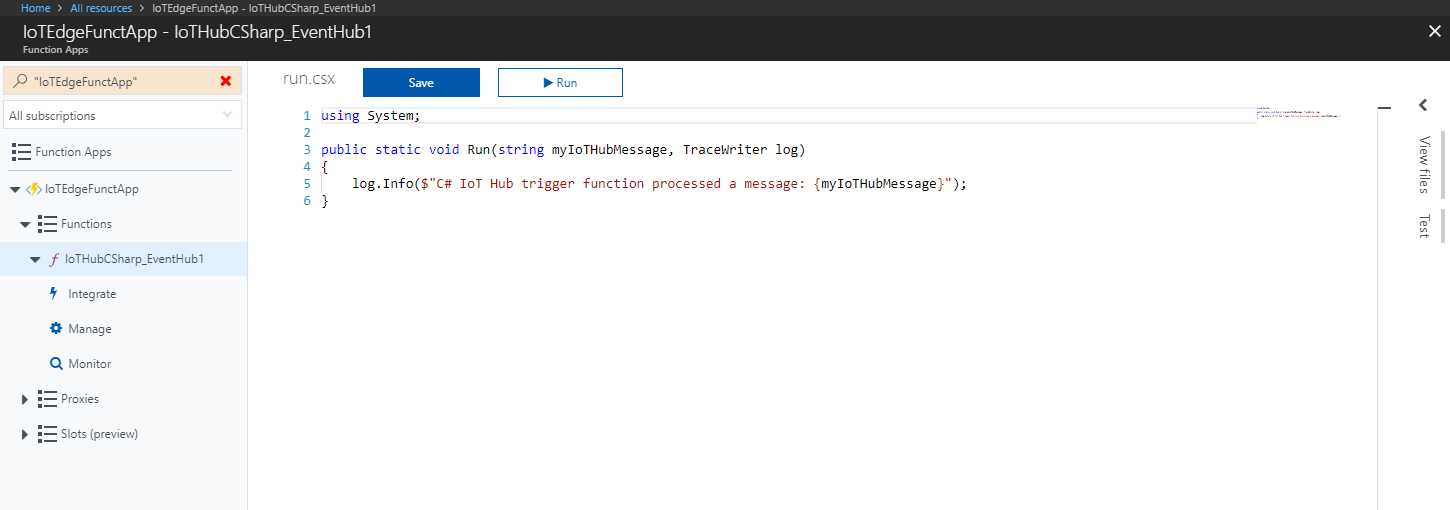
You are redirected to the function editor.
Delete all the code in it and replace it with the following code:
#r "Microsoft.WindowsAzure.Storage"
#r "NewtonSoft.Json"

using System;
using Microsoft.WindowsAzure.Storage;
using Microsoft.WindowsAzure.Storage.Table;
using Newtonsoft.Json;
using System.Threading.Tasks;

public static async Task Run(string myIoTHubMessage, TraceWriter log)
{
    log.Info($"C# IoT Hub trigger function processed a message: {myIoTHubMessage}");

    //RowKey of the table object to be changed
    string tableName = "IoTMessages";
    string tableURL = "https://iothubmrstorage.table.core.windows.net/IoTMessages";

    // If you did not name your Storage Service as suggested in the course, change the name here with the one you chose.
    string storageAccountName = "iotedgestor";

    string storageAccountKey = "<Insert your Storage Key here>";

    string partitionKey = "PK_IoTMessages";
    string rowKey = "RK_1_IoTMessages";

    Microsoft.WindowsAzure.Storage.Auth.StorageCredentials storageCredentials =
        new Microsoft.WindowsAzure.Storage.Auth.StorageCredentials(storageAccountName, storageAccountKey);

    CloudStorageAccount storageAccount = new CloudStorageAccount(storageCredentials, true);

    // Create the table client.
    CloudTableClient tableClient = storageAccount.CreateCloudTableClient();

    // Get a reference to a table named "IoTMessages"
    CloudTable messageTable = tableClient.GetTableReference(tableName);

    //Retrieve the table object by its RowKey
    TableOperation operation = TableOperation.Retrieve<MessageEntity>(partitionKey, rowKey);
    TableResult result = await messageTable.ExecuteAsync(operation);

    //Create a MessageEntity so to set its parameters
    MessageEntity messageEntity = (MessageEntity)result.Result;

    messageEntity.MessageContent = myIoTHubMessage;
    messageEntity.PartitionKey = partitionKey;
    messageEntity.RowKey = rowKey;

    //Replace the table appropriate table Entity with the value of the MessageEntity Ccass structure.
    operation = TableOperation.Replace(messageEntity);

    // Execute the insert operation.
    await messageTable.ExecuteAsync(operation);
}

// This MessageEntity structure which will represent a Table Entity
public class MessageEntity : TableEntity
{
    public string Type { get; set; }
    public string MessageContent { get; set; }
}
Change the following variables, so that they correspond to the appropriate values (Table and Storage values, from step 11 and 13, respectively, of Chapter 11), that you find in your Storage Account:
- tableName, with the name of your Table located in your Storage Account.
- tableURL, with the URL of your Table located in your Storage Account.
- storageAccountName, with the name of the value corresponding with the name of your Storage Account name.
- storageAccountKey, with the Key you obtained in the Storage Service you created previously.

With the code in place, click Save.
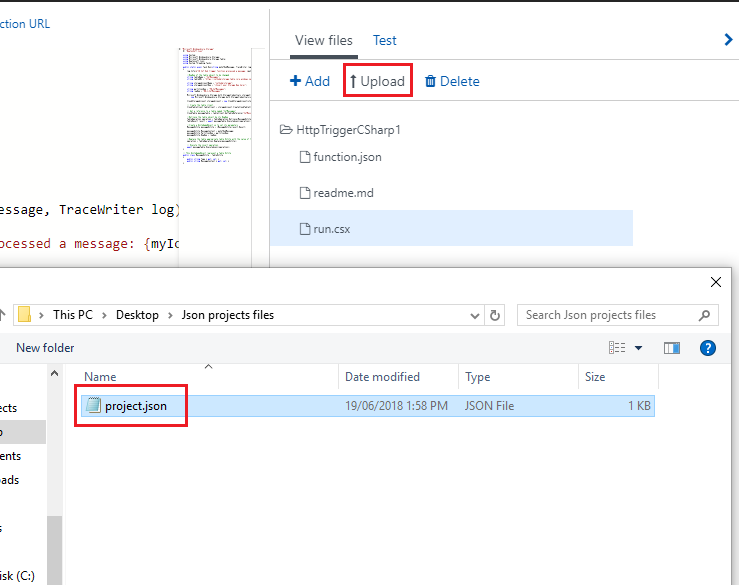
Next, click the < (arrow) icon, on the right-hand side of the page.
A panel slides in from the right. In that panel, click Upload, and a File Browser appears.
Navigate to, and click, the project.json file, which you created in Notepad previously, and then click the Open button. This file defines the libraries that your function use.
When the file is uploaded, it appears in the panel on the right. Clicking it opens it within the Function editor. It must look exactly the same as the next image.
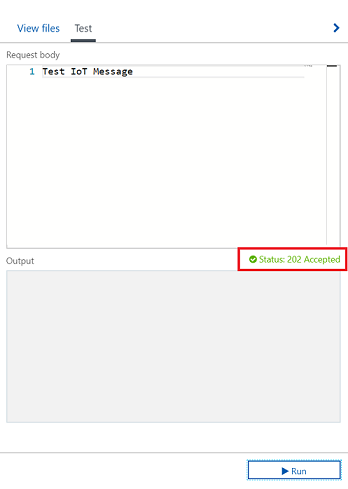
At this point, it would be good to test the capability of your Function to store the message on your Table. On the top right side of the window, click on Test.
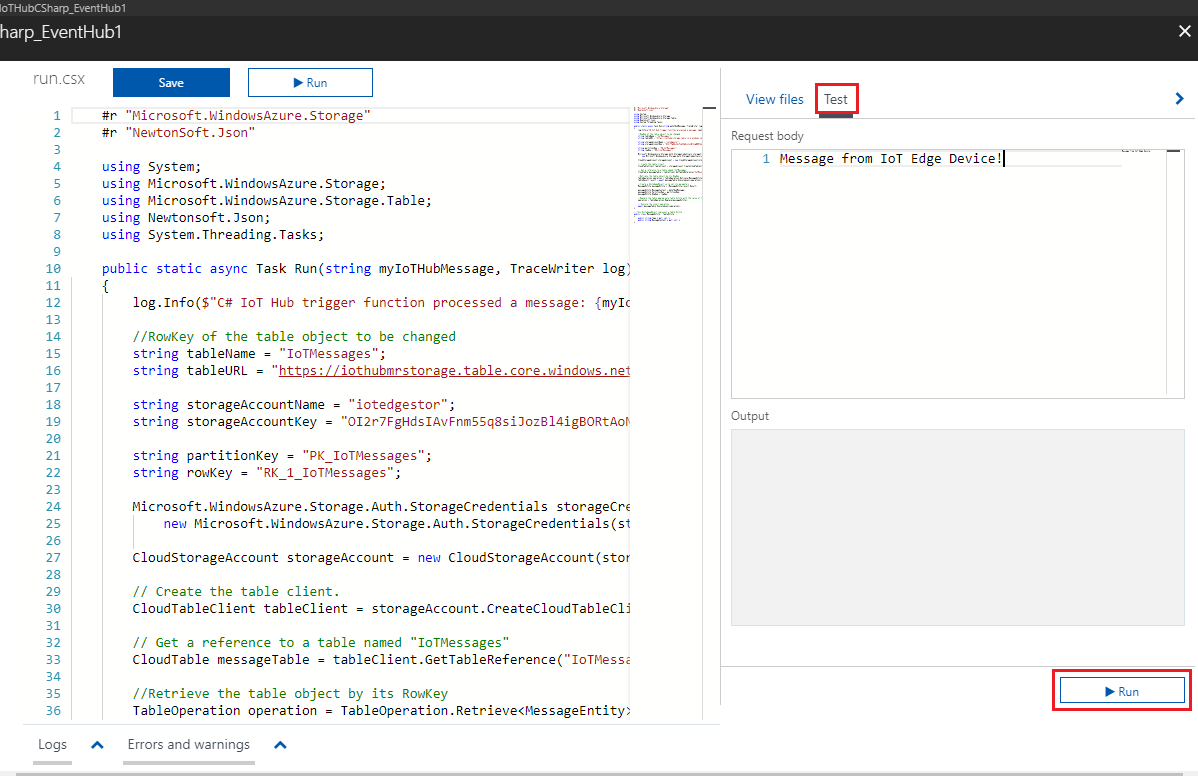
Insert a message on the Request body, as shown in the earlier image, and click on Run.
The function runs, displaying the result status (you notice the green Status 202 Accepted, over the Output window, which means it was a successful call):
Chapter 14 - View active messages
If you now open Visual Studio (not Visual Studio Code), you can visualize your test message result, as it is stored in the MessageContent string area.
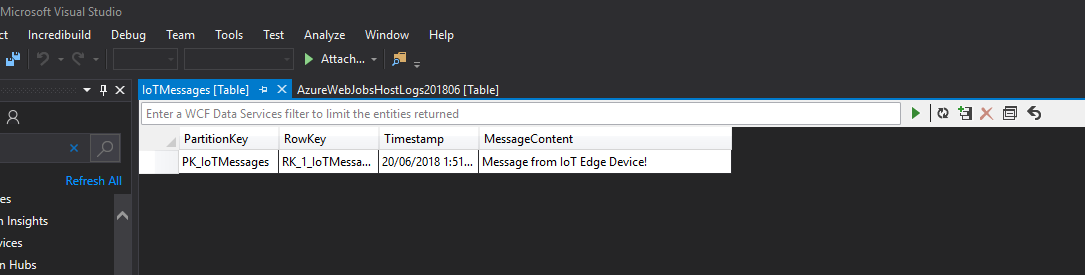
With the Table Service and Function App in place, your Ubuntu device messages appear in your IoTMessages Table. If not already running, start your device again, and you are able to see the result messages from your device, and module, within your Table, through using Visual Studio Cloud Explorer.
Chapter 15 - Power BI Setup
To visualize the data from your IOT device, you'll setup Power BI (desktop version), to collect the data from the Table Service, which you created. The HoloLens version of Power BI then use that data to visualize the result.
Open the Microsoft Store on Windows 10 and search for Power BI Desktop.
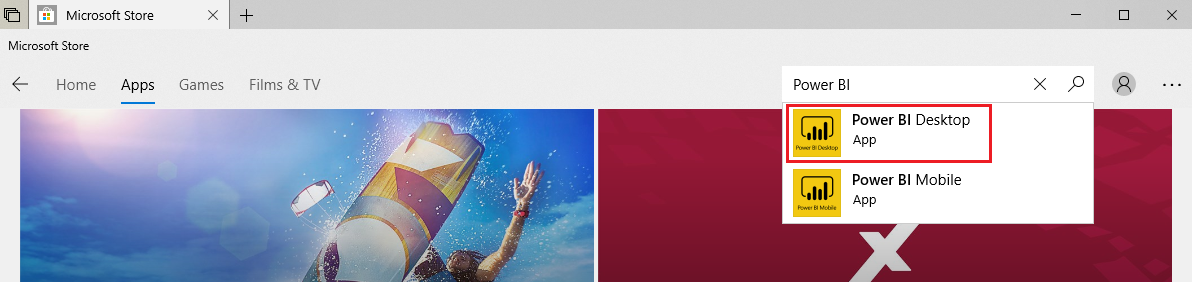
Download the application. Once it is finished downloading, open it.
Log into Power BI with your Microsoft 365 account. You may be redirected to a browser, to sign up. Once you're signed up, go back to the Power BI app, and sign in again.
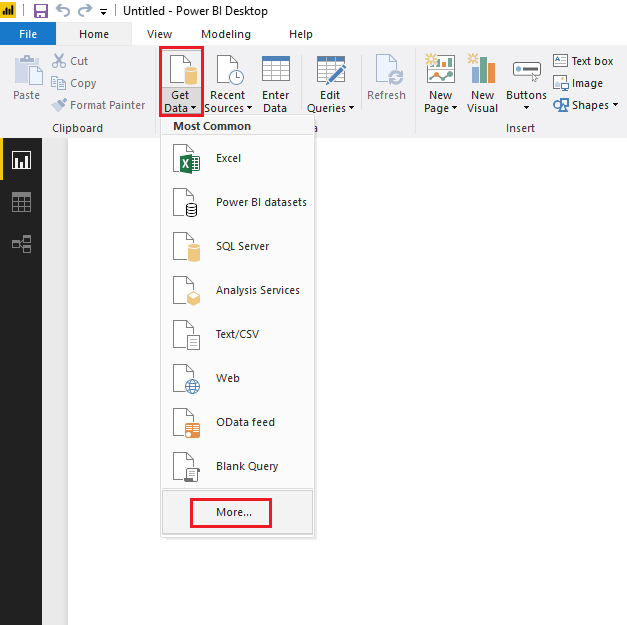
Click on Get Data and then click on More....
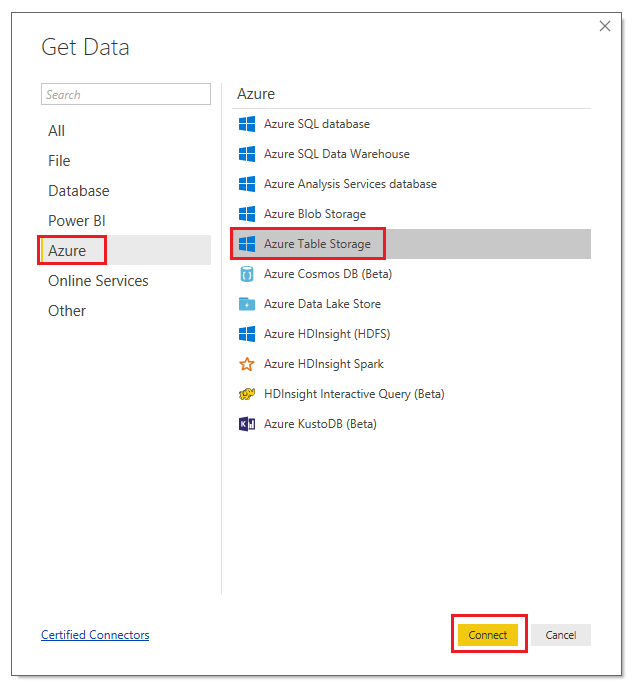
Click Azure, Azure Table Storage, then click on Connect.
You are prompted to insert the Table URL that you collected earlier (in step 13 of Chapter 11), while creating your Table Service. After inserting the URL, delete the portion of the path referring to the Table "sub-folder" (which was IoTMessages, in this course). The final result should be as displayed in the following image. Then click on OK.
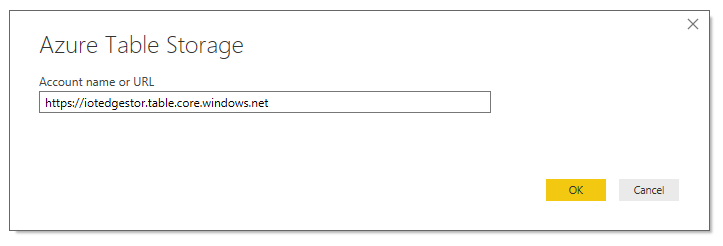
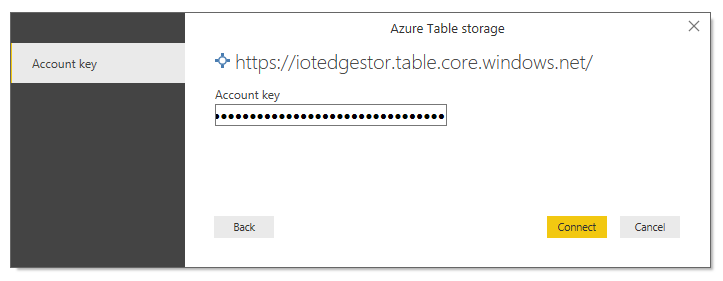
You are prompted to insert the Storage Key that you noted (in step 11 of Chapter 11) earlier while creating your Table Storage. Then click on Connect.
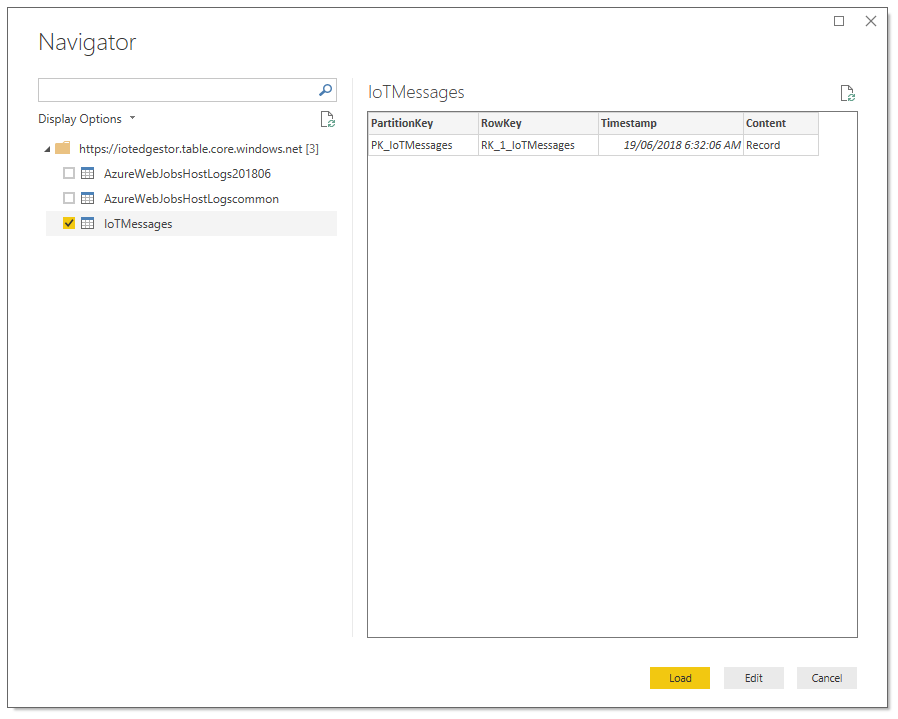
A Navigator Panel is displayed, tick the box next to your Table and click on Load.
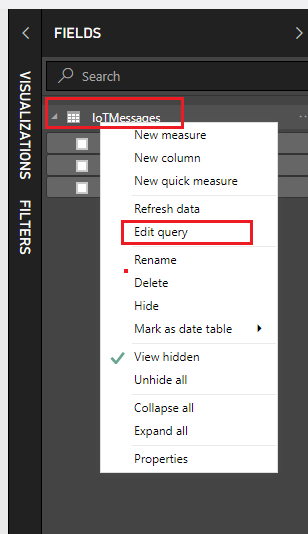
Your table is now loaded on Power BI, but it requires a query to display the values in it. Right-click on the table name located in the FIELDS panel at the right side of the screen. Then click on Edit Query.
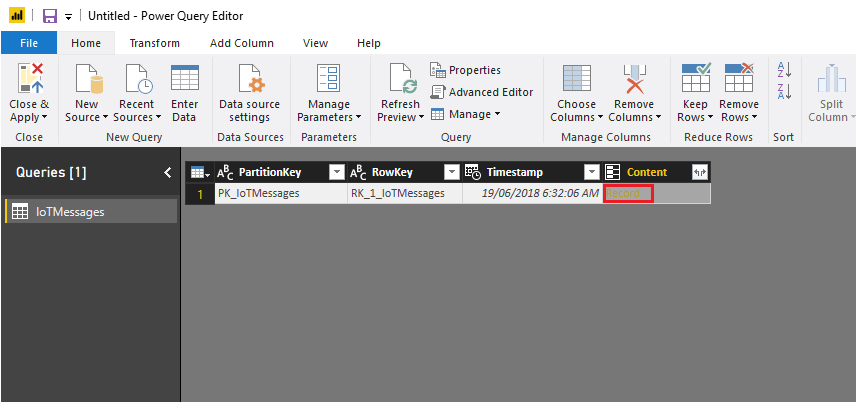
A Power Query Editor opens up as a new window, displaying your table. Click on the word Record within the Content column of the table, to visualize your stored content.
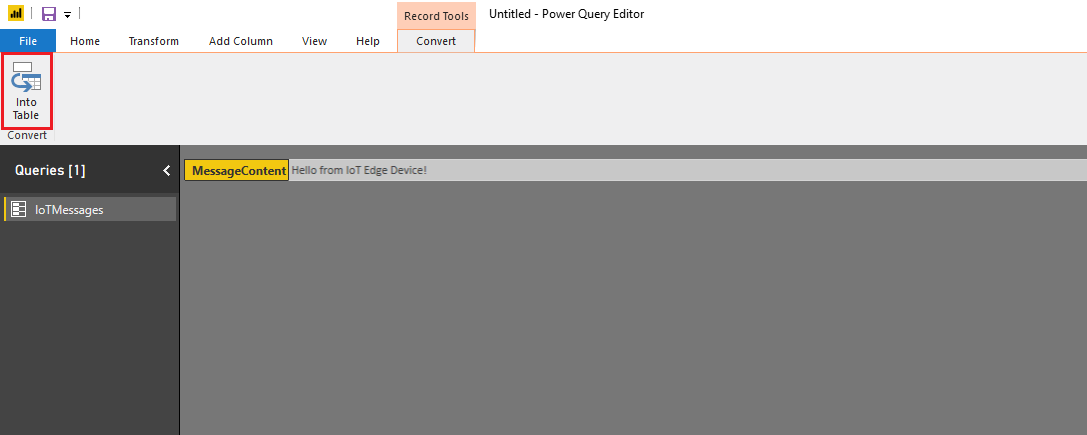
Click on Into Table, at the top-left of the window.
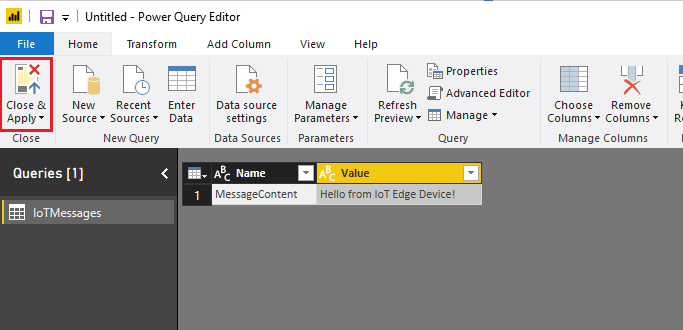
Click on Close & Apply.
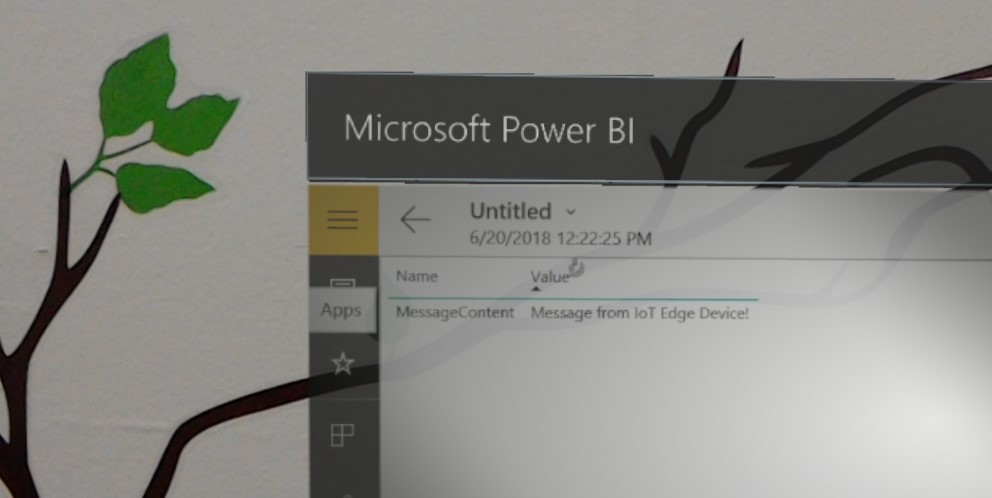
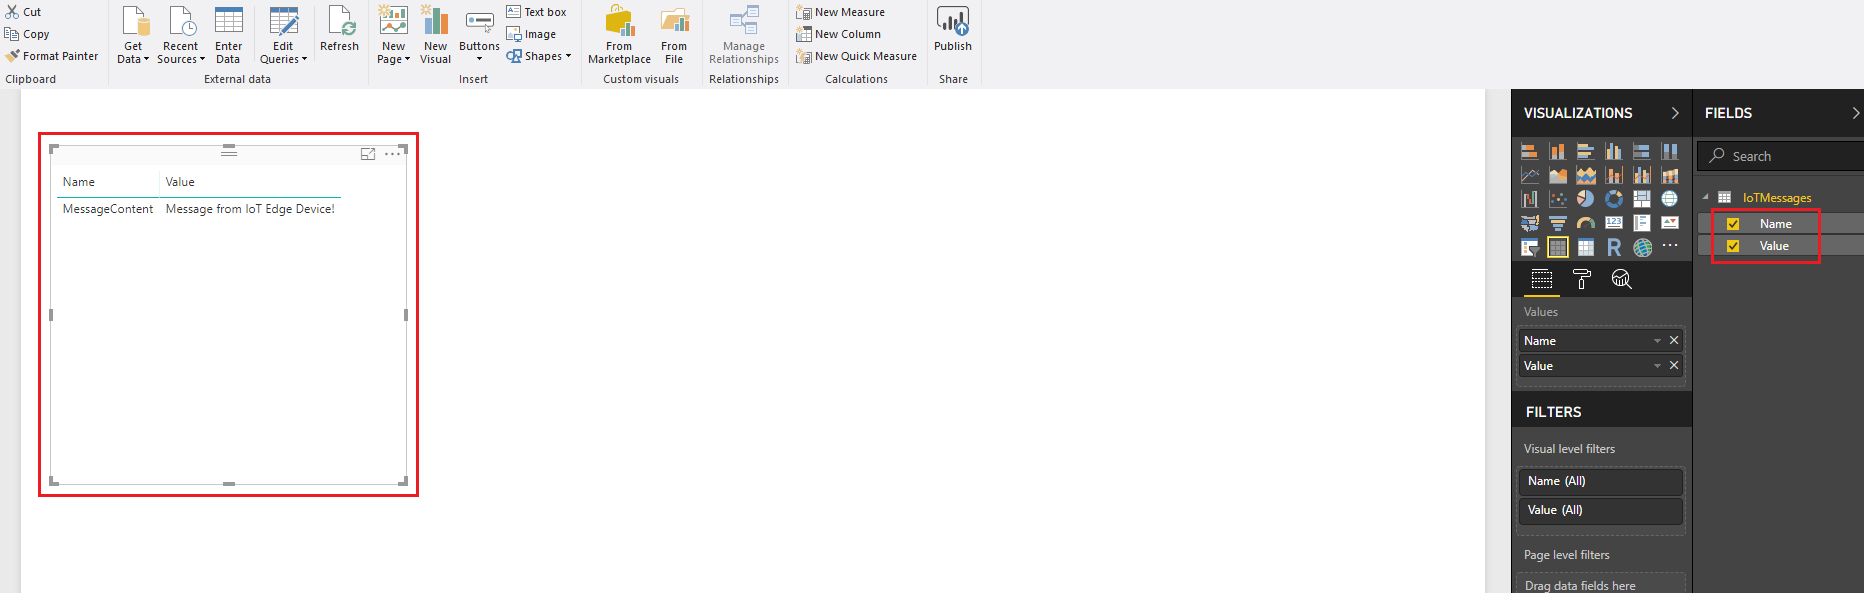
Once it finishes loading the query, within the FIELDS panel, on the right side of the screen, tick the boxes corresponding to the parameters Name and Value, to visualize the MessageContent column content.
Click on the blue disk icon at the top left of the window to save your work in a folder of your choice.
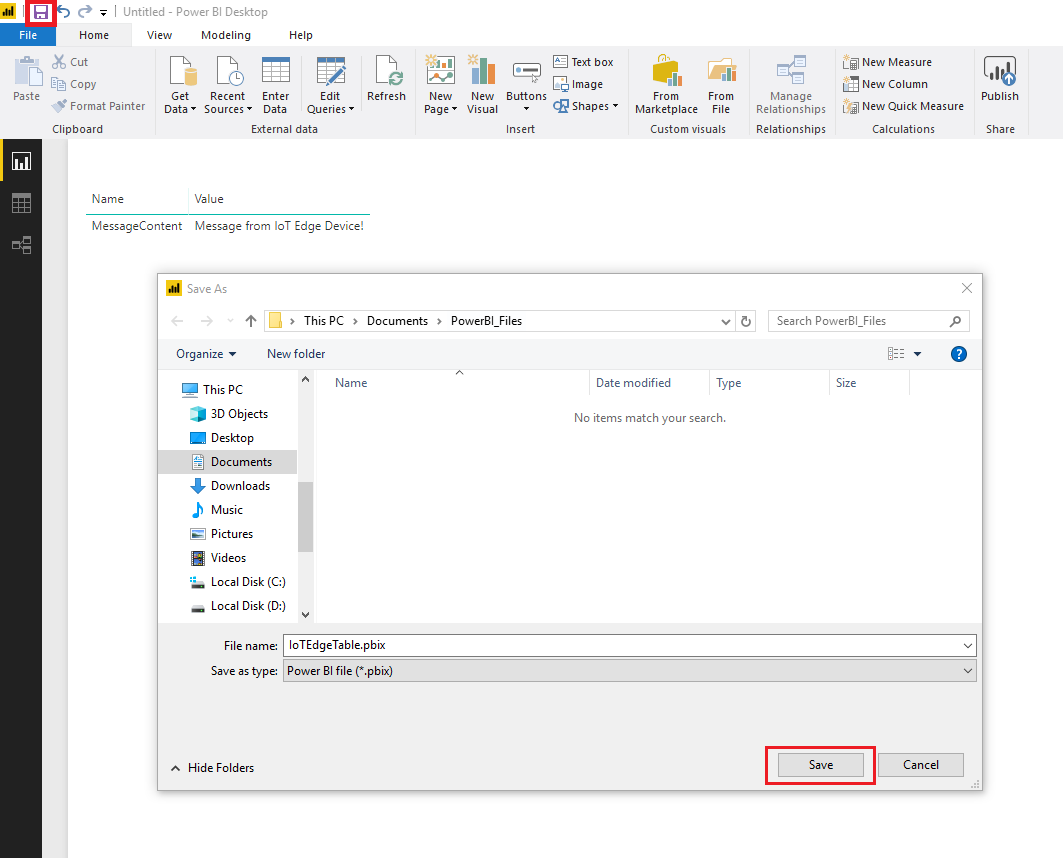
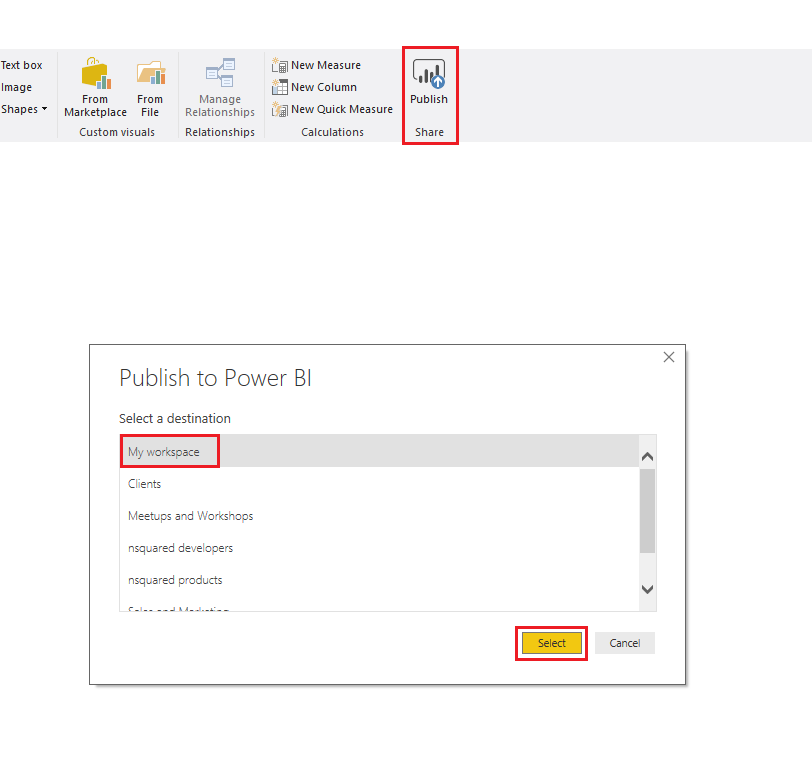
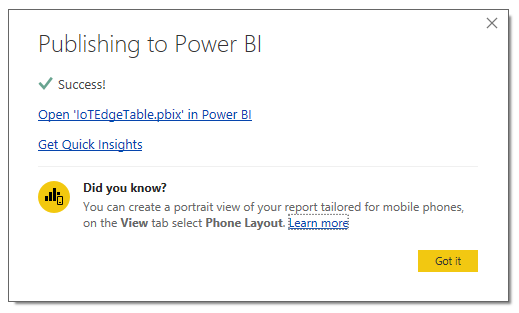
You can now click on the Publish button to upload your table to your Workspace. When prompted, click My workspace and click Select. Wait for it to display the successful result of the submission.
Warning
The following Chapter is HoloLens specific. Power BI is not currently available as an immersive application, however you can run the desktop version in the Windows Mixed Reality Portal (aka Cliff House), through the Desktop app.
Chapter 16 - Display Power BI data on HoloLens
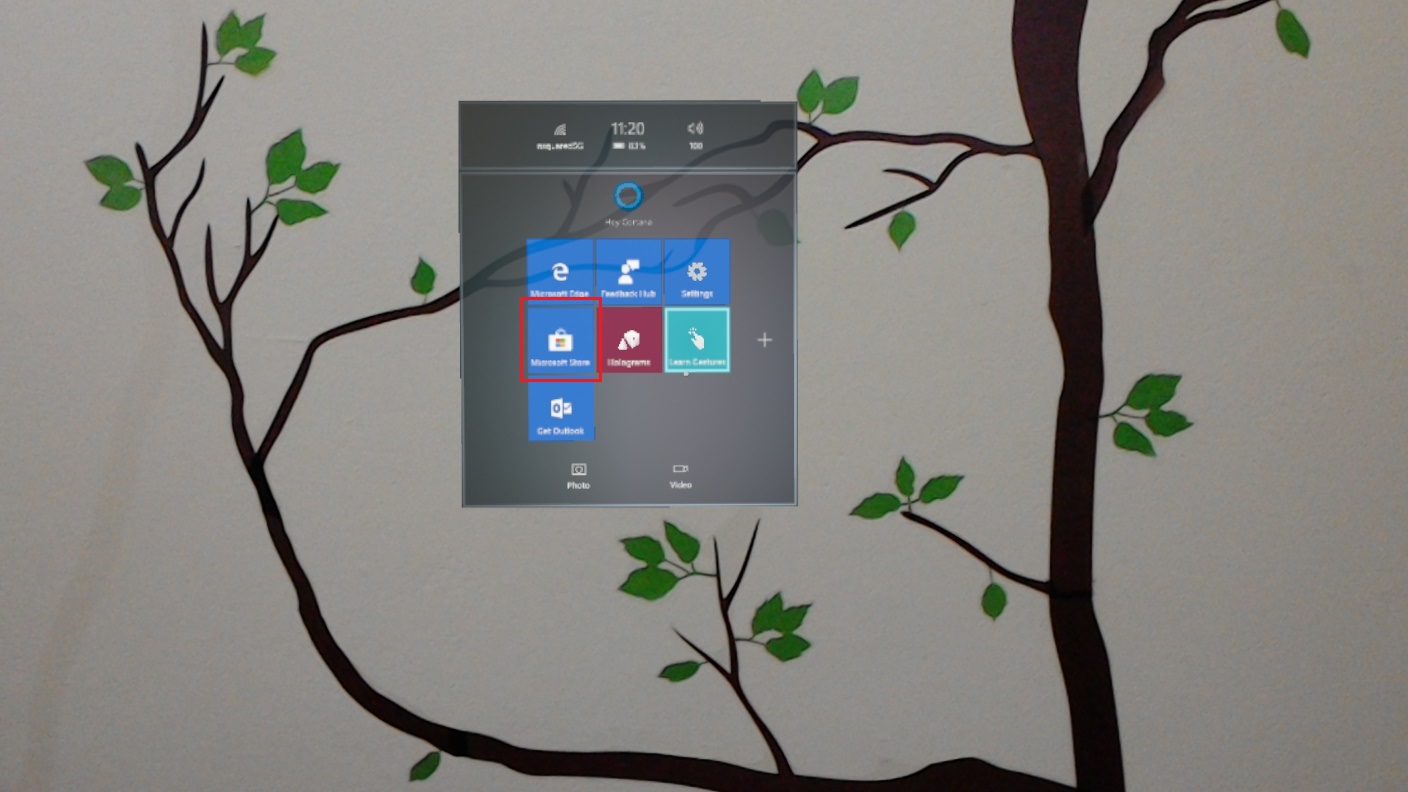
On your HoloLens, log in to the Microsoft Store, by tapping on its icon in the applications list.
Search and then download the Power BI application.

Start Power BI from your applications list.
Power BI might ask you to log in to your Microsoft 365 account.
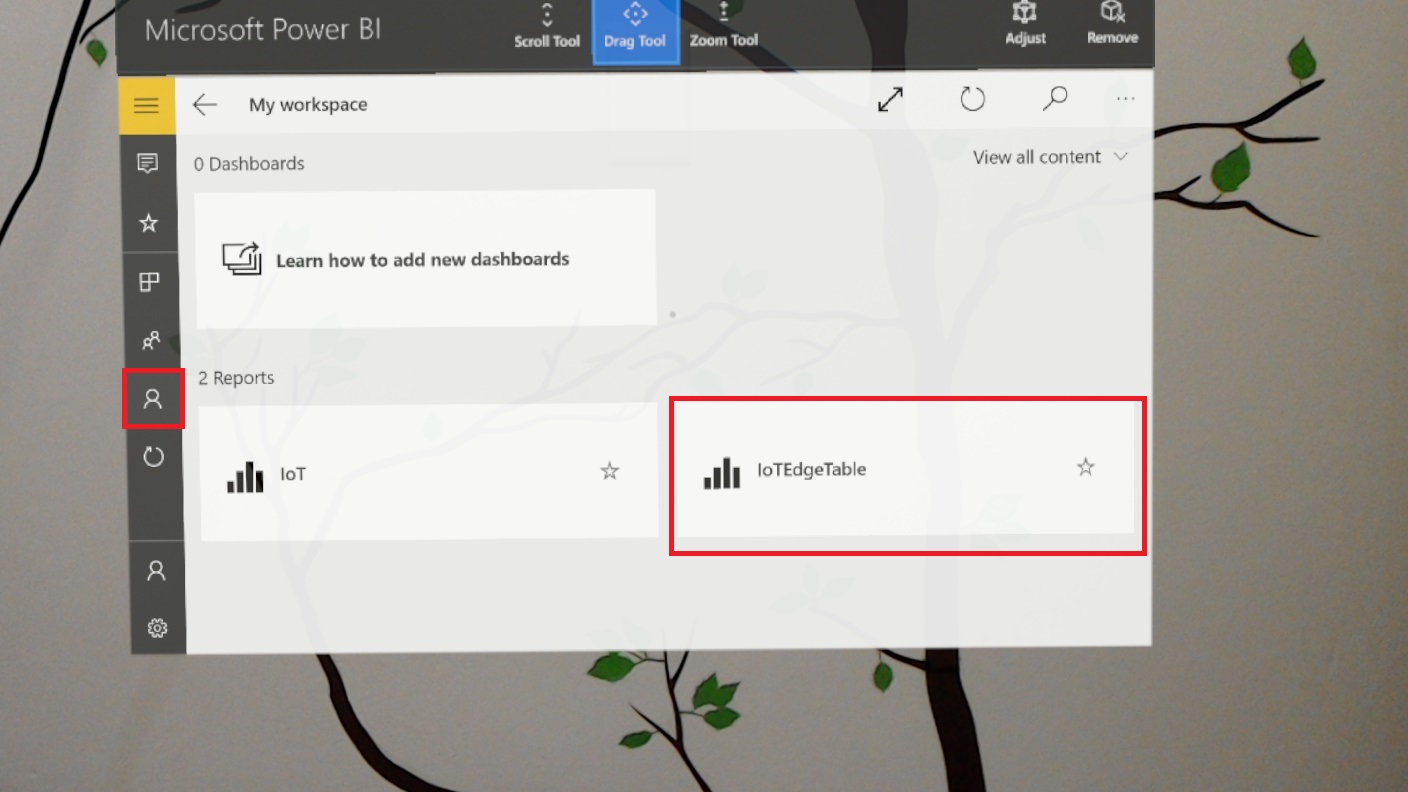
Once inside the app, the workspace should display by default as shown in the following image. If that doesn't happen, simply click on the workspace icon on the left side of the window.
Your finished your IoT Hub application
Congratulations, you successfully created an IoT Hub Service, with a simulated Virtual Machine Edge device. Your device can communicate the results of a machine learning model to an Azure Table Service, facilitated by an Azure Function App, which is read into Power BI, and visualized within a Microsoft HoloLens.
Bonus exercises
Exercise 1
Expand the messaging structure stored in the table and display it as a graph. You might want to collect more data and store it in the same table, to be later displayed.
Exercise 2
Create another "camera capture" module to be deployed on the IoT board, so that it can capture images through the camera to be analyzed.