नोट
इस पृष्ठ तक पहुंच के लिए प्राधिकरण की आवश्यकता होती है। आप साइन इन करने या निर्देशिकाएँ बदलने का प्रयास कर सकते हैं।
इस पृष्ठ तक पहुंच के लिए प्राधिकरण की आवश्यकता होती है। आप निर्देशिकाएँ बदलने का प्रयास कर सकते हैं।
Applies to: Azure Logic Apps (Consumption)
This tutorial shows how to build an example workflow that automates an approval-based task by using Azure Logic Apps. This example specifically creates a Consumption logic app workflow that processes subscription requests for a mailing list that's managed by MailChimp.
The workflow starts with monitoring an email account for requests, sends received requests for approval, checks whether or not the request gets approval, adds approved members to the mailing list, and confirms whether or not new members get added to the list.
When you finish, your workflow looks like the following high level example:

Tip
To learn more, you can ask Azure Copilot these questions:
- What's Azure Logic Apps?
- What's a Consumption logic app workflow?
To find Azure Copilot, on the Azure portal toolbar, select Copilot.
You can create a similar workflow with a Standard logic app resource where some connector operations, such as Azure Blob Storage, are also available as built-in, service provider-based operations. However, the user experience and tutorial steps vary slightly from the Consumption version.
Prerequisites
An Azure account and subscription. If you don't have a subscription, sign up for a free Azure account.
A MailChimp account where you previously created a list named "test-members-ML" where your logic app can add email addresses for approved members. If you don't have an account, sign up for a free account, and then learn how to create a MailChimp list.
An email account in Office 365 Outlook or Outlook.com, which supports approval workflows. For other email providers, see Connectors for Azure Logic Apps.
This tutorial uses Office 365 Outlook with a work or school account. If you use a different email account, the general steps stay the same, but the user experience might slightly differ. If you use Outlook.com, use your personal Microsoft account instead to sign in.
Important
If you want to use the Gmail connector, only G-Suite business accounts can use this connector without restriction in logic app workflows. If you have a Gmail consumer account, you can use this connector with only specific Google-approved services, or you can create a Google client app to use for authentication with your Gmail connector. For more information, see Data security and privacy policies for Google connectors in Azure Logic Apps.
If your logic app workflow needs to communicate through a firewall that limits traffic to specific IP addresses, that firewall needs to allow access for both the inbound and outbound IP addresses used by Azure Logic Apps in the Azure region where your logic app resource exists. If your logic app also uses managed connectors, such as the Office 365 Outlook connector or SQL connector, or uses custom connectors, the firewall also needs to allow access for all the managed connector outbound IP addresses in your logic app's Azure region.
Create a Consumption logic app resource
In the Azure portal, sign in with your Azure account.
In the Azure portal search box, enter logic app, and select Logic apps.

On the Logic apps page toolbar, select Add.
The Create Logic App page appears and shows the following options:
Plan Description Consumption Creates a logic app resource that supports only one workflow that runs in multitenant Azure Logic Apps and uses the Consumption model for billing. Standard Creates a logic app resource that supports multiple workflows. You have the following options:
- Workflow Service Plan: Workflows run in single-tenant Azure Logic Apps and use the Standard model for billing.
- App Service Environment V3: Workflows run in single-tenant Azure Logic Apps and use an App Service Environment plan for billing.
- Hybrid: Workflows run on-premises and in multiple clouds using Kubernetes Event-driven Autoscaling (KEDA). For more information, see Create Standard workflows for hybrid deployment.On the Create Logic App page, select Consumption (Multi-tenant).
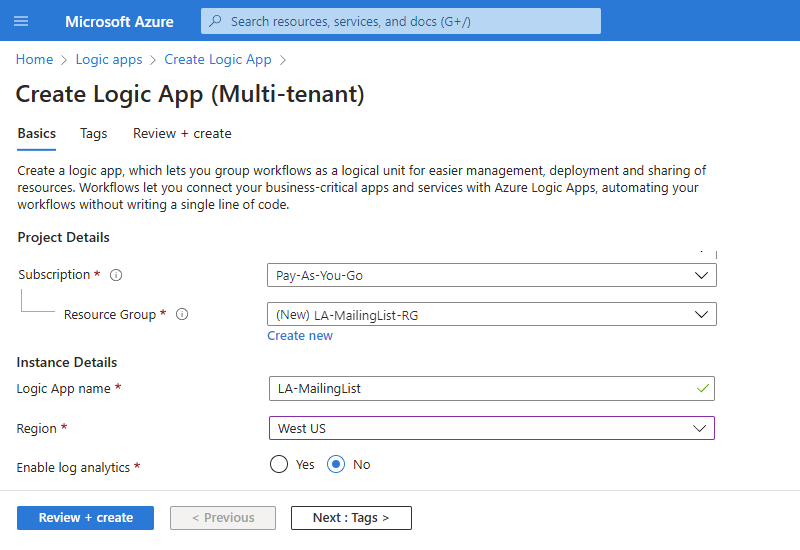
On the Basics tab, provide the following information about your logic app resource:
Property Required Value Description Subscription Yes <Azure-subscription-name> Your Azure subscription name.
This example uses Pay-As-You-Go.Resource Group Yes <Azure-resource-group-name> The Azure resource group where you create your logic app and related resources. This name must be unique across regions and can contain only letters, numbers, hyphens (-), underscores (_), parentheses (()), and periods (.).
This example creates a resource group named LA-MailingList-RG.Logic App name Yes <logic-app-resource-name> Your logic app resource name, which must be unique across regions and can contain only letters, numbers, hyphens (-), underscores (_), parentheses (()), and periods (.).
This example creates a logic app resource named LA-MailingList.Region Yes <Azure-region> The Azure datacenter region for your app.
This example uses West US.Enable log analytics Yes No Change this option only when you want to enable diagnostic logging. For this tutorial, keep the default selection.
Note: This option is available only with Consumption logic apps.Note
Availability zones are automatically enabled for new and existing Consumption logic app workflows in Azure regions that support availability zones. For more information, see Reliability in Azure Functions and Protect logic apps from region failures with zone redundancy and availability zones.
After you finish, your settings look similar to the following example:
When you finish, select Review + create. After Azure validates the information about your logic app resource, select Create.
After Azure deploys your logic app resource, select Go to resource. Or, find and select your logic app resource by using the Azure search box.


Add a trigger to check emails
The following steps add a trigger that waits for incoming emails that have subscription requests.
On the logic app menu, under Development Tools, select Logic app designer.
On the workflow designer, follow these general steps to add the Office 365 Outlook trigger named When a new email arrives.
The Office 365 Outlook connector requires that you sign in with a Microsoft work or school account. If you're using a personal Microsoft account, use the Outlook.com connector.
Sign in to your email account, which creates a connection between your workflow and your email account.
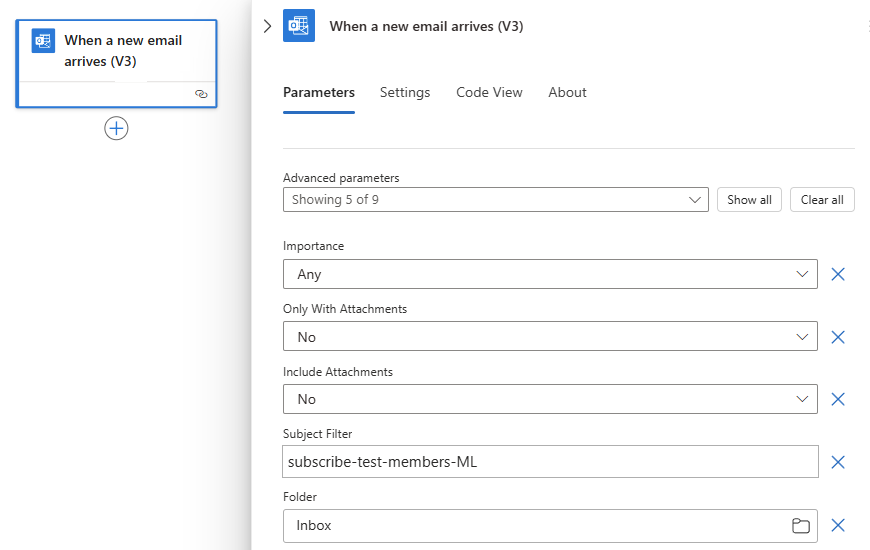
In the trigger information box, from the Advanced parameters list, add the following parameters, if they don't appear, and provide the following information:
Parameter Value Description Importance Any Specifies the importance level of the email that you want. Folder Inbox The email folder to check. Subject Filter subscribe-test-members-ML Specifies the text to find in the email subject and filters emails based on the subject line. Note
When you select inside some edit boxes, the options for the dynamic content list (lightning icon) and expression editor (function icon) appear, which you can ignore for now.
For more information about this trigger's properties, see the Office 365 Outlook connector reference or the Outlook.com connector reference.
When you finish, the trigger looks similar to the following example:
Save your workflow. On the designer toolbar, select Save.

Your workflow is now live but doesn't do anything other check your emails. Next, add an action that responds when the trigger fires.
Add an action to send approval email
The following steps add an action that sends an email to approve or reject the request.
On the designer, under the trigger named When a new email arrives, follow these general steps to add the Office 365 Outlook action named Send approval email.
For the Send approval email action, provide the following information:
Property Required Value Description To Yes <approver-email-address> The approver's email address. For testing, use your own address. Subject No <email-subject> A descriptive email subject.
This example uses Approve member request for test-members-ML.For more information about these properties, see the Office 365 Outlook connector reference or the Outlook.com connector reference.
When you finish, the Send approval email action looks like the following example:

Save your workflow.

Next, add a condition that checks the approver's selected response.
Add an action to check approval response
On the designer, under the Send approval email action, follow these general steps to add the Control action named Condition.
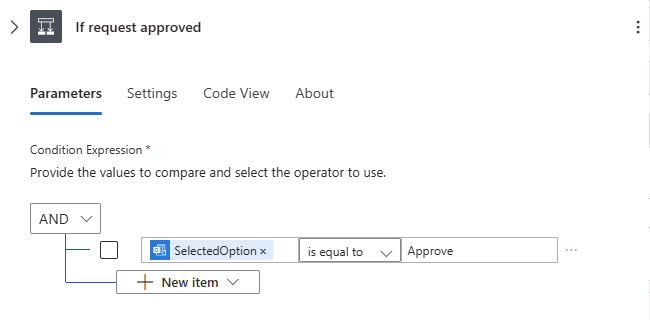
On the Condition action pane, rename the action with If request approved.
Build a condition that checks whether the approver selected Approve.
On the Parameters tab, in the first row under the AND list, select inside the left box, and then select the dynamic content list (lightning icon). From this list, in the Send approval email section, select the SelectedOption output.

In the middle box, keep the operator named is equal to.
In the right box, enter Approve.
When you finish, the condition looks like the following example:
Save your workflow.


Add an action to include member in MailChimp list
The following steps add an action that includes the approved member on your mailing list.
In the condition's True block, follow these general steps to add the MailChimp action named Add member to list.
Sign in and authorize access to your MailChimp account, which creates a connection between your workflow and your MailChimp account.
In the Add member to list action, provide the following information:
Parameter Required Value Description List Id Yes <mailing-list-name> The name for your MailChimp mailing list.
This example uses test-members-ML.Status Yes <member-subscription-status> The new member's subscription status.
This example selects subscribed.Email Address Yes <member-email-address> The new member's email address.
1. Select inside the Email Address box, and then select the dynamic content list (lightning icon).
From the dynamic content list, in the When a new email arrives section, select From, which is a trigger output.For more information about the Add member to list action properties, see the MailChimp connector reference.
When you finish, the Add member to list action looks like the following example:

Save your workflow.

Add an action to check success or failure
The following steps add a condition to check whether the new member successfully joined your mailing list. Your workflow can then notify you whether this operation succeeded or failed.
In the True block, under the Add member to list action, follow these general steps to add the Control action named Condition.
Rename the condition with If add member succeeded.
Build a condition that checks whether the approved member succeeds or fails in joining your mailing list.
On the Parameters tab, in the first row under the AND list, select inside the left box, and then select the dynamic content list (lightning icon). From this list, in the Add member to list section, select the Status output.
In the middle box, keep the operator named is equal to.
In the right box, enter subscribed.
When you finish, the condition looks like the following example:


Add an action to send success email
The following steps add an action to send success email when the workflow succeeds in adding the member to your mailing list.
In the True block for the If add member succeeded condition, follow these general steps to add the Office 365 Outlook action named Send an email.
Rename the Send an email action with Send email on success.
In the Send email on success action, provide the following information:
Parameter Required Value Description To Yes <recipient-email-address> The email recipient's email address. For testing purposes, use your own email address. Subject Yes <success-email-subject> The subject for the success email. For this example, follow these steps:
1. Enter the following text with a trailing space: Success! Member added to test-members-ML:
2. Select inside the Subject box, and select the dynamic content list option (lightning icon).
3. From the Add member to list section, select Email Address.
Note: If this output doesn't appear, next to the Add member to list section name, select See more.Body Yes <success-email-body> The body content for the success email. For this example, follow these steps:
1. Enter the following text with a trailing space: Member opt-in status:
2. Select inside the Body box, and select the dynamic content list option (lightning icon).
3. From the Add member to list section, select Status.When you finish, the action looks like the following example:

Save your workflow.

Add an action to send failure email
The following steps add an action to send failure email when the workflow fails in adding the member to your mailing list.
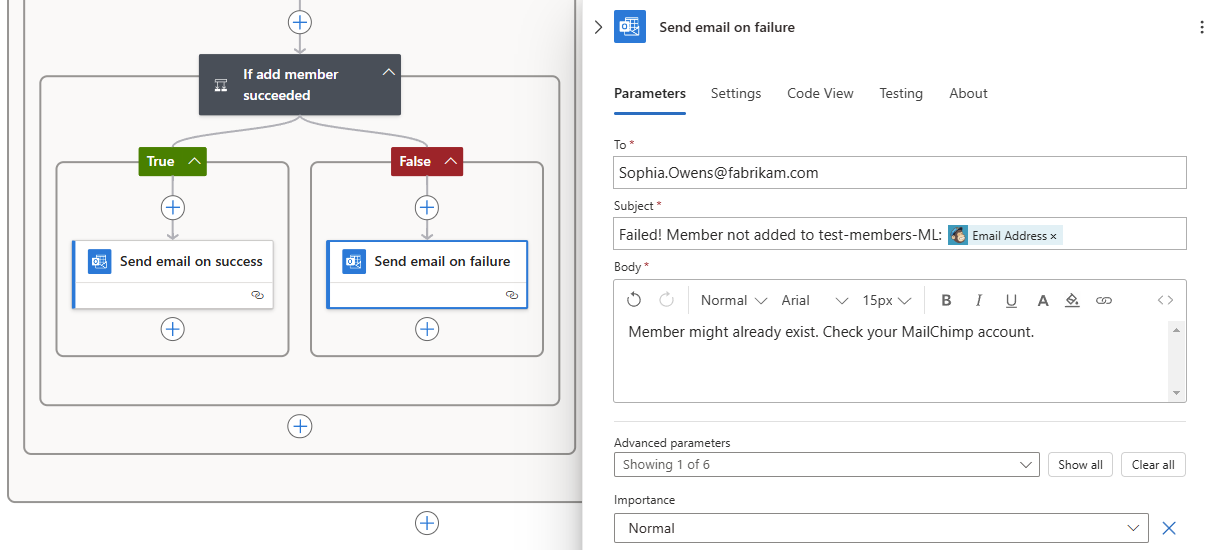
In the False block for the If add member succeeded condition, follow these general steps to add the Office 365 Outlook action named Send an email.
Rename the Send an email action with Send email on failure.
In the Send email on failure action, provide the following information:
Parameter Required Value Description To Yes <recipient-email-address> The email recipient's email address. For testing purposes, use your own email address. Subject Yes <failure-email-subject> The subject for the failure email. For this example, follow these steps:
1. Enter the following text with a trailing space: Failed, member not added to test-members-ML:
2. Select inside the Subject box, and select the dynamic content list option (lightning icon).
3. From the Add member to list section, select Email Address.
Note: If this output doesn't appear, next to the Add member to list section name, select See more.Body Yes <failure-email-body> The body content for the failure email.
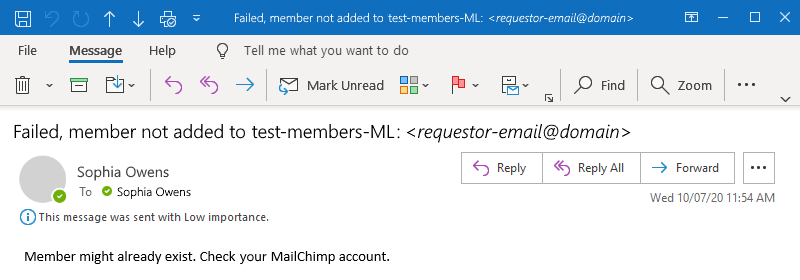
For this example, enter the following text: Member might already exist. Check your MailChimp account.When you finish, the action looks like the following example:
Save your workflow.

Your finished workflow looks similar to the following example:

Test your workflow
Send yourself an email request to join your mailing list. Wait for the request to appear in your inbox.
To manually start your workflow, on the designer toolbar, select Run > Run.
If your email has a subject that matches the trigger's subject filter, your workflow sends you email to approve the subscription request.
In the approval email that you receive, select Approve.
If the subscriber's email address doesn't exist on your mailing list, your workflow adds that person's email address and sends you an email like the following example:

If your workflow can't add the subscriber, you get an email like the following example:


Tip
If you don't get any emails, check your email's junk folder. Otherwise, if you're unsure that your logic app ran correctly, see Troubleshoot your logic app.
Congratulations, you created and ran a logic app workflow that integrates information across Azure, Microsoft services, and other SaaS apps!
Clean up resources
Your workflow continues running until you disable or delete the logic app resource. When you no longer need this sample, delete the resource group that contains your logic app and related resources.
Your workflow continues running until you disable or delete the logic app resource. When you no longer need this sample, delete the resource group that contains your logic app and related resources.
In the Azure portal search box, enter resource groups, and select Resource groups.
From the Resource groups list, select the resource group for this tutorial.
On the resource group menu, select Overview.
On the Overview page toolbar, select Delete resource group.
When the confirmation pane appears, enter the resource group name, and select Delete.
Next steps
In this tutorial, you created a logic app workflow that handles approvals for mailing list requests. Now, learn how to build a logic app workflow that processes and stores email attachments by integrating Azure services, such as Azure Storage and Azure Functions.