Tutorial: Microservices communication using Dapr Publish and Subscribe
In this tutorial, you'll:
- Create a publisher microservice and a subscriber microservice that leverage the Dapr pub/sub API to communicate using messages for event-driven architectures.
- Deploy the application to Azure Container Apps via the Azure Developer CLI with provided Bicep.
The sample pub/sub project includes:
- A message generator (publisher)
checkoutservice that generates messages of a specific topic. - An (subscriber)
order-processorservice that listens for messages from thecheckoutservice of a specific topic.

Prerequisites
- Install Azure Developer CLI
- Install and init Dapr
- Docker Desktop
- Install Git
Run the Node.js applications locally
Before deploying the application to Azure Container Apps, run the order-processor and checkout services locally with Dapr and Azure Service Bus.
Prepare the project
Clone the sample Dapr application to your local machine.
git clone https://github.com/Azure-Samples/pubsub-dapr-nodejs-servicebus.gitNavigate into the sample's root directory.
cd pubsub-dapr-nodejs-servicebus
Run the Dapr applications using the Dapr CLI
Start by running the order-processor subscriber service with Dapr.
From the sample's root directory, change directories to
order-processor.cd order-processorInstall the dependencies.
npm installRun the
order-processorservice with Dapr.dapr run --app-port 5001 --app-id order-processing --app-protocol http --dapr-http-port 3501 --resources-path ../components -- npm run startIn a new terminal window, from the sample's root directory, navigate to the
checkoutpublisher service.cd checkoutInstall the dependencies.
npm installRun the
checkoutservice with Dapr.dapr run --app-id checkout --app-protocol http --resources-path ../components -- npm run startExpected output
In both terminals, the
checkoutservice publishes 10 messages received by theorder-processorservice before exiting.checkoutoutput:== APP == Published data: {"orderId":1} == APP == Published data: {"orderId":2} == APP == Published data: {"orderId":3} == APP == Published data: {"orderId":4} == APP == Published data: {"orderId":5} == APP == Published data: {"orderId":6} == APP == Published data: {"orderId":7} == APP == Published data: {"orderId":8} == APP == Published data: {"orderId":9} == APP == Published data: {"orderId":10}order-processoroutput:== APP == Subscriber received: {"orderId":1} == APP == Subscriber received: {"orderId":2} == APP == Subscriber received: {"orderId":3} == APP == Subscriber received: {"orderId":4} == APP == Subscriber received: {"orderId":5} == APP == Subscriber received: {"orderId":6} == APP == Subscriber received: {"orderId":7} == APP == Subscriber received: {"orderId":8} == APP == Subscriber received: {"orderId":9} == APP == Subscriber received: {"orderId":10}Make sure both applications have stopped by running the following commands. In the checkout terminal:
dapr stop --app-id checkoutIn the order-processor terminal:
dapr stop --app-id order-processor
Deploy the Dapr application template using Azure Developer CLI
Deploy the Dapr application to Azure Container Apps using azd.
Prepare the project
In a new terminal window, navigate into the sample's root directory.
cd pubsub-dapr-nodejs-servicebus
Provision and deploy using Azure Developer CLI
Run
azd initto initialize the project.azd initWhen prompted in the terminal, provide the following parameters.
Parameter Description Environment Name Prefix for the resource group created to hold all Azure resources. Azure Location The Azure location for your resources. Azure Subscription The Azure subscription for your resources. Run
azd upto provision the infrastructure and deploy the Dapr application to Azure Container Apps in a single command.azd upThis process may take some time to complete. As the
azd upcommand completes, the CLI output displays two Azure portal links to monitor the deployment progress. The output also demonstrates howazd up:- Creates and configures all necessary Azure resources via the provided Bicep files in the
./infradirectory usingazd provision. Once provisioned by Azure Developer CLI, you can access these resources via the Azure portal. The files that provision the Azure resources include:main.parameters.jsonmain.bicep- An
appresources directory organized by functionality - A
corereference library that contains the Bicep modules used by theazdtemplate
- Deploys the code using
azd deploy
Expected output
Initializing a new project (azd init) Provisioning Azure resources (azd provision) Provisioning Azure resources can take some time You can view detailed progress in the Azure Portal: https://portal.azure.com (✓) Done: Resource group: resource-group-name (✓) Done: Application Insights: app-insights-name (✓) Done: Portal dashboard: portal-dashboard-name (✓) Done: Log Analytics workspace: log-analytics-name (✓) Done: Key vault: key-vault-name (✓) Done: Container Apps Environment: ca-env-name (✓) Done: Container App: ca-checkout-name (✓) Done: Container App: ca-orders-name Deploying services (azd deploy) (✓) Done: Deploying service checkout (✓) Done: Deploying service orders - Endpoint: https://ca-orders-name.endpoint.region.azurecontainerapps.io/ SUCCESS: Your Azure app has been deployed! You can view the resources created under the resource group resource-group-name in Azure Portal: https://portal.azure.com/#@/resource/subscriptions/subscription-id/resourceGroups/resource-group-name/overview- Creates and configures all necessary Azure resources via the provided Bicep files in the
Confirm successful deployment
In the Azure portal, verify the checkout service is publishing messages to the Azure Service Bus topic.
Copy the
checkoutcontainer app name from the terminal output.Sign in to the Azure portal and search for the container app resource by name.
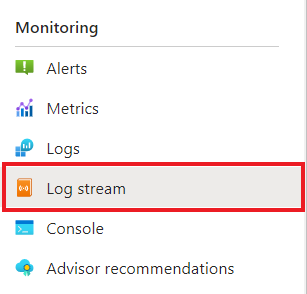
In the Container Apps dashboard, select Monitoring > Log stream.
Confirm the
checkoutcontainer is logging the same output as in the terminal earlier.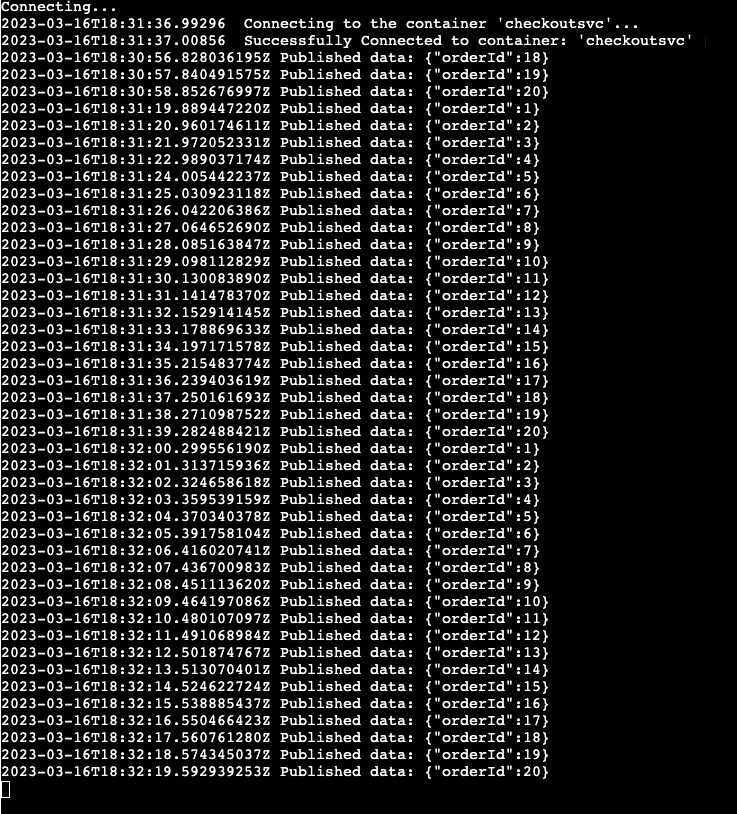
Do the same for the
order-processorservice.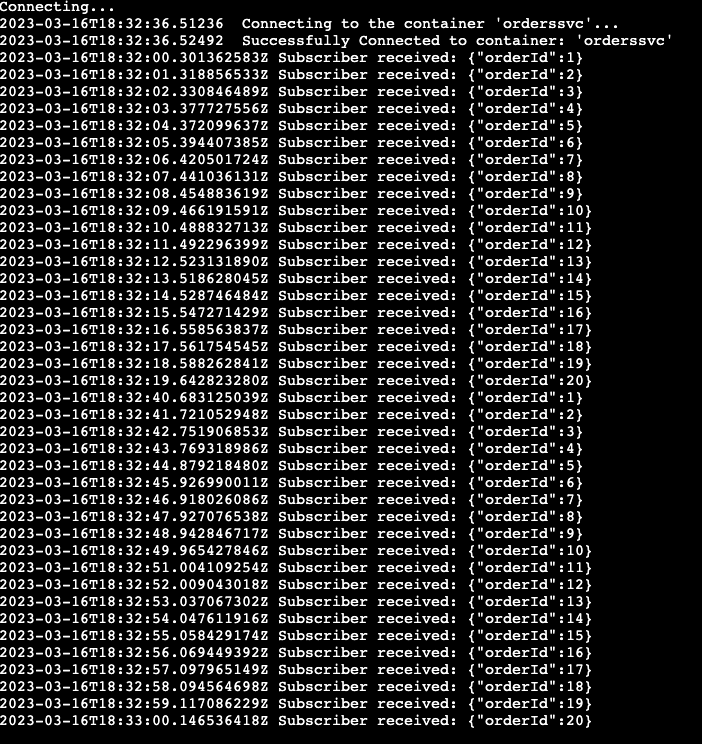
What happened?
Upon successful completion of the azd up command:
- Azure Developer CLI provisioned the Azure resources referenced in the sample project's
./infradirectory to the Azure subscription you specified. You can now view those Azure resources via the Azure portal. - The app deployed to Azure Container Apps. From the portal, you can browse to the fully functional app.
Run the Python applications locally
Before deploying the application to Azure Container Apps, run the order-processor and checkout services locally with Dapr and Azure Service Bus.
Prepare the project
Clone the sample Dapr application to your local machine.
git clone https://github.com/Azure-Samples/pubsub-dapr-python-servicebus.gitNavigate into the sample's root directory.
cd pubsub-dapr-python-servicebus
Run the Dapr applications using the Dapr CLI
Start by running the order-processor subscriber service with Dapr.
From the sample's root directory, change directories to
order-processor.cd order-processorInstall the dependencies.
pip3 install -r requirements.txtRun the
order-processorservice with Dapr.dapr run --app-id order-processor --resources-path ../components/ --app-port 5001 -- python3 app.pyIn a new terminal window, from the sample's root directory, navigate to the
checkoutpublisher service.cd checkoutInstall the dependencies.
pip3 install -r requirements.txtRun the
checkoutservice with Dapr.dapr run --app-id checkout --resources-path ../components/ -- python3 app.pyExpected output
In both terminals, the
checkoutservice publishes 10 messages received by theorder-processorservice before exiting.checkoutoutput:== APP == Published data: {"orderId":1} == APP == Published data: {"orderId":2} == APP == Published data: {"orderId":3} == APP == Published data: {"orderId":4} == APP == Published data: {"orderId":5} == APP == Published data: {"orderId":6} == APP == Published data: {"orderId":7} == APP == Published data: {"orderId":8} == APP == Published data: {"orderId":9} == APP == Published data: {"orderId":10}order-processoroutput:== APP == Subscriber received: {"orderId":1} == APP == Subscriber received: {"orderId":2} == APP == Subscriber received: {"orderId":3} == APP == Subscriber received: {"orderId":4} == APP == Subscriber received: {"orderId":5} == APP == Subscriber received: {"orderId":6} == APP == Subscriber received: {"orderId":7} == APP == Subscriber received: {"orderId":8} == APP == Subscriber received: {"orderId":9} == APP == Subscriber received: {"orderId":10}Make sure both applications have stopped by running the following commands. In the checkout terminal:
dapr stop --app-id checkoutIn the order-processor terminal:
dapr stop --app-id order-processor
Deploy the Dapr application template using Azure Developer CLI
Deploy the Dapr application to Azure Container Apps using azd.
Prepare the project
In a new terminal window, navigate into the sample's root directory.
cd pubsub-dapr-python-servicebus
Provision and deploy using Azure Developer CLI
Run
azd initto initialize the project.azd initWhen prompted in the terminal, provide the following parameters.
Parameter Description Environment Name Prefix for the resource group created to hold all Azure resources. Azure Location The Azure location for your resources. Azure Subscription The Azure subscription for your resources. Run
azd upto provision the infrastructure and deploy the Dapr application to Azure Container Apps in a single command.azd upThis process may take some time to complete. As the
azd upcommand completes, the CLI output displays two Azure portal links to monitor the deployment progress. The output also demonstrates howazd up:- Creates and configures all necessary Azure resources via the provided Bicep files in the
./infradirectory usingazd provision. Once provisioned by Azure Developer CLI, you can access these resources via the Azure portal. The files that provision the Azure resources include:main.parameters.jsonmain.bicep- An
appresources directory organized by functionality - A
corereference library that contains the Bicep modules used by theazdtemplate
- Deploys the code using
azd deploy
Expected output
Initializing a new project (azd init) Provisioning Azure resources (azd provision) Provisioning Azure resources can take some time You can view detailed progress in the Azure Portal: https://portal.azure.com (✓) Done: Resource group: resource-group-name (✓) Done: Application Insights: app-insights-name (✓) Done: Portal dashboard: portal-dashboard-name (✓) Done: Log Analytics workspace: log-analytics-name (✓) Done: Key vault: key-vault-name (✓) Done: Container Apps Environment: ca-env-name (✓) Done: Container App: ca-checkout-name (✓) Done: Container App: ca-orders-name Deploying services (azd deploy) (✓) Done: Deploying service checkout (✓) Done: Deploying service orders - Endpoint: https://ca-orders-name.endpoint.region.azurecontainerapps.io/ SUCCESS: Your Azure app has been deployed! You can view the resources created under the resource group resource-group-name in Azure Portal: https://portal.azure.com/#@/resource/subscriptions/subscription-id/resourceGroups/resource-group-name/overview- Creates and configures all necessary Azure resources via the provided Bicep files in the
Confirm successful deployment
In the Azure portal, verify the checkout service is publishing messages to the Azure Service Bus topic.
Copy the
checkoutcontainer app name from the terminal output.Sign in to the Azure portal and search for the container app resource by name.
In the Container Apps dashboard, select Monitoring > Log stream.
Confirm the
checkoutcontainer is logging the same output as in the terminal earlier.
Do the same for the
order-processorservice.
What happened?
Upon successful completion of the azd up command:
- Azure Developer CLI provisioned the Azure resources referenced in the sample project's
./infradirectory to the Azure subscription you specified. You can now view those Azure resources via the Azure portal. - The app deployed to Azure Container Apps. From the portal, you can browse to the fully functional app.
Run the .NET applications locally
Before deploying the application to Azure Container Apps, run the order-processor and checkout services locally with Dapr and Azure Service Bus.
Prepare the project
Clone the sample Dapr application to your local machine.
git clone https://github.com/Azure-Samples/pubsub-dapr-csharp-servicebus.gitNavigate into the sample's root directory.
cd pubsub-dapr-csharp-servicebus
Run the Dapr applications using the Dapr CLI
Start by running the order-processor subscriber service with Dapr.
From the sample's root directory, change directories to
order-processor.cd order-processorInstall the dependencies.
dotnet buildRun the
order-processorservice with Dapr.dapr run --app-id order-processor --resources-path ../components/ --app-port 7001 -- dotnet run --project .In a new terminal window, from the sample's root directory, navigate to the
checkoutpublisher service.cd checkoutInstall the dependencies.
dotnet buildRun the
checkoutservice with Dapr.dapr run --app-id checkout --resources-path ../components/ -- dotnet run --project .Expected output
In both terminals, the
checkoutservice publishes 10 messages received by theorder-processorservice before exiting.checkoutoutput:== APP == Published data: {"orderId":1} == APP == Published data: {"orderId":2} == APP == Published data: {"orderId":3} == APP == Published data: {"orderId":4} == APP == Published data: {"orderId":5} == APP == Published data: {"orderId":6} == APP == Published data: {"orderId":7} == APP == Published data: {"orderId":8} == APP == Published data: {"orderId":9} == APP == Published data: {"orderId":10}order-processoroutput:== APP == Subscriber received: {"orderId":1} == APP == Subscriber received: {"orderId":2} == APP == Subscriber received: {"orderId":3} == APP == Subscriber received: {"orderId":4} == APP == Subscriber received: {"orderId":5} == APP == Subscriber received: {"orderId":6} == APP == Subscriber received: {"orderId":7} == APP == Subscriber received: {"orderId":8} == APP == Subscriber received: {"orderId":9} == APP == Subscriber received: {"orderId":10}Make sure both applications have stopped by running the following commands. In the checkout terminal.
dapr stop --app-id checkoutIn the order-processor terminal:
dapr stop --app-id order-processor
Deploy the Dapr application template using Azure Developer CLI
Deploy the Dapr application to Azure Container Apps using azd.
Prepare the project
In a new terminal window, navigate into the sample's root directory.
cd pubsub-dapr-csharp-servicebus
Provision and deploy using Azure Developer CLI
Run
azd initto initialize the project.azd initWhen prompted in the terminal, provide the following parameters.
Parameter Description Environment Name Prefix for the resource group created to hold all Azure resources. Azure Location The Azure location for your resources. Azure Subscription The Azure subscription for your resources. Run
azd upto provision the infrastructure and deploy the Dapr application to Azure Container Apps in a single command.azd upThis process may take some time to complete. As the
azd upcommand completes, the CLI output displays two Azure portal links to monitor the deployment progress. The output also demonstrates howazd up:- Creates and configures all necessary Azure resources via the provided Bicep files in the
./infradirectory usingazd provision. Once provisioned by Azure Developer CLI, you can access these resources via the Azure portal. The files that provision the Azure resources include:main.parameters.jsonmain.bicep- An
appresources directory organized by functionality - A
corereference library that contains the Bicep modules used by theazdtemplate
- Deploys the code using
azd deploy
Expected output
Initializing a new project (azd init) Provisioning Azure resources (azd provision) Provisioning Azure resources can take some time You can view detailed progress in the Azure Portal: https://portal.azure.com (✓) Done: Resource group: resource-group-name (✓) Done: Application Insights: app-insights-name (✓) Done: Portal dashboard: portal-dashboard-name (✓) Done: Log Analytics workspace: log-analytics-name (✓) Done: Key vault: key-vault-name (✓) Done: Container Apps Environment: ca-env-name (✓) Done: Container App: ca-checkout-name (✓) Done: Container App: ca-orders-name Deploying services (azd deploy) (✓) Done: Deploying service checkout (✓) Done: Deploying service orders - Endpoint: https://ca-orders-name.endpoint.region.azurecontainerapps.io/ SUCCESS: Your Azure app has been deployed! You can view the resources created under the resource group resource-group-name in Azure Portal: https://portal.azure.com/#@/resource/subscriptions/subscription-id/resourceGroups/resource-group-name/overview- Creates and configures all necessary Azure resources via the provided Bicep files in the
Confirm successful deployment
In the Azure portal, verify the checkout service is publishing messages to the Azure Service Bus topic.
Copy the
checkoutcontainer app name from the terminal output.Sign in to the Azure portal and search for the container app resource by name.
In the Container Apps dashboard, select Monitoring > Log stream.
Confirm the
checkoutcontainer is logging the same output as in the terminal earlier.
Do the same for the
order-processorservice.
What happened?
Upon successful completion of the azd up command:
- Azure Developer CLI provisioned the Azure resources referenced in the sample project's
./infradirectory to the Azure subscription you specified. You can now view those Azure resources via the Azure portal. - The app deployed to Azure Container Apps. From the portal, you can browse to the fully functional app.
Clean up resources
If you're not going to continue to use this application, delete the Azure resources you've provisioned with the following command:
azd down
Next steps
Povratne informacije
Stiže uskoro: Tijekom 2024. postupno ćemo ukinuti servis Problemi sa servisom GitHub kao mehanizam za povratne informacije za sadržaj i zamijeniti ga novim sustavom za povratne informacije. Dodatne informacije potražite u članku: https://aka.ms/ContentUserFeedback.
Pošaljite i pogledajte povratne informacije za