Install and set up Inventory Visibility
Note
Azure Active Directory is now Microsoft Entra ID. Learn more
This article describes how to install the Inventory Visibility Add-in for Microsoft Dynamics 365 Supply Chain Management.
Tip
If you're a feature consultant or solution consultant, we recommend that you join the Inventory Visibility Add-in Yammer group, where you can read about the latest developments, exchange tips with other consultants and developers, and discuss features.
If you're experiencing technical issues or running into exceptions, you can get help by sending email directly to the Inventory Visibility product team at inventvisibilitysupp@microsoft.com (please be sure to include your Supply Chain Management environment ID).
For useful code samples and troubleshooting guides, visit the Inventory Visibility GitHub repo.
Inventory Visibility prerequisites
Before you install the Inventory Visibility, you must complete the following tasks:
- Obtain a Supply Chain Management environment that's linked to a Dataverse environment.
- Make sure that the prerequisites for setting up add-ins have been completed. For information about these prerequisites, see Add-ins overview. Inventory Visibility doesn't require dual-write linking.
The following table lists the countries/regions where Inventory Visibility is currently supported.
| Azure region | Region short name |
|---|---|
| Asia East | eas |
| Asia Southeast | seas |
| Australia East | eau |
| Australia Southeast | seau |
| Brazil South | sbr |
| Canada Central | cca |
| Canada East | eca |
| China East 2 | cne2 |
| China North 2 | cnn2 |
| Europe North | neu |
| Europe West | weu |
| France Central | cfr |
| France South | sfr |
| India Central | cin |
| India South | sin |
| Japan East | ejp |
| Japan West | wjp |
| Norway East | eno |
| Norway West | wno |
| South Africa West | wza |
| South Africa North | nza |
| Switzerland North | nch |
| Switzerland West | wch |
| UAE North | nae |
| UK South | suk |
| UK West | wuk |
| US East | eus |
| US West | wus |
If you have any questions about these prerequisites, contact the Inventory Visibility product team at inventvisibilitysupp@microsoft.com.
Install the Inventory Visibility Add-in
Before you install the add-in, register an application and add a client secret to Microsoft Entra under your Azure subscription. For instructions, see Register an application and Add a client secret. Be sure to make a note of the Application (client) ID, Client secret, and Tenant ID values, because you'll need them later.
Important
If you have more than one environment, create a different Microsoft Entra application for each of them. If you use the same application ID and tenant ID to install the Inventory Visibility Add-in for different environments, a token issue will occur for older environments. As a result, only the latest installation will be valid.
You can install the Inventory Visibility Add-in from either of two places:
- Microsoft Dynamics Lifecycle Services – Lifecycle Services is a collaboration portal that provides a unified collaborative environment together with a set of regularly updated services that help you manage the application lifecycle of your implementations.
- Power Platform admin center – The Power Platform admin center provides a unified portal where administrators can manage environments and settings for Power Apps, Power Automate, Power Pages, and Microsoft Copilot Studio.
Install the Inventory Visibility Add-in from Lifecycle Services
After you register an application and add a client secret to Microsoft Entra ID, follow these steps to install the Inventory Visibility Add-in.
Sign in to Lifecycle Services.
On the home page, select the project where your environment is deployed.
On the project page, select the environment where you want to install the add-in.
On the environment page, scroll down until you find the Environment add-ins section in the Power Platform integration section. There, you can find the Dataverse environment name. Confirm that the Dataverse environment name is the one that you want to use for Inventory Visibility.
Important
Before you start the installation, you should check for linking mismatch warnings in Lifecycle Services. To do so, open the details page for your environment in Lifecycle Services and look for a warning that resembles the following example: "Microsoft has detected that your environment is linked via dual-write to a different destination than specified in Power Platform Integration, which isn't recommended." If you see this warning, it's possible that your dual-write environment is linked to a Dataverse instance, but Lifecycle Services isn't set up for Power Platform integration. This linking mismatch can cause unexpected behavior. For information about how to fix this issue, see Linking mismatch. After the linking mismatch is fixed, you can install Inventory Visibility.
In the Environment add-ins section, select Install a new add-in.
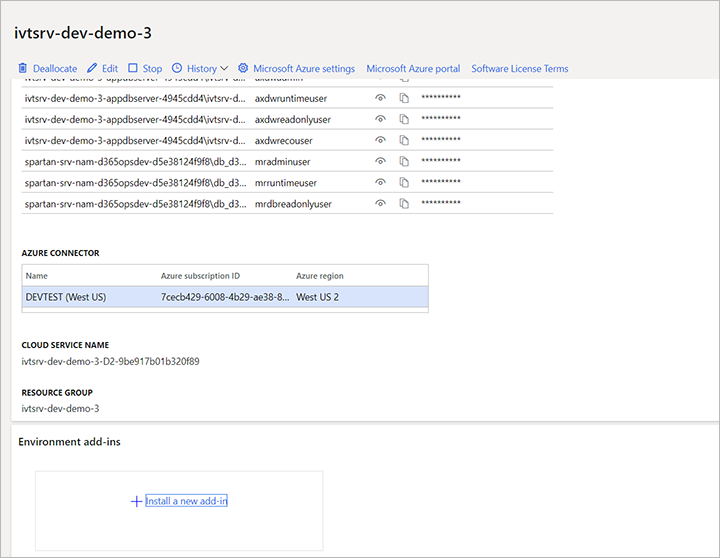
Select the Install a new add-in link. A list of available add-ins appears.
In the list, select Inventory Visibility.
Set the following fields for your environment:
- Microsoft Entra application (client) ID – Enter the Microsoft Entra application ID that you created and made a note of earlier.
- Microsoft Entra tenant ID – Enter the tenant ID that you made a note of earlier.
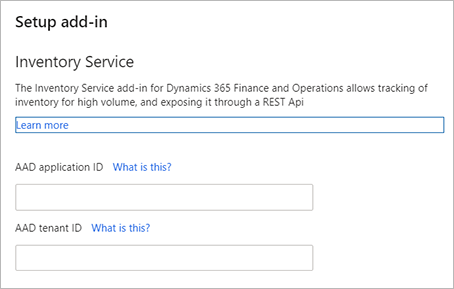
Agree to the terms and conditions by selecting the Terms and conditions checkbox.
Select Install. The status of the add-in is shown as Installing. When the installation is completed, refresh the page. The status should change to Installed.
In Dataverse, select the Apps section in the left navigation, and verify that the Inventory Visibility Power Apps is installed successfully. If the Apps section doesn't exist, contact the Inventory Visibility product team at inventvisibilitysupp@microsoft.com.


Note
If the system warns you that you don't have permission to install Inventory Visibility on Lifecycle Services, you must contact the administrator to modify your permission.
If it takes more than an hour to install from the Lifecycle Services page, then your user account probably lacks permission to install solutions in the Dataverse environment. Follow these steps to resolve the issue:
- Cancel the Inventory Visibility Add-in installation process from the Lifecycle Services page.
- Install the Inventory Visibility Add-in from the Power Platform admin center.
- After the installation is completed, go back to the Lifecycle Services page, and check the status of the Inventory Visibility Add-in.
Install the Inventory Visibility Add-in from the Power Platform admin center
After you register an application and add a client secret to Microsoft Entra ID, you must install the Inventory Visibility Add-in.
Important
Unless you using the unified developer experience, you should check for linking mismatch warnings in Lifecycle Services before you install Inventory Visibility. To do so, open the details page for your environment in Lifecycle Services and look for a warning that resembles the following example: "Microsoft has detected that your environment is linked via dual-write to a different destination than specified in Power Platform Integration, which isn't recommended." If you see this warning, it's possible that your dual-write environment is linked to a Dataverse instance, but Lifecycle Services isn't set up for Power Platform integration. This linking mismatch can cause unexpected behavior. For information about how to fix this issue, see Linking mismatch. After the linking mismatch is fixed, you can install Inventory Visibility.
Follow these steps to install the Inventory Visibility Add-in.
Sign in to the Microsoft 365 admin center.
Make sure that the Dynamics 365 Unified Operations Plan license is assigned to the user account that you want to use to install the add-in. If the license isn't assigned, assign it.
Sign in to the Power Platform admin center by using the same user account.
Select the environment where you want to install the add-in.
On the top bar, select Resources > Dynamics 365 apps.
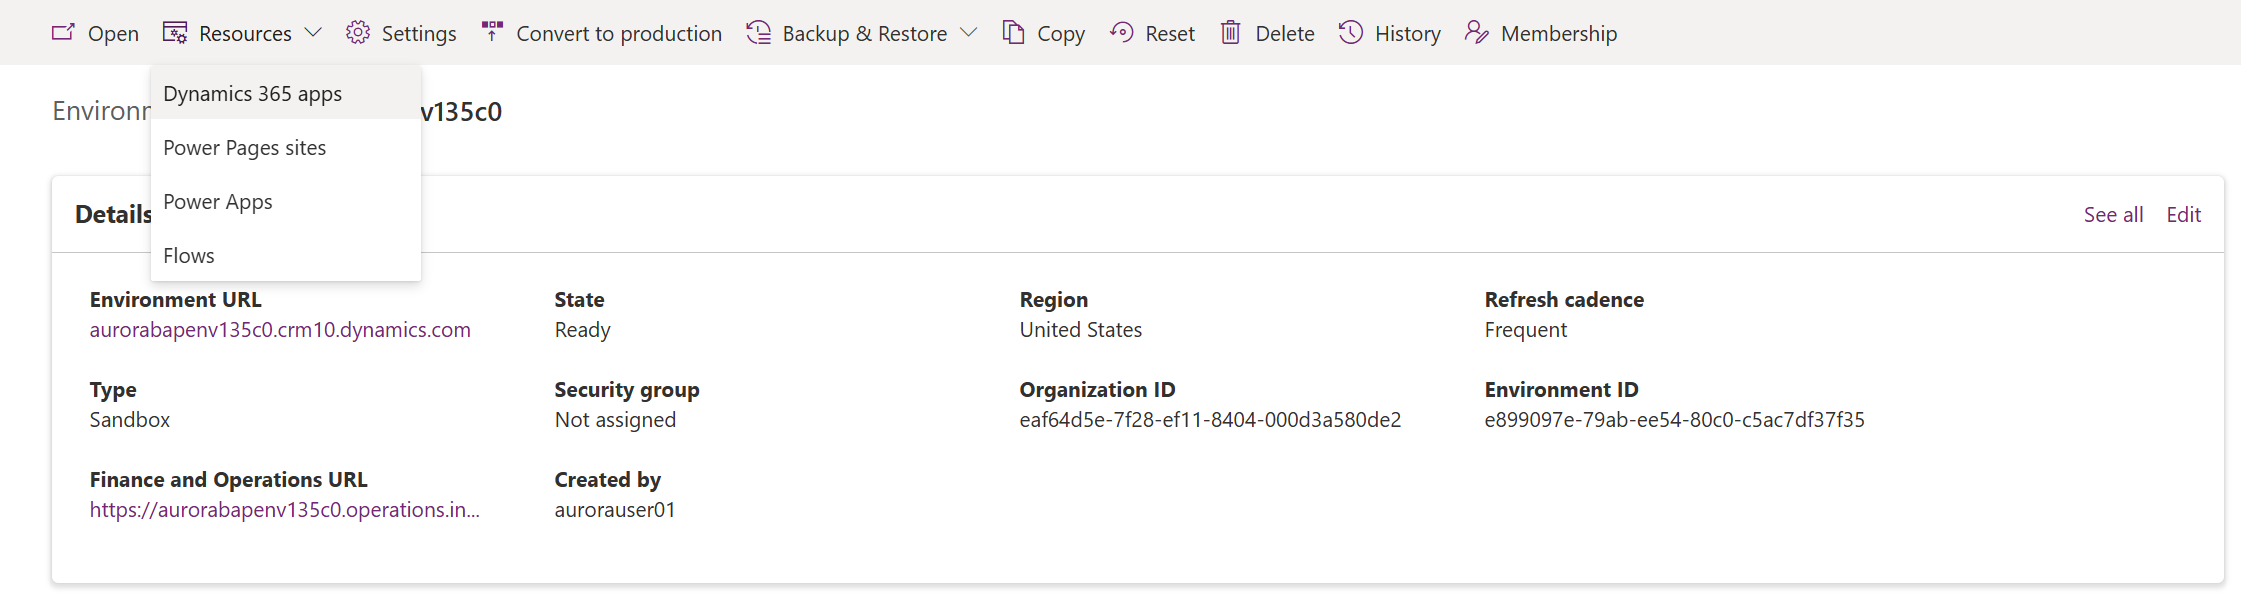
Select Install App.
Find Dynamics 365 Inventory Visibility in the list, and select Next.
Set the following fields for your environment:
- Enter application id of service – Enter the Microsoft Entra application ID that you created and made a note of earlier.
- Enter tenant id of service – Enter the tenant ID that you made a note of earlier.
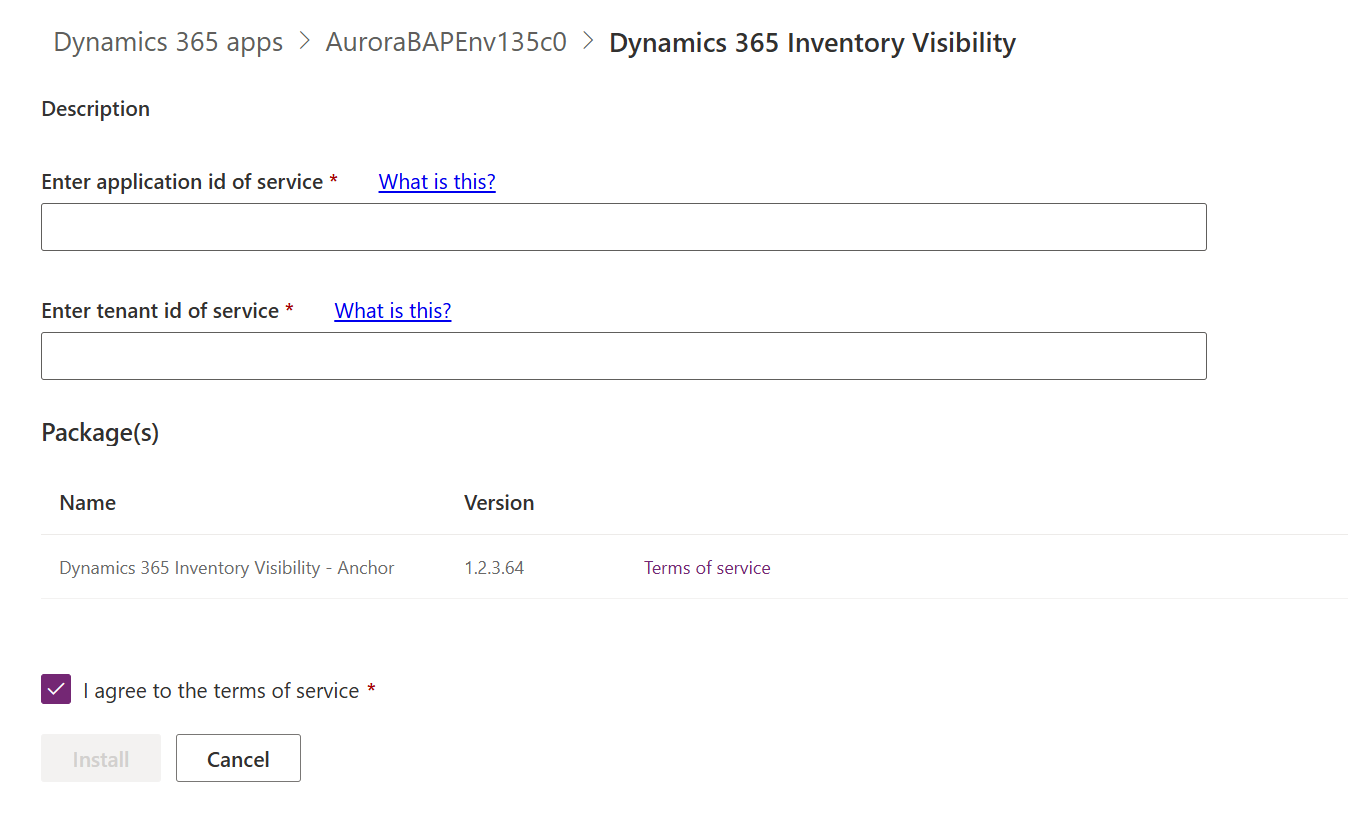
Agree to the terms of service.
Select Install. During the installation, the status of the add-in is shown as Installing. After the installation is completed, refresh the page. The status should change to Installed.


Note
If the installation fails, contact the Inventory Visibility product team at inventvisibilitysupp@microsoft.com.
Set up Inventory Visibility in Supply Chain Management
Deploy the Inventory Visibility integration package
If you're running Supply Chain Management version 10.0.18 or later, you can skip this deployment session and jump ahead to the Set up Inventory Visibility integration section.
If you're running Supply Chain Management version 10.0.17 or earlier, contact the Inventory Visibility on-board support team at inventvisibilitysupp@microsoft.com to get the package file. Then deploy the package in Lifecycle Services.
Note
If a version mismatch error occurs during deployment, you must manually import the X++ project into your development environment. Then create the deployable package in your development environment, and deploy it in your production environment.
Make sure that the following features are turned on in your Supply Chain Management environment. (By default, they're turned on.)
| Feature description | Code version | Toggle class |
|---|---|---|
| Enable or disable using inventory dimensions on InventSum table | 10.0.11 | InventUseDimOfInventSumToggle |
| Enable or disable using inventory dimensions on InventSumDelta table | 10.0.12 | InventUseDimOfInventSumDeltaToggle |
Set up Inventory Visibility integration
Once you've installed the add-in, prepare your Supply Chain Management system to work with it by following these steps.
In Supply Chain Management, open the Feature management workspace, and turn on the Inventory Visibility integration feature.
Go to Inventory Management > Set up > Inventory Visibility Integration parameters.
Open the General tab and make the following settings:
- Inventory Visibility endpoint – Enter the URL of the environment where you're running Inventory Visibility. For more information, see Find your service endpoint and read the configuration.
- Maximum number of records in a single request – Set to the maximum number of records to include in a single request. You must enter a positive integer less than or equal to 1000. The default value is 512. We strongly recommend keeping the default value unless you've received advice from Microsoft Support or are otherwise certain that you need to change it.
The following optional features enhance the functionality of Inventory Visibility. Decide whether you want to use one or both of these features. If you do, set them up. (You can also set them up later.)
- Soft reservations and offsets – Soft reservations help organizations achieve a single source of truth for available inventory, especially during the order fulfillment process. For information about how to enable and set up this feature, see Inventory Visibility reservations.
- Support for warehouse management processes (WMS) items – This feature lets you use WMS items with Inventory Visibility. For information about how to enable and set up this feature, see Inventory Visibility support for WMS items.
- Inventory summary – This feature provides an inventory summary for products together with all dimensions. For information about how to enable and set up this feature, see Inventory summary.
- Preload a streamlined on-hand query – This feature provides an aggregated inventory summary for products by configured dimensions. For information about how to enable and set up this feature, see Preload a streamlined on-hand query.
After you finish setting up the optional features you selected, go to Inventory Management > Periodic tasks > Inventory Visibility Integration, and enable the job. All inventory change events from Supply Chain Management will now be posted to Inventory Visibility.
Note
When you enable the Inventory Visibility integration job, if you receive an error that states that you must update the partition schema, see the Update partition schema to two if you get an error when enabling the Inventory Visibility integration job section of this article for instructions.
Inventory Visibility integration hotfixes
For a list of the latest hotfixes available for Inventory Visibility integration features in Supply Chain Management, see Recent Dynamics 365 SCM hotfixes.
Update partition schema to two if you get an error when enabling the Inventory Visibility integration job
When you try to enable the Inventory Visibility integration batch job from Supply Chain Management, you might receive the following error:
Cannot sync more than 500000 records in the same warehouse. To mitigate this issue, update partition schema to 2 in Inventory Visibility Add-in. Contact Inventory Visibility Support Team at
inventvisibilitysupp@microsoft.comfor more info.
If you receive this error, follow these steps to update your partition schema to help prevent out-of-memory issues. If you don't receive this error, you can skip this procedure.
- In Power Apps, delete all inventory data.
- Set up a system to send API requests to Inventory Visibility.
- After data is deleted, call the
GetAPI with a body ofnoneto get all partition IDs (by using/api/environment/{environmentId}/allpartitionids). Review the response to confirm that data has been completely cleared. The result should be empty. - Call the
PostAPI with a body ofnoneto change the partition schema (by using/api/environment/{environmentId}/updatePartitionSchema?newversion=2). - In Power Apps, enable the advanced warehouse inventory feature, and update the configuration.
- In Power Apps, review the runtime configuration. The
CachePartitonIdVersionfield should show a value ofByLocationAndProductIdMod64. - In Supply Chain Management, go to Inventory Management > Periodic tasks > Inventory Visibility Integration, and enable the job.
Update the Inventory Visibility Add-in
To update an installed version of the Inventory Visibility Add-in to the latest version, follow these steps:
Sign in to the Power Platform admin center.
On the navigation pane, select Environments.
Open the environment where you want to update the Inventory Visibility Add-in.
In the Resources section, select Dynamics 365 apps.
In the list, find the row where Name is Dynamics 365 Inventory Visibility. Check the value in the Status column for this row.
- If the Status is Installed, then you're already running the latest version so you can skip the rest of this procedure.
- If the Status is Update available, then an update is available. Continue with the next step.
Tip
To see which version of the add-in you are currently running, regardless of the status, open the More application actions menu (ellipsis button), and then select Details.
If the page shows that an update is available, open the More application actions menu (ellipsis button), and then select Update.
In the dialog box that appears, select the I agree to the terms of service checkbox, and then select Update.
A pop-up window prompts you to confirm the action. To proceed, enter the name of your environment in the field provided, and then select Update.
Uninstall the Inventory Visibility Add-in
To uninstall the Inventory Visibility Add-in, follow these steps:
Sign in to Supply Chain Management.
Go to Inventory Management > Periodic tasks > Inventory Visibility Integration, and disable the job.
Go to Lifecycle Services and open the page for the environment where you want to uninstall the add-in (see also the Install the Inventory Visibility Add-in section).
Select Uninstall.
Note
Uninstalling from the Power Platform admin center isn't officially supported.
The uninstall process terminates the Inventory Visibility Add-in, unregisters the add-in from Lifecycle Services, and deletes any temporary data that's stored in the Inventory Visibility Add-in data cache. Primary inventory data that was synced to your Dataverse subscription isn't deleted.
Important
If you want to continue to use Inventory Visibility in the current environment, we recommend that you don't delete all solutions from your Dataverse environment. If you want to delete all inventory data in Dataverse, we recommend that you use the delete all inventory data option. If you aren't sure about your scenario, contact inventvisibilitysupp@microsoft.com for assistance.
Note
If you must delete all solutions that are related to Inventory Visibility, follow these steps.
Open Power Apps.
Use the environment picker in the upper right to select the target Dataverse environment.
Go to Solutions, and delete solutions in the following order:
- Dynamics 365 Inventory Visibility – Anchor
- Dynamics 365 Inventory Visibility – Copilot
- Dynamics 365 Inventory Visibility – Application
- Dynamics 365 Inventory Visibility – Controls
- Dynamics 365 Inventory Visibility – Plugins
- Dynamics 365 Inventory Visibility – Base
- Dynamics 365 Product Search - Anchor
- Dynamics 365 Product Search Core
Inventory Visibility data that's stored in tables is deleted together with the solutions.
Move data between Supply Chain Management databases and Dataverse environments
There are several ways to migrate data between Supply Chain Management databases and Dataverse environments. For instructions, see the Inventory Visibility GitHub repo. If the target environment of your movement operation is a production environment, or if your scenario isn't listed in the guide, contact inventvisibilitysupp@microsoft.com for assistance.
Povratne informacije
Stiže uskoro: Tijekom 2024. postupno ćemo ukinuti servis Problemi sa servisom GitHub kao mehanizam za povratne informacije za sadržaj i zamijeniti ga novim sustavom za povratne informacije. Dodatne informacije potražite u članku: https://aka.ms/ContentUserFeedback.
Pošaljite i pogledajte povratne informacije za