Megjegyzés
Az oldalhoz való hozzáféréshez engedély szükséges. Megpróbálhat bejelentkezni vagy módosítani a címtárat.
Az oldalhoz való hozzáféréshez engedély szükséges. Megpróbálhatja módosítani a címtárat.
In this tutorial, you learn how to create an Apache Spark application written in Scala using Apache Maven with IntelliJ IDEA. The article uses Apache Maven as the build system. And starts with an existing Maven archetype for Scala provided by IntelliJ IDEA. Creating a Scala application in IntelliJ IDEA involves the following steps:
- Use Maven as the build system.
- Update Project Object Model (POM) file to resolve Spark module dependencies.
- Write your application in Scala.
- Generate a jar file that can be submitted to HDInsight Spark clusters.
- Run the application on Spark cluster using Livy.
Ebben az oktatóanyagban a következőket sajátíthatja el:
- Az IntelliJ IDEA Scala beépülő moduljának telepítése
- Use IntelliJ to develop a Scala Maven application
- Create a standalone Scala project
Előfeltételek
An Apache Spark cluster on HDInsight. For instructions, see Create Apache Spark clusters in Azure HDInsight.
Oracle Java fejlesztői készlet. Ez az oktatóanyag a Java 8.0.202-es verzióját használja.
A Java IDE. This article uses IntelliJ IDEA Community 2018.3.4.
Azure Toolkit for IntelliJ. Lásd : Az Azure Toolkit for IntelliJ telepítése.
Az IntelliJ IDEA Scala beépülő moduljának telepítése
Do the following steps to install the Scala plugin:
Nyissa meg az IntelliJ IDEA-t.
On the welcome screen, navigate to Configure>Plugins to open the Plugins window.
Select Install for Azure Toolkit for IntelliJ.
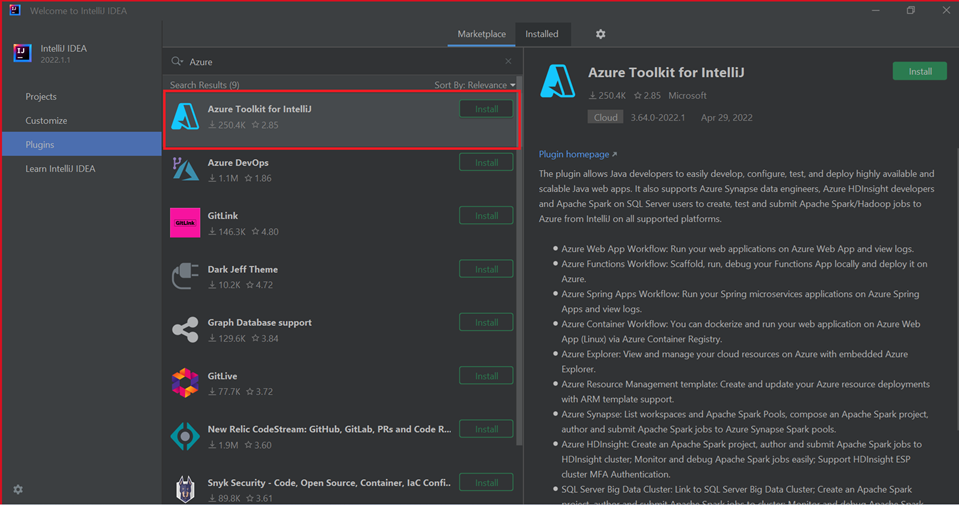
Select Install for the Scala plugin that is featured in the new window.

A beépülő modul sikeres telepítése után újra kell indítania az IDE-t.
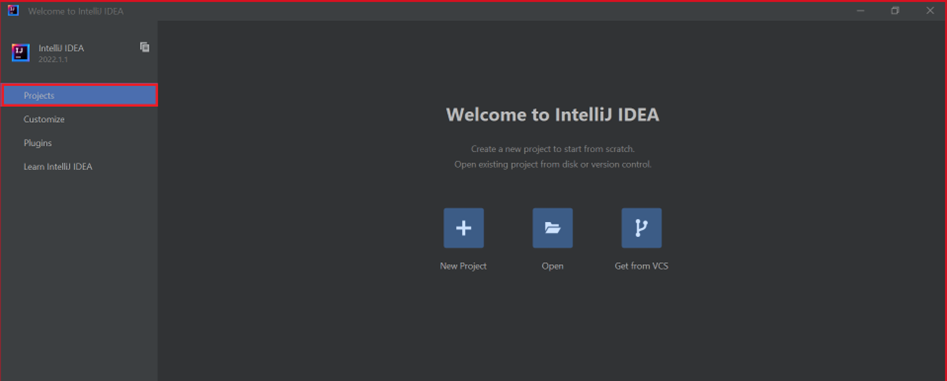
Use IntelliJ to create application
Indítsa el az IntelliJ IDEA-t, és válassza az Új projekt létrehozása lehetőséget az Új projekt ablak megnyitásához.
Select Apache Spark/HDInsight from the left pane.
Válassza Spark Project (Scala) a főablakból.
From the Build tool drop-down list, select one of the following values:
- Maven for Scala project-creation wizard support.
- SBT a függőségek kezeléséhez és a Scala-projekt létrehozásához.
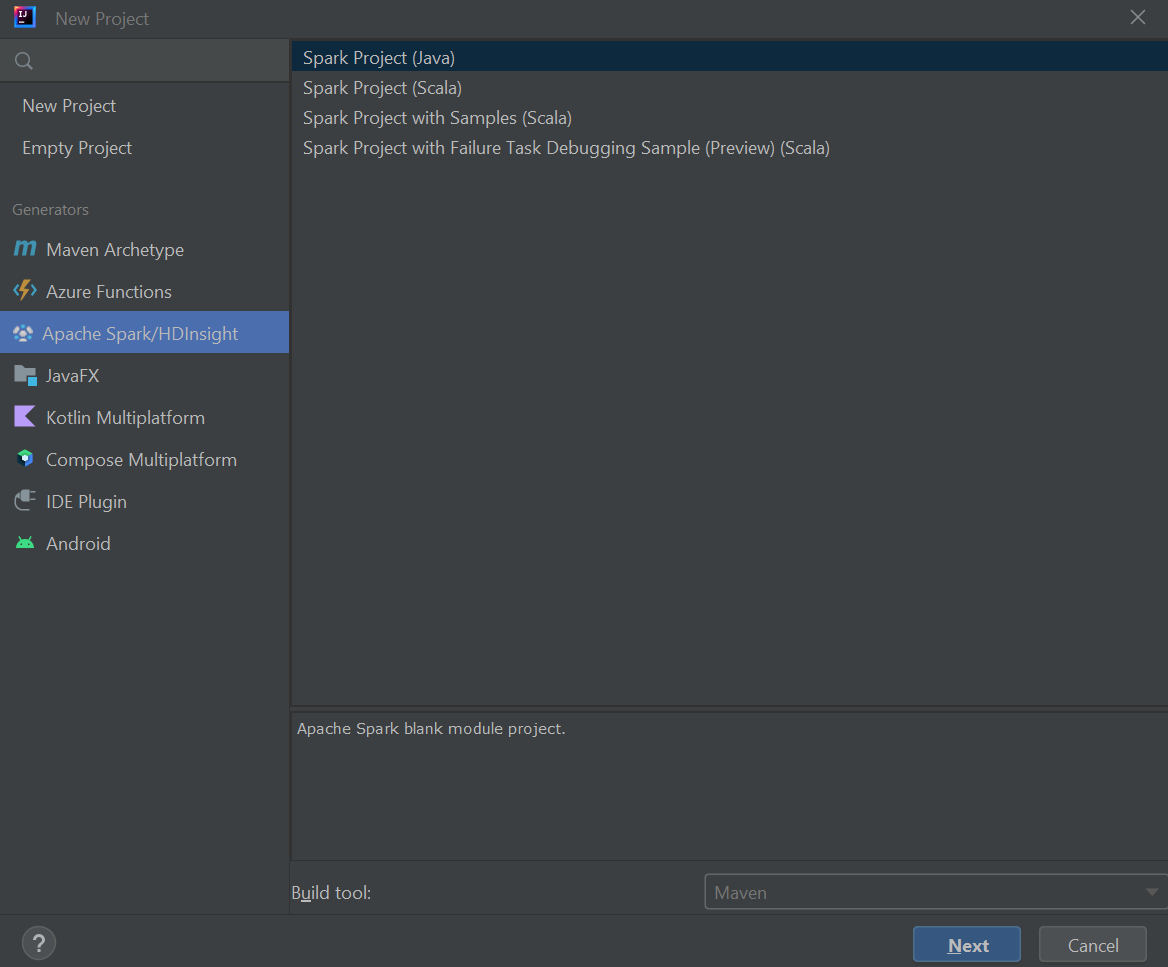
Válassza a Következőlehetőséget.
Az Új projekt ablakban adja meg a következő információkat:
Ingatlan Leírás Project name Adjon meg egy nevet. Projekt helye Adja meg a projekt mentésének helyét. Project SDK This field will be blank on your first use of IDEA. Válassza az Új lehetőséget... és lépjen a JDK-ra. Spark verzió A létrehozási varázsló integrálja a Spark SDK és a Scala SDK megfelelő verzióját. If the Spark cluster version is earlier than 2.0, select Spark 1.x. Ellenkező esetben válassza Spark2.x. Ez a példa a Spark 2.3.0 -t (Scala 2.11.8) használja. 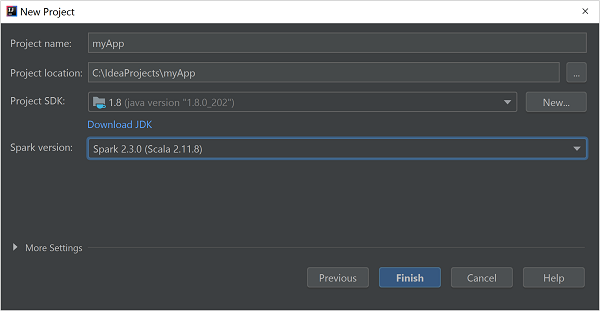
Válassza ki a Befejezésopciót.
Create a standalone Scala project
Indítsa el az IntelliJ IDEA-t, és válassza az Új projekt létrehozása lehetőséget az Új projekt ablak megnyitásához.
Select Maven from the left pane.
Specify a Project SDK. If blank, select New... and navigate to the Java installation directory.
Select the Create from archetype checkbox.
From the list of archetypes, select
org.scala-tools.archetypes:scala-archetype-simple. This archetype creates the right directory structure and downloads the required default dependencies to write Scala program.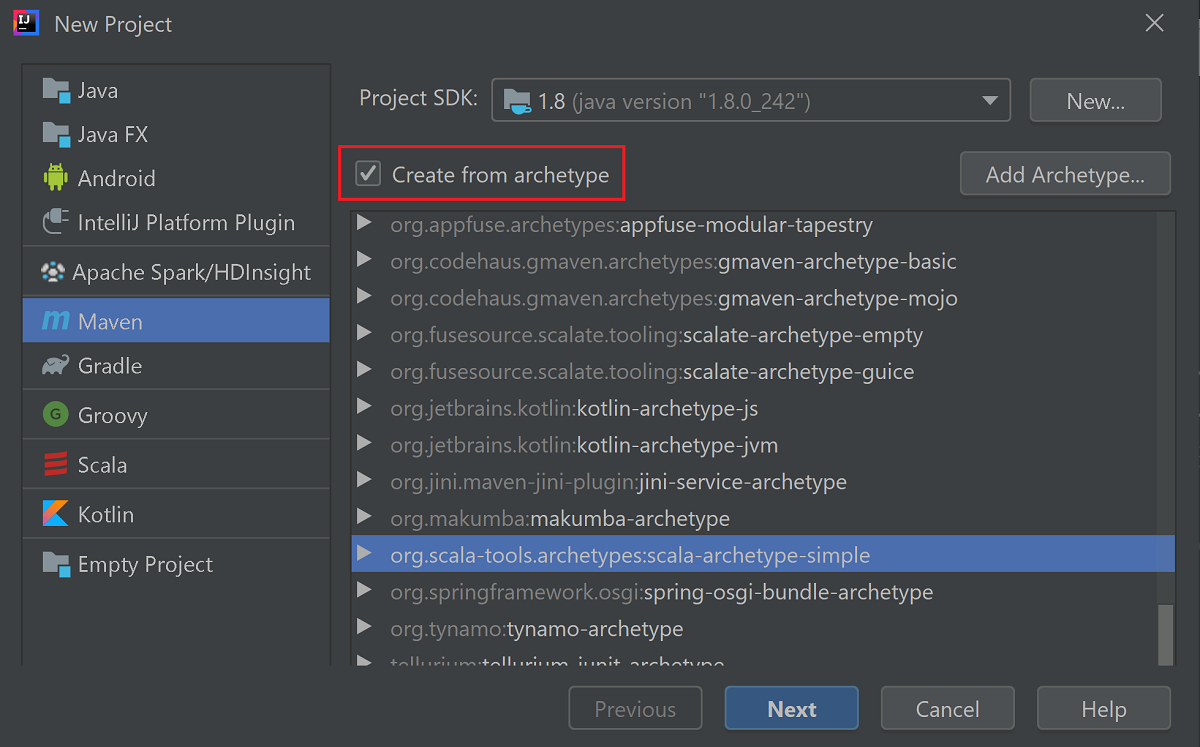
Válassza a Következőlehetőséget.
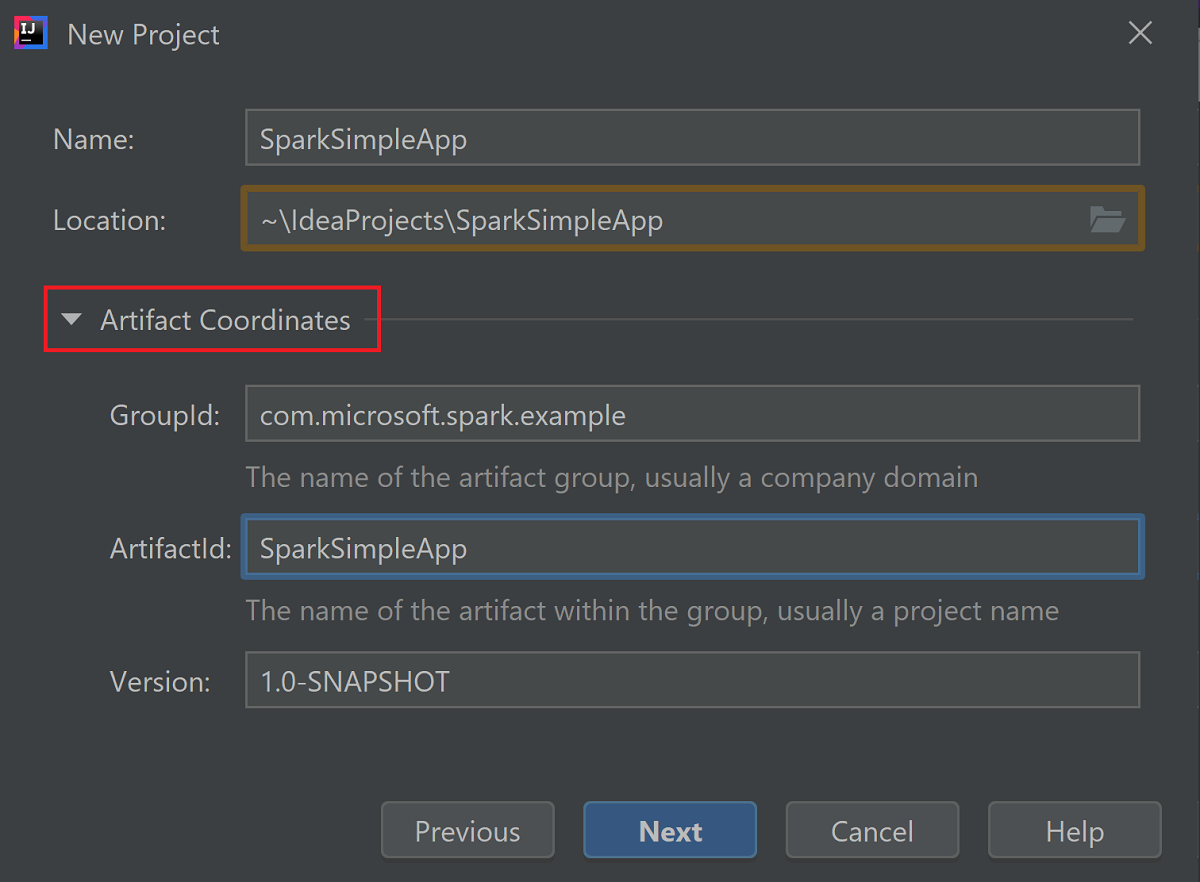
Expand Artifact Coordinates. Provide relevant values for GroupId, and ArtifactId. Name, and Location will autopopulate. The following values are used in this tutorial:
- GroupId: com.microsoft.spark.example
- ArtifactId: SparkSimpleApp
Válassza a Következőlehetőséget.
Verify the settings and then select Next.
Verify the project name and location, and then select Finish. The project will take a few minutes to import.
Once the project has imported, from the left pane navigate to SparkSimpleApp>src>test>scala>com>microsoft>spark>example. Right-click MySpec, and then select Delete.... You don't need this file for the application. A párbeszédpanelen kattintson az OK gombra.
In the later steps, you update the pom.xml to define the dependencies for the Spark Scala application. For those dependencies to be downloaded and resolved automatically, you must configure Maven.
From the File menu, select Settings to open the Settings window.
From the Settings window, navigate to Build, Execution, Deployment>Build Tools>Maven>Importing.
Select the Import Maven projects automatically checkbox.
Válassza a Alkalmazlehetőséget, majd válassza OKlehetőséget. You'll then be returned to the project window.
:::image type="content" source="./media/apache-spark-create-standalone-application/configure-maven-download.png" alt-text="Configure Maven for automatic downloads." border="true":::From the left pane, navigate to src>main>scala>com.microsoft.spark.example, and then double-click App to open App.scala.
Replace the existing sample code with the following code and save the changes. This code reads the data from the HVAC.csv (available on all HDInsight Spark clusters). Retrieves the rows that only have one digit in the sixth column. And writes the output to /HVACOut under the default storage container for the cluster.
package com.microsoft.spark.example

import org.apache.spark.SparkConf
import org.apache.spark.SparkContext

/**
  * Test IO to wasb
  */
object WasbIOTest {
    def main (arg: Array[String]): Unit = {
        val conf = new SparkConf().setAppName("WASBIOTest")
        val sc = new SparkContext(conf)

        val rdd = sc.textFile("wasb:///HdiSamples/HdiSamples/SensorSampleData/hvac/HVAC.csv")

        //find the rows which have only one digit in the 7th column in the CSV
        val rdd1 = rdd.filter(s => s.split(",")(6).length() == 1)

        rdd1.saveAsTextFile("wasb:///HVACout")
    }
}
In the left pane, double-click pom.xml.
Within
<project>\<properties>add the following segments:<scala.version>2.11.8</scala.version> <scala.compat.version>2.11.8</scala.compat.version> <scala.binary.version>2.11</scala.binary.version>Within
<project>\<dependencies>add the following segments:<dependency> <groupId>org.apache.spark</groupId> <artifactId>spark-core_${scala.binary.version}</artifactId> <version>2.3.0</version> </dependency>Save changes to pom.xml.Create the .jar file. IntelliJ IDEA enables creation of JAR as an artifact of a project. Do the following steps.
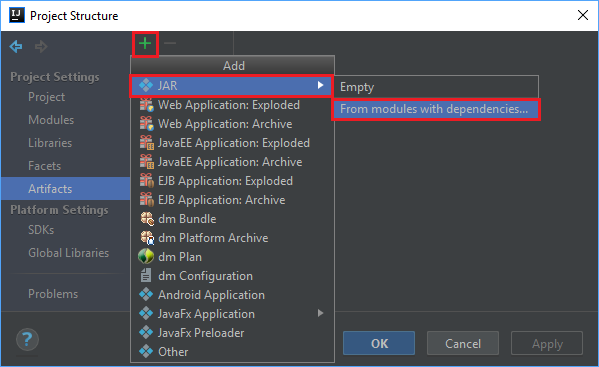
From the File menu, select Project Structure....
From the Project Structure window, navigate to Artifacts>the plus symbol +>JAR>From modules with dependencies....
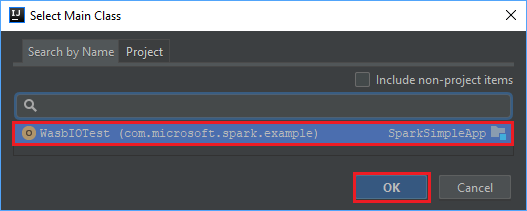
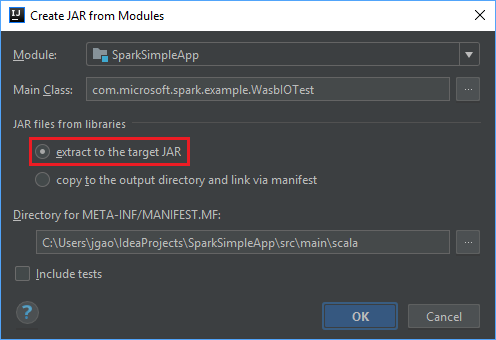
In the Create JAR from Modules window, select the folder icon in the Main Class text box.
In the Select Main Class window, select the class that appears by default and then select OK.
In the Create JAR from Modules window, ensure the extract to the target JAR option is selected, and then select OK. This setting creates a single JAR with all dependencies.
The Output Layout tab lists all the jars that are included as part of the Maven project. You can select and delete the ones on which the Scala application has no direct dependency. For the application, you're creating here, you can remove all but the last one (SparkSimpleApp compile output). Select the jars to delete and then select the negative symbol -.
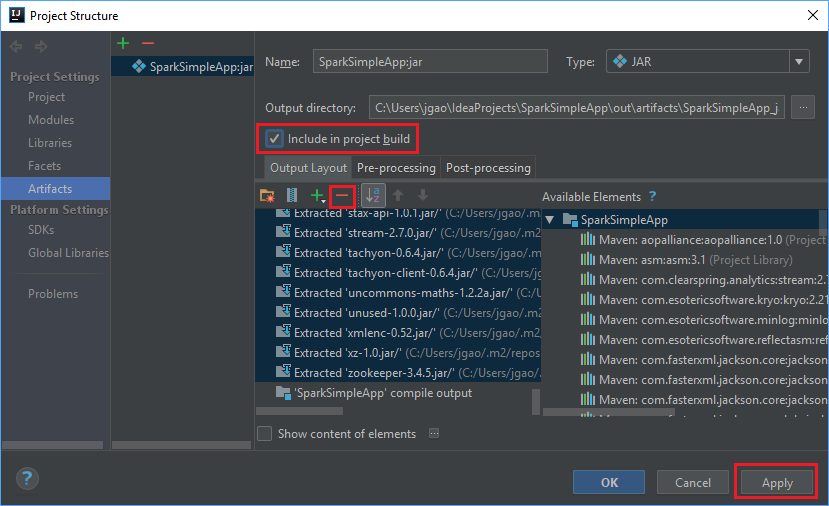
Ensure sure the Include in project build checkbox is selected. This option ensures that the jar is created every time the project is built or updated. Válassza az Alkalmaz és az OK gombokat.
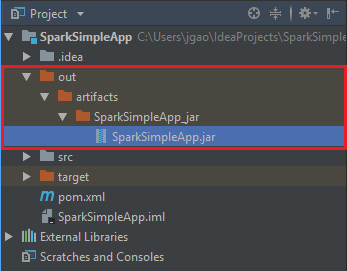
To create the jar, navigate to Build>Build Artifacts>Build. The project will compile in about 30 seconds. The output jar is created under \out\artifacts.
Run the application on the Apache Spark cluster
To run the application on the cluster, you can use the following approaches:
Copy the application jar to the Azure Storage blob associated with the cluster. Ehhez használhatja az AzCopy parancssori segédprogramot. There are many other clients as well that you can use to upload data. Ezekről bővebben az Apache Hadoop-feladatok adatainak feltöltése a HDInsightban című témakörben talál.
Use Apache Livy to submit an application job remotely to the Spark cluster. Spark clusters on HDInsight includes Livy that exposes REST endpoints to remotely submit Spark jobs. For more information, see Submit Apache Spark jobs remotely using Apache Livy with Spark clusters on HDInsight.
Erőforrások tisztítása
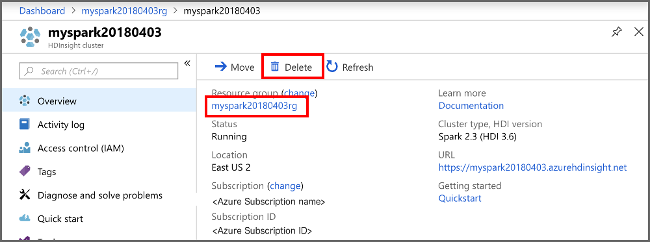
Ha nem folytatja az alkalmazás használatát, törölje a létrehozott fürtöt az alábbi lépésekkel:
Jelentkezzen be a Azure portalra.
A felül található Keresőmezőbe írja be a HDInsight parancsot.
Select HDInsight clusters under Services.
In the list of HDInsight clusters that appears, select the ... next to the cluster that you created for this tutorial.
Válassza a Törlés lehetőséget. Válassza Igenlehetőséget.
Következő lépés
In this article, you learned how to create an Apache Spark scala application. Advance to the next article to learn how to run this application on an HDInsight Spark cluster using Livy.