Alkalmazások hibakeresése helyi Docker-tárolóban
A Visual Studio egységes módot kínál a Docker-tárolók fejlesztésére és az alkalmazás helyi ellenőrzésére. Futtathatja és hibakeresésre használhatja az alkalmazásokat Linux vagy Windows rendszerű tárolókban, amelyek a helyi Windows-asztalon futnak, és a Docker telepítve van, és nem kell újraindítania a tárolót minden alkalommal, amikor módosít egy kódmódosítást.
Ez a cikk bemutatja, hogyan indíthat el egy alkalmazást a Visual Studióval egy helyi Docker-tárolóban, végezhet módosításokat, majd frissíthet a böngészőben a módosítások megtekintéséhez. Ez a cikk azt is bemutatja, hogyan állíthat be töréspontokat a tárolóalapú alkalmazások hibakereséséhez. A támogatott projekttípusok közé tartozik a webalkalmazás, a konzolalkalmazás és a .NET-keretrendszert és a .NET Core-t célzó Azure-függvény. A cikkben bemutatott példák egy ASP.NET Core Web App típusú projekt és egy Konzolalkalmazás (.NET-keretrendszer) típusú projekt.
Ha már rendelkezik támogatott típusú projektel, a Visual Studio létrehozhat egy Docker-fájlt, és konfigurálhatja a projektet tárolóban való futtatásra. Lásd: Tárolóeszközök a Visual Studio-ban.
Előfeltételek
Ha helyi Docker-tárolóban szeretne alkalmazásokat hibakeresésre telepíteni, a következő eszközöket kell telepíteni:
- Visual Studio 2019 telepített webfejlesztési szolgáltatáskészlettel
- Visual Studio 2022 telepített webfejlesztési munkaállomással
A Docker-tárolók helyi futtatásához helyi Docker-ügyfélnek kell lennie. Használhatja Docker Desktop, amelyhez Windows 10 vagy újabb verzió szükséges.
Webalkalmazás létrehozása
Ha rendelkezik projekttel, és hozzáadta a Docker-támogatást az áttekintésleírása szerint, hagyja ki ezt a szakaszt.
A Visual Studio startablakában válassza Új projekt létrehozásalehetőséget.
Válassza ASP.NET Core Web Applehetőséget, majd válassza a Továbblehetőséget.
Adja meg az új alkalmazás nevét (vagy használja az alapértelmezett nevet), adja meg a lemez helyét, majd válassza a Továbblehetőséget.
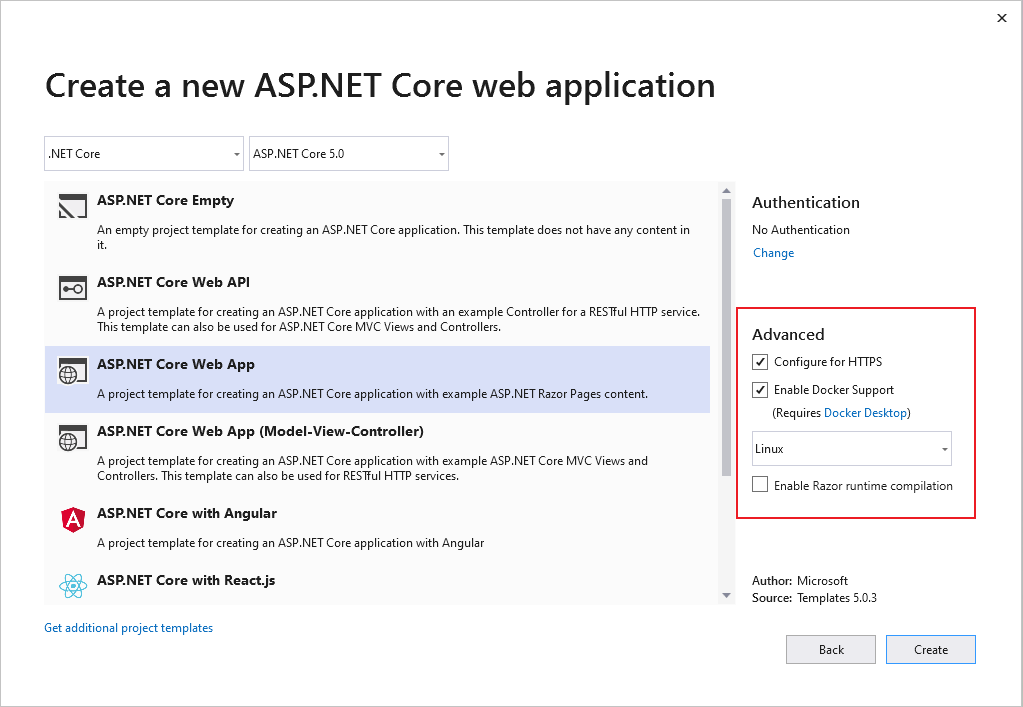
Válassza ki a megcélzni kívánt .NET-verziót. Ha nem biztos benne, válassza az LTS (hosszú távú támogatás) kiadását.

Válassza ki, hogy SSL-támogatást szeretne-e, ha bejelöli vagy törli a HTTPS- konfigurálása jelölőnégyzetet.
Jelölje be a Docker-támogatás engedélyezése jelölőnégyzetet.
A legördülő listában válassza ki a kívánt tárolótípust: Windows vagy Linux.
A folyamat befejezéséhez válassza a elemet, majd hozzon létre egy-et.
A Visual Studio startablakában válassza Új projekt létrehozásalehetőséget.
Válassza ASP.NET Core Web Applehetőséget, majd válassza a Továbblehetőséget.
Adja meg az új alkalmazás nevét (vagy használja az alapértelmezett nevet), adja meg a lemez helyét, majd válassza a Továbblehetőséget.
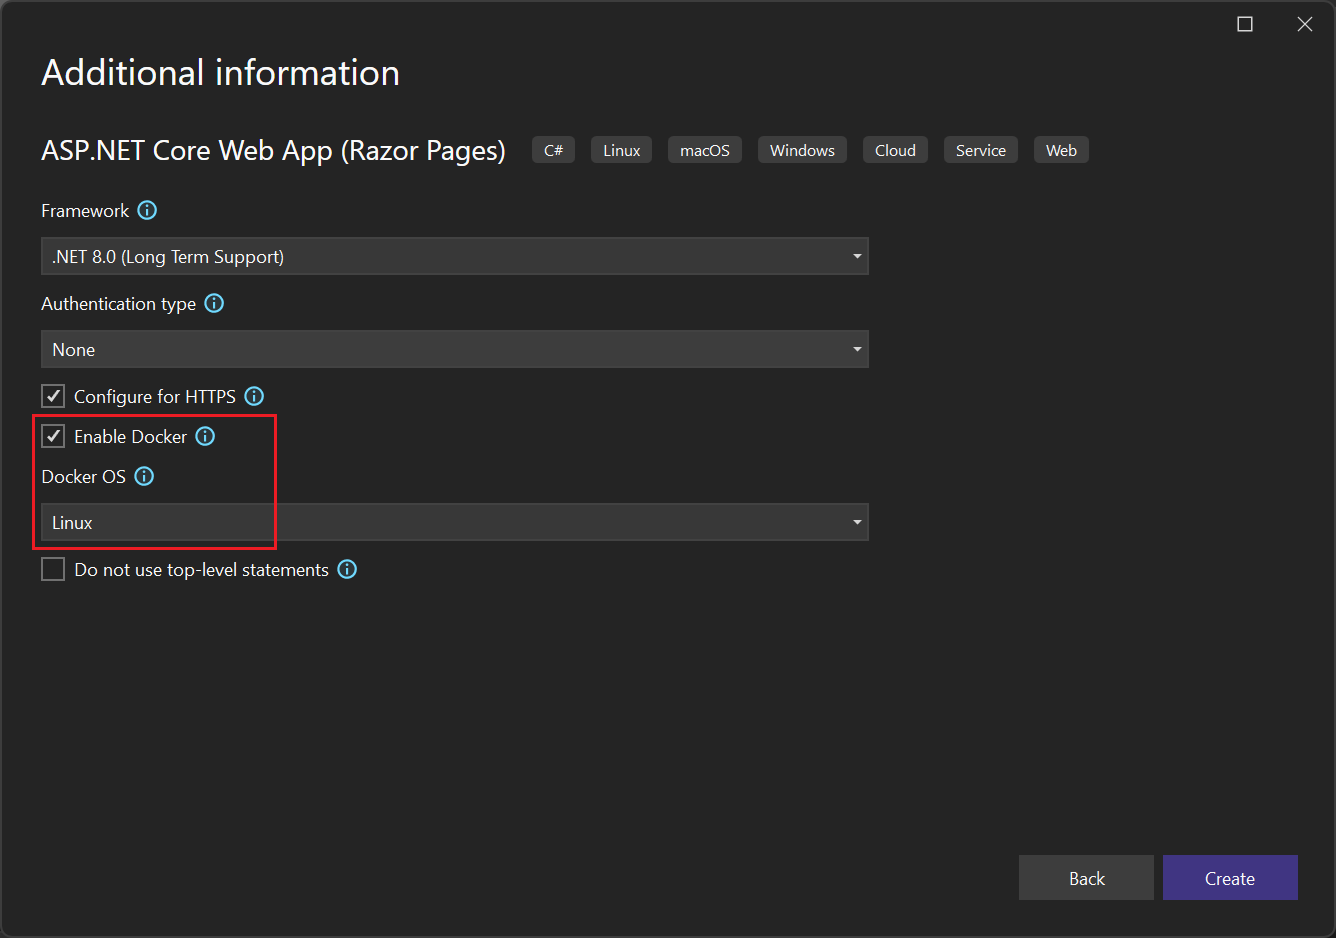
Válassza ki a megcélzni kívánt .NET-verziót. Ha nem biztos benne, válassza az LTS (hosszú távú támogatás) kiadását.

Válassza ki, hogy SSL-támogatást szeretne-e, ha bejelöli vagy törli a HTTPS- konfigurálása jelölőnégyzetet.
Jelölje be a Docker- engedélyezése jelölőnégyzetet.
A Docker operációs rendszer legördülő listában válassza ki a kívánt tárolótípust: Windows vagy Linux.
A folyamat befejezéséhez válassza a létrehozása lehetőséget.
Razor-lapok szerkesztése és frissítése
A Razor-lapok módosításainak gyors iterálásához elindíthatja az alkalmazást egy tárolóban. Ezután folytassa a módosításokat, és ellenőrizze a módosításokat az Internet Information Services (IIS) Express szolgáltatásával.
Győződjön meg arról, hogy a Docker be van állítva a használt tárolótípus (Linux vagy Windows) használatára. Kattintson a jobb gombbal a Tálcán a Docker ikonra, és válassza a Váltás Linux-tárolókra vagy Váltás Windows-tárolókra, ha szükséges.
A kód szerkesztése és a futó webhely frissítése az ebben a szakaszban leírtak szerint nem engedélyezett a .NET Core és a .NET 5 és újabb verziók alapértelmezett sablonjaiban. Az engedélyezéshez adja hozzá a NuGet-csomagot Microsoft.AspNetCore.Mvc.Razor.RuntimeCompilation. Adjon hozzá egy hívást a bővítménymetódushoz AddRazorRuntimeCompilation a
Startup.ConfigureServicesmetódus kódjához. Ezt csak DEBUG módban kell engedélyezni, ezért kódolnia kell azMainmetódusban:// Add services to the container. var mvcBuilder = builder.Services.AddRazorPages(); #if DEBUG if (Env.IsDevelopment()) { mvcBuilder.AddRazorRuntimeCompilation(); } #endifTovábbi információ: Razor-fájlok kompilálása ASP.NET Core. A pontos kód a cél keretrendszertől és a használt projektsablontól függően változhat.
A hibakeresési megoldáskonfigurációs beállítása. Ezután nyomja le Ctrl+F5 a Docker-rendszerkép létrehozásához és helyi futtatásához.
Ha a tárolórendszerkép egy Docker-tárolóban van felépítve és fut, a Visual Studio elindítja a webalkalmazást az alapértelmezett böngészőben.
Menjen az Index lapra. Ezen a lapon módosításokat hajtunk végre.
Térjen vissza a Visual Studióba, és nyissa meg Index.cshtml.
Adja hozzá a következő HTML-tartalmat a fájl végéhez, majd mentse a módosításokat.
<h1>Hello from a Docker container!</h1>A kimeneti ablakban, amikor a .NET-build befejeződött, és a következő sorok láthatók, váltson vissza a böngészőbe, és frissítse a lapot:
Now listening on: http://*:80
Application started. Press Ctrl+C to shut down.
A módosítások alkalmazása megtörtént!
Hibakeresés töréspontokkal
A módosítások gyakran további ellenőrzést igényelnek. Ehhez a feladathoz használhatja a Visual Studio hibakeresési funkcióit.
A Visual Studióban nyissa meg a Index.cshtml.cs.
Cserélje le a
OnGetmetódus tartalmát a következő kódra:ViewData["Message"] = "Your application description page from within a container";A kódsor bal oldalán állítson be egy töréspontot.
A hibakeresés megkezdéséhez és a töréspont eléréséhez nyomja le az F5 billentyűt.
Váltson a Visual Studióra a töréspont megtekintéséhez. Értékek vizsgálata.


Azonnali újratöltés
A Visual Studio 17.10-ben és újabb verzióiban a gyakori újratöltés is támogatott a tárolókban, bár vegye figyelembe, hogy egy tárolóban frissítenie kell a lapot a módosítások megtekintéséhez. Ha a módosítás CSS-fájlra változik, a módosítások megtekintéséhez ismét frissítenie kell a lapot. Vegye figyelembe, hogy a hatókörhöz tartozó CSS-fájlok (.razor.css fájlok, lásd ASP.NET Core Blazor CSS-elkülönítési) frissítései nem támogatottak a gyors újratöltés részeként.
.NET-keretrendszer-konzolalkalmazás létrehozása
Ez a szakasz bemutatja, hogyan lehet hibakeresést végezni egy .NET-keretrendszer konzolalkalmazás-projektjében egy helyi Docker-tárolóban, először bemutatva, hogyan adhat hozzá Docker-támogatást a projekthez. Fontos felismerni, hogy a különböző projekttípusok különböző szintű Docker-támogatással rendelkeznek. A .NET Core -hoz (beleértve a .NET 5-öt és újabb verziót is) a Docker-támogatásnak még több szintje is van, mint a .NET-keretrendszer konzolalkalmazás-projektjei.
.NET-keretrendszer konzolalkalmazás-projekt létrehozásakor nincs lehetőség a Docker-támogatás engedélyezésére. Egy ilyen projekt létrehozása után nem lehet explicit módon docker-támogatást adni a projekthez. .NET-keretrendszer-konzolalkalmazás-projekt esetén lehetőség van a tároló vezénylésére vonatkozó támogatás hozzáadására. A .NET-keretrendszer konzolalkalmazás-projektjének vezénylési támogatásának egyik mellékhatása, hogy hozzáadja a Docker-támogatást a projekthez.
Az alábbi eljárás bemutatja, hogyan adhat vezénylési támogatást egy .NET-keretrendszer-konzolalkalmazás-projekthez, amely később hozzáadja a Docker-támogatást a projekthez, és lehetővé teszi a projekt hibakeresését egy helyi Docker-tárolóban.
- Hozzon létre egy új .NET-keretrendszerkonzol-alkalmazásprojektet.
- A Megoldáskezelőben kattintson a jobb gombbal a projekt elemére, majd válassza a >Tároló-vezénylési támogatás hozzáadásalehetőséget. A megjelenő párbeszédpanelen válassza Docker Composelehetőséget. A program hozzáad egy Docker-fájlt a projekthez, és hozzáad egy Docker Compose-projektet a társított támogatási fájlokkal.
Hibakeresés töréspontokkal
A Megoldáskezelőben nyissa meg a Program.cs.
Cserélje le a
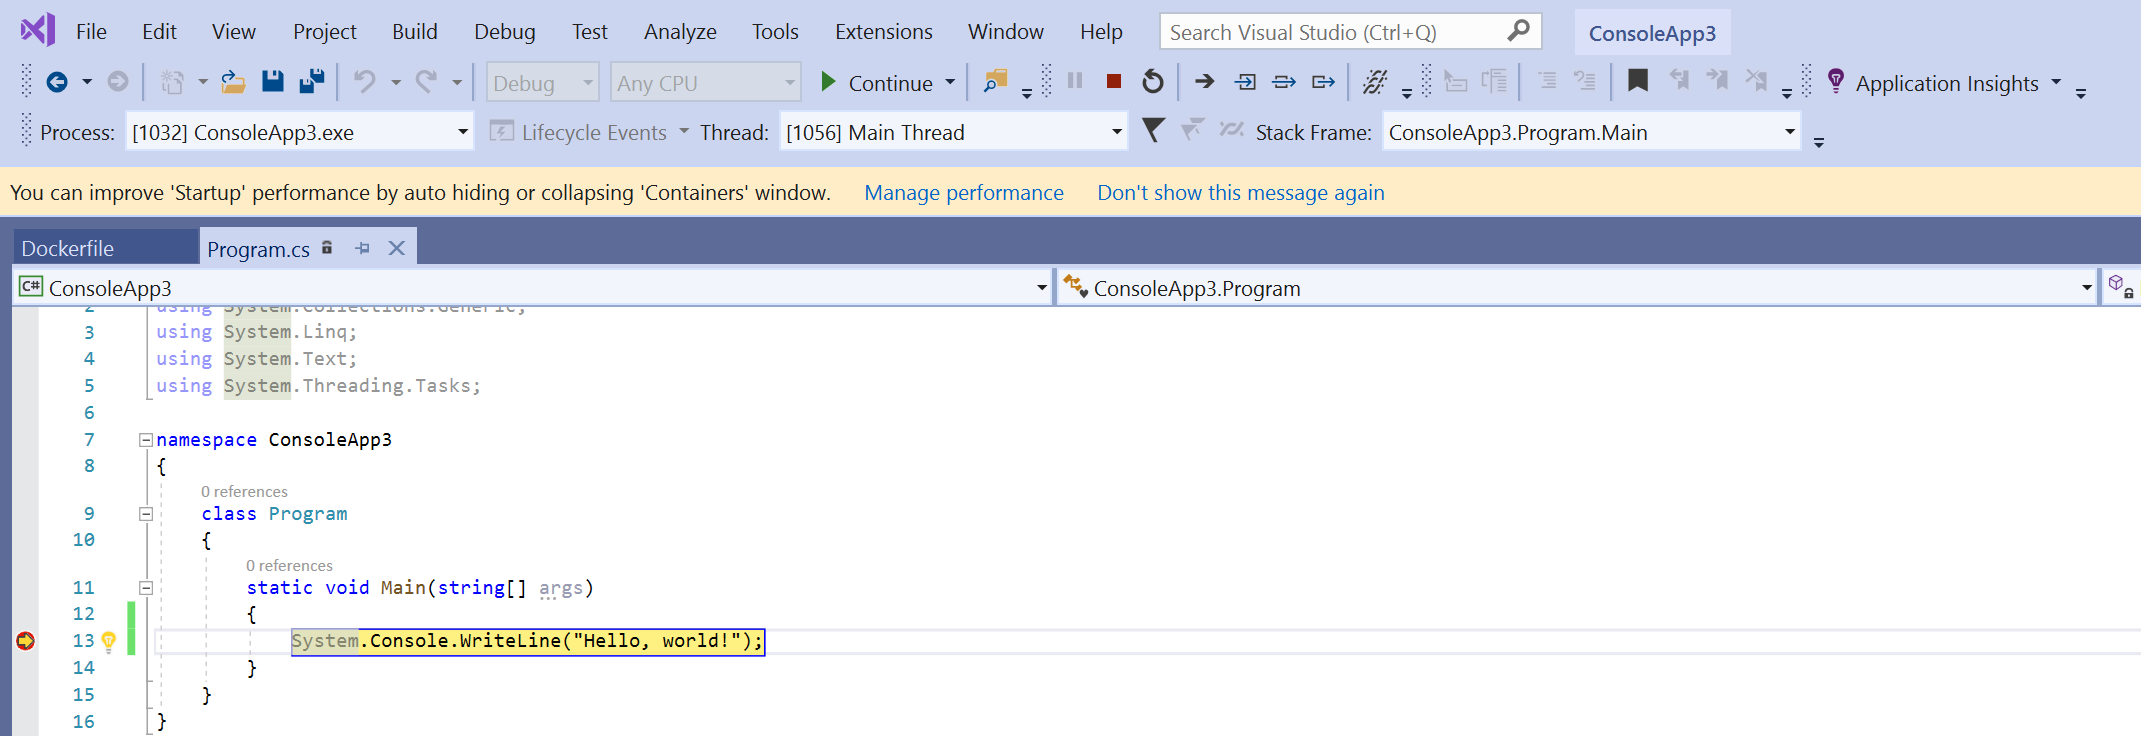
Mainmetódus tartalmát a következő kódra:System.Console.WriteLine("Hello, world!");Állítson be egy töréspontot a kódsortól balra.
Nyomja le F5 billentyűkombinációt a hibakeresés megkezdéséhez és a töréspont eléréséhez.
Váltson a Visual Studióra a töréspont megtekintéséhez és az értékek vizsgálatához.

Hitelesítés az Azure-szolgáltatásokhoz a token proxy használatával
Ha az Azure-szolgáltatásokat egy tárolóból használja, a DefaultAzureCredential (a VisualStudioCredential engedélyezve) segítségével hitelesítheti magát az Azure-szolgáltatásokhoz a Microsoft Entra-fiókjával anélkül, hogy a tárolón bármilyen további konfigurációra lenne szükség. Ennek engedélyezéséről Visual Studio Container Toolskonfigurálásáról olvashat. Emellett be kell állítania az Azure-hitelesítést a Visual Studióban az Visual Studio Azure-ral való hitelesítésecímű témakör utasításait követve. A VisualStudioCredential támogatása egy tárolóban a Visual Studio 17.6-os és újabb verziójában érhető el.
Azure Functions
Ha egy integrált Azure Functions-projektet hibakeres, és a tárolóban lévő tokenproxyval kezeli az Azure-szolgáltatásokhoz való hitelesítést, a .NET futtatókörnyezetet be kell másolnia a tárolóba, hogy a tokenproxy futtatható legyen. Izolált Azure Functions-projekt hibakeresése esetén már rendelkezik .NET-futtatókörnyezetsel, így nincs szükség erre a további lépésre.
Annak érdekében, hogy a .NET-futtatókörnyezet elérhető legyen a tokenproxy számára, adja hozzá vagy módosítsa a dockerfile debug rétegét, amely a .NET-futtatókörnyezetet a tárolólemezképbe másolja. Linux-tárolók esetén a következő kódot adhatja hozzá a Dockerfile-hoz:
# This layer is to support debugging, VS's Token Proxy requires the runtime to be installed in the container
FROM mcr.microsoft.com/dotnet/runtime:8.0 AS runtime
FROM base as debug
COPY --from=runtime /usr/share/dotnet /usr/share/dotnet
RUN ln -s /usr/share/dotnet/dotnet /usr/bin/dotnet
Emellett a Visual Studio-projektben módosítania kell, hogy ezt a réteget a gyors módban történő hibakereséskor használandó rétegként adja meg. A Gyors mód magyarázatáért lásd a Visual Studio Docker-tárolók testreszabásarészt. Egytárolós környezetben (nem Docker Compose esetén) állítsa az MSBuild DockerfileFastModeStage tulajdonságot debug értékre, hogy ezt a réteget használhassa hibakereséshez. A Docker Compose esetében módosítsa a docker-compose.vs.debug.yml az alábbiak szerint:
# Set the stage to debug to use an image with the .NET runtime in it
services:
  functionappintegrated:
    build:
      target: debug
Az Azure Functions használatával történő hitelesítés kódmintájáért, beleértve az integrált és az izolált forgatókönyveket is, tekintse meg VisualStudioCredentialExample.
Tároló újrafelhasználása
Ha a Gyors mód-ot használja, amelyet a Visual Studio általában a hibakeresési konfigurációban alkalmaz, akkor a Visual Studio csak a tárolóképeket és magát a tárolót építi újra a Dockerfile módosításakor. Ha nem módosítja a Dockerfile-t, a Visual Studio újra felhasználja a tárolót egy korábbi futtatásból.
Ha manuálisan módosította a tárolót, és tiszta tárolórendszerképpel szeretne újraindulni, használja a Build>Clean parancsot a Visual Studióban, majd hozza létre a szokásos módon.
Ha nem gyors módot használ, amely jellemző a kiadási konfigurációra, a Visual Studio a projekt minden egyes létrehozásakor újraépíti a tárolót.
A gyors mód használata konfigurálható; lásd A Visual Studio Container Toolskonfigurálása című témakört.
Hibaelhárítás
Útmutató a Visual Studio Docker fejlesztési hibaelhárításához.
Kapcsolódó tartalom
További részletekért olvassa el a Hogyan épít a Visual Studio tárolóalapú alkalmazásokat.
További információ a Dockerről a Visual Studióval, a Windowssal és az Azure-ral
- További információ tárolófejlesztésről a Visual Studiohasználatával.
- Docker-tárolók létrehozásához és üzembe helyezéséhez lásd: Docker-integráció az Azure Pipelines.
- A Windows Server- és Nano Server-cikkek indexét a Windows tárolóinformációscímű témakörben talál.
- Ismerje meg Azure Kubernetes Service, és tekintse át az Azure Kubernetes Service dokumentációját.