Catatan
Akses ke halaman ini memerlukan otorisasi. Anda dapat mencoba masuk atau mengubah direktori.
Akses ke halaman ini memerlukan otorisasi. Anda dapat mencoba mengubah direktori.
Dalam artikel ini, Anda mempelajari cara menggunakan cache Azure Managed Redis dengan bahasa Python dan menyambungkan menggunakan ID Microsoft Entra.
Prasyarat
- Langganan Azure - buat akun secara gratis
- Menginstal lingkungan bahasa Python 3.7+
- Tambahkan impor ini dari ke proyek Anda dan ke lingkungan pengembangan Anda
-
redis- Klien Redis Python -
redis-entraid- Ekstensi autentikasi Redis Microsoft Entra ID -
azure-identity- Pustaka autentikasi Azure
-
Membuat instans terkelola Azure Redis
Pertama, buat cache. Anda dapat membuat cache menggunakan Azure Managed Redis atau Azure Cache for Redis menggunakan portal Microsoft Azure. Dalam Panduan Mulai Cepat ini, kami menggunakan Layanan Azure Managed Redis.
Saat Anda membuat cache, ID Microsoft Entra diaktifkan secara default membuatnya aman sejak awal. Cache Anda juga harus menggunakan titik akhir publik untuk Panduan Memulai Cepat ini.
Untuk membuat cache dengan portal, ikuti salah satu prosedur berikut:
- Azure Managed Redis
- Azure Cache for Redis
Secara opsional, Anda dapat membuat cache menggunakan Azure CLI, PowerShell, mana pun yang Anda inginkan.
Kode untuk menyambungkan ke cache Redis
Di bagian pertama sampel kode, atur koneksi Anda ke cache.
- Port untuk cache Azure Managed Redis dan Enterprise: 10000
- Port untuk instans Azure Cache for Redis: 6380
import redis
from azure.identity import DefaultAzureCredential
from redis_entraid.cred_provider import create_from_default_azure_credential

redis_host = "<host-url>"
redis_port = 10000  # Managed Redis default port

credential_provider = create_from_default_azure_credential(
    ("https://redis.azure.com/.default",),
)

r = redis.Redis(
    host=redis_host,
    port=redis_port,
    ssl=True,
    decode_responses=True,
    credential_provider=credential_provider
)
Sebelum dapat menjalankan kode ini, Anda harus menambahkan diri Anda sebagai pengguna Redis ke cache.
Anda juga harus mengotorisasi koneksi Anda ke Azure dari baris perintah menggunakan baris perintah Azure atau baris perintah pengembang Azure (azd).
Anda juga harus menambahkan pengguna atau Prinsipal sistem ke cache Anda. Tambahkan siapa saja yang mungkin menjalankan program sebagai pengguna di cache Redis.
Hasilnya terlihat seperti ini:
PING: True
GET: Hello from Azure Managed Redis!
Di sini, Anda dapat melihat sampel kode ini secara keseluruhan. Kode berisi beberapa pemeriksaan kesalahan yang dihilangkan dari penjelasan kode sebelumnya untuk kesederhanaan. Langkah terakhir adalah menutup koneksi ke cache.
import redis
from azure.identity import DefaultAzureCredential
from redis_entraid.cred_provider import create_from_default_azure_credential

redis_host = "<host-url>"
redis_port = 10000  # Managed Redis default port

credential_provider = create_from_default_azure_credential(
    ("https://redis.azure.com/.default",),
)

try:
    r = redis.Redis(
        host=redis_host,
        port=redis_port,
        ssl=True,
        decode_responses=True,
        credential_provider=credential_provider,
        socket_timeout=10,
        socket_connect_timeout=10
    )

    print("PING:", r.ping())
    r.set("Message", "Hello from Azure Managed Redis!")
    print("GET:", r.get("Message"))

except Exception as e:
    print(f"Error: {e}")
finally:
    if 'r' in locals():
        r.close()
Membersihkan sumber daya
Jika Anda ingin terus menggunakan sumber daya yang Anda buat di artikel ini, simpan grup sumber daya.
Jika tidak, jika Anda sudah selesai dengan sumber daya, Anda dapat menghapus grup sumber daya Azure yang Anda buat untuk menghindari biaya.
Penting
Penghapusan grup sumber daya tidak bisa dipulihkan. Ketika Anda menghapus grup sumber daya, semua sumber daya di dalamnya dihapus secara permanen. Pastikan Anda tidak salah menghapus grup sumber daya atau sumber daya secara tidak sengaja. Jika Anda membuat sumber daya di dalam grup sumber daya yang sudah ada yang berisi sumber daya yang ingin Anda simpan, Anda dapat menghapus setiap sumber daya satu per satu alih-alih menghapus grup sumber daya.
Untuk menghapus grup sumber daya
Masuk ke portal Azure, lalu pilih Grup sumber daya.
Pilih grup sumber daya yang ingin Anda hapus.
Jika ada banyak grup sumber daya, gunakan kotak Filter untuk bidang apa pun... , ketik nama grup sumber daya yang Anda buat untuk artikel ini. Pilih grup sumber daya dalam daftar hasil.
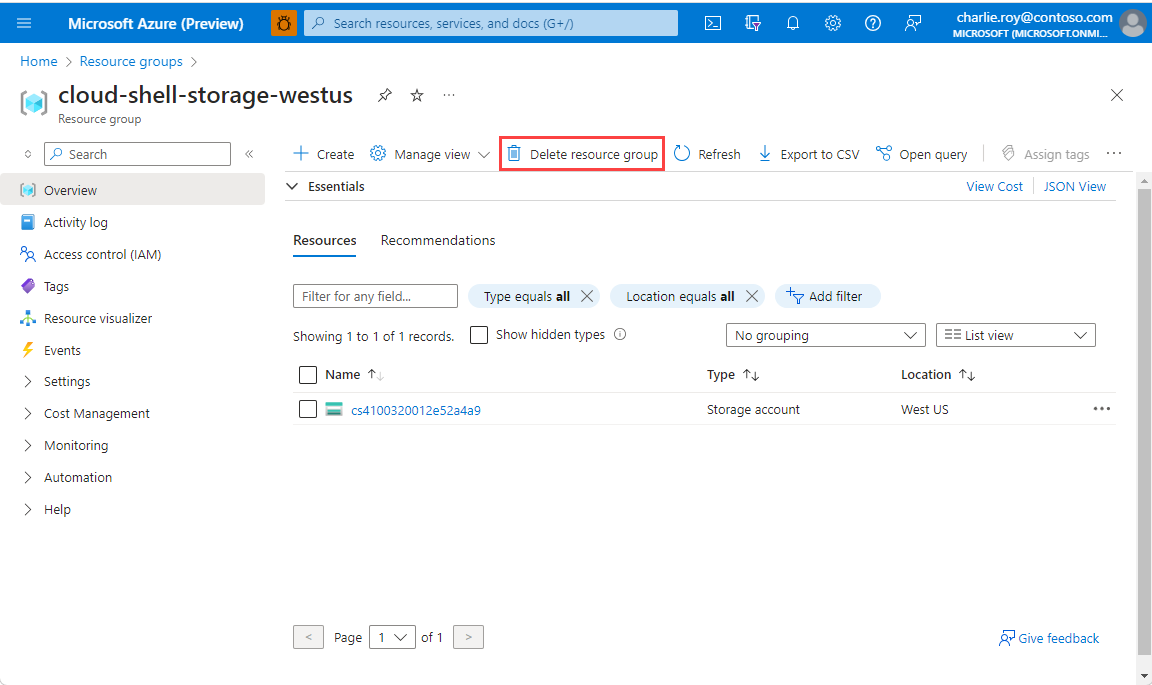
Pilih Hapus grup sumber daya.
Anda diminta untuk mengonfirmasi penghapusan grup sumber daya. Ketik nama grup sumber daya Anda lagi untuk mengonfirmasi, lalu pilih Hapus.
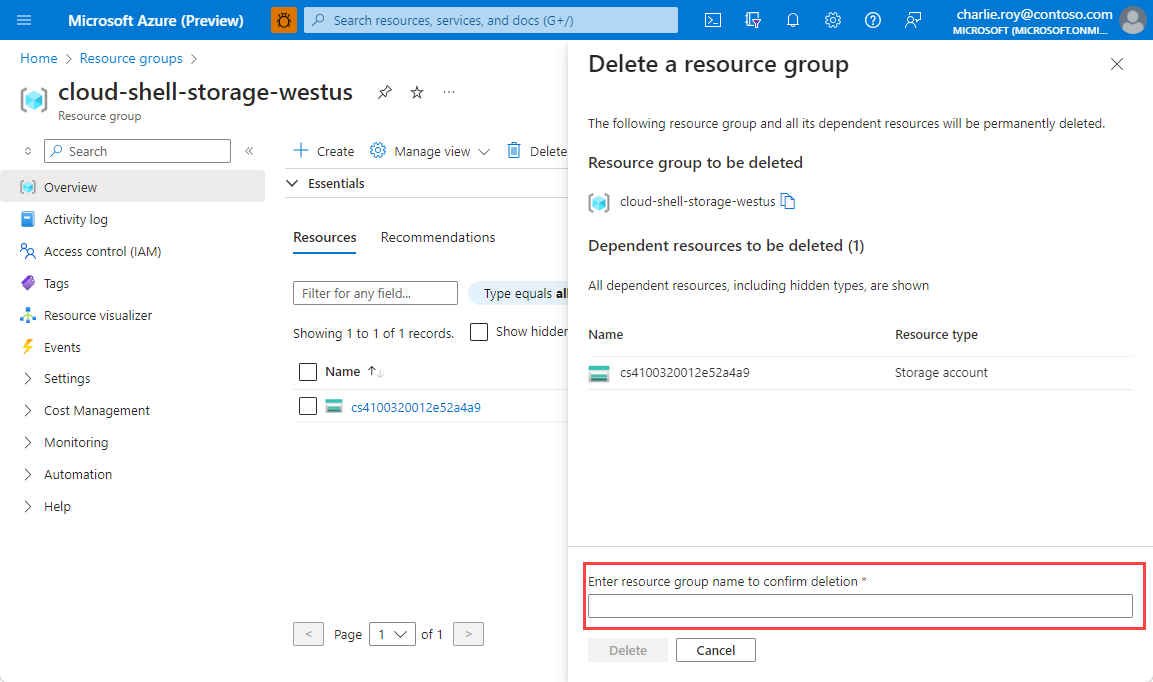
Setelah beberapa saat, grup sumber daya dan semua sumber dayanya akan dihapus.