Setelah tersambung ke komputer virtual Anda, Anda perlu menemukan disk. Dalam contoh ini, kami menggunakan lsblk untuk mencantumkan disk.
lsblk -o NAME,HCTL,SIZE,MOUNTPOINT | grep -i "sd"
The output is similar to the following example:
sda     0:0:0:0      30G
├─sda1             29.9G /
├─sda14               4M
└─sda15             106M /boot/efi
sdb     1:0:1:0      14G
└─sdb1               14G /mnt
sdc     3:0:0:0       4G
In this example, the disk that was added was sdc. It's a LUN 0 and is 4GB.
For a more complex example, here's what multiple data disks look like in the portal:
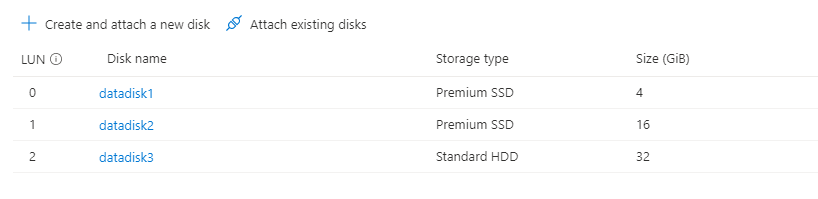
In the image, you can see that there are 3 data disks: 4 GB on LUN 0, 16GB at LUN 1, and 32G at LUN 2.
Here's what that might look like using lsblk:
sda     0:0:0:0      30G
├─sda1             29.9G /
├─sda14               4M
└─sda15             106M /boot/efi
sdb     1:0:1:0      14G
└─sdb1               14G /mnt
sdc     3:0:0:0       4G
sdd     3:0:0:1      16G
sde     3:0:0:2      32G
From the output of lsblk you can see that the 4GB disk at LUN 0 is sdc, the 16GB disk at LUN 1 is sdd, and the 32G disk at LUN 2 is sde.
Prepare a new empty disk
Important
If you are using an existing disk that contains data, skip to mounting the disk.
The following instructions will delete data on the disk.
If you're attaching a new disk, you need to partition the disk.
The parted utility can be used to partition and to format a data disk.
- Use the latest version
parted that is available for your distro.
- If the disk size is 2 tebibytes (TiB) or larger, you must use GPT partitioning. If disk size is under 2 TiB, then you can use either MBR or GPT partitioning.
The following example uses parted on /dev/sdc, which is where the first data disk will typically be on most VMs. Replace sdc with the correct option for your disk. We're also formatting it using the XFS filesystem.
sudo parted /dev/sdc --script mklabel gpt mkpart xfspart xfs 0% 100%
sudo mkfs.xfs /dev/sdc1
sudo partprobe /dev/sdc1
Use the partprobe utility to make sure the kernel is aware of the new partition and filesystem. Failure to use partprobe can cause the blkid or lslbk commands to not return the UUID for the new filesystem immediately.
Mount the disk
Create a directory to mount the file system using mkdir. The following example creates a directory at /datadrive:
sudo mkdir /datadrive
Use mount to then mount the filesystem. The following example mounts the /dev/sdc1 partition to the /datadrive mount point:
sudo mount /dev/sdc1 /datadrive
To ensure that the drive is remounted automatically after a reboot, it must be added to the /etc/fstab file. It's also highly recommended that the UUID (Universally Unique Identifier) is used in /etc/fstab to refer to the drive rather than just the device name (such as, /dev/sdc1). If the OS detects a disk error during boot, using the UUID avoids the incorrect disk being mounted to a given location. Remaining data disks would then be assigned those same device IDs. To find the UUID of the new drive, use the blkid utility:
sudo blkid
The output looks similar to the following example:
/dev/sda1: LABEL="cloudimg-rootfs" UUID="11111111-1b1b-1c1c-1d1d-1e1e1e1e1e1e" TYPE="ext4" PARTUUID="1a1b1c1d-11aa-1234-1a1a1a1a1a1a"
/dev/sda15: LABEL="UEFI" UUID="BCD7-96A6" TYPE="vfat" PARTUUID="1e1g1cg1h-11aa-1234-1u1u1a1a1u1u"
/dev/sdb1: UUID="22222222-2b2b-2c2c-2d2d-2e2e2e2e2e2e" TYPE="ext4" TYPE="ext4" PARTUUID="1a2b3c4d-01"
/dev/sda14: PARTUUID="2e2g2cg2h-11aa-1234-1u1u1a1a1u1u"
/dev/sdc1: UUID="33333333-3b3b-3c3c-3d3d-3e3e3e3e3e3e" TYPE="xfs" PARTLABEL="xfspart" PARTUUID="c1c2c3c4-1234-cdef-asdf3456ghjk"
Note
Improperly editing the /etc/fstab file could result in an unbootable system. If unsure, refer to the distribution's documentation for information on how to properly edit this file. You should create a backup of the /etc/fstab file is created before editing.
Next, open the /etc/fstab file in a text editor. Add a line to the end of the file, using the UUID value for the /dev/sdc1 device that was created in the previous steps, and the mountpoint of /datadrive. Using the example from this article, the new line would look like the following:
UUID=33333333-3b3b-3c3c-3d3d-3e3e3e3e3e3e /datadrive xfs defaults,nofail 1 2
When you're done editing the file, save and close the editor.
Note
Later removing a data disk without editing fstab could cause the VM to fail to boot. Most distributions provide either the nofail and/or nobootwait fstab options. These options allow a system to boot even if the disk fails to mount at boot time. Consult your distribution's documentation for more information on these parameters.
The nofail option ensures that the VM starts even if the filesystem is corrupt or the disk does not exist at boot time. Without this option, you may encounter behavior as described in Cannot SSH to Linux VM due to FSTAB errors
